zapier-platform-cli
Version:
The CLI for apps in the Zapier Developer Platform.
1,386 lines (1,060 loc) • 73.8 kB
Markdown
<!-- GENERATED! ONLY EDIT `README-source.md` -->
<h1 align="center">
<a href="https://zapier.com"><img src="https://cdn.rawgit.com/zapier/zapier-platform-cli/master/goodies/zapier-logomark.png" alt="Zapier" width="200"></a>
<br>
Zapier Platform CLI
<br>
<br>
</h1>
<p align="center">
<a href="https://travis-ci.org/zapier/zapier-platform-cli"><img src="https://img.shields.io/travis/zapier/zapier-platform-cli/master.svg" alt="Travis"></a>
<a href="https://www.npmjs.com/package/zapier-platform-cli"><img src="https://img.shields.io/npm/v/zapier-platform-cli.svg" alt="npm version"></a>
<!--possible downloads badge too, once that's good-->
</p>
Zapier is a platform for creating integrations and workflows. This CLI is your gateway to creating custom applications on the Zapier platform.
[These docs are available here](http://zapier.github.io/zapier-platform-cli/), the [CLI docs are available here](http://zapier.github.io/zapier-platform-cli/cli.html), and you can [view all the schema definitions here](https://zapier.github.io/zapier-platform-schema/build/schema.html).
## Table of Contents
<!-- toc -->
- [Getting Started](#getting-started)
* [What is an App?](#what-is-an-app)
* [How does the CLI Platform Work](#how-does-the-cli-platform-work)
* [CLI vs the Web Builder Platform](#cli-vs-the-web-builder-platform)
* [Requirements](#requirements)
* [Quick Setup Guide](#quick-setup-guide)
* [Tutorial](#tutorial)
- [Creating a Local App](#creating-a-local-app)
* [Local Project Structure](#local-project-structure)
* [Local App Definition](#local-app-definition)
- [Registering an App](#registering-an-app)
- [Deploying an App Version](#deploying-an-app-version)
* [Private App Version (default)](#private-app-version-default)
* [Sharing an App Version](#sharing-an-app-version)
* [Promoting an App Version](#promoting-an-app-version)
- [Converting an Existing App](#converting-an-existing-app)
- [Authentication](#authentication)
* [Basic](#basic)
* [Custom](#custom)
* [Digest](#digest)
* [Session](#session)
* [OAuth2](#oauth2)
- [Resources](#resources)
* [Resource Definition](#resource-definition)
- [Triggers/Searches/Creates](#triggerssearchescreates)
* [Return Types](#return-types)
- [Fields](#fields)
* [Custom/Dynamic Fields](#customdynamic-fields)
* [Dynamic Dropdowns](#dynamic-dropdowns)
* [Search-Powered Fields](#search-powered-fields)
- [Z Object](#z-object)
* [`z.request([url], options)`](#zrequesturl-options)
* [`z.console(message)`](#zconsolemessage)
* [`z.dehydrate(func, inputData)`](#zdehydratefunc-inputdata)
* [`z.stashFile(bufferStringStream, [knownLength], [filename])`](#zstashfilebufferstringstream-knownlength-filename)
* [`z.JSON`](#zjson)
* [`z.hash()`](#zhash)
* [`z.errors`](#zerrors)
- [Bundle Object](#bundle-object)
* [`bundle.authData`](#bundleauthdata)
* [`bundle.inputData`](#bundleinputdata)
* [`bundle.inputDataRaw`](#bundleinputdataraw)
* [`bundle.meta`](#bundlemeta)
- [Environment](#environment)
* [Defining Environment Variables](#defining-environment-variables)
* [Accessing Environment Variables](#accessing-environment-variables)
- [Making HTTP Requests](#making-http-requests)
* [Shorthand HTTP Requests](#shorthand-http-requests)
* [Manual HTTP Requests](#manual-http-requests)
+ [POST and PUT Requests](#post-and-put-requests)
* [Using HTTP middleware](#using-http-middleware)
* [HTTP Request Options](#http-request-options)
* [HTTP Response Object](#http-response-object)
- [Dehydration](#dehydration)
- [Stashing Files](#stashing-files)
- [Logging](#logging)
* [Console Logging](#console-logging)
* [Viewing Console Logs](#viewing-console-logs)
* [HTTP Logging](#http-logging)
* [Viewing HTTP Logs](#viewing-http-logs)
- [Error Handling](#error-handling)
* [General Errors](#general-errors)
* [Halting Execution](#halting-execution)
* [Stale Authentication Credentials](#stale-authentication-credentials)
- [Testing](#testing)
* [Writing Unit Tests](#writing-unit-tests)
* [Running Unit Tests](#running-unit-tests)
* [Testing & Environment Variables](#testing--environment-variables)
* [Viewing HTTP Logs in Unit Tests](#viewing-http-logs-in-unit-tests)
* [Testing in your CI (Jenkins/Travis/etc.)](#testing-in-your-ci-jenkinstravisetc)
- [Using `npm` Modules](#using-npm-modules)
- [Using Transpilers](#using-transpilers)
- [Example Apps](#example-apps)
- [Command line Tab Completion](#command-line-tab-completion)
* [Zsh Completion Script](#zsh-completion-script)
* [Bash Completion Script](#bash-completion-script)
- [Upgrading Zapier Platform CLI or Zapier Platform Core](#upgrading-zapier-platform-cli-or-zapier-platform-core)
* [Upgrading Zapier Platform CLI](#upgrading-zapier-platform-cli)
+ [When to update CLI](#when-to-update-cli)
* [Upgrading Zapier Platform Core](#upgrading-zapier-platform-core)
+ [When to update Core](#when-to-update-core)
- [Development of the CLI](#development-of-the-cli)
- [Publishing of the CLI (after merging)](#publishing-of-the-cli-after-merging)
- [Get Help!](#get-help)
<!-- tocstop -->
## Getting Started
### What is an App?
A CLI App is an implementation of your app's API. You build a Node.js application
that exports a single object ([JSON Schema](https://github.com/zapier/zapier-platform-schema/blob/master/docs/build/schema.md#appschema)) and upload it to Zapier.
Zapier introspects that definition to find out what your app is capable of and
what options to present end users in the Zap Editor.
For those not familiar with Zapier terminology, here is how concepts in the CLI
map to the end user experience:
* [Authentication](#authentication), (usually) which lets us know what credentials to ask users
for. This is used during the "Connect Accounts" section of the Zap Editor.
* [Triggers](#triggerssearchescreates), which read data *from* your API. These have their own section in the Zap Editor.
* [Creates](#triggerssearchescreates), which send data *to* your API to create new records. These are listed under "Actions" in the Zap Editor.
* [Searches](#triggerssearchescreates), which find specific records *in* your system. These are also listed under "Actions" in the Zap Editor.
* [Resources](#resources), which define an object type in your API (say a contact) and the operations available to perform on it. These are automatically extracted into Triggers, Searches, and Creates.
### How does the CLI Platform Work
Zapier takes the App you upload and sends it over to Amazon Web Service's Lambda.
We then make calls to execute the operations your App defines as we execute Zaps.
Your App takes the input data we provide (if any), makes the necessary HTTP calls,
and returns the relevant data, which gets fed back into Zapier.
### CLI vs the Web Builder Platform
From a user perspective, both the CLI and the existing web builder platform offer the same experience. The biggest difference is how they're developed. The CLI takes a much more code-first approach, allowing you to develop your Zapier app just like you would any other programming project. The web builder, on the other hand, is much better for folks who want to make an app with minimal coding involved. Both will continue to coexist, so pick whichever fits your needs best!
### Requirements
All Zapier CLI apps are run using Node.js `v6.10.2`.
You can develop using any version of Node you'd like, but your code has to run on Node `v6.10.2`. You can accomplish this by developing on your preferred version and then transpiling with [Babel](https://babeljs.io/) (or similar).
To ensure stability for our users, we also require that you run your tests on `v6.10.2` as well. If you don't have it available, we recommend using either [nvm](https://github.com/creationix/nvm#installation) or [n](https://github.com/tj/n#installation) to install `v6.10.2` and run the tests locally. On Windows you can use [nvm-windows](https://github.com/coreybutler/nvm-windows#installation--upgrades) or [nodist](https://github.com/marcelklehr/nodist#installation).
For NVM on Mac (via [homebrew](http://brew.sh/)):
```bash
brew install nvm
nvm install v6.10.2
```
You can then either swap to that version with `nvm use v6.10.2`, or do `nvm exec v6.10.2 zapier test` so you can run tests without having to switch versions while developing.
### Quick Setup Guide
> Be sure to check the [Requirements](#requirements) before you start! Also, we recommend the [Tutorial](https://github.com/zapier/zapier-platform-cli/wiki/Tutorial) for a more thorough introduction.
First up is installing the CLI and setting up your auth to create a working "Zapier Example" application. It will be private to you and visible in your live [Zap editor](https://zapier.com/app/editor).
```bash
# install the CLI globally
npm install -g zapier-platform-cli
# setup auth to Zapier's platform with a deploy key
zapier login
```
Your Zapier CLI should be installed and ready to go at this point. Next up, we'll create our first app!
```bash
# create a directory with the minimum required files
zapier init example-app
# move into the new directory
cd example-app
# install all the libraries needed for your app
npm install
```
> Note: there are plenty of templates & example apps to choose from! [View all Example Apps here.](#example-apps)
You should now have a working local app. You can run several local commands to try it out.
```bash
# run the local tests
# the same as npm test, but adds some extra things to the environment
zapier test
```
Next, you'll probably want to upload app to Zapier itself so you can start testing live.
```bash
# push your app to Zapier
zapier push
```
> Go check out our [full CLI reference documentation](http://zapier.github.io/zapier-platform-cli/cli.html) to see all the other commands!
### Tutorial
For a full tutorial, head over to our [wiki](https://github.com/zapier/zapier-platform-cli/wiki/Tutorial) for a comprehensive walkthrough for creating your first app. If this isn't your first rodeo, read on!
## Creating a Local App
> Tip: check the [Quick Setup](#quick-setup-guide) if this is your first time using the platform!
Creating an App can be done entirely locally and they are fairly simple Node.js apps using the standard Node environment and should be completely testable. However, a local app stays local until you `zapier register`.
```bash
# make your folder
mkdir zapier-example
cd zapier-example
# create the needed files from a template
zapier init . --template=trigger
# install all the libraries needed for your app
npm install
```
If you'd like to manage your **local App**, use these commands:
* `zapier init . --template=resource` - initialize/start a local app project ([see templates here](https://github.com/zapier/zapier-platform-cli/wiki/Example-Apps))
* `zapier convert 1234 .` - initialize/start from an existing app (alpha)
* `zapier scaffold resource Contact` - auto-injects a new resource, trigger, etc.
* `zapier test` - run the same tests as `npm test`
* `zapier validate` - ensure your app is valid
* `zapier describe` - print some helpful information about your app
### Local Project Structure
In your app's folder, you should see this general recommended structure. The `index.js` is Zapier's entry point to your app. Zapier expects you to export an `App` definition there.
```plain
$ tree .
.
├── README.md
├── index.js
├── package.json
├── triggers
│ └── contact-by-tag.js
├── resources
│ └── Contact.js
├── test
│ ├── basic.js
│ ├── triggers.js
│ └── resources.js
├── build
│ └── build.zip
└── node_modules
├── ...
└── ...
```
### Local App Definition
The core definition of your `App` will look something like this, and is what your `index.js` should provide as the _only_ export:
```javascript
const App = {
// both version strings are required
version: require('./package.json').version,
platformVersion: require('zapier-platform-core').version,
// see "Authentication" section below
authentication: {
},
// see "Dehydration" section below
hydrators: {
},
// see "Making HTTP Requests" section below
requestTemplate: {
},
beforeRequest: [
],
afterResponse: [
],
// See "Resources" section below
resources: {
},
// See "Triggers/Searches/Creates" section below
triggers: {
},
searches: {
},
creates: {
}
};
module.exports = App;
```
> Tip: you can use higher order functions to create any part of your App definition!
## Registering an App
Registering your App with Zapier is a necessary first step which only enables basic administrative functions. It should happen before `zapier push` which is to used to actually expose an App Version in the Zapier interface and editor.
```bash
# register your app
zapier register "Zapier Example"
# list your apps
zapier apps
```
> Note: this doesn't put your app in the editor - see the docs on pushing an App Version to do that!
If you'd like to manage your **App**, use these commands:
* `zapier apps` - list the apps in Zapier you can administer
* `zapier register "Name"` - creates a new app in Zapier
* `zapier link` - lists and links a selected app in Zapier to your current folder
* `zapier history` - print the history of your app
* `zapier collaborate [user@example.com]` - add admins to your app who can push
* `zapier invite [user@example.com]` - add users to try your app before promotion
## Deploying an App Version
An App Version is related to a specific App but is an "immutable" implementation of your app. This makes it easy to run multiple versions for multiple users concurrently. By default, **every App Version is private** but you can `zapier promote` it to production for use by over 1 million Zapier users.
```bash
# push your app version to Zapier
zapier push
# list your versions
zapier versions
```
If you'd like to manage your **Version**, use these commands:
* `zapier versions` - list the versions for the current directory's app
* `zapier push` - push the current version of current directory's app & version (read from `package.json`)
* `zapier promote [1.0.0]` - mark a version as the "production" version
* `zapier migrate [1.0.0] [1.0.1] [100%]` - move users between versions, regardless of deployment status
* `zapier deprecate [1.0.0] [YYYY-MM-DD]` - mark a version as deprecated, but let users continue to use it (we'll email them)
* `zapier env 1.0.0 [KEY] [value]` - set an environment variable to some value
### Private App Version (default)
A simple `zapier push` will only create the App Version in your editor. No one else using Zapier can see it or use it.
### Sharing an App Version
This is how you would share your app with friends, co-workers or clients. This is perfect for quality assurance, testing with active users or just sharing any app you like.
```bash
# sends an email this user to let them view the app in the UI privately
zapier invite user@example.com
# sends an email this user to let them admin the app (make changes just like you)
zapier collaborate user@example.com
```
You can also invite anyone on the internet to your app by observing the URL at the bottom of `zapier invite`, it should look something like `https://zapier.com/platform/public-invite/1/222dcd03aed943a8676dc80e2427a40d/`. You can put this in your help docs, post it to Twitter, add it to your email campaign, etc.
### Promoting an App Version
Promotion is how you would share your app with every one of the 1 million+ Zapier users. If this is your first time promoting - you may have to wait for the Zapier team to review and approve your app.
If this isn't the first time you've promoted your app - you might have users on older versions. You can `zapier migrate` to either move users over (which can be dangerous if you have breaking changes). Or, you can `zapier deprecate` to give users some time to move over themselves.
```bash
# promote your app version to all Zapier users
zapier promote 1.0.1
# OPTIONAL - migrate your users between one app version to another
zapier migrate 1.0.0 1.0.1
# OR - mark the old version as deprecated
zapier deprecate 1.0.0 2017-01-01
```
## Converting an Existing App
> Warning! This is in a **very** alpha state - the immediate goal is to provide some basic structure to match an existing application. It will not even get close to a working copy of your existing app (yet).
If you have an existing application (nominally named "V2") on https://zapier.com/developer/builder/ you can use it as a template to kickstart your local application.
```bash
# the 1234 is from the URL in https://zapier.com/developer/builder/
zapier convert 1234 .
```
You app will be created and you can continue working on it.
> Note - there is no way to convert a CLI app to a V2 app and we do not plan on implementing this.
## Authentication
Most applications require some sort of authentication - and Zapier provides a handful of methods for helping your users authenticate with your application. Zapier will provide some of the core behaviors, but you'll likely need to handle the rest.
> Hint: You can access the data tied to your authentication via the `bundle.authData` property in any method called in your app. Exceptions exist in OAuth and Session auth. Please see them below.
### Basic
Useful if your app requires two pieces of information to authentication: `username` and `password` which only the end user can provide. By default, Zapier will do the standard Basic authentication base64 header encoding for you (via an automatically registered middleware).
> Example App: check out https://github.com/zapier/zapier-platform-example-app-basic-auth for a working example app for basic auth.
> Note: if you do the common API Key pattern like `Authorization: Basic APIKEYHERE:x` you should look at the "Custom" authentication method instead.
```javascript
const authentication = {
type: 'basic',
// "test" could also be a function
test: {
url: 'https://example.com/api/accounts/me.json'
},
connectionLabel: '{{bundle.authData.username}}' // Can also be a function, check digest auth below for an example
// you can provide additional fields, but we'll provide `username`/`password` automatically
};
const App = {
// ...
authentication: authentication,
// ...
};
```
### Custom
This is what most "API Key" driven apps should default to using. You'll likely provide some custom `beforeRequest` middleware or a `requestTemplate` to complete the authentication by adding/computing needed headers.
> Example App: check out https://github.com/zapier/zapier-platform-example-app-custom-auth for a working example app for custom auth.
```javascript
const authentication = {
type: 'custom',
// "test" could also be a function
test: {
url: 'https://{{bundle.authData.subdomain}}.example.com/api/accounts/me.json'
},
fields: [
{key: 'subdomain', type: 'string', required: true, helpText: 'Found in your browsers address bar after logging in.'},
{key: 'api_key', type: 'string', required: true, helpText: 'Found on your settings page.'}
]
};
const addApiKeyToHeader = (request, z, bundle) => {
request.headers['X-Subdomain'] = bundle.authData.subdomain;
const basicHash = Buffer(`${bundle.authData.api_key}:x`).toString('base64');
request.headers.Authorization = `Basic ${basicHash}`;
return request;
};
const App = {
// ...
authentication: authentication,
beforeRequest: [
addApiKeyToHeader,
],
// ...
};
```
### Digest
Very similar to the "Basic" authentication method above, but uses digest authentication instead of Basic authentication.
```javascript
const authentication = {
type: 'digest',
// "test" could also be a function
test: {
url: 'https://example.com/api/accounts/me.json'
},
connectionLabel: (z, bundle) => { // Can also be a string, check basic auth above for an example
// bundle.inputData has whatever comes back from the .test function/request, assuming it returns a JSON object
return bundle.inputData.email;
}
// you can provide additional fields, but Zapier will provide `username`/`password` automatically
};
const App = {
// ...
authentication: authentication,
// ...
};
```
### Session
Probably the most "powerful" mechanism for authentication - it gives you the ability to exchange some user provided data for some authentication data (IE: username & password for a session key).
> Example App: check out https://github.com/zapier/zapier-platform-example-app-session-auth for a working example app for session auth.
```javascript
const getSessionKey = (z, bundle) => {
const promise = z.request({
method: 'POST',
url: 'https://example.com/api/accounts/login.json',
body: {
username: bundle.inputData.username,
password: bundle.inputData.password,
}
});
return promise.then((response) => {
if (response.status === 401) {
throw new Error('The username/password you supplied is invalid');
}
return {
sessionKey: JSON.parse(response.content).sessionKey
};
});
};
const authentication = {
type: 'session',
// "test" could also be a function
test: {
url: 'https://example.com/api/accounts/me.json'
},
fields: [
{key: 'username', type: 'string', required: true, helpText: 'Your login username.'},
{key: 'password', type: 'string', required: true, helpText: 'Your login password.'}
],
sessionConfig: {
perform: getSessionKey
}
};
const includeSessionKeyHeader = (request, z, bundle) => {
if (bundle.authData.sessionKey) {
request.headers = request.headers || {};
request.headers['X-Session-Key'] = bundle.authData.sessionKey;
}
return request;
};
const sessionRefreshIf401 = (response, z, bundle) => {
if (bundle.authData.sessionKey) {
if (response.status === 401) {
throw new z.errors.RefreshAuthError(); // ask for a refresh & retry
}
}
return response;
};
const App = {
// ...
authentication: authentication,
beforeRequest: [
includeSessionKeyHeader
],
afterResponse: [
sessionRefreshIf401
],
// ...
};
```
> Note - For Session auth, `authentication.sessionConfig.perform` will have the provided fields in `bundle.inputData` instead of `bundle.authData` because `bundle.authData` will only have "previously existing" values, which will be empty the first time the Zap runs.
### OAuth2
Zapier's OAuth2 implementation is based on the `authorization_code` flow, similar to [GitHub](http://developer.github.com/v3/oauth/) and [Facebook](https://developers.facebook.com/docs/authentication/server-side/).
> Example App: check out https://github.com/zapier/zapier-platform-example-app-oauth2 for a working example app for oauth2.
It looks like this:
1. Zapier sends the user to the authorization URL defined by your App
1. Once authorized, your website sends the user to the `redirect_uri` Zapier provided (`zapier describe` to find out what it is)
1. Zapier makes a call on the backend to your API to exchange the `code` for an `access_token`
1. Zapier remembers the `access_token` and makes calls on behalf of the user
1. (Optionally) Zapier can refresh the token if it expires
You are required to define the authorization URL and the API call to fetch the access token. You'll also likely want to set your `CLIENT_ID` and `CLIENT_SECRET` as environment variables:
```bash
# setting the environment variables on Zapier.com
$ zapier env 1.0.0 CLIENT_ID 1234
$ zapier env 1.0.0 CLIENT_SECRET abcd
# and when running tests locally, don't forget to define them!
$ CLIENT_ID=1234 CLIENT_SECRET=abcd zapier test
```
Your auth definition would look something like this:
```javascript
const authentication = {
type: 'oauth2',
test: {
url: 'https://{{bundle.authData.subdomain}}.example.com/api/accounts/me.json'
},
// you can provide additional fields for inclusion in authData
oauth2Config: {
// "authorizeUrl" could also be a function returning a string url
authorizeUrl: {
method: 'GET',
url: 'https://{{bundle.inputData.subdomain}}.example.com/api/oauth2/authorize',
params: {
client_id: '{{process.env.CLIENT_ID}}',
state: '{{bundle.inputData.state}}',
redirect_uri: '{{bundle.inputData.redirect_uri}}',
response_type: 'code'
}
},
// Zapier expects a response providing {access_token: 'abcd'}
// "getAccessToken" could also be a function returning an object
getAccessToken: {
method: 'POST',
url: 'https://{{bundle.inputData.subdomain}}.example.com/api/v2/oauth2/token',
body: {
code: '{{bundle.inputData.code}}',
client_id: '{{process.env.CLIENT_ID}}',
client_secret: '{{process.env.CLIENT_SECRET}}',
redirect_uri: '{{bundle.inputData.redirect_uri}}',
grant_type: 'authorization_code'
},
headers: {
'Content-Type': 'application/x-www-form-urlencoded'
}
},
scope: 'read,write'
},
// If you need any fields upfront, put them here
fields: [
{key: 'subdomain', type: 'string', required: true, default: 'app'}
]
};
const addBearerHeader = (request, z, bundle) => {
if (bundle.authData && bundle.authData.access_token) {
request.headers.Authorization = `Bearer ${bundle.authData.access_token}`;
}
return request;
};
const App = {
// ...
authentication: authentication,
beforeRequest: [
addBearerHeader,
]
// ...
};
module.exports = App;
```
> Note - For OAuth, `authentication.oauth2Config.authorizeUrl`, `authentication.oauth2Config.getAccessToken`, and `authentication.oauth2Config.refreshAccessToken` will have the provided fields in `bundle.inputData` instead of `bundle.authData` because `bundle.authData` will only have "previously existing" values, which will be empty the first time the Zap runs.
## Resources
A `resource` is a representation (as a JavaScript object) of one of the REST resources of your API. Say you have a `/recipes`
endpoint for working with recipes; you can define a recipe resource in your app that will tell Zapier how to do create,
read, and search operations on that resource.
```javascript
const Recipe = {
// `key` is the unique identifier the Zapier backend references
key: 'recipe',
// `noun` is the user-friendly name displayed in the Zapier UI
noun: 'Recipe',
// `list` and `create` are just a couple of the methods you can define
list: {
//...
},
create: {
//...
}
};
```
The quickest way to create a resource is with the `zapier scaffold` command:
```bash
zapier scaffold resource "Recipe"
```
This will generate the resource file and add the necessary statements to the `index.js` file to import it.
### Resource Definition
A resource has a few basic properties. The first is the `key`, which allows Zapier to identify the resource on our backend.
The second is the `noun`, the user-friendly name of the resource that is presented to users throughout the Zapier UI.
> Example App: check out https://github.com/zapier/zapier-platform-example-app-resource for a working example app using resources.
After those, there is a set of optional properties that tell Zapier what methods can be performed on the resource.
The complete list of available methods can be found in the [Resource Schema Docs](https://github.com/zapier/zapier-platform-schema/blob/master/docs/build/schema.md#resourceschema).
For now, let's focus on two:
* `list` - Tells Zapier how to fetch a set of this resource. This becomes a Trigger in the Zapier Editor.
* `create` - Tells Zapier how to create a new instance of the resource. This becomes an Action in the Zapier Editor.
Here is a complete example of what the list method might look like
```javascript
const listRecipesRequest = {
url: 'http://example.com/recipes'
};
const Recipe = {
key: 'recipe',
//...
list: {
display: {
label: 'New Recipe',
description: 'Triggers when a new recipe is added.'
},
operation: {
perform: listRecipesRequest
}
}
};
```
The method is made up of two properties, a `display` and an `operation`. The `display` property ([schema](https://github.com/zapier/zapier-platform-schema/blob/master/docs/build/schema.md#basicdisplayschema)) holds the info needed to present the method as an available Trigger in the Zapier Editor. The `operation` ([schema](https://github.com/zapier/zapier-platform-schema/blob/master/docs/build/schema.md#resourceschema)) provides the implementation to make the API call.
Adding a create method looks very similar.
```javascript
const createRecipeRequest = {
url: 'http://example.com/recipes',
method: 'POST',
body: {
name: 'Baked Falafel',
style: 'mediterranean'
}
};
const Recipe = {
key: 'recipe',
//...
list: {
//...
},
create: {
display: {
label: 'Add Recipe',
description: 'Adds a new recipe to our cookbook.'
},
operation: {
perform: createRecipeRequest
}
}
};
```
Every method you define on a `resource` Zapier converts to the appropriate Trigger, Create, or Search. Our examples
above would result in an app with a New Recipe Trigger and an Add Recipe Create.
Note the keys for the Trigger, Create, Search, and Search or Create are automatically generated (in case you want to use them in a dynamic dropdown), like: `{resourceName}List`, `{resourceName}Create`, `{resourceName}Search`, and `{resourceName}SearchOrCreate`; in the examples above, `{resourceName}` would be `recipe`.
## Triggers/Searches/Creates
Triggers, Searches, and Creates are the way an app defines what it is able to do. Triggers read
data into Zapier (i.e. watch for new recipes). Searches locate individual records (find recipe by title). Creates create
new records in your system (add a recipe to the catalog).
The definition for each of these follows the same structure. Here is an example of a trigger:
```javascript
const recipeListRequest = {
url: 'http://example.com/recipes',
};
const App = {
//...
triggers: {
new_recipe: {
key: 'new_recipe', // uniquely identifies the trigger
noun: 'Recipe', // user-friendly word that is used to refer to the resource
// `display` controls the presentation in the Zapier Editor
display: {
label: 'New Recipe',
helpText: 'Triggers when a new recipe is added.'
},
// `operation` implements the API call used to fetch the data
operation: {
perform: recipeListRequest
}
},
another_trigger: {
// Another trigger definition...
}
}
};
```
You can find more details on the definition for each by looking at the [Trigger Schema](https://github.com/zapier/zapier-platform-schema/blob/master/docs/build/schema.md#triggerschema),
[Search Schema](https://github.com/zapier/zapier-platform-schema/blob/master/docs/build/schema.md#searchschema), and [Create Schema](https://github.com/zapier/zapier-platform-schema/blob/master/docs/build/schema.md#createschema).
> Example App: check out https://github.com/zapier/zapier-platform-example-app-trigger for a working example app using triggers.
> Example App: check out https://github.com/zapier/zapier-platform-example-app-rest-hooks for a working example app using REST hook triggers.
> Example App: check out https://github.com/zapier/zapier-platform-example-app-search for a working example app using searches.
> Example App: check out https://github.com/zapier/zapier-platform-example-app-create for a working example app using creates.
### Return Types
Each of the 3 types of function expects a certain type of object. As of core `v1.0.11`, there are automated checks to let you know when you're trying to pass the wrong type back. There's more info in each relevant `post_X` section of the [v2 docs](https://zapier.com/developer/documentation/v2/scripting/#available-methods). For reference, each expects:
| Method | Return Type | Notes |
| --- | --- | --- |
| Trigger | Array | 0 or more objects that will be passed to the [deduper](https://zapier.com/developer/documentation/v2/deduplication/) |
| Search | Array | 0 or more objects. If len > 0, put the best match first |
| Action | Object | Can also be [Object] |
## Fields
On each trigger, search, or create in the `operation` directive - you can provide an array of objects as fields under the `inputFields`. Fields are what your users would see in the main Zapier user interface. For example, you might have a "create contact" action with fields like "First name", "Last name", "Email", etc.
You can find more details on each and every field option at [Field Schema](https://github.com/zapier/zapier-platform-schema/blob/master/docs/build/schema.md#fieldschema).
Those fields have various options you can provide, here is a succinct example:
```javascript
const App = {
//...
creates: {
create_recipe: {
//...
operation: {
// an array of objects is the simplest way
inputFields: [
{key: 'title', required: true, label: 'Title of Recipe', helpText: 'Name your recipe!'},
{key: 'style', required: true, choices: {mexican: 'Mexican', italian: 'Italian'}}
],
perform: () => {}
}
}
}
};
```
### Custom/Dynamic Fields
In some cases, it might be necessary to provide fields that are dynamically generated - especially for custom fields. This is a common pattern for CRMs, form software, databases and more. Basically - you can provide a function instead of a field and we'll evaluate that function - merging the dynamic fields with the static fields.
> You should see `bundle.inputData` partially filled in as users provide data - even in field retrieval. This allows you to build hierarchical relationships into fields (EG: only show issues from the previously selected project).
```javascript
const recipeFields = (z, bundle) => {
const response = z.request('http://example.com/api/v2/fields.json');
// json is is [{"key":"field_1"},{"key":"field_2"}]
return response.then(res => res.json);
};
const App = {
//...
creates: {
create_recipe: {
//...
operation: {
// an array of objects is the simplest way
inputFields: [
{key: 'title', required: true, label: 'Title of Recipe', helpText: 'Name your recipe!'},
{key: 'style', required: true, choices: {mexican: 'Mexican', italian: 'Italian'}},
recipeFields // provide a function inline - we'll merge the results!
],
perform: () => {}
}
}
}
};
```
Additionally, if there is a field that affects the generation of dynamic fields, you can set the `altersDynamicFields: true` property. This informs the Zapier UI that whenver the value of that field changes, fields need to be recomputed. An example could be a static dropdown of "dessert type" that will change whether the function that generates dynamic fields includes a field "with sprinkles."
```javascript
module.exports = {
key: 'dessert',
noun: 'Dessert',
display: {
label: 'Order Dessert',
description: 'Orders a dessert.'
},
operation: {
inputFields: [
{key: 'type', required: true, choices: {1: 'cake', 2: 'ice cream', 3: 'cookie'}, altersDynamicFields: true},
function(z, bundle) {
if (bundle.inputData.type === '2') {
return [{key: 'with_sprinkles', type: 'boolean'}];
}
return [];
}
],
perform: function (z, bundle) {/* ... */}
}
};
```
### Dynamic Dropdowns
Sometimes, API endpoints require clients to specify a parent object in order to create or access the child resources. Imagine having to specify a company id in order to get a list of employees for that company. Since people don't speak in auto-incremented ID's, it is necessary that Zapier offer a simple way to select that parent using human readable handles.
Our solution is to present users a dropdown that is populated by making a live API call to fetch a list of parent objects. We call these special dropdowns "dynamic dropdowns."
To define one, you can provide the `dynamic` property on your field to specify the trigger that should be used to populate the options for the dropdown. The value for the property is a dot-separated concatenation of a trigger's key, the field to use for the value, and the field to use for the label.
```javascript
const App = {
//...
resources: {
project: {
key: 'project',
//...
list: {
//...
operation: {
perform: () => { return [{id: 123, name: 'Project 1'}]; } // called for project_id dropdown
}
}
},
issue: {
key: 'issue',
//...
create: {
//...
operation: {
inputFields: [
{key: 'project_id', required: true, label: 'Project', dynamic: 'projectList.id.name'}, // calls project.list
{key: 'title', required: true, label: 'Title', helpText: 'What is the name of the issue?'},
],
}
}
}
}
};
```
In the UI, users will see something like this:
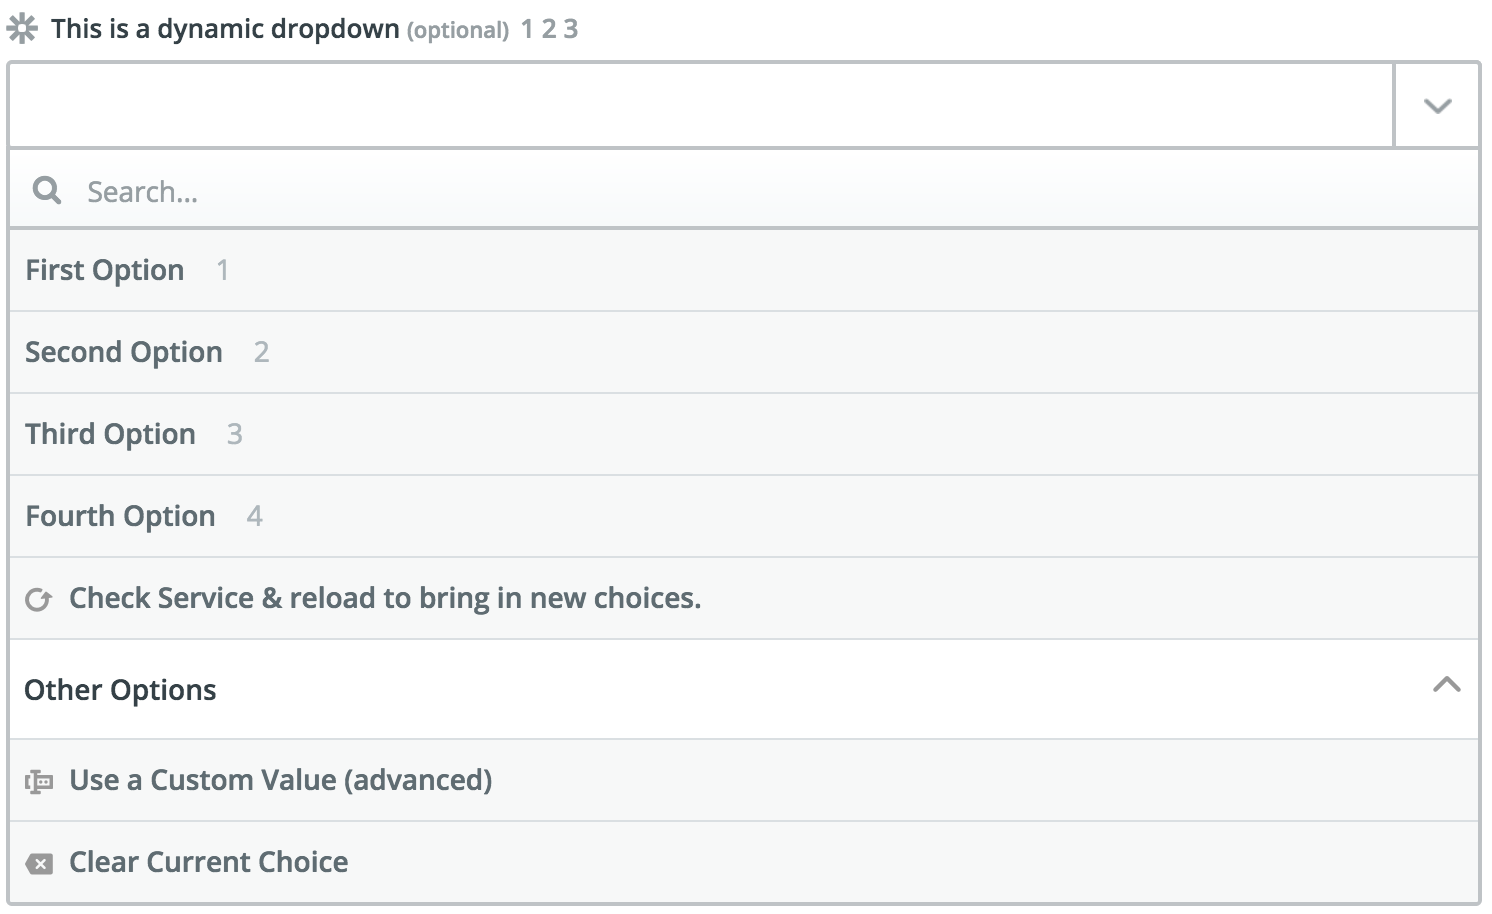
> Dynamic dropdowns are one of the few fields that automatically invalidate Zapier's field cache, so it is not necessary to set `altersDynamicFields` to true for these fields.
### Search-Powered Fields
For fields that take id of another object to create a relationship between the two (EG: a project id for a ticket), you can specify the `search` property on the field to indicate that Zapier needs to prompt the user to setup a Search step to populate the value for this field. Similar to dynamic dropdowns, the value for this property is a dot-separated concatenation of a search's key and the field to use for the value.
```javascript
const App = {
//...
resources: {
project: {
key: 'project',
//...
search: {
//...
operation: {
perform: () => { return [{id: 123, name: 'Project 1'}]; } // called for project_id
}
}
},
issue: {
key: 'issue',
//...
create: {
//...
operation: {
inputFields: [
{key: 'project_id', required: true, label: 'Project', dynamic: 'projectList.id.name', search: 'projectSearch.id'}, // calls project.search (requires a trigger in the "dynamic" property)
{key: 'title', required: true, label: 'Title', helpText: 'What is the name of the issue?'},
],
}
}
}
}
};
```
**NOTE:** This has to be combined with the `dynamic` property to give the user a guided experience when setting up a Zap.
If you don't define a trigger for the `dynamic` property, the search connector won't show.
## Z Object
We provide several methods off of the `z` object, which is provided as the first argument to all function calls in your app.
> The `z` object is passed into your functions as the first argument - IE: `perform: (z) => {}`.
### `z.request([url], options)`
`z.request([url], options)` is a promise based HTTP client with some Zapier-specific goodies. See [Making HTTP Requests](#making-http-requests).
### `z.console(message)`
`z.console(message)` is a logging console, similar to Node.js `console` but logs remotely, as well as to stdout in tests. See [Log Statements](#console-logging)
### `z.dehydrate(func, inputData)`
`z.dehydrate(func, inputData)` is used to lazily evaluate a function, perfect to avoid API calls during polling or for reuse. See [Dehydration](#dehydration).
### `z.stashFile(bufferStringStream, [knownLength], [filename])`
`z.stashFile(bufferStringStream, [knownLength], [filename])` is a promise based file stasher that returns a URL file pointer. See [Stashing Files](#stashing-files).
### `z.JSON`
`z.JSON` is similar to the JSON built-in like `z.JSON.parse('...')`, but catches errors and produces nicer tracebacks.
### `z.hash()`
`z.hash()` is a crypto tool for doing things like `z.hash('sha256', 'my password')`
### `z.errors`
`z.errors` is a collection error classes that you can throw in your code, like `throw new z.errors.HaltedError('...')`.
The available errors are:
* HaltedError - Stops current operation, but will never turn off Zap. Read more on [Halting Execution](#halting-execution)
* ExpiredAuthError - Turns off Zap and emails user to manually reconnect. Read more on [Stale Authentication Credentials](#stale-authentication-credentials)
* RefreshAuthError - (OAuth2 or Session Auth) Tells Zapier to refresh credentials and retry operation. Read more on [Stale Authentication Credentials](#stale-authentication-credentials)
For more details on error handling in general, see [here](#error-handling).
## Bundle Object
This object holds the user's auth details and the data for the API requests.
> The `bundle` object is passed into your functions as the second argument - IE: `perform: (z, bundle) => {}`.
### `bundle.authData`
`bundle.authData` is user-provided authentication data, like `api_key` or `access_token`. [Read more on authentication.](#authentication)
### `bundle.inputData`
`bundle.inputData` is user-provided data for this particular run of the trigger/search/create, as defined by the inputFields. For example:
```javascript
{
createdBy: 'Bobby Flay'
style: 'mediterranean'
}
```
### `bundle.inputDataRaw`
`bundle.inputDataRaw` is kind of like `inputData`, but before rendering `{{curlies}}`:
```javascript
{
createdBy: '{{chef_name}}'
style: '{{style}}'
}
```
### `bundle.meta`
`bundle.meta` is extra information useful for doing advanced behaviors depending on what the user is doing. It looks something like this:
```javascript
{
frontend: false,
prefill: false,
hydrate: true,
test_poll: false,
standard_poll: true,
first_poll: false,
limit: -1,
page: 0,
}
```
For example - if you want to do pagination - you could do:
```javascript
const getList = (z, bundle) => {
const promise = z.request({
url: 'http://example.com/api/list.json',
params: {
limit: 100,
offset: 100 * bundle.meta.page
}
});
return promise.then((response) => response.json);
};
```
## Environment
Apps can define environment variables that are available when the app's code executes. They work just like environment
variables defined on the command line. They are useful when you have data like an OAuth client ID and secret that you
don't want to commit to source control. Environment variables can also be used as a quick way to toggle between a
a staging and production environment during app development.
It is important to note that **variables are defined on a per-version basis!** When you push a new version, the
existing variables from the previous version are copied, so you don't have to manually add them. However, edits
made to one version's environment will not affect the other versions.
### Defining Environment Variables
To define an environment variable, use the `env` command:
```bash
# Will set the environment variable on Zapier.com
zapier env 1.0.0 MY_SECRET_VALUE 1234
```
You will likely also want to set the value locally for testing.
```bash
export MY_SECRET_VALUE=1234
```
Alternatively, we provide some extra tooling to work with an `.environment` that looks like this:
```
MY_SECRET_VALUE=1234
```
And then in your `test/basic.js` file:
```javascript
const zapier = require('zapier-platform-core');
should('some tests', () => {
zapier.tools.env.inject(); // testing only!
console.log(process.env.MY_SECRET_VALUE);
// should print '1234'
});
```
> This is a popular way to provide `process.env.ACCESS_TOKEN || bundle.authData.access_token` for convenient testing.
### Accessing Environment Variables
To view existing environment variables, use the `env` command.
```bash
# Will print a table listing the variables for this version
zapier env 1.0.0
```
Within your app, you can access the environment via the standard `process.env` - any values set via local `export` or `zapier env` will be there.
For example, you can access the `process.env` in your perform functions:
```javascript
const listExample = (z, bundle) => {
const httpOptions = {
headers: {
'my-header': process.env.MY_SECRET_VALUE
}
};
const response = z.request('http://example.com/api/v2/recipes.json', httpOptions);
return response.then(res => res.json);
};
const App = {
// ...
triggers: {
example: {
// ...
operation: {
// ...
perform: listExample
}
}
}
};
```
> Note! Be sure to lazily access your environment variables - we generally set the environment variables after your code is already loaded.
## Making HTTP Requests
There are two primary ways to make HTTP requests in the Zapier platform:
1. **Shorthand HTTP Requests** - these are simple object literals that make it easy to define simple requests.
1. **Manual HTTP Requests** - this is much less "magic", you use `z.request([url], options)` to make the requests and control the response.
There are also a few helper constructs you can use to reduce boilerplate:
1. `requestTemplate` which is an shorthand HTTP request that will be merged with every request.
2. `beforeRequest` middleware which is an array of functions to mutate a request before it is sent.
2. `afterResponse` middleware which is an array of functions to mutate a response before it is completed.
> Note: you can install any HTTP client you like - but this is greatly discouraged as you lose [automatic HTTP logging](#http-logging) and middleware.
### Shorthand HTTP Requests
For simple HTTP requests that do not require special pre or post processing, you can specify the HTTP options as an object literal in your app definition.
This features:
1. Lazy `{{curly}}` replacement.
2. JSON de-serialization.
3. Automatic non-2xx error raising.
```javascript
const triggerShorthandRequest = {
method: 'GET',
url: 'http://{{bundle.authData.subdomain}}.example.com/v2/api/recipes.json',
params: {
sort_by: 'id',
sort_order: 'DESC'
}
};
const App = {
// ...
triggers: {
example: {
// ...
operation: {
// ...
perform: triggerShorthandRequest
}
}
}
};
```
In the url above, `{{bundle.authData.subdomain}}` is automatically replaced with the live value from the bundle. If the call returns a non 2xx return code, an error is automatically raised. The response body is automatically parsed as JSON and returned.
An error will be raised if the response is not valid JSON, so _do not use shorthand HTTP requests with non-JSON responses_.
### Manual HTTP Requests
When you need to do custom processing of the response, or need to process non-JSON responses, you can make manual HTTP requests. This approach does not perform any magic - no status code checking, no automatic JSON parsing. Use this method when you need more control. Manual requests do perform lazy `{{curly}}` replacement.
To make a manual HTTP request, use the `request` method of the `z` object:
```javascript
const listExample = (z, bundle) => {
const customHttpOptions = {
headers: {
'my-header': 'from zapier'
}
};
return z.request('http://example.com/api/v2/recipes.json', customHttpOptions)
.then(response => {
if (response.status >= 300) {
throw new Error(`Unexpected status code ${response.status}`);
}
const recipes = JSON.parse(response.content);
// do any custom processing of recipes here...
return recipes;
});
};
const App = {
// ...
triggers: {
example: {
// ...
operation: {
// ...
perform: listExample
}
}
}
};
```
#### POST and PUT Requests
To POST or PUT data to your API you can do this:
```javascript
const App = {
// ...
triggers: {
example: {
// ...
operation: {
// ...
perform: (z, bundle) => {
const recipe = {
name: 'Baked Falafel',
style: 'mediterranean',
directions: 'Get some dough....'
};
const options = {
method: 'POST',
body: JSON.stringify(recipe)
};
return z.request('http://example.com/api/v2/recipes.json', options)
.then(response => {
if (response.status !== 201) {
throw new Error(`Unexpected status code ${response.status}`);
}
});
}
}
}
}
};
```
> Note: you need to call `z.JSON.stringify()` before setting the `body`.
### Using HTTP middleware
If you need to process all HTTP requests in a certain way, you may be able to use one of utility HTTP middleware functions.
> Example App: check out https://github.com/zapier/zapier-platform-example-app-middleware for a working example app using HTTP middleware.
Try putting them in your app definition:
```javascript
const addHeader = (request, /*z*/) => {
request.headers['my-header'] = 'from zapier';
return request;
};
const mustBe200 = (response, /*z*/) => {
if (response.status !== 200) {
throw new Error(`Unexpected status code ${response.status}`);
}
return response;
};
const autoParseJson = (response, z) => {
response.json = z.JSON.parse(response.content);
return response;
};
const App = {
// ...
beforeRequest: [
addHeader,
],
afterResponse: [
mustBe200,
autoParseJson,
]
// ...
};
```
A `beforeRequest` middleware function takes a request options object, and returns a (possibly mutated) request object. An `afterResponse` middleware function takes a response object, and returns a (possibly mutated) response object. Middleware functions are executed in the order specified in the app definition, and each subsequent middleware receives the request or response object returned by the previous middleware.
Middleware functions can be asynchronous - just return a promise f