verifalia-widget
Version:
A lightweight JavaScript widget with zero dependencies that performs real-time email address validation using the Verifalia email verification service. This widget integrates seamlessly with any web form to swiftly identify and eliminate invalid, undelive
1,063 lines (769 loc) • 55 kB
Markdown
Verifalia widget - Real-Time Email Verification for Your Web Pages
==================================================================
[Verifalia](https://verifalia.com/) provides a lightning-fast, powerful service for **real-time email address validation and
deliverability checks**; drop this JavaScript widget into any web page, and it automatically binds to every `input`
field of type `email` (or to fields with "email" in their name or ID - or any other fields matched by a configured
XPath [selector](#inputbindingsselector)), preventing form submission unless the field contains a valid email address
that points to an active, deliverable mailbox. The widget ships as a single, lightweight JavaScript file (9 KB gzipped),
has no external dependencies, and offers a wide range of customization options.
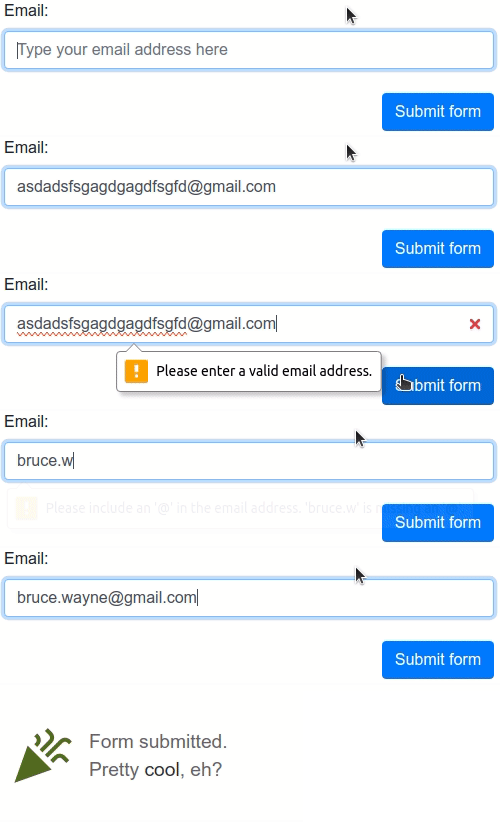
By default, the widget **blocks form submission for invalid, unreachable, disposable, and throw-away email addresses**.
You can easily change this to allow or exclude different address types - for example, addresses from free providers like
Gmail or Yahoo. The widget works out of the box with all HTML5 forms, including mobile ones: just add it to a page, and
it starts validating every email address in real time.
The widget also integrates with several [CAPTCHA services](#bot-detection--captcha) - including Cloudflare Turnstile,
hCaptcha, Google reCAPTCHA v2, and Google reCAPTCHA v3 - to make sure only real humans trigger email verifications.
If it detects any of the following validation libraries or form-building services on your page, the widget integrates with
them automatically: [Adobe Marketo Engage](#adobe-marketo-engage), [FormSite](#formsite), [FormStack](#formstack),
[FormValidation](#formvalidation), [Google Tag Manager (GTM)](#google-tag-manager-gtm), [HubSpot](#hubspot),
[Instapage](#instapage), [jQuery Validation Plugin](#jquery-validation-plugin),
[Kendo UI for jQuery](#kendo-ui-for-jquery), [KickoffLabs](#kickofflabs), [Leadpages](#leadpages), [Pardot](#pardot),
[Parsley](#parsley), [SamCart](#samcart), [Unbounce](#unbounce), [Validate.js](#validatejs), and
[Zoho Sites](#zoho-sites). Other form validation libraries may also work with the widget, but they aren't officially
supported.
This widget is a great fit for many integration scenarios, but it only runs in the browser and has a limited set of
extension points: for a more powerful, Node.js-compatible solution with a much richer feature set, check out the
[Verifalia SDK for JavaScript](https://www.npmjs.com/package/verifalia).
# Table of contents
* [Installing the widget on your page](#installing-the-widget-on-your-page)
* [Manual installation](#manual-installation)
* [How it works](#how-it-works)
* [HTML5 forms](#html5-forms)
* [Visual feedback](#visual-feedback)
* [Directionality](#directionality)
* [Bot detection / CAPTCHA](#bot-detection--captcha)
* [Cloudflare Turnstile](#cloudflare-turnstile)
* [hCaptcha](#hcaptcha)
* [Google reCAPTCHA v2](#google-recaptcha-v2)
* [Invisible reCAPTCHA](#invisible-recaptcha)
* [Google reCAPTCHA v3](#google-recaptcha-v3)
* [Integration with existing validation libraries and form building services](#integration-with-existing-validation-libraries-and-form-building-services)
* [Adobe Marketo Engage](#adobe-marketo-engage)
* [FormSite](#formsite)
* [FormStack](#formstack)
* [FormValidation](#formvalidation)
* [Google Tag Manager (GTM)](#google-tag-manager-gtm)
* [HubSpot](#hubspot)
* [Instapage](#instapage)
* [jQuery Validation Plugin](#jquery-validation-plugin)
* [Kendo UI for jQuery](#kendo-ui-for-jquery)
* [KickoffLabs](#kickofflabs)
* [Leadpages](#leadpages)
* [Pardot](#pardot)
* [Parsley](#parsley)
* [SamCart](#samcart)
* [Unbounce](#unbounce)
* [Validate.js](#validatejs)
* [Zoho Sites](#zoho-sites)
* [Configuring the widget](#configuring-the-widget)
* [Using JavaScript](#using-javascript)
* [Using data-verifalia-* attributes](#using-data-verifalia--attributes)
* [Advanced settings](#advanced-settings)
* [captcha](#captcha)
* [captcha.provider](#captchaprovider)
* [captcha.siteKey](#captchasitekey)
* [captcha.language](#captchalanguage)
* [captcha.containerSelector](#captchacontainerselector)
* [inputBindings](#inputbindings)
* [inputBindings.appendHiddenFields](#inputbindingsappendhiddenfields)
* [inputBindings.autoWireup](#inputbindingsautowireup)
* [inputBindings.classNames](#inputbindingsclassnames)
* [inputBindings.debounceTime](#inputbindingsdebouncetime)
* [inputBindings.events](#inputbindingsevents)
* [inputBindings.preventSubmission](#inputbindingspreventsubmission)
* [inputBindings.selector](#inputbindingsselector)
* [inputBindings.squiggles](#inputbindingssquiggles)
* [inputBindings.styling](#inputbindingsstyling)
* [emailValidations](#emailvalidations)
* [emailValidations.allow](#emailvalidationsallow)
* [emailValidations.block](#emailvalidationsblock)
* [emailValidations.memoize](#emailvalidationsmemoize)
* [emailValidations.messages](#emailvalidationsmessages)
* [Widget methods](#widget-methods)
* [wireup()](#wireup)
* [Widget events](#widget-events)
* [verifalia-widget:initializing event](#verifalia-widgetinitializing-event)
* [verifalia-widget:initialized event](#verifalia-widgetinitialized-event)
* [verifalia-widget:field-validation-started event](#verifalia-widgetfield-validation-started-event)
* [verifalia-widget:field-validation-completed event](#verifalia-widgetfield-validation-completed-event)
* [verifalia-widget:captcha-requested event](#verifalia-widgetcaptcha-requested-event)
* [Displaying potential corrections for mistyped email addresses](#displaying-potential-corrections-for-mistyped-email-addresses)
* [Known limitations](#known-limitations)
* [Error squiggles](#error-squiggles)
* [Google Sites](#google-sites)
* [Microsoft Power Apps](#microsoft-power-apps)
* [Changelog / What's new](#changelog--whats-new)
* [v1.14.1](#v1141)
* [v1.13](#v113)
* [v1.12](#v112)
* [v1.11](#v111)
* [v1.10](#v110)
* [v1.9](#v19)
* [v1.8](#v18)
* [v1.7](#v17)
* [v1.6](#v16)
* [v1.5](#v15)
* [v1.4.3](#v143)
* [v1.3.1](#v131)
* [v1.3](#v13)
* [v1.2](#v12)
* [v1.1](#v11)
* [v1.0.1](#v101)
* [v1.0](#v10)
## Installing the widget on your page
Using the Verifalia email verification service requires a Verifalia account - if you don't have one,
[sign up for free](https://verifalia.com/sign-up). You'll also need a *browser app key* (a short
alphanumeric string). To create one, go to *Team → Users & Browser Apps* in the
[Verifalia client area](https://app.verifalia.com/) and click *Create*: select *Browser app* as the user type
and click *Create* to save.
Once you have a browser app, head to its *Embeddable widget* tab to generate the embedding code - it'll
include the HTML snippet with your browser app key already filled in. Paste it into your page or form
and you're good to go! For instructions specific to the validation libraries and form-building services
we support, see the relevant sections below.
### Manual installation
Instead of using the dashboard's code generator, you can manually copy the HTML block below and place it just before
the closing `</body>` tag. Set the `data-verifalia-appkey` attribute to your browser app key (available in the
Verifalia dashboard), or set it via JavaScript as described in the next section.
```html
...
<script defer
src="https://unpkg.com/verifalia-widget@1.14.1/dist/verifalia-widget.js"
data-verifalia-appkey="YOUR BROWSER APP KEY HERE"
integrity="sha512-FmYZDXdfPJA66WfnM8PYo+T/epRUdbVzigcc9bpVD8xLvI2V2VRx4S6lWGdVHjfUpaIr4YrNhv6EZmc3wWsBDg=="
crossorigin="anonymous"></script>
</body>
</html>
```
or
```html
...
<script defer
src="https://cdn.jsdelivr.net/npm/verifalia-widget@1.14.1/dist/verifalia-widget.js"
data-verifalia-appkey="YOUR BROWSER APP KEY HERE"
integrity="sha512-FmYZDXdfPJA66WfnM8PYo+T/epRUdbVzigcc9bpVD8xLvI2V2VRx4S6lWGdVHjfUpaIr4YrNhv6EZmc3wWsBDg=="
crossorigin="anonymous"></script>
</body>
</html>
```
CDNs courtesy of [unpkg](https://unpkg.com/) and [jsDelivr](https://www.jsdelivr.com/).
Alternatively, you can also self-host the JavaScript file. Use [npm](https://npmjs.org/) to download it:
```bash
$ npm install verifalia-widget
```
After installation, the file is available at `./node_modules/verifalia-widget/dist/verifalia-widget.js`.
## How it works
The widget has no external dependencies. It works out of the box with standard HTML5 forms - including mobile ones -
and integrates automatically with popular form validation libraries and form-building services, including
[Adobe Marketo Engage](https://business.adobe.com/products/marketo/adobe-marketo.html),
[FormSite](https://www.formsite.com/), [FormStack](https://www.formstack.com/),
[FormValidation](https://formvalidation.io/), [HubSpot](https://hubspot.com/),
[Google Tag Manager (GTM)](#google-tag-manager-gtm), [Instapage](https://instapage.com/),
[jQuery Validation Plugin](https://jqueryvalidation.org/), [Kendo UI for jQuery](https://www.telerik.com/kendo-jquery-ui),
[KickoffLabs](https://kickofflabs.com/), [Leadpages](https://www.leadpages.com/), [Pardot](https://pardot.com/),
[Parsley](https://parsleyjs.org/), [SamCart](#samcart), [Unbounce](https://unbounce.com/),
[Validate.js](https://validatejs.org/), and [Zoho Sites](https://www.zoho.com/sites/).
When one of these libraries or services is detected on the page, the widget adjusts its behavior to work alongside the
existing validation logic and styles. You can further customize this behavior using the settings described below.
### HTML5 forms
On load, if no supported validation libraries are detected, the widget uses plain HTML5 form methods. It automatically
binds to every `input` field of type `email`, as well as to every `input` field whose `name` or `id` contains the word
"email" (see [autoWireup](#inputbindingsautowireup) to disable this behavior, and [selector](#inputbindingsselector) to
control which fields are bound). When the containing form is submitted - or while the user is typing - the widget verifies
the email address and blocks submission if the address is invalid, points to an inactive mailbox, or is disposable or
throw-away (see [emailValidations](#emailvalidations) to change the validation logic, and
[events](#inputbindingsevents) to change which events trigger verification).
The widget automatically appends hidden fields to the form to store the Verifalia verification results, including the
job ID, classification, and status. Each hidden field is named after the original field's `name` attribute, with one of
these suffixes:
- `-verifalia-id` - the Verifalia job ID (a unique identifier for the verification job);
- `-verifalia-classification` - the result classification: `Deliverable`, `Undeliverable`, `Risky`, or `Unknown`;
- `-verifalia-status` - the result status: `Success`, `MailboxDoesNotExist`, `MailboxHasInsufficientStorage`, etc. (see the [complete list](https://verifalia.com/developers#email-validations-status-codes)).
> **Security note:** Don't rely solely on client-side data. Always double-check the submitted values on your back end:
> use the job ID to retrieve the full verification result via the Verifalia API, and confirm the email address,
> classification, and status match what was submitted. Check out the [developer documentation](https://verifalia.com/developers)
> for details on the API and the available open-source SDKs.
#### Visual feedback
When the widget binds to an `input` field, it adds the CSS class `verifalia-field` to it. During validation, it adds
`verifalia-field-processing`, and once validation completes, it adds either `verifalia-field-valid` or
`verifalia-field-invalid`. If the request is throttled, it adds `verifalia-field-throttled`. You can change any of
these class names using the [classNames](#inputbindingsclassnames) setting.
The widget also shows these user-facing messages during the standard
[HTML5 form validation](https://developer.mozilla.org/en-US/docs/Learn/HTML/Forms/Form_validation) process:
- `Please hold on for a second, until we verify this email address...` - while validation is in progress;
- `Please enter a valid email address.` - if the address is invalid;
- `Too many attempts, please try again later.` - if the request is throttled.
To customize these messages, use the [messages](#emailvalidationsmessages) setting.
For a better user experience, the widget also shows error squiggles after validation completes, to highlight typos or
other issues:

You can turn off squiggles using the [squiggles](#inputbindingssquiggles) setting. Note the [limitations](#error-squiggles)
around squiggles on `<input type="email" />` fields with non-ASCII characters.
#### Directionality
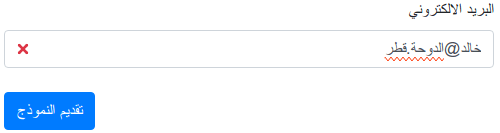
The widget automatically detects the directionality of each bound `input` element and adapts its
[visual feedback](#visual-feedback) accordingly. Its default CSS classes show a validity indicator on the right for
left-to-right languages (Latin, Cyrillic, Greek, Indic, etc.) and on the left for right-to-left languages (Arabic,
Hebrew, Persian, Urdu, Sindhi, etc.). Error squiggles follow the same directionality logic.
Because the widget reads the *computed* `dir` value, it automatically inherits the closest `dir` set on any ancestor
element. The most common case is setting `dir` once on the root `html` element:
```html
<html dir="rtl">
...
<div>
...
<input type="email" ...>
```
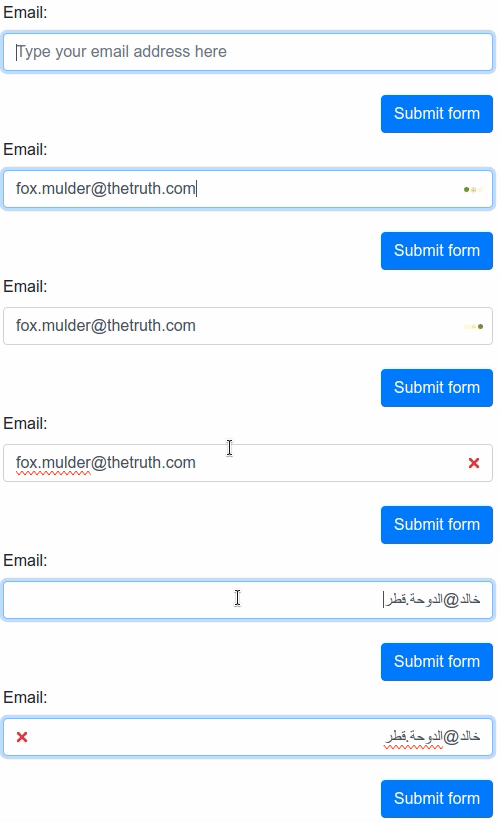
If a field needs to accept both left-to-right and right-to-left addresses - for example, when the direction isn't known
in advance - set `dir="auto"` directly on the `input` field:
```html
<html>
...
<div>
...
<input type="email" dir="auto" ...>
```
In this case, the widget adjusts the directionality of its [visual feedback](#visual-feedback) dynamically as the user
types:
For advanced customization, the widget also sets a `verifalia-field-dir` attribute on each bound `input` element,
reflecting its computed directionality (`ltr` or `rtl`). You can use this to write directionality-specific CSS rules:
```css
.verifalia-field-invalid[verifalia-field-dir=rtl] {
background-color: #f00;
}
```
#### Bot detection / CAPTCHA
The widget integrates with CAPTCHA services to ensure only real humans trigger email verifications, protecting your
Verifalia credits and preventing throttling; you can run multiple widget instances on the same page, each with a
different CAPTCHA service or different CAPTCHA settings.
The supported CAPTCHA services are:
##### Cloudflare Turnstile
To enable bot detection with Cloudflare Turnstile:
1. In the [Verifalia client area](https://app.verifalia.com/), find the browser app running the widget from the *Team → Users & Browser apps* menu and enter
the Cloudflare Turnstile *secret key* in the *Bot detection* section. This lets the Verifalia servers communicate
with Cloudflare.
2. Set [captcha.provider](#captchaprovider) to `turnstile`.
3. Set [captcha.siteKey](#captchasitekey) to your Turnstile *sitekey*.
4. Optionally, configure [captcha.language](#captchalanguage) and [captcha.containerSelector](#captchacontainerselector).
Here's what the resulting code looks like:
```html
<script defer src=”...”
data-verifalia-appkey=”...”
data-verifalia-captcha-provider="turnstile"
data-verifalia-captcha-siteKey="0x4AAEM1L3BICKA">
</script>
```
The widget automatically loads the Cloudflare Turnstile script. For more details, see
https://www.cloudflare.com/products/turnstile/
##### hCaptcha
To enable bot detection with hCaptcha:
1. In the [Verifalia client area](https://app.verifalia.com/), find the browser app running the widget from the *Team → Users & Browser apps* menu and enter the hCaptcha *secret key* in the
*Bot detection* section. This lets the Verifalia servers communicate with hCaptcha.
2. Optionally, also enter the hCaptcha *sitekey* there - this prevents tokens issued for one sitekey from being used
elsewhere, per the [hCaptcha docs](https://docs.hcaptcha.com/).
3. Set [captcha.provider](#captchaprovider) to `hCaptcha`.
4. Set [captcha.siteKey](#captchasitekey) to your hCaptcha *sitekey*.
5. Optionally, configure [captcha.language](#captchalanguage) and [captcha.containerSelector](#captchacontainerselector).
Here's what the resulting code looks like:
```html
<script defer src=”...”
data-verifalia-appkey=”...”
data-verifalia-captcha-provider="hCaptcha"
data-verifalia-captcha-siteKey="347e3460-7fcb-43c0-bb23-5431f81d3854">
</script>
```
The widget automatically loads the hCaptcha script. For more details, see https://www.hcaptcha.com/
##### Google reCAPTCHA v2
To enable bot detection with Google reCAPTCHA v2:
1. In the [Verifalia client area](https://app.verifalia.com/), find the browser app running the widget from the *Team → Users & Browser apps* menu and enter the reCAPTCHA v2 *secret key* in the
*Bot detection* section. This lets the Verifalia servers communicate with Google.
2. Set [captcha.provider](#captchaprovider) to `reCaptcha_v2`.
3. Set [captcha.siteKey](#captchasitekey) to your reCAPTCHA v2 *sitekey*.
4. Optionally, configure [captcha.language](#captchalanguage) and [captcha.containerSelector](#captchacontainerselector).
Here's what the resulting code looks like:
```html
<script defer src=”...”
data-verifalia-appkey=”...”
data-verifalia-captcha-provider="reCaptcha_v2"
data-verifalia-captcha-siteKey="809DKSJHDsad7987ad9shKAHLKASL">
</script>
```
###### Invisible reCAPTCHA
For invisible reCAPTCHA, follow the same steps as above, plus:
5. Set a CAPTCHA container element using [captcha.containerSelector](#captchacontainerselector).
6. Add `data-size="invisible"` to that container element.
Here's what the resulting code looks like:
```html
<script defer src=”...”
data-verifalia-appkey=”...”
data-verifalia-captcha-provider="reCaptcha_v2"
data-verifalia-captcha-siteKey="612ASG239909asdajKHDSDSAD3877823"
data-verifalia-captcha-containerSelector="//*[@id='captcha-container']">
</script>
<div id="captcha-container" data-size="invisible"></div>
```
The widget automatically loads the Google reCAPTCHA v2 script. For more details, see
https://www.google.com/recaptcha/about/
##### Google reCAPTCHA v3
To enable bot detection with Google reCAPTCHA v3:
1. In the [Verifalia client area](https://app.verifalia.com/), find the browser app running the widget from the *Team → Users & Browser apps* menu and enter the reCAPTCHA v3 *secret key* in the
*Bot detection* section.
2. In that same section, adjust the *Score threshold* if needed. reCAPTCHA v3 assigns a score from 0 to 1 per
submission - 0 means likely a bot, 1 means likely a real user. Submissions scoring below your threshold will be
treated as bot-generated and rejected.
3. Set [captcha.provider](#captchaprovider) to `reCaptcha_v3`.
4. Set [captcha.siteKey](#captchasitekey) to your reCAPTCHA v3 *sitekey*.
5. Optionally, configure [captcha.language](#captchalanguage) and [captcha.containerSelector](#captchacontainerselector).
Here's what the resulting code looks like:
```html
<script defer src=”...”
data-verifalia-appkey=”...”
data-verifalia-captcha-provider="reCaptcha_v3"
data-verifalia-captcha-siteKey="12ASHGD1230980SDAJSDPO2109388123">
</script>
```
The widget automatically loads the Google reCAPTCHA v3 script. For more details, see
https://www.google.com/recaptcha/about/
### Integration with existing validation libraries and form building services
The widget detects widely used form validation libraries and form-building services and plugs its email verification
logic into them automatically - no extra wiring needed. We currently support:
[Adobe Marketo Engage](#adobe-marketo-engage), [FormSite](#formsite), [FormStack](#formstack),
[FormValidation](#formvalidation), [Google Tag Manager (GTM)](#google-tag-manager-gtm), [HubSpot](#hubspot),
[Instapage](#instapage), [jQuery Validation Plugin](#jquery-validation-plugin),
[Kendo UI for jQuery](#kendo-ui-for-jquery), [KickoffLabs](#kickofflabs), [Leadpages](#leadpages),
[Pardot](#pardot), [Parsley](#parsley), [SamCart](#samcart), [Unbounce](#unbounce), [Validate.js](#validatejs),
and [Zoho Sites](#zoho-sites).
#### Adobe Marketo Engage
The widget supports [Adobe Marketo Engage](https://business.adobe.com/products/marketo/adobe-marketo.html) (formerly
Marketo) out of the box. When it detects a Marketo Engage page, it automatically adds email validation to the form.
To add the widget to a Marketo Engage form, open the page in the Marketo UI, drag in the *HTML element*, paste the
code snippet from the Verifalia dashboard into the custom HTML editor, and click *Save*.
#### FormSite
The widget works with [FormSite](https://www.formsite.com/) automatically. When it detects a FormSite page, it adds
email validation to the form.
To add the widget to a FormSite form, paste the code snippet from the Verifalia dashboard into a *Custom Code* item,
found under the *Formatting Items* tab in the FormSite Form Editor.
#### FormStack
The widget also works with [FormStack](https://www.formstack.com/). When it detects a FormStack page, it adds email
validation to the form.
To add the widget to a FormStack form, paste the code snippet from the Verifalia dashboard into the *Footer HTML*
editor in the *Advanced Code Editor*.
#### FormValidation
The widget integrates with the [FormValidation](https://formValidation.io/) library out of the box. When it detects
FormValidation on the page, it automatically replaces the default `FormValidation.validators.emailAddress` logic. In
this mode, the widget doesn't add its own bindings to `input` fields, deferring to the existing library behavior.
#### Google Tag Manager (GTM)
The widget is available as a
[community template in the Google Tag Manager gallery](https://tagmanager.google.com/gallery/#/owners/verifalia/templates/verifalia-widget-gtm-template).
To embed it in a GTM workspace:
- In the *Tags* section, click *New*.
- Click *Tag Configuration*, choose a tag type, then select *Discover more tag types in the Community Template Gallery*.
- From the list, select *Verifalia Email Verification Widget* and click *Add to workspace*.
Once added, enter your Verifalia browser app key in the *App key* field. Adjust any options in *Widget Settings* as
needed, give the tag a meaningful name, and save it.
> For a step-by-step walkthrough, see: [how to block invalid emails and typos using Google Tag Manager](https://verifalia.com/help/email-verification-widget/how-to-block-invalid-emails-and-typos-using-google-tag-manager-gtm)
#### HubSpot
The widget supports [HubSpot](https://hubspot.com/) landing pages. When it detects a HubSpot page, it automatically
adds email verification to every email field on the page.
To add the widget to a HubSpot landing page, edit the page in HubSpot and click the *Settings* button in the header.
Scroll down to *Advanced settings*, paste the code snippet from the Verifalia dashboard into the *Footer HTML* text
area, and close the *Settings* dialog (HubSpot auto-saves changes). Click *Publish* to go live.
> For a step-by-step walkthrough, see: [how to block invalid emails in a HubSpot website page or landing page](https://verifalia.com/help/email-verification-widget/how-to-block-invalid-emails-in-hubspot-website-pages-and-landing-pages)
#### Instapage
The widget supports [Instapage](https://instapage.com/). When it detects an Instapage page, it automatically adds
email verification to the form.
To add the widget to an Instapage landing page, edit the page in Instapage and click *HTML/CSS* in the sidebar. Click
*BODY*, paste the code snippet from the Verifalia dashboard into the HTML editor, and click *Save*. Then click
*UPDATE* to publish.
> For a step-by-step walkthrough, see: [how to block invalid emails in Instapage landing pages](https://verifalia.com/help/email-verification-widget/how-to-block-invalid-emails-in-instapage-landing-pages)
#### jQuery Validation Plugin
The widget supports the [jQuery Validation Plugin](https://jqueryvalidation.org/) out of the box. When it detects the
plugin on the page, it automatically overrides the default `email` validation logic. No additional field bindings are
added, so the existing plugin configuration is respected.
In this mode, the widget doesn't add CSS classes to fields, so it plays nicely with the plugin's own visual feedback.
To override this, set the `styling` property as described below.
#### Kendo UI for jQuery
The widget supports [Kendo UI for jQuery](https://www.telerik.com/kendo-jquery-ui)'s Validator out of the box,
automatically replacing its default `email` validation logic. No additional field bindings are added.
> **Note:** Kendo UI for jQuery gives precedence to any validation error message set via `data-<rulekey>-msg` or
> `validationMessage` field attributes. When these attributes are present, they may interfere with the message the
> widget displays during async email verification, which could be confusing for users.
> For more, read: [improving email verification with Kendo UI and Verifalia](https://www.telerik.com/blogs/improving-email-verification-kendo-ui-verifalia)
#### KickoffLabs
The widget supports [KickoffLabs](https://kickofflabs.com/) pages out of the box and automatically adds email
verification to every email field.
To add the widget to a KickoffLabs page, click the *Edit* dropdown in the KickoffLabs UI, select *Tracking Codes*,
paste the code snippet from the Verifalia dashboard into the *Footer Scripts* area, and click *Save Script Changes*.
> For a step-by-step walkthrough, see: [how to block invalid emails in KickoffLabs landing pages](https://verifalia.com/help/email-verification-widget/how-to-block-invalid-emails-in-kickofflabs-landing-pages)
#### Leadpages
The widget supports [Leadpages](https://www.leadpages.com/) out of the box and automatically adds email verification to
every email field on the page.
To add the widget to a Leadpages landing page, click *Edit* in the Leadpages UI, click the *Settings* button in the
sidebar, go to the *Analytics* tab, paste the code snippet from the Verifalia dashboard into the
*Immediately before the closing </body> tag* area, and click *Save*.
If your page has a pop-up form, click *Edit pop-up* (visible when hovering the activation button), then click
*Settings* in the sidebar and paste the code snippet into the same area. In both cases, click *Update* in the header
to publish.
> For a step-by-step walkthrough, see: [how to block invalid emails in Leadpages landing pages and pop-up forms](https://verifalia.com/help/email-verification-widget/how-to-block-invalid-emails-in-leadpages-landing-pages-and-pop-up-forms)
#### Pardot
The widget integrates with [Pardot](https://pardot.com/) automatically. When added to a Pardot landing page, it adds
email verification to every email field.
To add the widget to a Pardot landing page form, click *Look and Feel* in the classic editor, go to the *Below Form*
tab, click the HTML button in the WYSIWYG editor, and paste the code snippet from the Verifalia dashboard.
#### Parsley
The widget supports the [Parsley](https://parsleyjs.org/) form validation library out of the box. When it detects
Parsley on the page, it joins the Parsley validation process and binds to `input` fields using the same logic described
in [HTML5 forms](#html5-forms).
In this mode, the widget doesn't add CSS classes to fields, deferring to Parsley's own visual feedback. To override
this, set the `styling` property as described below.
#### SamCart
The widget supports [SamCart](https://www.samcart.com/) checkout pages out of the box and automatically adds email
verification to every email field.
To add the widget to a SamCart checkout page, open the product editor in SamCart, click the *Advanced* tab, paste the
code snippet from the Verifalia dashboard into the *Embed HTML/Scripts in Header* area, and click *Save Changes*.
In this mode, the widget doesn't add CSS classes to fields, deferring to SamCart's own visual feedback. To override
this, set the `styling` property as described below.
> For a step-by-step walkthrough, see: [how to block invalid emails in SamCart checkout pages](https://verifalia.com/help/email-verification-widget/how-to-block-invalid-emails-in-samcart-checkout-pages)
#### Unbounce
The widget supports [Unbounce](https://unbounce.com/) landing pages and automatically adds email verification to every
email field.
To add the widget to an Unbounce page, edit the page in Unbounce and click *Javascripts* at the bottom. Click
*Add New Javascript*, set the placement to *Before Body End Tag*, paste the code snippet from the Verifalia dashboard
into the code area, and click *Done*. Click *Save* in the header, then *Republish* to go live.
> For a step-by-step walkthrough, see: [how to block invalid emails in Unbounce landing pages](https://verifalia.com/help/email-verification-widget/how-to-block-invalid-emails-in-unbounce-landing-pages)
#### Validate.js
The widget supports [Validate.js](https://validatejs.org/) out of the box. When it detects Validate.js on the page, it
automatically overrides the default `email` validation logic. No additional field bindings or CSS classes are added, so
existing Validate.js configuration is left intact.
#### Zoho Sites
The widget integrates with [Zoho Sites](https://www.zoho.com/sites/) automatically. When added to a Zoho Sites page,
it adds email verification to every email field.
To add the widget to a Zoho Sites website, click *Settings* in the Builder UI, go to *Header and Footer Code* under
*General*, paste the code snippet from the Verifalia dashboard into the *Header Code* area, and click *Save*. To
publish, click *Back to Builder* and then *Publish*.
## Configuring the widget
The widget ships with sensible defaults that cover most use cases. When you need more control, you can configure it
using either [JavaScript](#using-javascript) or [`data-verifalia-*` HTML attributes](#using-data-verifalia--attributes).
For the full list of available settings, see [Advanced settings](#advanced-settings) below.
### Using JavaScript
Add a small configuration script *before* the `verifalia-widget.js` script tag. The widget reads the `VerifaliaWidgetConfig`
property on the `window` object when it loads - changes made after that point have no effect.
Here's an example of setting your browser app key via `VerifaliaWidgetConfig`:
```html
<script>
window.VerifaliaWidgetConfig = {
appKey: 'YOUR-APPKEY-HERE'
};
</script>
```
### Using data-verifalia-* attributes
Alternatively, configure the widget using `data-verifalia-*` attributes on a specific `input` field or any of its
ancestor elements (including the parent `form` and the `body`). As a fallback, the widget also looks for
`data-verifalia-*` attributes on the `script` element that loaded it.
Here's an example of setting your browser app key at the `body` level:
```html
<body data-verifalia-appkey="YOUR-APPKEY-HERE">
...
```
### Advanced settings
This section is a complete reference for all available configuration settings.
#### captcha
Configure CAPTCHA integration using the `captcha` object or the corresponding `data-verifalia-captcha-*` attributes
(see [Using data-verifalia-* attributes](#using-data-verifalia--attributes)).
Here's the full type definition:
```typescript
captcha: {
provider: string;
siteKey: string;
language: string;
containerSelector: string;
}
```
Here's a full example for a widget using Cloudflare Turnstile, with a custom container that includes a Turnstile
`data-theme` attribute:
```html
<label>
Enter your email, please:
<input type="text" data-verifalia-captcha-provider="Turnstile"
data-verifalia-captcha-siteKey="YOUR TURNSTILE SITE KEY HERE"
data-verifalia-captcha-containerSelector="//*[@id='challengeContainer']" />
</label>
<div id="challengeContainer" data-theme="light" />
```
#### captcha.provider
The CAPTCHA service to integrate with. Supported values:
- `Turnstile` for [Cloudflare Turnstile](https://www.cloudflare.com/products/turnstile/) (see documentation: [https://developers.cloudflare.com/turnstile/get-started/](https://developers.cloudflare.com/turnstile/get-started/))
- `hCaptcha` for [hCaptcha](https://www.hcaptcha.com/) (see documentation: [https://docs.hcaptcha.com/](https://docs.hcaptcha.com/))
- `reCaptcha_v2` for [Google reCAPTCHA v2](https://www.google.com/recaptcha/about/) (see documentation: [https://developers.google.com/recaptcha/docs/display](https://developers.google.com/recaptcha/docs/display))
- `reCaptcha_v3` for [Google reCAPTCHA v3](https://www.google.com/recaptcha/about/) (see documentation: [https://developers.google.com/recaptcha/docs/display](https://developers.google.com/recaptcha/docs/v3))
You can also set this via the `data-verifalia-captcha-provider` attribute (see [Using data-verifalia-* attributes](#using-data-verifalia--attributes)).
#### captcha.siteKey
The public site key ("sitekey") from your selected CAPTCHA provider.
You can also set this via the `data-verifalia-captcha-siteKey` attribute (see [Using data-verifalia-* attributes](#using-data-verifalia--attributes)).
#### captcha.language
The language code to use when rendering the CAPTCHA. If not set, the CAPTCHA service auto-detects the user's locale.
Check your CAPTCHA provider's docs for supported language codes:
- Cloudflare Turnstile: https://developers.cloudflare.com/turnstile/reference/supported-languages/
- hCaptcha: https://docs.hcaptcha.com/languages
- Google reCAPTCHA v2: https://developers.google.com/recaptcha/docs/language
- Google reCAPTCHA v3: https://developers.google.com/recaptcha/docs/language
You can also set this via the `data-verifalia-captcha-language` attribute (see [Using data-verifalia-* attributes](#using-data-verifalia--attributes)).
#### captcha.containerSelector
An XPath selector for the element that will contain the CAPTCHA challenge. If not set, the widget creates a `div`
element next to the bound `input` field.
You can also set this via the `data-verifalia-captcha-containerSelector` attribute (see [Using data-verifalia-* attributes](#using-data-verifalia--attributes)).
#### inputBindings
Configure how the widget binds to `input` fields using the `inputBindings` property. All properties are optional and
have defaults as described below.
```typescript
inputBindings: {
appendHiddenFields: boolean;
autoWireup: boolean;
classNames: {
base: string;
exception: string;
invalid: string;
valid: string;
throttled: string;
processing: string;
insufficientBalance: string;
}
debounceTime: number;
events: string;
preventSubmission: string;
selector: string;
squiggles: boolean;
styling: boolean;
}
```
#### inputBindings.appendHiddenFields
When `true`, the widget appends hidden `input` fields to the form with the validation result after each verification.
Defaults to `true`. These fields are useful for verifying results server-side via the
[Verifalia API](https://verifalia.com/developers) and guarding against front-end data tampering.
You can also set this via the `data-verifalia-inputBindings-appendHiddenFields` attribute.
#### inputBindings.autoWireup
When `true`, the widget automatically binds to `input` fields as described above. Defaults to `true`.
You can also set this via the `data-verifalia-inputBindings-autoWireup` attribute (see [Using data-verifalia-* attributes](#using-data-verifalia--attributes)).
#### inputBindings.classNames
The CSS class names the widget applies to bound fields:
- `base` - applied when the widget attaches to a field. Defaults to `verifalia-field`.
- `processing` - applied while validation is in progress. Defaults to `verifalia-field-processing`.
- `valid` - applied for a valid email address. Defaults to `verifalia-field-valid`.
- `invalid` - applied for an invalid email address. Defaults to `verifalia-field-invalid`.
- `throttled` - applied when the validation request is throttled. Defaults to `verifalia-field-throttled`.
- `exception` - applied when a network or code error occurs. Defaults to `verifalia-field-exception`.
- `insufficientBalance` - applied when the account is out of credits. Defaults to `verifalia-field-insufficient-balance`.
You can also set each class name via the corresponding `data-verifalia-inputBindings-classNames-*` attribute (e.g.,
`data-verifalia-inputBindings-classNames-base`, `data-verifalia-inputBindings-classNames-valid`, etc.), see [Using data-verifalia-* attributes](#using-data-verifalia--attributes).
#### inputBindings.debounceTime
How long the widget waits between keystrokes before triggering email verification, in milliseconds; defaults to `500`.
You can also set this via the `data-verifalia-inputBindings-debounceTime` attribute (see [Using data-verifalia-* attributes](#using-data-verifalia--attributes)).
#### inputBindings.events
One or more `input` field events that trigger email verification, separated by commas. Defaults to `input`, meaning
verification starts on any change to the field's content. When this is set to an empty string, verification only
triggers on form submit.
> **Tip:** Set this to `blur` to verify the email when the field loses focus.
You can also set this via the `data-verifalia-inputBindings-events` attribute (see [Using data-verifalia-* attributes](#using-data-verifalia--attributes)).
#### inputBindings.preventSubmission
A comma-separated list of conditions that should block form submission:
- `invalid` - block submission if the email address is invalid;
- `throttled` - block submission if the verification request was throttled;
- `exception` - block submission if an error occurred (e.g., no network connection);
- `insufficientBalance` - block submission if the account is out of credits or the browser app has hit its daily quota.
Defaults to `invalid, throttled`.
You can also set this via the `data-verifalia-inputBindings-preventSubmission` attribute (see [Using data-verifalia-* attributes](#using-data-verifalia--attributes)).
#### inputBindings.selector
An XPath selector for the `input` fields the widget binds to.
Defaults to:
`//input[@type="email" or ((not(@type) or @type="text") and contains(@name, "email")) or @*[starts-with(name(), "data-verifalia")]]`
This matches any `input` that:
- has `type="email"`, or
- has `type="text"` or no type, and includes "email" in its `name` attribute, or
- has a `data-verifalia-*` attribute.
You can also set this via the `data-verifalia-inputBindings-selector` attribute (see [Using data-verifalia-* attributes](#using-data-verifalia--attributes)).
#### inputBindings.squiggles
When `true`, the widget shows error squiggles in the `input` field after verification, highlighting likely typos or
other issues. Defaults to `true`. Note the [limitations](#error-squiggles) around squiggles on
`<input type="email" />` fields with non-ASCII characters. Squiggles will never appear if
[`styling`](#inputbindingsstyling) is `false`.
You can also set this via the `data-verifalia-inputBindings-squiggles` attribute (see [Using data-verifalia-* attributes](#using-data-verifalia--attributes)).

#### inputBindings.styling
Controls whether the widget applies its predefined styles and [CSS classes](#inputbindingsclassnames) to bound fields:
- `true` - always apply styles and classes;
- `false` - never apply styles and classes;
- `undefined` (default) - let the widget decide based on the host environment (some hosts have their own styling, and the widget defers to them in those cases).
You can also set this via the `data-verifalia-inputBindings-styling` attribute (see [Using data-verifalia-* attributes](#using-data-verifalia--attributes)).
#### emailValidations
Defines the email validation logic and preferences; all properties are optional and have defaults as described below.
```ts
emailValidations: {
allow: string;
block: string;
memoize: boolean | number;
messages: {
invalid: string;
processing: string;
throttled: string;
insufficientBalance: string;
}
};
```
An email address passes validation if it matches the `allow` rule *and* does not match the `block` rule.
#### emailValidations.allow
A comma-separated string of classifications, status codes, or attributes that the widget should allow. Classifications
use their plain names; status codes use the `status:` prefix; attributes use the `@` prefix with the values `free`,
`role`, or `disposable`. The string is case-insensitive.
For example, to allow `Deliverable` and `Unknown` classifications, plus role accounts and catch-all mailboxes:
```javascript
allow: 'deliverable, unknown, @role, status:ServerIsCatchAll'
```
Defaults to `deliverable, risky, unknown`.
You can also set this via the `data-verifalia-emailValidations-allow` attribute (see [Using data-verifalia-* attributes](#using-data-verifalia--attributes)).
#### emailValidations.block
A comma-separated string using the same format as `allow`, specifying what the widget should block.
For example, to block free email providers like Gmail and Yahoo:
```javascript
block: '@free'
```
Defaults to `@disposable`.
You can also set this via the `data-verifalia-emailValidations-block` attribute (see [Using data-verifalia-* attributes](#using-data-verifalia--attributes)).
#### emailValidations.memoize
Controls [memoization](https://en.wikipedia.org/wiki/Memoization) of validation results to speed up repeat
verifications:
- `true` - cache results for 60 seconds (default);
- `false` - disable caching;
- a number - cache results for that many seconds.
You can also set this via the `data-verifalia-emailValidations-memoize` attribute (see [Using data-verifalia-* attributes](#using-data-verifalia--attributes)).
#### emailValidations.messages
The user-facing messages displayed during the form validation process:
- `invalid` - defaults to `Please enter a valid email address.`
- `processing` - defaults to `Please hold on for a second, until we verify this email address...`
- `throttled` - defaults to `Too many attempts, please try again later.`
- `insufficientBalance` - defaults to `The verification failed because of insufficient balance: please notify the website owner about this issue.`
You can also set each message via the corresponding `data-verifalia-emailValidations-messages-*` attribute (see [Using data-verifalia-* attributes](#using-data-verifalia--attributes)).
## Widget methods
After loading, the widget exposes a `VerifaliaWidget` object on `window` for advanced use cases.
### wireup()
Use `wireup()` to manually attach the widget to a portion of the DOM. This is useful when
[`autoWireup`](#inputbindingsautowireup) is set to `false`. The method signature (TypeScript):
```ts
wireup(rootNode: Node, live: boolean): void
```
- `rootNode` - the DOM node the widget will scan for child (or self) `input` fields to bind to;
- `live` - when `true`, the widget continuously monitors the DOM for newly added fields.
The default [`autoWireup`](#inputbindingsautowireup) behavior of `true` is equivalent to calling:
```javascript
window.VerifaliaWidget.wireup(document, true);
```
## Widget events
The widget fires synthetic events throughout its lifecycle, all prefixed with `verifalia-widget:` for easy filtering.
### verifalia-widget:initializing event
Fired once when the widget script begins initializing, from the `document` object. This event is cancelable - call
`preventDefault()` to abort initialization.
```html
<script>
document.addEventListener('verifalia-widget:initializing', (event) => {
console.log('The Verifalia widget is initializing...');
// Uncomment the line below to abort initialization
// event.preventDefault();
});
</script>
```
### verifalia-widget:initialized event
Fired once when the widget finishes initializing, from the `document` object; bubbles up the DOM.
```html
<script>
document.addEventListener('verifalia-widget:initialized', (event) => {
console.log('The Verifalia widget is ready!');
});
</script>
```
### verifalia-widget:field-validation-started event
Fired whenever the widget starts verifying a field, from that field's element; bubbles up the DOM.
```html
<script>
document.addEventListener('verifalia-widget:field-validation-started', (event) => {
console.log('Email verification started for field', event.target);
});
</script>
```
### verifalia-widget:field-validation-completed event
Fired when verification finishes for a field, from that field's element. Bubbles up the DOM. The `detail` property
contains:
- `status` - the outcome of the verification. One of:
- `Allowed` - the email passed the [allow](#emailvalidationsallow)/[block](#emailvalidationsblock) rules;
- `Canceled` - the verification was canceled (e.g., the field value changed mid-verification);
- `Exception` - an unexpected error occurred;
- `InsufficientBalance` - the account is out of credits or the browser app hit its daily quota;
- `NotAllowed` - the email did not pass the [allow](#emailvalidationsallow)/[block](#emailvalidationsblock) rules;
- `Throttled` - the request exceeded the configured rate limit.
- `validation` - present only when `status` is `Allowed` or `NotAllowed`. Contains the full
[job snapshot](https://verifalia.com/developers/email-verifications/retrieving-jobs#email-validations-job-snapshot) from the Verifalia API.
```html
<script>
document.addEventListener('verifalia-widget:field-validation-completed', (event) => {
console.log('Email verification completed for field', event.target);
console.log('Status', event.detail.status);
console.log('Validation', event.detail.validation);
});
</script>
```
### verifalia-widget:captcha-requested event
Fired early in the email verification process, when the widget needs a CAPTCHA response token: use this event to
prepare your UI for a CAPTCHA challenge. Fires from the target field's element and bubbles up the DOM.
```html
<script>
document.addEventListener('verifalia-widget:captcha-requested', (event) => {
console.log('Optional CAPTCHA response token requested for field', event.target);
});
</script>
```
#### Displaying potential corrections for mistyped email addresses
When Verifalia detects a potential typo, it includes suggested corrections in the verification result. You can display
these however you like by listening for the
[verifalia-widget:field-validation-completed](#verifalia-widgetfield-validation-completed-event) event.
Here's an example that shows the first suggestion in a `<div>`:
```html
<div id="didYouMean"></div>
<script>
document.addEventListener('verifalia-widget:field-validation-completed', event => {
const didYouMean = document.getElementById('didYouMean');
const entries = event?.detail?.validation?.entries;
didYouMean.innerHTML = (entries && entries[0].suggestions)
? `Did you mean <strong>${entries[0].suggestions[0]}?</strong>`
: '';
});
</script>
```
## Known limitations
### Error squiggles
`<input type="email" />` fields have [poor support for non-ASCII email addresses](https://www.grepular.com/The_Sad_State_of_HTML_Email_Input_Fields_and_IDNs),
which can cause squiggles to appear in the wrong position. If your users might enter internationalized email addresses,
use `type="text"` instead - it handles these correctly in all browsers.
Also, the widget applies styling to the `background` CSS property of bound fields when squiggles are enabled, and
resets it on load. This can cause visual conflicts if you've applied CSS `transition` rules to `background` on those
fields. We recommend avoiding `background` and `transition: background` declarations on email input fields when
squiggles are enabled.
### Google Sites
[Google Sites](https://sites.google.com/) sandboxes every embedded code block in its own `iframe`, which prevents
scripts from accessing other parts of the page. As a result, the widget can't reach email fields defined in a different
`iframe`. That said, the widget **does** support [Google Tag Manager (GTM)](#google-tag-manager-gtm) - see that section
for an alternative approach.
### Microsoft Power Apps
Microsoft Power Apps uses a proprietary form validation technology called Power Fx, which is incompatible with the HTML
standard. Unfortunately, this means the widget (and other standards-compliant validation scripts) can't work with Power
Apps forms.
## Changelog / What's new
### v1.14.1
Released on March 4, 2026
- Improved email verification performance using speculative preconnections to Verifalia API endpoints.
- Updated the default XPath selector to avoid binding to fields unlikely to contain email addresses.
- Improved README.
### v1.13
Released on January 15, 2025
- Added support for [Google Tag Manager (GTM)](#google-tag-manager-gtm).
- Added support for the [SamCart](#samcart) checkout pages.
- Added support for [trusted origins](https://verifalia.com/help/sub-accounts/what-are-trusted-origins-and-how-to-configure-them).
- Improved widget registration as a singleton in the `window` object.
- Improved README.