utquidem
Version:
The meta-framework suite designed from scratch for frontend-focused modern web development.
546 lines (391 loc) • 16.8 kB
Markdown
---
sidebar_position: 2
---
# 开发网站
本章将介绍如何使用 Modern.js,进行内容类网站的开发。本章对应的代码仓库地址在[这里查看](https://github.com/modern-js-dev/modern-js-examples/tree/main/quick-start/website)。
通过本章你可以了解到:
- 如何创建一个内容类网站项目。
- 如何使用客户端路由。
- 如何使用组件样式。
- 如何开发和使用 BFF API。
- 如何使用服务端渲染功能( SSR )。
- 如何配置项目所需的静态资源、自定义 HTML。
- 如何使用测试功能。
## 环境准备
import EnvPrepare from '@site/docs/components/env-prepare.md';
<EnvPrepare />
## 创建项目
使用 `@modern-js/create` 创建新项目,运行命令如下:
```bash
npx @modern-js/create website
```
:::info 注
`website` 为创建的项目名。
:::
按照如下选择,生成项目:
```bash
? 请选择你想创建的工程类型: 应用
? 请选择开发语言: TS
? 请选择包管理工具: pnpm
? 是否需要支持以下类型应用: 不需要
? 是否需要调整默认配置:是
? 请选择客户端路由方式:启用约定式路由
? 是否关闭「应用状态管理」功能: 否
? 是否启用 Less 支持: 否
? 是否启用 Sass 支持: 否
```
:::info 注
这里将**客户端路由方式**改为:约定式路由,其他选项则依然使用的是默认选项。
:::
## 开发调试
进入项目根目录, 之后执行 `pnpm run dev` 即可启动开发服务器:
```bash
# 进入项目根目录
cd website
# 启动开发服务器
pnpm run dev
```
浏览器中访问 `http://localhost:8080`,可以看到应用已经正常启动。
修改 `src/pages/index.tsx` 会触发重新编译和热更新,浏览器中页面会自动展示对应变化。
### Unbundled 开发模式
import DevUnbundle from '@site/docs/components/dev-unbundle.md'
<DevUnbundle/>
:::info 注
Unbundled 模式暂不支持在 Windows 平台使用,支持即将上线。
:::
### IDE 支持
import DevIDE from '@site/docs/components/dev-ide.md'
<DevIDE/>
## 约定式路由
当前项目 `src/` 目录下的文件结构为:
```bash
.
├── src/
│ ├── pages/
│ │ ├── index.css
│ │ └── index.tsx
```
`pages/` 目录是 Modern.js 中启用约定式路由的标识,`pages/` 中的文件路径和文件内容,将被自动转换成客户端路由逻辑。以当前项目为例,访问 `http://localhost:8080` 会渲染 `index.tsx` 的组件内容。
:::info 注
`pages/` 中的 `index.[jt]sx`,将会被映射到上一级路由。
:::
现在,我们在 `pages/` 目录下新增两个文件:
```bash
touch pages/about.tsx pages/introduction.tsx
```
文件内容如下:
```js title="about.tsx"
const About = () => <div>About page</div>;
export default About;
```
```js title="introduction.tsx"
const Introduction = () => <div>Introduction page</div>;
export default Introduction;
```
这两个文件会生成两个新的客户端路由:`/about`,`/introduction`。
访问 `http://localhost:8080/about`、`http://localhost:8080/introduction` 可以查看这两个路由渲染的页面内容。
我们修改 `index.tsx` 文件的内容,增加跳转到其他两个路由的链接:
```js title="index.tsx" {15-20}
import { Link } from '@modern-js/runtime/router';
import './index.css';
const Index = () => (
<div className="container">
<main>
<div className="logo">
<img
src="https://lf3-static.bytednsdoc.com/obj/eden-cn/ylaelkeh7nuhfnuhf/modernjs-cover.png"
width="300"
alt="Modern.js Logo"
/>
</div>
<div className="grid">
<Link to="/introduction" className="card">
<h2>Introduction</h2>
</Link>
<Link to="/about" className="card">
<h2>About</h2>
</Link>
</div>
</main>
<footer className="footer">
<a href="#" target="_blank" rel="noopener noreferrer">
Powered by Modern.JS
</a>
</footer>
</div>
);
export default Index;
```
访问 `http://localhost:8080/`,点击 **Introduction** 和 **About** 两个链接,分别跳转到 `/introduction`、`/about` 两个路由。
:::info 补充信息
本章使用的是约定式路由,但是我们也可以使用自控式路由实现上述需求。关于路由的详细介绍,请参考【[添加客户端路由](/docs/guides/tutorials/c08-client-side-routing/8.1-code-based-routing)】。
:::
### 设置 Head
当前项目是一个 SPA 应用,虽然客户端路由可以模拟多个页面的效果,但是实际上不同路由使用的都是同一个 HTML 文档,所以默认情况下,HTML 文档 `head` 元素内的 `title`、`meta` 等元素一直是不变的。
通常,当网站发生页面切换时,我们希望页面的 `title` 元素信息也能随之改变。我们可以使用 `@modern-js/runtime/head` 提供的 `Helmet` 组件,更改不同路由中的 `head` 元素。分别对 `index.tsx`、`about.tsx`、`introduction.tsx` 这三个文件做修改,关键代码如下:
```js title="index.tsx" {1,5-7}
import { Helmet } from '@modern-js/runtime/head';
const Index = () => (
<div className="container">
<Helmet>
<title>Home</title>
</Helmet>
// ....
<div>
)
```
```js title="about.tsx" {1,5-7}
import { Helmet } from '@modern-js/runtime/head';
const About = () => (
<div>
<Helmet>
<title>About</title>
</Helmet>
<div>About page</div>
</div>
);
export default About;
```
```js title="introduction.tsx" {1,5-7}
import { Helmet } from '@modern-js/runtime/head';
const Introduction = () => (
<div>
<Helmet>
<title>Introduction</title>
</Helmet>
<div>Introduction page</div>
</div>
);
export default Introduction;
```
修改代码后,刷新页面。可以发现浏览器标签窗口上显示的标题会随着页面跳转而更改。
:::info 补充信息
更多用法,请参考【[Head API](/docs/apis/runtime/app/head)】。
:::
## 组件样式
### Utility Class
Utility Class 是对通用功能(如文字居中、水平对齐等)涉及的 CSS 规则的封装。开发者可以直接使用这些 CSS Class 进行样式设置。
Modern.js 集成了主流的 Utility Class 解决方案 —— [Tailwind CSS](https://tailwindcss.com/),我们利用 [Tailwind CSS](https://tailwindcss.com/)
设置组件的通用样式。
首先,需要开启 Tailwind CSS 支持,在项目根目录下执行 `pnpm run new`,进行如下选择:
然后按照如下选择操作:
```bash
? 请选择你想要的操作: 启用可选功能
? 启用可选功能: 启用 TailwindCSS 支持
```
然后,新建 `src/pages/_app.tsx`,`pages/` 目录下的 `_app.tsx` 相当于入口的根组件,负责全局布局、样式等工作。在这个文件中,我们引入 Tailwind CSS 的样式文件:
```js title="_app.tsx"
import 'tailwindcss/base.css';
import 'tailwindcss/components.css';
import 'tailwindcss/utilities.css';
```
现在,我们就可以在组件中使用 Tailwind CSS 提供的 Utility Class 了。我们使用 `text-center` 这个 Class,为 `src/pages/about.tsx` 中的文字设置居中效果:
```js title="about.tsx"
const About = () => (
<div>
<div className="text-center">About page</div>
</div>
);
```
浏览器访问 `http://localhost:8080/about`,会发现 `About page` 已经居中显示了。
:::info 补充信息
关于 Tailwind CSS 的更多介绍,请参考【[Tailwind CSS](/docs/guides/usages/css/tailwindcss)】。
:::
### CSS in JS
组件有时候需要设置自己的特有样式,这时候使用 Utility Class 就不是很方便了。我们可以用 CSS in JS 的写法直接在组件的 JS 代码中编写特有样式。Modern.js 通过集成 [styled-components](https://styled-components.com/) 提供 CSS in JS 的支持。
接下来,我们使用 CSS in JS 实现 `src/pages/introduction.tsx` 中的组件样式。
首先,在文件中引入 `styled` 模块:
```js title="introduction.tsx"
import styled from '@modern-js/runtime/styled';
```
`styled` 模块的使用方式同 [styled-components](https://styled-components.com/) 一致,我们可以定义如下样式组件:
```js title="src/pages/introduction.tsx"
const Title = styled.div`
font-size: 24px;
font-weight: bold;
text-align: center;
`;
```
`src/pages/introduction.tsx` 完整的代码如下:
```js title="introduction.tsx" {2,4-8,15}
import { Helmet } from '@modern-js/runtime/head';
import styled from '@modern-js/runtime/styled';
const Title = styled.div`
font-size: 24px;
font-weight: bold;
text-align: center;
`;
const Introduction = () => (
<div>
<Helmet>
<title>Introduction</title>
</Helmet>
<Title>Introduction page</Title>
</div>
);
export default Introduction;
```
:::info 注
上面的示例也可以通过 Tailwind CSS 提供的 Utility Class 实现,这里仅用于举例说明 CSS in JS 的使用方式。通常,Utility Class + CSS in JS 的方案可以满足绝大多数项目的样式编写需求。
:::
:::info 补充信息
关于组件样式的更多用法,请参考【[CSS 开发方案](/docs/guides/usages/css/css-in-js)】。
:::
## 客户端兼容性
Modern.js 提供自动 Polyfill、Browserslist 配置、差异化分发等特性,能够最大化的兼顾客户端兼容性和资源加载性能。关于这部分内容的更多介绍,请参考【[客户端兼容性](/docs/guides/usages/basic-configuration/compatibility)】。
## 一体化 BFF
当前页面还没有有效数据,现在我们创建一个 API,用于提供 `introduction.tsx` 所需的数据。通过开启 BFF 功能,我们可以在同一个项目内,编写 API 代码。
我们执行 `pnpm run new` 来开启 BFF 功能:
import LaunchBFFChoices from '@site/docs/components/launch-bff-choices.md';
<LaunchBFFChoices />
执行完成后,项目中新增了 `api/` 目录,添加 `api/data.ts` 文件,代码如下:
```js title="api/data.ts"
export default async () => {
return {
title: 'Introduction to Modern.js',
content:
'Modern.js is a modern web development solution. It offers best practice for different scenarios,such as mobile pages, websites, API services, etc.',
};
};
```
这样我们就成功创建了一个 BFF API。访问 `http://localhost:8080/api/data`,返回的数据就是 `data.ts` 中默认导出函数的返回值。
:::info 注
这里只演示了如何创建 BFF API,返回的数据依然是静态数据,实际场景中,`data.ts` 应该调用其他 API 或从数据库中获取动态数据。
:::
通常情况下,组件代码中通过 `axios`,执行请求地址来获取数据。但是 Modern.js 提供了一种更加简洁的方式,可以像使用函数一样来调用 API,关键代码如下:
```js title="introduction.tsx" {9-19}
import { useState, useEffect } from 'react'
import styled from '@modern-js/runtime/styled';
import { Helmet } from '@modern-js/runtime/head';
import getData from '@api/data';
// ...
const Introduction = () => {
const [data, setData] = useState(null)
useEffect(()=>{
const load = async () => {
const res = await getData();
const _data = await res.json();
setData(_data);
}
load();
},[])
return (
// ...
)
}
export default Introduction;
```
:::info 补充信息
关于 BFF 的更多介绍,请参考【[添加 BFF](/docs/guides/tutorials/c09-bff/9.1-serverless)】、【[一体化 BFF](/docs/guides/features/server-side/bff/function)】。
:::
## 一体化 SSR
当前 `/introduction` 页面中的数据是在浏览器端获取的,即 CSR 运行模式。网站通常更关注页面的 SEO 和首屏渲染时间,因此使用服务端渲染( SSR )更适合网站开发场景。Modern.js 内置 SSR Server,只需要一行配置即可使用 SSR 能力。
在 `modern.config.js` 中,开启 `ssr` 选项:
```js title="modern.config.js"
export default defineConfig({
server: {
ssr: true,
},
});
```
Modern.js 提供了 `useLoader` API,可以同构在浏览器端、服务端渲染时的数据获取。现在,我们用 `useLoader` 替换 `useEffect`,关键代码如下:
```js title="introduction.tsx" {1,7-10}
import { useLoader } from '@modern-js/runtime';
import getData from '@api/data';
// ...
const Introduction = () => {
const { data } = useLoader(async () => {
const res = await getData();
return res.data;
});
return (
// ...
)
}
export default Introduction;
```
:::info 注
Modern.js 提供的一体化 BFF 调用能同构的在 CSR/SSR 时获取数据,开发者无需关心环境差异。
:::
直接访问 `http://localhost:8080/introduction`,可以发现返回的 HTML 文档是包含 API 数据的完整页面内容。
:::info 补充信息
更多信息,请参考【[useLoader](/docs/apis/runtime/container/use-loader)】、【[一体化 SSR](/docs/guides/features/server-side/web/ssr-and-spr)】。
:::
### 局部 CSR
有些场景下,我们不希望整个页面都是 SSR,即在使用 SSR 时,页面的局部依然是 CSR(客户端渲染)。例如,`/introduction` 页面有一个实时显示当前时间的组件,我们可以通过 `NoSSR` 组件实现页面局部的 CSR。关键代码如下:
```js title="introduction.tsx" {2,23-25}
import { useState, useEffect } from 'react';
import { NoSSR } from '@modern-js/runtime/ssr';
//...
const Introduction = () => {
const [time, setTime] = useState(new Date().toString());
// ...
useEffect(() => {
const timerId = setInterval(() => {
setTime(new Date().toString());
}, 1000);
return () => {
clearInterval(timerId);
};
}, []);
return (
<div>
// ...
<NoSSR>
<div>Current time: {time}</div>
</NoSSR>
</div>
);
};
export default Introduction;
```
## 配置 Favicon 等通用静态资源
在 `config/` 目录下,添加 `favicon.ico` 图标文件,构建生成的 HTML 页面将包含 Favicon 信息。
在 `config/public` 目录下,可以放置任意格式的静态资源化文件,文件会被 Serve 在应用同域名下。
:::info 补充信息
关于静态资源的更多使用方法,请参考配置 【[`config/public`](/docs/apis/hooks/mwa/config/public)】。
:::
## 自定义 HTML
Modern.js 支持修改默认使用的 HTML 模板文件。
例如,当我们需要集成 Google Analytics 等工具,统计分析用户的行为信息。我们可以通过自定义项目使用的 HTML 模板,在模板中添加相关工具的 JS SDK 引用代码,实现集成。
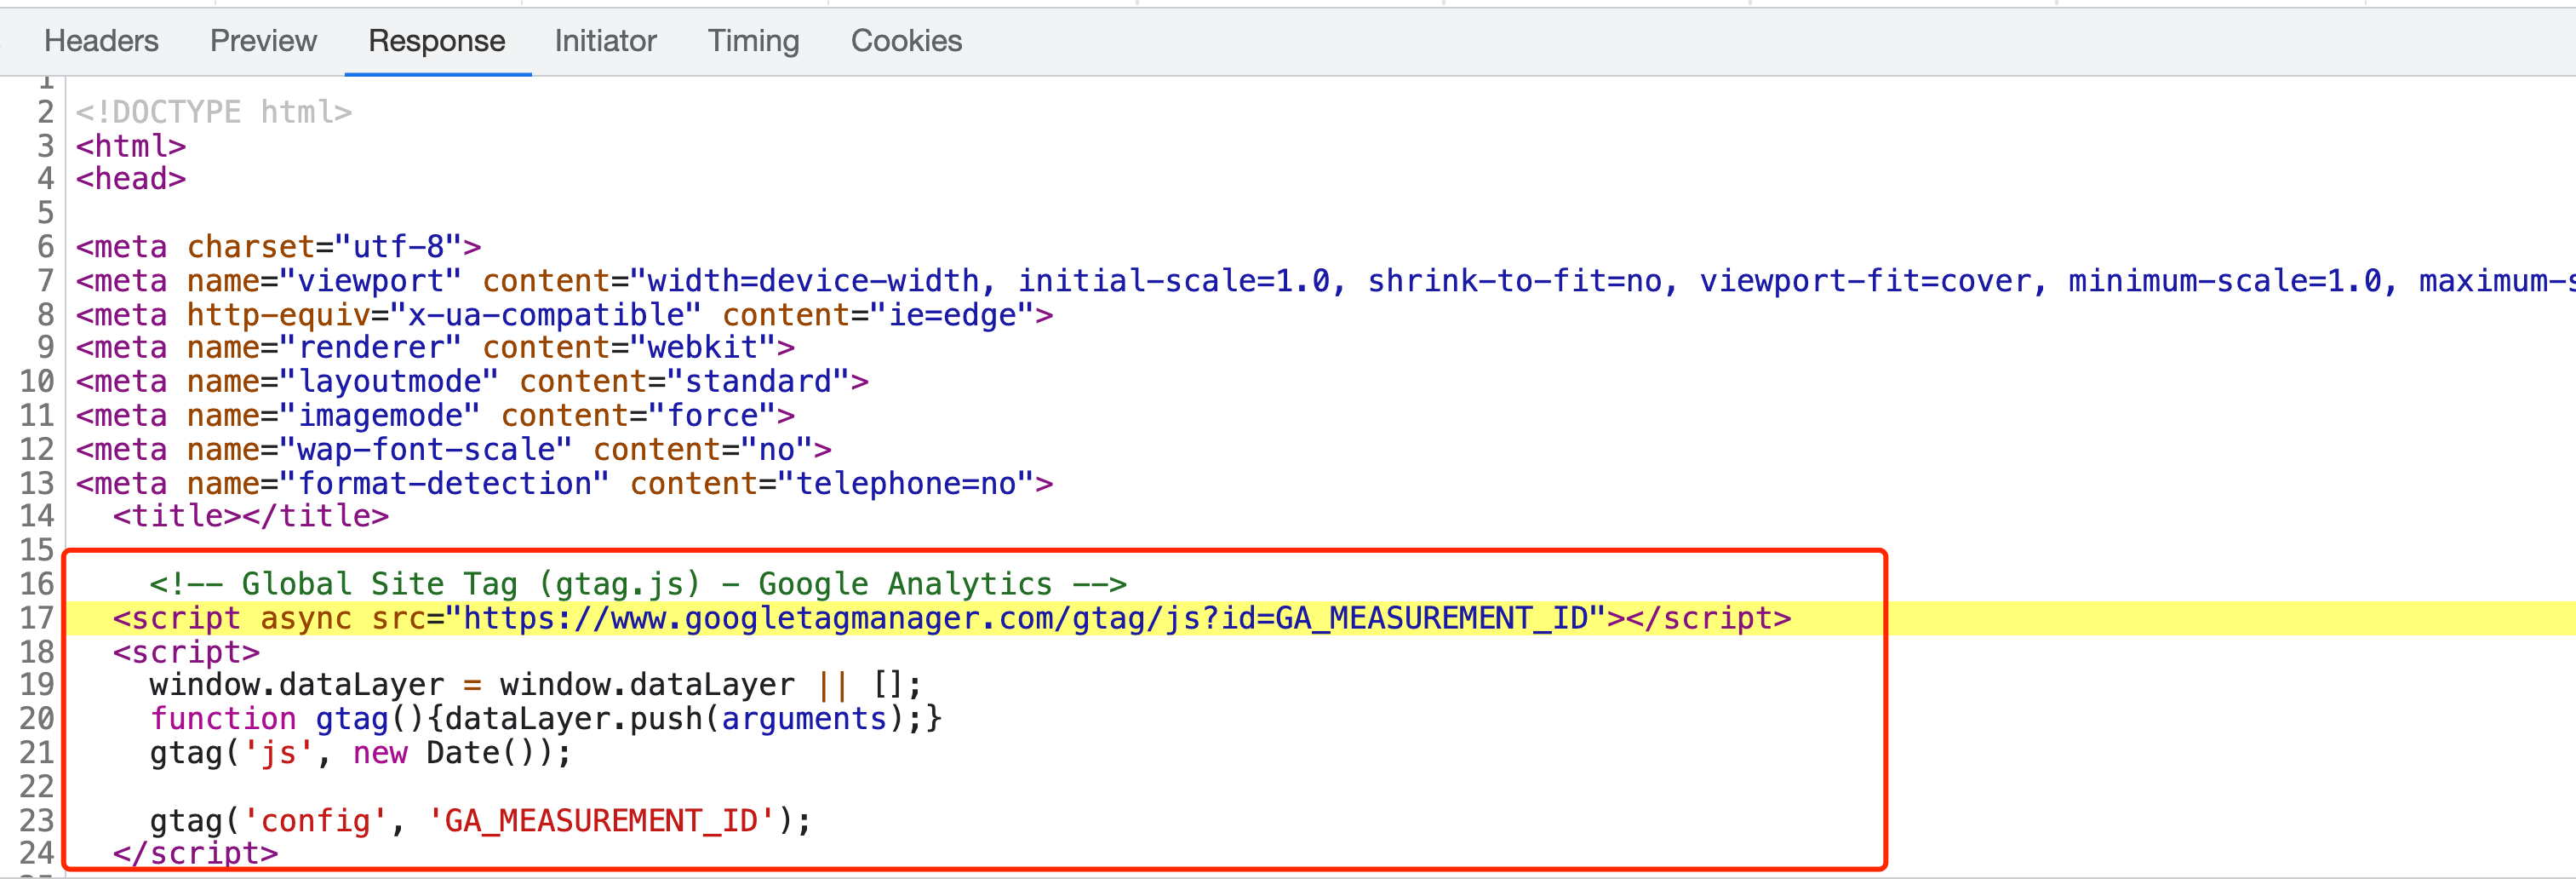
以 Google Analytics 为例,我们新建 `config/html/top.html` 文件,内容如下:
```js
<!-- Global Site Tag (gtag.js) - Google Analytics -->
<script async src="https://www.googletagmanager.com/gtag/js?id=GA_MEASUREMENT_ID"></script>
<script>
window.dataLayer = window.dataLayer || [];
function gtag(){dataLayer.push(arguments);}
gtag('js', new Date());
gtag('config', 'GA_MEASUREMENT_ID');
</script>
```
在构建生成的 HTML 页面 `<head>` 标签内,将包含上面的代码,如下图所示:
:::info 补充信息
更多信息,请参考【[自定义 HTML 模板](/docs/guides/usages/basic-configuration/html)】。
:::
## 测试
Modern.js 内置 [Jest](https://jestjs.io/) 、[Testing Library](https://testing-library.com/) 等测试库/框架,提供单元测试、组件/页面集成测试、业务模型 Model 测试等功能。
使用测试功能,需要先开启该功能。在项目根目录下,执行 `pnpm run new`,进行如下选择:
```bash
? 请选择你想要的操作: 启用可选功能
? 启用可选功能: 启用「单元测试 / 集成测试」功能
```
现在,我们对首页做集成测试。在 `src/` 目录下新建 `__tests__` 目录,用于放置测试用例,编写测试用例 `index.test.tsx`:
```js title="index.test.tsx"
import { renderApp } from '@modern-js/runtime/testing';
import Index from '../pages/index';
describe('home page', () => {
it('should have contents', () => {
const { getByText } = renderApp(<Index />);
expect(getByText('Powered by Modern.JS')).toBeInTheDocument();
});
});
```
默认情况下,`src/` 目录下文件名匹配规则 `*.test.(t|j)sx?` 的文件都会被识别为测试用例。执行 `pnpm run test`,会运行项目下的所有测试用例。
:::info 补充信息
更多用法,请参考【[Testing API](/docs/apis/runtime/testing/render)】。
:::
## 部署
import Deploy from '@site/docs/components/deploy.md';
<Deploy/>