tagui
Version:
Command-line tool for digital process automation (RPA)
300 lines (240 loc) • 26.5 kB
Markdown
# TagUI
TagUI is a general purpose tool for automating web interactions ~ http://tebel.org
### FEATURES
- automate Chrome, Firefox, PhantomJS
- unzip and run on macOS, Linux, Windows
- natural language with JavaScript support
- Chrome extension for recording steps
- object repositories / flexible datatables
- intelligent XPath/CSS element selector
- visual automation of website and desktop
- live mode to try steps or code in real-time
- option to auto-upload run results online
- run by schedule, command line, API URL
- advanced outgoing API calls to webservices
# Why This
The goal of web automation is to reproduce cognitive interactions that you have with websites so that your laptop or server can do it for you, base on your schedule or conditions. TagUI helps you rapidly automate your repetitive or time-critical tasks - use cases include process automation, data acquisition and testing of web apps.
This is a full-feature and free open-source tool, so there's nothing to upgrade to or any paid subscription. To feedback suggestions or bugs, [raise an issue](https://github.com/tebelorg/TagUI/issues) or email ken@tebel.org. Originally developed by a test automation engineer to avoid writing chunks of code when automating web interactions.
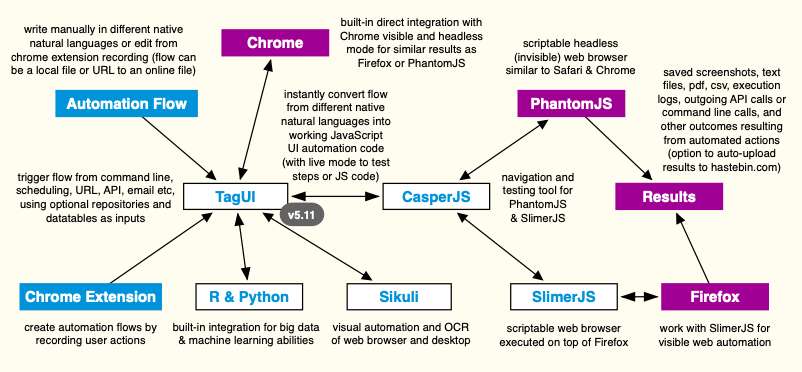
### HOW IT WORKS
TagUI converts your intentions in simple natural language into lines of working JavaScript code that perform web automation. Under the hood, it uses CasperJS, PhantomJS & SlimerJS. As an example, TagUI will instantly convert the automation flow below into 100+ lines of JavaScript code and automatically perform the steps to download a report. This makes it easy for rapid prototyping, deployment and maintenance of web automation.
```
https://www.typeform.com
click login
type username as user@gmail.com
type password as 12345678
click btnlogin
hover Test Event
click action results tooltip
click section_results
download https://admin.typeform.com/form/2592751/analyze/csv to report.csv
```
The automation flow can be triggered from scheduling, command line, API URL, email etc. Everything happens headlessly in the background without seeing any web browser, so that you can continue using the computer or server uninterrupted. Running on a visible web browser is also supported, using Chrome or Firefox browser (see chrome or firefox option below). API calls can be made with a single line to integrate with other applications.
If you know JavaScript and want to be more expressive, you can even use JavaScript directly in the flow. If not, you will still enjoy friendly but powerful features such as repositories to store your reusable objects, flexible datatables for batch automation, and a Chrome extension which creates automation flows by recording your actions. For rapid prototyping, there's also an interactive live mode for trying out TagUI steps or JavaScript code in real-time. TagUI has built-in integration with Chrome / headless Chrome directly, which also works in live mode.
There is automatic waiting for web elements to appear + error-checking + nesting of JavaScript code blocks. Not forgetting the option to run automation flows hosted online or auto-upload run results online for sharing. TagUI also supports visual automation of website and desktop through built-in integration with Sikuli. Instead of using element identifiers, images can be used to identify user interface elements to interact with.
# Set Up
TagUI is in v2.0 and runs on macOS, Linux, Windows ([link to release notes](https://github.com/tebelorg/TagUI/releases))
### PACKAGED INSTALLATION
Easiest way to use TagUI - no setup is needed, all dependencies are packaged in
Platform|macOS|Linux|Windows|Node.js
:------:|:---:|:---:|:-----:|:-----:
Package|[unzip and run](https://raw.githubusercontent.com/tebelorg/Tump/master/TagUI_macOS.zip)|[unzip and run](https://raw.githubusercontent.com/tebelorg/Tump/master/TagUI_Linux.zip)|[unzip and run](https://raw.githubusercontent.com/tebelorg/Tump/master/TagUI_Windows.zip)|[npm install tagui](https://www.npmjs.com/package/tagui)
Optional - configure web browser settings in tagui_config.txt, such as browser resolution, step timeout of 10s etc
### MANUAL INSTALLATION
If you prefer to download dependencies manually from respective websites
1. PhantomJS (headless scriptable web browser) - http://phantomjs.org
2. CasperJS (navigation/testing for PhantomJS) - http://casperjs.org
3. SlimerJS (scriptable web browser for Firefox) - https://slimerjs.org
4. TagUI (general purpose web automation tool) - https://git.io/vMCTZ
5. PHP (only required for manual Windows setup) - http://windows.php.net
Tip - recommend putting TagUI to a folder path without spaces (some dependencies have issue with that). for manual Windows setup, 1. set SLIMERJS_EXECUTABLE env variable to point to slimerjs.bat, 2. put [GNU utilities](http://unxutils.sourceforge.net) (cut / gawk / grep / head / sort / tail / tee), [curl ssl](https://curl.haxx.se) in tagui\src\unx, 3. add phantomjs\bin, casperjs\bin, php folders to path
# To Use
### COMMAND LINE
```
./tagui flow_filename option(s) for macOS/Linux, tagui flow_filename option(s) for Windows
```
- Flow filename (and its .csv) can be a local file or the URL of an online file
- Automation flow filename can have no extension, .gui or .txt file extension
- Objects, keywords, datatables can be defined in flow_filename.csv (optional)
Option|Purpose
:----:|:------
IMPORTANT|SAVE YOUR WORK BEFORE USING CHROME OR HEADLESS, TAGUI WILL RESTART CHROME
headless|run on invisible Chrome web browser instead of default PhantomJS (first install [Chrome](https://www.google.com/chrome/))
chrome|run on visible Chrome web browser instead of invisible PhantomJS (first install Chrome)
firefox|run on visible Firefox web browser instead of invisible browser (first install [Firefox](https://www.mozilla.org/en-US/firefox/new/))
upload|upload automation flow and result to [hastebin.com](https://hastebin.com) (expires 30 days after last view)
report|web report for sharing of run results on webserver (default is only a text log file)
debug|show run-time backend messages from PhantomJS for detailed tracing and logging
quiet|run without output except for explicit output (echo / show / check / errors etc)
test|professional testing using [CasperJS assertions](http://docs.casperjs.org/en/latest/modules/tester.html) (TagUI smart tx('selector') usable)
input(s)|add your own parameter(s) to be used in your automation flow as variables p1 to p9
Tip - to run tagui from anywhere in macOS/Linux, use ln -sf /full_path/tagui/src/tagui /usr/local/bin/tagui to create symbolic link. to run tagui from anywhere in Windows, add tagui/src [folder to path](http://lmgtfy.com/?q=add+to+path+in+windows). then tagui will be accessible from any folder. if you have issue running visible automation using Firefox/SlimerJS [check this setting](https://docs.slimerjs.org/current/installation.html#using-unstable-version-or-very-old-versions-of-firefox).
### BY SCHEDULING
To schedule an automation flow in crontab (macOS/Linux), for example at 8am daily
```
0 8 * * * /full_path_on_your_server/tagui flow_filename option(s)
```
Tip - for Windows, use Task Scheduler instead (search schedule from Start Menu)
### CHROME EXTENSION
Download from [Chrome Web Store](https://chrome.google.com/webstore/detail/tagui-web-automation/egdllmehgfgjebhlkjmcnhiocfcidnjk/) to use TagUI Chrome web browser extension for recording automation flows. TagUI Chrome extension is based on [Resurrectio tool](https://github.com/ebrehault/resurrectio) and records steps such as page navigation, clicking web elements and entering information. To start recording automation flows, click TagUI icon on your Chrome toolbar. Right-click for shortcuts to various TagUI steps, such as capturing webpage or element screenshot. The recording is not foolproof. It is meant to simplify flow creation with some edits, instead of typing everything manually. [See this video](https://www.youtube.com/watch?v=bFvsc4a8hWQ) for an example of recording sequence of steps, editing for adjustments and playing back the automation.
### VISUAL AUTOMATION
TagUI has built-in integration with [Sikuli (base on OpenCV)](http://sikulix.com) to allow identifying web elements and desktop user interface elements for interaction. Steps that support visual automation are tap / click, hover / move, type / enter, select / choose. Simply specify an image filename (.png or .bmp format) of what to look for visually, in place of the element identifier, to use visual automation alongside your usual automation steps. Powerful stuff.
Sikuli is excluded from TagUI packaged installation due to complex dependencies that are handled by its installer. [Download Sikuli](http://sikulix.com/quickstart/) to tagui/src/tagui.sikuli folder and setup (choose option 1 - Pack1). Relative paths are supported for image filenames (eg pc.png, images/button.bmp). A screen (real or Xvfb) is needed for visual automation.
### FLOW SAMPLES
Following automation flow samples ([tagui/src/samples folder](https://github.com/tebelorg/TagUI/tree/master/src/samples)) are included with TagUI
Flow Sample |Purpose
:-----------|:------
1_yahoo|searches github on Yahoo and captures screenshot of results
2_twitter|goes to a Twitter page and saves some profile information
3_github|goes to a GitHub page and downloads the repo using 2 ways
4_conditions|goes through examples of using conditions in natural language
5_repositories|shows using repositories on Russian social media site VK.com
6_datatables|set of flows uses datatables to retrieve and act on GitHub info
7_testing|shows how to use check step and CasperJS test assertions
8_hastebin|used by upload option to upload flow result to hastebin.com
9_misc|shows how to use steps popup, frame, dom, js, { and } block
# Cheat Sheet
### AUTOMATION WORKFLOW
- What happens behind the scenes when you run an automation flow
### STEPS DESCRIPTION
- TagUI auto-waits for a webpage element to appear and interacts with it as soon as it appears
- Element identifier can be auto-recorded using TagUI Chrome extension, or [found from web browser](https://help.surveygizmo.com/help/how-to-find-element-ids-to-use-with-javascript)
- TagUI auto-selects provided identifier in this order - xpath, css, id, name, class, title, aria-label, text(), href
Step|Parameters (separator in bold)|Purpose
:---|:-----------------------------|:------
tap / click|element to click|click on an element
hover / move|element to hover|move cursor to element
type / enter|element to type ***as*** text to type ([enter] = enter key)|enter element as text
select / choose|element to select ***as*** option value to select|choose dropdown option
read / fetch|element to read (page = webpage) ***to*** variable name|fetch element text to variable
show / print|element to read (page = webpage, ie raw html) |print element text to output
save|element (page = webpage) ***to*** optional filename|save element text to file
echo|text (in quotation marks) and variables|print text/variables to output
dump|text and variables ***to*** optional filename|save text/variables to file
snap|element (page = webpage) ***to*** optional filename|save screenshot to file
download|url to download ***to*** filename to save|download from url to file
receive|url keyword to watch ***to*** filename to save|receive resource to file
wait|optional time in seconds (default is 5 seconds)|explicitly wait for some time
live|try steps or code interactively in Chrome / PhantomJS|enter live mode ([firefox pending](https://github.com/laurentj/slimerjs/issues/188))
check|condition **|** text if true **|** text if false (text in quotes)|check condition and print result
frame|frame name **|** subframe name if any|next step or block in frame/subframe
popup|url keyword of popup window to look for|next step or block in popup window
{ and }|use { to start block and } to end block|define step/code block
api|full url (including parameters) of api call|call api save response to api_result
dom|javascript code for document object model|run code in dom save to dom_result
js|javascript statements (skip auto-detection)|treat as JS code explicitly
//|user comments (ignored during execution)|add user comments
Tip - to use variables where text is expected, '+variable+' can be used. as default execution context is local, to run javascript on webpage dom (eg document.querySelector) use dom step. xpath is an expressive way to identify web elements. if you know xpath and using xpath for element identifier, use double quotes for text //\*[@title="Login"]
### CONDITIONS EXAMPLES
- Conditions can be expressed in natural language (optional brackets) or [JavaScript](https://www.w3schools.com/js/)
- Write text in quotation marks (either " or ' works) to differentiate text from variable names
- { and } block is required after for / while, auto-wait disables in while loop (will hang CasperJS)
Condition (in natural language)|JavaScript
:------------------------------|:---------
example - if day equals to "Friday"| if (day == "Friday")
example - if menu contains "fruits"| if (menu.indexOf("fruits")>-1)
example - if A more than B and C not equals to D | if ((A > B) && (C != D))
example - for n from 1 to 4 | for (n=1; n<=4; n++)
example - while cupcakes equal to 12| while (cupcakes == 12)
contain|.indexOf("text")>-1
not contain|.indexOf("text")\<0
equal to|==
not equal to|!=
more than / greater than / higher than|>
more than or equal to / greater than or equal to / higher than or equal to|>=
less than / lesser than / lower than|<
less than or equal to / lesser than or equal to / lower than or equal to|<=
and|&&
or|||
Tip - use { and } step to define step/code blocks for powerful repetitive automation with for loop. conversion to CasperJS blocks syntax happens automatically. when using contain / equal, you can write with or without s behind
### REPOSITORIES
- Repositories help to make objects or steps reusable and improve readability
- Save repository file with same name as your flow filename and with .csv behind
- Repository must have 2 columns, for example below (headers up to you to name)
- Using \`object\` in your flow replaces it with its definition (which can contain objects)
- For example, \`type email\` becomes type user-email-textbox as user@gmail.com
OBJECT|DEFINITION
:-----|:---------
email|user-email-textbox
create account|btn btn--green btn-xl signup-btn
type email|type \`email\` as user@gmail.com
### DATATABLES
- Datatables extend the power of repositories files to manage batch automation
- TagUI loops through each column to automate using values from different datasets
- Eg, echo "TESTCASE - \`testname\`" in your flow shows TESTCASE - Trade USDSGD
- Data-centric approach with rows representing data fields (usually row = test case)
TEST TRADES|TEST #1|TEST #2|TEST #3
:----------|:------|:------|:------
testname|Trade USDSGD|Trade USDJPY|Trade EURUSD
username|test_account|test_account|test_account
password|12345678|12345678|12345678
currency-pair|USDSGD|USDJPY|EURUSD
size|10000|1000|100000
direction|BUY|SELL|BUY
# Developers Reference
TagUI is a young tool and it tries to do the specific task of automating web interactions very well (especially process automation). It's designed to make prototyping, deployment and maintenance of web automation easier by minimizing iteration time for each phase. While TagUI can be used for test automation or data-scraping, there are some resources below which may be better fits for these goals.
For test automation, there are already very established open-source tools/frameworks with mature and supportive ecosystems, which you can find out more what's current from resources such as this [test automation list](https://github.com/atinfo/awesome-test-automation). For data-scraping, there are various open-source projects just to handle that very well, which you can find out more by searching [crawler topic on GitHub](https://github.com/search?utf8=✓&q=topic%3Acrawler&type=Repositories). There's even a tool for extracting and curating articles, [how cool is that](https://github.com/codelucas/newspaper).
### API
Automation flows can also be triggered via API URL. TagUI has an API service and runner for managing a queue of incoming requests via API. To set up, add a crontab entry on your server with the desired frequency to check and process incoming service requests. Below will check every 15 minutes and run pending flows in the queue. If there's an automation in progress, TagUI will wait for the next check instead of concurrently starting a new run.
```
0,15,30,45 * * * * /full_path_on_your_server/tagui_crontab
```
To call an automation flow from your application or web browser, use below API syntax. Custom input(s) supported. Automation flows can also be triggered from emails using the API. For email integration, [install Tmail](https://github.com/tebelorg/Tmail). It's an open-source mailbot to act on incoming emails or perform mass emailing; it also delivers emails by API. Emails with run-time variables can be sent directly from your flow with a single line (see flow sample 6C_datatables).
```
your_website_url/tagui_service.php?SETTINGS="flow_filename option(s)"
```
Besides integrating with web applications, TagUI can be extended to integrate with hardware (eg Arduino or Raspberry Pi) for physical world interactions or machine learning service providers for AI decision-making ability. Input parameters can be sent to an automation flow to be used as variables p1 to p9. Output parameters from an automation flow can be sent to your Arduino or application API URL (see samples 3_github and 6C_datatables).
For making outgoing API calls in your automation flow, to feed data somewhere or send emails etc, use the api step followed by full URL (including parameters) of the API call. Response from the API will be saved in api_result variable. If the API response is JSON data, the variable api_json will be created for easy access to JSON data elements. For example, api_json.parent_element.child_element retrieves value of child_element. If not, api_json will be null.
```js
api_config = {method:'PUT', header:['Header1: value1','Header2: value2'], body:{'id':123,'pwd':'abc'}};
```
For advanced API calls, you can set above variable api_config which defaults as `{method:'GET', header:[], body:{}}`. Besides GET, you can use other methods such as POST, PUT, DELETE etc. You can define multiple headers in the format `'Header_name: header_value'` and provide a payload body for PUT requests for example. You can set it like above before using the api step, or set using `api_config.method = 'PUT';` and `api_config.header[0] = 'Header1: value1';` etc. `api_config.body` will be automatically converted to JSON format for sending to API endpoint.
### CHROME
TagUI has built-in integration with Chrome web browser to run web automation in visible or headless mode. It uses a websocket connection to directly communicate automation JavaScript code and information to Chrome.
To develop new custom methods for Chrome integration, see this [TagUI issue](https://github.com/tebelorg/TagUI/issues/24#issuecomment-312361674) and [tagui_header.js](https://github.com/tebelorg/TagUI/blob/master/src/tagui_header.js) for examples of websocket calls from TagUI to Chrome (via Chrome Debugging Protocol). The function chrome_step(method, params) sends message to Chrome and returns the response. You will see examples from simple websocket calls such as getting webpage title to stacked ones such as handling of frame or popup window. To tweak how TagUI launches / kills Chrome and the integration PHP process, see TagUI runner script for [macOS/Linux](https://github.com/tebelorg/TagUI/blob/master/src/tagui) or [Windows](https://github.com/tebelorg/TagUI/blob/master/src/tagui.cmd).
Probably the best way to see the websocket communication in action is to enter TagUI live mode (add live step in your automation flow), then tail -f tagui_chrome.log in another terminal to see the Chrome Debugging Protocol messages going to and fro as you enter TagUI steps or JavaScript code. If you are running on Windows, you can click on the PHP process window directly to see the messages.
At run-time TagUI will start a PHP thread in the background to manage the integration with Chrome for concurrent communication. The [Textalk PHP websocket](https://github.com/Textalk/websocket-php) is used as it is super-light and most importantly, it works even without any update for 2 years. The normal approach to integrate with Chrome is through [chrome-remote-interface](https://github.com/cyrus-and/chrome-remote-interface) project or tools [such as Chromy](https://github.com/OnetapInc/chromy) which is based on chrome-remote-interface. However, that approach introduces Node.js dependency which means users without a Node.js development environment cannot run TagUI with Chrome. Outside of JavaScript ecosystem, there are also tools like [chromedp in Go language](https://github.com/knq/chromedp) to integrate with Chrome.
In order to retain TagUI unzip and run functionality, the approach of launching a [separate PHP thread](https://github.com/tebelorg/TagUI/blob/master/src/tagui_chrome.php) is chosen. Since the TagUI [natural language interpreter](https://github.com/tebelorg/TagUI/blob/master/src/tagui_parse.php) is already written in PHP, there is no new dependency. Also, doing websocket communication within the single-threaded JavaScript environment used by CasperJS is not possible as it involves a redesign of fundamental CasperJS methods such as casper.exists to support async/await or use JavaScript promises which are not yet supported by CasperJS (for compatibility with [latest PhantomJS](https://github.com/casperjs/casperjs/issues/1663#issuecomment-285952446)).
Like chrome-remote-interface, TagUI communicates with Chrome through [Chrome Debugging Protocol](https://chromedevtools.github.io/devtools-protocol/). The protocol is primarily designed for debugging the web browser instead of web automation, so many methods are still in experimental status. However, the API is stable enough for TagUI steps to work with Chrome. When chrome or headless option is used, TagUI replaces CasperJS methods it uses with custom methods to talk to Chrome instead of PhantomJS. When firefox option is used or by default, TagUI doesn't invoke custom methods and PHP process.
### TESTING
The step check allows simple testing of conditions. For professional test automation, CasperJS comes with a tester module for unit and functional testing purpose. To use the advanced testing features, run TagUI with test option. As CasperJS is not yet [supporting Chrome](https://github.com/casperjs/casperjs/issues/1825), below won't work when chrome or headless option is used.
CasperJS test scripts are inherently different in structure and syntax from its usual automation scripts. With the test option, TagUI automatically sets up your automation flow to work as a test script. CasperJS will output a XUnit XML file, which is compatible with continuous integration tools such as Jenkins.
TagUI allows you to reuse the same flow for testing or automation by running it with or without the test option. Below are examples of CasperJS test assertions written in JavaScript code that can be used directly in your automation flow (after navigating using usual flow steps). As this is direct CasperJS code, there is no auto-wait. You can use the wait step to explicitly wait for a few seconds for steps which take a long time for web-server to respond.
```js
test.assertTextExists('ABOUT','Check for ABOUT text');
test.assertSelectorHasText(tx('header'), 'Interface automation','Check for phrase in header element');
```
For the list of 30+ expressive test assertions built into CasperJS, [click here](http://docs.casperjs.org/en/latest/modules/tester.html). To know more about CasperJS testing framework, [click here](http://docs.casperjs.org/en/latest/testing.html). As TagUI allows you to write JavaScript code directly within the automation flow, advanced testing or coding techniques that can be implemented in CasperJS should work directly within your flow.
TagUI recognizes most JavaScript code. In the event you get an error saying that it cannot understand the step for your JavaScript line, raise an issue or modify the source code ([tagui_parse.php](https://github.com/tebelorg/TagUI/blob/master/src/tagui_parse.php) is where interpretation of natural language to CasperJS JavaScript code takes place). Alternatively, use step js to explicitly declare that whatever follows on that line is JavaScript code and ensure that the line is not treated as a TagUI step.
### FILES
Filename |Purpose
:--------|:------
tagui|main runner for TagUI web automation
tagui.cmd|main runner for Windows platform
tagui_chrome.php|PHP thread for Chrome integration
tagui_chrome.in|interface in-file for Chrome integration
tagui_chrome.out|interface out-file for Chrome integration
tagui_chrome.log|log for Chrome websocket transactions
tagui_config.txt|web browser settings used for automation
tagui_crontab|to run service request batch from crontab
tagui_footer.js|template for CasperJS / integrations code
tagui_header.js|template for CasperJS / integrations code
tagui_parse.php|to interpret natural language into code
tagui_report.php|to generate html report from text log
tagui_runner.php|retrieving service requests from queue
tagui_service.php|receiving service requests into queue
tagui_service.in|log to track incoming service requests
tagui_service.out|log to track processed service requests
tagui_service.log|log to track service requests history
tagui_service.act|service request batch ready to execute
tagui_service.run|service request batch currently running
tagui_service.done|service request batch finished running
tagui.py|interface for Sikuli visual automation
tagui.log|log for Sikuli Python transactions
tagui_sikuli.in|interface in-file for Sikuli integration
tagui_sikuli.out|interface out-file for Sikuli integration
# Be a Force for Good
TagUI default config does not hide identity as an automated user
# License
TagUI is open-source software released under the MIT license