tagui
Version:
Command-line tool for digital process automation (RPA)
267 lines (202 loc) • 19.2 kB
Markdown
**TagUI is a command-line tool for digital process automation. This branch of automation is commercially known as RPA (robotic process automation), and aims to reproduce user interactions with computer applications - for example mouse clicks and keyboard entries. For more info and documentation, visit TagUI [repository page](https://github.com/kelaberetiv/TagUI).**
# [Setup](https://github.com/kelaberetiv/TagUI#set-up)
*In this section, we'll download and install TagUI on your computer - it works on Windows, macOS, Linux.*
- TagUI is easy to use right away, in most environments all dependencies are packaged in
- To use [visual automation](https://github.com/kelaberetiv/TagUI#visual-automation) on desktop or browser, be sure to have Java JDK v8 (64-bit) or later
Platform|macOS|Linux|Windows|Node.js (macOS/Linux)
:------:|:---:|:---:|:-----:|:-------------------:
Package|[unzip and run](https://github.com/tebelorg/Tump/releases/download/v1.0.0/TagUI_macOS.zip)|[unzip and run](https://github.com/tebelorg/Tump/releases/download/v1.0.0/TagUI_Linux.zip)|[unzip and run](https://github.com/tebelorg/Tump/releases/download/v1.0.0/TagUI_Windows.zip)|[npm install tagui](https://www.npmjs.com/package/tagui)
**Recommended locations to unzip to**
- Windows - c:\
- macOS - desktop
- Linux - /home/your_id
> avoid spaces in the folder path as some components of TagUI don't work well with spaces in folder and file names
> optional - configure web browser settings in tagui_config.txt, such as browser resolution, step timeout of 10s etc
# [Using it (overview)](https://github.com/kelaberetiv/TagUI#to-use)
*In this section, we'll have a guided walkthrough on running TagUI, using its Chrome extension, and some examples.*
### COMMAND LINE
`tagui flow_filename option(s)` for Windows
`./tagui flow_filename option(s)` for macOS/Linux
- Flow filename can be a local file or the URL of an online file
- Filename can have no extension, .txt or .js or .tagui extension
- Type tagui without parameters to see its version and options
Log files (.log .raw .js) are created after running. To turn off, put an empty file tagui_no_logging in tagui/src folder.
> If your command prompt or terminal font size is too small, you can set it to much larger font sizes for easier reading.
> Below example will run a script to perform a search on Yahoo website and capture a screenshot of the results.
**Windows** - unzip the tagui folder to c:\\. Open command prompt with Start Menu -> type run -> type cmd and enter
```
c:
cd c:\tagui\src
tagui samples\1_yahoo
```
**macOS** - unzip the tagui folder to your desktop. Open terminal from Apps -> Utilities -> Terminal and enter commands
```
cd /Users/your_id/Desktop/tagui/src
./tagui samples/1_yahoo
```
**Linux** - unzip the tagui folder to a convenient folder on your laptop for example /home/your_id and enter commands
```
cd /home/your_id/tagui/src
./tagui samples/1_yahoo
```
> if the script works successfully, you will notice five .png files - congratulations, you have run your first TagUI script!
**Troubleshooting potential exceptions**
- For Windows computers, if you see 'MSVCR110.dll is missing' error, install [this from Microsoft website](https://www.microsoft.com/en-us/download/details.aspx?id=30679) (choose vcredist_x86.exe) - this file is required to run the Windows PHP engine packaged with TagUI.
- For some newer macOS versions, if you get a 'dyld: Library not loaded' error, [install OpenSSL in this way](https://github.com/kelaberetiv/TagUI/issues/86#issuecomment-372045221).
- For some flavours of Linux (Ubuntu for example), which do not have PHP pre-installed, google how to install PHP accordingly (eg Ubuntu, apt-get install php). Most Linux distributions would already come with PHP.
- For Firefox automation, download an [older version here](https://ftp.mozilla.org/pub/firefox/releases/59.0/) (SlimerJS doesn't work with Firefox v60 onwards).
Now, you can try the same automation script with Chrome browser by running with chrome option (for Windows enter `tagui samples\1_yahoo chrome`, for macOS/Linux enter `./tagui samples/1_yahoo chrome`). The automation will now run in the foreground instead, so you'll be able to see the navigation on Yahoo and DuckDuckGo websites.
TagUI can also be run from desktop icons, scheduled tasks, or REST API calls.
<details>
<summary>
Click to show the command line options for TagUI tool and their purposes
</summary>
Option|Purpose
:----:|:------
chrome|run on visible Chrome web browser instead of invisible PhantomJS (first install [Chrome](https://www.google.com/chrome/))
headless|run on invisible Chrome web browser instead of default PhantomJS (first install Chrome)
firefox|run on visible Firefox web browser instead of invisible browser (first install [Firefox](https://www.mozilla.org/en-US/firefox/new/))
report|track run result in tagui/src/tagui_report.csv and save html log of automation execution
upload|upload automation flow and result to [hastebin.com](https://hastebin.com) (expires 30 days after last view)
speed|skip 3-second delay between datatable iterations (and skip restarting of Chrome)
quiet|run without output except for explicit output (echo / show / check / errors etc)
debug|show run-time backend messages from PhantomJS mode for detailed tracing and logging
test|testing with check step test assertions for CI/CD integration (output XUnit XML file)
baseline|output execution log and relative-path output files to a separate baseline directory
input(s)|add your own parameter(s) to be used in your automation flow as variables p1 to p9
data.csv|specify a csv file to be used as the datatable for batch automation of many records
</details>
<details>
<summary>
Click to show info on automation logs, and how to run tagui from any directory
</summary>
After each automation run, a .log file will be created to store output of the execution, a .js file is the generated JavaScript file, a .raw is the expanded flow after reading in any module sub-scripts that are called in that flow. These files are for user reference purpose and can be helpful in debugging or troubleshooting the automation flow. To turn off creation of these files, put an empty file tagui_no_logging in tagui/src folder.
**To run tagui from anywhere**
- For MacOS/Linux, use ln -sf /full_path/tagui/src/tagui /usr/local/bin/tagui to create symbolic link
- For Windows, add tagui/src [folder to path](http://lmgtfy.com/?q=add+to+path+in+windows), then tagui will be accessible from any folder
</details>
<details>
<summary>
Click to show how to run TagUI scripts by double-clicking as desktop icons
</summary>
To do that on Windows, create a .cmd or .bat file with contents like the following, which goes to the directory where you want to run the automation, and run tagui command on the file with your specified options. Double-clicking the .cmd or .bat file will start automation. You can also [associate .tagui files directly](https://www.digitaltrends.com/computing/how-to-set-default-programs-and-file-types-in-windows-10) to be opened by tagui\src\tagui.cmd command.
```
@echo off
c:
cd c:\folder
tagui filename quiet speed chrome
```
To do that on macOS / Linux, create a file with contents like the following, which goes to the directory where you want to run the automation, and run tagui command on the file with your specified options. You will need to use the command chmod 700 on the file to give it execute permissions, so that it can be run by double-clicking on it.
```
cd /Users/username/folder
tagui filename quiet speed chrome
```
</details>
### BY SCHEDULING
To schedule an automation flow with crontab (macOS/Linux), for example at 8am daily
```
0 8 * * * /full_path_on_your_server/tagui flow_filename option(s)
```
**Tip** - for Windows, use Task Scheduler (search schedule from Start Menu) or [Z-Cron freeware](https://www.z-cron.com)
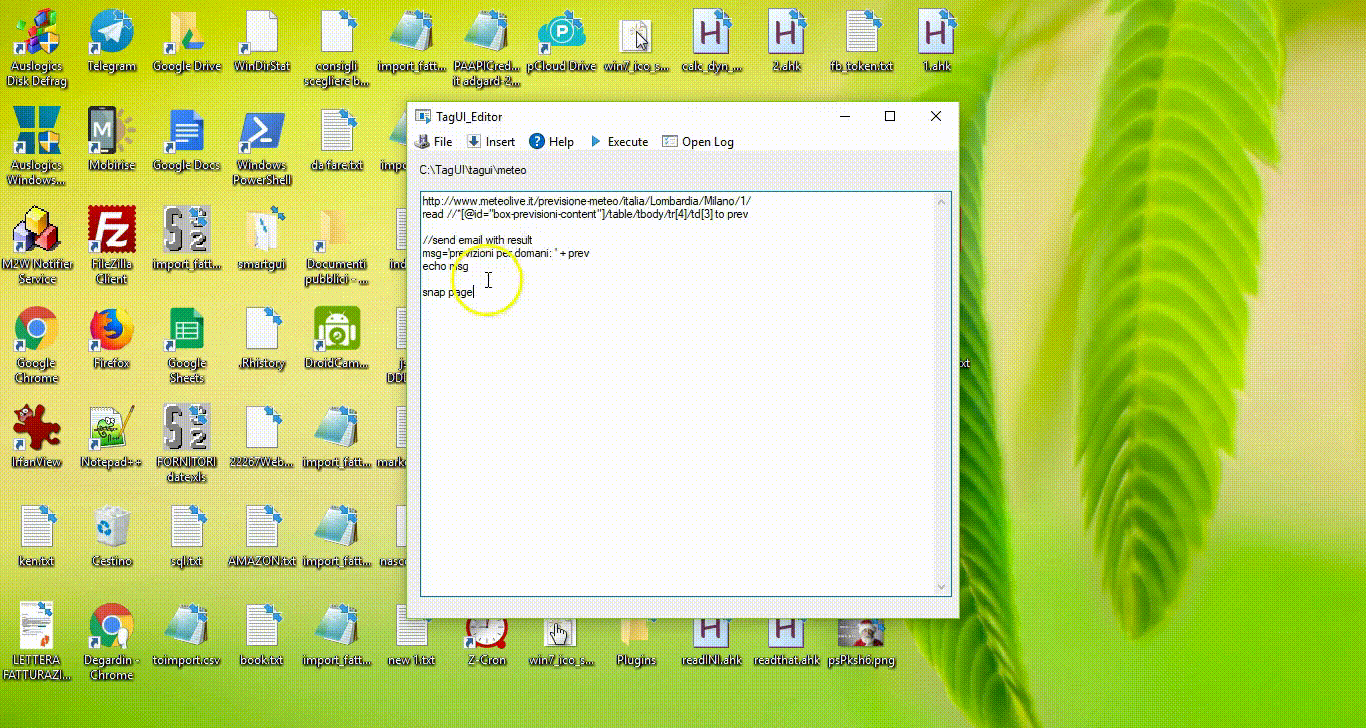
### TAGUI WRITER, SCREENSHOTER & EDITOR
TagUI Writer is a Windows app created by Arnaud Degardin / [@adegard](https://github.com/adegard) which makes it easy to write TagUI scripts. By pressing Ctrl + Left-click, a popup menu will appear with the list of TagUI steps for you to paste into your text editor. Arnaud also created a ScreenShoter app which makes it easy to capture snapshots for TagUI visual automation. Lastly, TagUI Editor allows you to edit and run TagUI scripts via AutoHotKey. To download, [click here](https://github.com/adegard/tagui_scripts).
### CHROME EXTENSION
Download from [Chrome Web Store](https://chrome.google.com/webstore/detail/tagui-web-automation/egdllmehgfgjebhlkjmcnhiocfcidnjk/) to use TagUI Chrome web browser extension for recording automation flows. TagUI Chrome extension records steps such as page navigation, clicking web elements and entering information.
**To start recording automation flows**
1. Go to the website URL you want to start the automation at
2. Click the TagUI icon, followed by the Start button
3. Carry out the steps you want to automate
4. Click the TagUI icon, followed by the Stop, then Export buttons to view the generated TagUI script
> while recording the steps, you can right click to bring up a menu for steps such as showing the element identifier
The recording isn't foolproof (for example, the underlying recording engine cannot capture frames, popup windows or tab key input). It's meant to simplify flow creation with some edits, instead of typing everything manually. [See this video](https://www.youtube.com/watch?v=bFvsc4a8hWQ) for an example of recording a sequence of steps, editing for adjustments and playing back the automation.
# [Using it (advanced)](https://github.com/kelaberetiv/TagUI#cheat-sheet)
*In this section, we'll spend some time exploring core features of TagUI.*
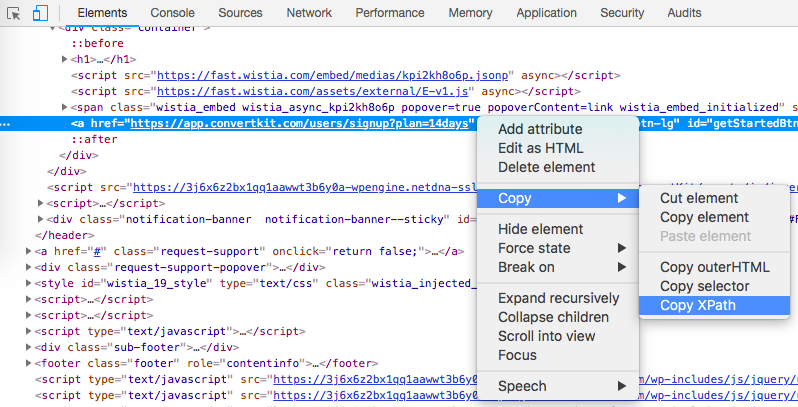
### FIND XPATH OF WEB ELEMENT
- In Chrome browser, right-click on the element, click Inspect, right-click on HTML code block, then
### STEPS DESCRIPTION
- TagUI auto-waits for a webpage element to appear and interacts with it as soon as it appears
- Element identifier can be auto-recorded using TagUI Chrome extension, or [found from web browser](https://github.com/kelaberetiv/TagUI#find-xpath-of-web-element)
- Identifiers help to pinpoint which webpage elements you want to interact with ([examples in flow samples](https://github.com/kelaberetiv/TagUI#flow-samples))
- TagUI auto-selects provided identifier in this order - xpath, css, id, name, class, title, aria-label, text(), href
Basic Step|Parameters (separator in bold)|Purpose
:---------|:-----------------------------|:------
http(s)://|just enter full url of webpage (\`variable\` for variable)|go to specified webpage
click|element to click|click on an element
rclick|element to right-click|right-click on an element
dclick|element to double-click|double-click on an element
hover|element to hover|move cursor to element
type|element ***as*** text ([enter] = enter, [clear] = clear field)|enter element as text
select|element to select ***as*** option value ([clear] = clear selection)|choose dropdown option
read|element to read (page = webpage) ***to*** variable name|fetch element text to variable
show|element to read (page = webpage, ie raw html) |print element text to output
save|element (page = webpage) ***to*** optional filename|save element text to file
snap|element (page = webpage) ***to*** optional filename|save screenshot to file
snap (pdf)|page ***to*** filename.pdf (headless Chrome / PhantomJS)|save webpage to basic pdf
load|filename ***to*** variable name|load file content to variable
echo|text (in quotation marks) and variables|print text/variables to output
dump|text (in quotation marks) and variables ***to*** optional filename|save text/variables to file
write|text (in quotation marks) and variables ***to*** optional filename|append text/variables to file
variable_name| = value (for text, put in quotes, use + to concat)|define variable variable_name
// (on new line)|user comments (ignored during execution)|add user comments
ask|question or instruction for user (reply stored in ask_result)|ask user for input
live|try steps or code interactively for Chrome / visual automation|enter live mode ([Firefox not yet](https://github.com/laurentj/slimerjs/issues/639))
**Tip** - to use variables where text is expected, \`variable\` can be used. XPath is an expressive way to identify web elements. If you know xpath and use xpath for element identifier, use double quotes for text //\*[@title="Login"]
<details>
<summary>
Click to show pro steps such as tagui, keyboard, mouse, table, wait, check, api, run, dom, js, r, py, vision, code blocks
</summary>
Pro Step|Parameters (separator in bold)|Purpose
:-------|:-----------------------------|:------
tagui|relative or absolute filename (see MODULES section)|run another tagui flow
keyboard|keystrokes and modifiers (using visual automation)|send keystrokes to screen
mouse|down or up (using sikuli visual automation)|send mouse event to screen
table|element (XPath selector only) ***to*** optional filename.csv|save basic html table to csv
wait|optional time in seconds (default is 5 seconds)|explicitly wait for some time
check|condition **|** text (in quotes) if true **|** text (in quotes) if false|check condition and print result
upload|element (CSS selector only) ***as*** filename to upload|upload file to website
download|url to download ***to*** filename to save|download from url to file
receive|url keyword to watch ***to*** filename to save|receive resource to file
frame|frame name **|** subframe name if any|next step or block in frame/subframe
popup|url keyword of new tab window to look for|next step or block in new tab window
{ and }|use { to start block and } to end block (on new line)|define block of steps and code
api|full url (including parameters) of api call|call api & save response to api_result
run|OS shell command including parameters|run OS command & save to run_result
dom|javascript code for document object model|run code in dom & save to dom_result
js|javascript statements (skip auto-detection)|treat as JS code explicitly
r|R statements for big data and machine learning|run R statements & save to r_result
py|python code for big data and machine learning|run python code & save to py_result
vision|custom visual automation commands|run custom sikuli commands
timeout|time in seconds before step errors out|change auto-wait timeout
**Tip** - for headless and visible Chrome, file downloads can be done using normal webpage interaction or specifying the URL as a navigation flow step. For Firefox and PhantomJS, the download and receive step can be used.
> on Windows, snap step requires display magnification to be set at 100% to work properly
As TagUI default execution context is local, to run javascript on webpage dom (eg document.querySelector) use dom step. Set dom_json variable to pass a variable for use in dom step. Or dom_json = {tmp_number: phone, tmp_text: name} to pass multiple variables for use in dom step (dom_json.tmp_number and dom_json.tmp_text).
> For steps run, dom, js, r, py, vision, instead of typing the step and the command, you can use something like py begin followed by many lines of py code, and end with py finish to denote an entire code block. This saves typing the step repeatedly for a large integration code block. Indentation of Python code within py begin-finish and vision begin-finish blocks is supported, for example in conditions or loops.
For steps r, py, vision, the helper functions r_step(), py_step(), vision_step() can be used to pass dynamic variables to those integrations. Below is an example for py step for passing variables from TagUI to Python integration.
```
phone = 1234567
name = 'donald duck'
py_step('phone = ' + phone)
py_step('name = "' + name + '"')
py print(name)
echo py_result
py print(phone)
echo py_result
```
</details>
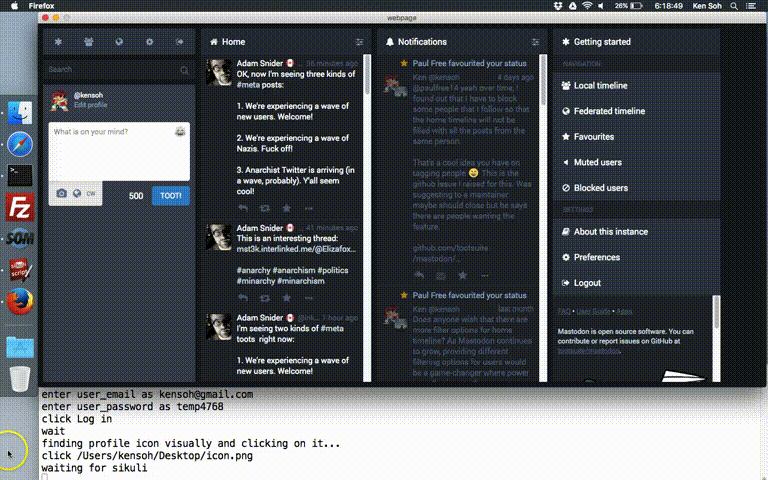
### VISUAL AUTOMATION
TagUI has built-in integration with [SikuliX (base on OpenCV)](http://sikulix.com) to allow visually identifying the web elements and desktop UI (user interface) elements for interaction by providing their images or (x,y) coordinates. Applicable steps are click, hover, type, select, read, show, save, snap, keyboard, mouse. To use visual automation, Java JDK v8 (64-bit) is required.
1. Check that [Java JDK](http://www.oracle.com/technetwork/java/javase/downloads/jdk8-downloads-2133151.html) is installed (entering `java -version` returns your Java version)
2. After Java is installed, you will have to restart your command prompt or terminal to use it
3. On Windows, set display magnification to recommended %, if it doesn't work then 100%
4. On Windows, if TagUI just hangs there, see if it's due to [this issue and try the solution](https://github.com/kelaberetiv/TagUI/issues/229)
5. On macOS, if can't find image on screen, may be due to [how the image was captured](https://github.com/kelaberetiv/TagUI/issues/240#issuecomment-405030276)
6. On Linux, requires installing and setting up dependencies by following [this guide](https://sikulix-2014.readthedocs.io/en/latest/newslinux.html#version-1-1-4-special-for-linux-people)
To use visual automation, simply specify an image (in .png or .bmp format) to visually look for in place of the element identifier. Alternatively, you can specify the (x,y) coordinates of the element that you want to interact with.
> Important! The element that corresponds to the image must be visible on the screen for visual automation to succeed. If it's blocked by another window for example, the automation will be unable to find the element.
To type onto the screen instead of a particular element, use `keyboard text` or `keyboard [modifiers]text` ([examples](https://github.com/kelaberetiv/TagUI/issues/370)). To do a snapshot or an OCR of the whole screen, use `page.png` or `page.bmp` as the element identifier for steps snap / read. Relative paths are supported for image filenames (eg pc.png, images/button.bmp). The usual helper functions visible() / present() can also be used to check whether an image is visible on the screen.
The keyboard and mouse steps, as well as helper functions mouse_xy(), mouse_x(), mouse_y(), can be used to do complex UI interactions. A screen (real or Xvfb) is needed for visual automation. [Tesseract OCR](https://github.com/tesseract-ocr/tesseract) (optical character recognition) is used for visually retrieving text. Also, by using vision step, you can send [custom SikuliX commands](http://sikulix-2014.readthedocs.io/en/latest/genindex.html) to do things that are not covered by TagUI.
# [Further Resources](https://github.com/kelaberetiv/TagUI)
*For more info and documentation on TagUI, visit its [repository page](https://github.com/kelaberetiv/TagUI).*