swagger-autogen-validator
Version:
This module performs the automatic construction of the Swagger documentation. The module can identify the endpoints and automatically capture methods such as to get, post, put, and so on. The module can also identify the paths, routes, middlewares, respon
1,704 lines (1,396 loc) • 52.2 kB
Markdown
# swagger-autogen
fork: https://github.com/davibaltar/swagger-autogen
## Add future:
Auto schema response 400 bad request from validatorjs rule
Definitions js file in folder component
```sh
src
_swagger.js
_items
____router.js
____controller.js
____definitions.js
____validateRules.js
```
## Use
### Example
#### Git: [Example project git](https://github.com/nhayhoc/example-swagger-autogen-validator).
#### Live example: [https://auto-swagger-validator-example.herokuapp.com/doc](https://auto-swagger-validator-example.herokuapp.com/doc).
#### Code change
```js
const swaggerAutogen = require('swagger-autogen')();
// ==>
const swaggerAutogen = require('swagger-autogen-validator')();
```
```js
swaggerAutogen(outputFile, endpointsFiles, doc);
// ==>
swaggerAutogen({outputFile, endpointsFiles, doc});
```
```js
// if need change path `definitions.js` or `validateRules.js`
swaggerAutogen({
...,
definitionFilePattern: 'src/**/definitions.js',
validateRulesFilePattern: 'src/**/validateRules.js'
});
```
```js
// definitions.js
exports.UserGetAll = {
pages: 10,
page: 1,
docs: [
{
id: 1,
name: "name1",
description: "name1 description",
},
],
};
exports.UserNewuser = {
name: "remote control",
description: "lorem remote control description",
};
```
```js
// validateRules.js
exports.getAll = {
page: "numeric|max:1000",
limit: "numeric|max:100",
};
exports.addNew = {
name: "required|string|max:100",
description: "required|string|max:1000",
};
```
```js
// controller.js
const validateRules = require("./validateRules");
const Validator = require("validatorjs");
exports.getAll = (req, res, next) => {
let { page, limit } = req.query;
let validation = new Validator({ page, limit }, validateRules.getAll);
if (validation.fails())
return res.status(400).json({ error: validation.errors.all() });
//
// let data = ....
/* #swagger.responses[200] = {
schema: { $ref: '#/definitions/UserGetAll' }
} */
res.json(data);
};
exports.addNew = (req, res, next) => {
let { name, description } = req.body;
/* #swagger.parameters['obj'] = {
in: 'body',
schema: { $ref: '#/definitions/UserNewuser' }
} */
let validation = new Validator({ name, description }, validateRules.addNew);
if (validation.fails())
return res.status(400).json({ error: validation.errors.all() });
//
// let data = ....
res.json(data);
};
```
## Future
This module performs the automatic construction of the Swagger documentation. The module can identify the endpoints and automatically capture methods such as to get, post, put, and so on. The module can also identify the paths, routes, middlewares, response status code, parameters in the path, header, query and body. It is possible to add information such as endpoint description, parameter description, definitions, security, among others. It is also possible to ignore or disable the automatic capture of an endpoint (in the latter case, having to manually add each information). The module generates the *.json* file with the documentation in the swagger format.
[](https://www.npmjs.com/package/swagger-autogen)
[](https://npmcharts.com/compare/swagger-autogen?minimal=true)
## Contents
- [swagger-autogen](#swagger-autogen)
- [Add future:](#add-future)
- [Use](#use)
- [Example](#example)
- [Git: Example project git.](#git-example-project-git)
- [Live example: https://auto-swagger-validator-example.herokuapp.com/doc.](#live-example-httpsauto-swagger-validator-exampleherokuappcomdoc)
- [Code change](#code-change)
- [Future](#future)
- [Contents](#contents)
- [Installation](#installation)
- [Update](#update)
- [Usage](#usage)
- [Usage (Basic)](#usage-basic)
- [Usage (With optionals)](#usage-with-optionals)
- [Building documentation without starting the project](#building-documentation-without-starting-the-project)
- [Building documentation at project startup](#building-documentation-at-project-startup)
- [Options](#options)
- [Endpoints](#endpoints)
- [Automatic capture](#automatic-capture)
- [Tags](#tags)
- [Summary](#summary)
- [Description](#description)
- [Operation ID](#operation-id)
- [Parameters](#parameters)
- [Body](#body)
- [Responses](#responses)
- [Schema and Definitions](#schema-and-definitions)
- [Adding examples (only OpenAPI 3.x)](#adding-examples-only-openapi-3x)
- [@schema](#schema)
- [Examples of Definitions](#examples-of-definitions)
- [Endpoint as deprecated](#endpoint-as-deprecated)
- [Ignoring endpoint](#ignoring-endpoint)
- [Properties Inheritance](#properties-inheritance)
- [Manual capture](#manual-capture)
- [Forced Endpoint Creation](#forced-endpoint-creation)
- [Swagger 2.0](#swagger-20)
- [Consumes and Produces](#consumes-and-produces)
- [Security](#security)
- [API Keys (Token) example](#api-keys-token-example)
- [OAuth2 example](#oauth2-example)
- [OpenAPI 3.x](#openapi-3x)
- [Request Body](#request-body)
- [Responses](#responses-1)
- [Security](#security-1)
- [Bearer Auth example](#bearer-auth-example)
- [OAuth2 example](#oauth2-example-1)
- [oneOf and anyOf](#oneof-and-anyof)
- [Enums](#enums)
- [Response Language](#response-language)
- [Examples](#examples)
- [Compatibility](#compatibility)
- [Tutorials](#tutorials)
- [Changelog](#changelog)
- [Help us!](#help-us)
- [License](#license)
## Installation
This is a [Node.js](https://nodejs.org/en/) module available through the [npm](https://www.npmjs.com/).
```bash
$ npm install --save-dev swagger-autogen
```
If you're using CommonJS:
```js
const swaggerAutogen = require('swagger-autogen')();
```
Or if you're using ES modules:
```js
import swaggerAutogen from 'swagger-autogen';
```
## Update
If you already have the module installed and want to update to the latest version, use the command:
```bash
$ npm install --save-dev swagger-autogen@latest
```
## Usage
[Example using Router](https://github.com/davibaltar/example-swagger-autogen-with-router)
[Example without Router](https://github.com/davibaltar/example-swagger-autogen)
[Tutorial in English](https://medium.com/@davibaltarx/automatic-api-documentation-in-node-js-using-swagger-dd1ab3c78284)
[Tutorial em Português Brasil](https://medium.com/@davibaltarx/documenta%C3%A7%C3%A3o-autom%C3%A1tica-de-apis-em-node-js-eb03041c643b)
The two sections below will show the basic usage and the full usage of the module.
Function signature:
```js
const swaggerAutogen: (outputFile: <string>, endpointsFiles: <Array of string>, data: <object>) => Promise <any>
```
**outputFile:** (Required*). Output file. It will be the file generated by the module containing the documentation in the format identified by Swagger.
**endpointsFiles:** (Required*). Files containing the endpoints or routes. These are the files that contain methods such as get, post, put, use, and so on, for example: `app.get('/path', ...)` or `route.use('/v1', ...)`.
**doc:** (Not Required). An object containing the details of the documentation. If not informed, or if any parameter of the object is omitted, the default values will be used. (See: [Usage (With optionals)](#usage-with-optionals) section)
### Usage (Basic)
The code below must be inserted in a separate file (e.g *swagger.js*):
**File: swagger.js**
```js
const swaggerAutogen = require('swagger-autogen')();
const doc = {
info: {
title: 'My API',
description: 'Description',
},
host: 'localhost:3000',
schemes: ['http'],
};
const outputFile = './path/swagger-output.json';
const endpointsFiles = ['./path/endpointsUser.js', './path/endpointsBook.js'];
/* NOTE: if you use the express Router, you must pass in the
'endpointsFiles' only the root file where the route starts,
such as index.js, app.js, routes.js, ... */
swaggerAutogen(outputFile, endpointsFiles, doc);
```
### Usage (With optionals)
The code below must be inserted in a separate file, for example:
**File: swagger.js**
```js
const swaggerAutogen = require('swagger-autogen')();
const doc = {
info: {
version: '', // by default: '1.0.0'
title: '', // by default: 'REST API'
description: '', // by default: ''
},
host: '', // by default: 'localhost:3000'
basePath: '', // by default: '/'
schemes: [], // by default: ['http']
consumes: [], // by default: ['application/json']
produces: [], // by default: ['application/json']
tags: [ // by default: empty Array
{
name: '', // Tag name
description: '', // Tag description
},
// { ... }
],
securityDefinitions: {}, // by default: empty object
definitions: {}, // by default: empty object (Swagger 2.0)
components: {} // by default: empty object (OpenAPI 3.x)
};
const outputFile = './path/swagger-output.json';
const endpointsFiles = ['./path/endpointsUser.js', './path/endpointsBook.js'];
/* NOTE: if you use the express Router, you must pass in the
'endpointsFiles' only the root file where the route starts,
such as: index.js, app.js, routes.js, ... */
swaggerAutogen(outputFile, endpointsFiles, doc);
```
**NOTE:** If you're using ES modules, use:
```js
swaggerAutogen()(outputFile, endpointsFiles, doc);
```
**NOTE:** To omit any of the attributes in the *.json* file, just assign the value **null** to the specified attribute in the **doc**.
## Building documentation without starting the project
To build the documentation without starting your project, add the following script to your project's _package.json_ file:
**File: package.json**
```js
// { ... },
"scripts": {
// ... ,
"swagger-autogen": "node ./swagger.js"
}
```
Where `./swagger.js` is the file containing the `swaggerAutogen(...)` function call (see section [Usage](#usage). After that, at the root of your project, run the following command:
```bash
$ npm run swagger-autogen
```
## Building documentation at project startup
To build the documentation before the project starts and immediately start it, rewrite the `swaggerAutogen(...)` function as follows:
If you're using CommonJS, use:
```js
// ...
swaggerAutogen(outputFile, endpointsFiles, doc).then(() => {
require('./index.js'); // Your project's root file
});
```
In case, you're using ES modules in your project, rewrite the `swaggerAutogen(...)` function as follows:
```js
// ...
swaggerAutogen()(outputFile, endpointsFiles, doc).then(async () => {
await import('./index.js'); // Your project's root file
});
```
Where *index.js* is your project's root file. Change the *start* script in your project's *package.json* to point to the file containing the `swaggerAutogen(...)` function. If you use Visual Studio Code, change the reference in your *launch.json* in the same way. Now, just run your project as usual. With that, the documentation will be generated, and soon after the project will start, automatically updating the documentation as soon as the project start.
See: [Complete example](https://github.com/davibaltar/example-swagger-autogen)
## Options
It is possible to change some options of the module by passing an object as a parameter. This object is **optional**.
```js
const options = {
openapi: <string>, // Enable/Disable OpenAPI. By default is null
language: <string>, // Change response language. By default is 'en-US'
disableLogs: <boolean>, // Enable/Disable logs. By default is false
autoHeaders: <boolean>, // Enable/Disable automatic headers capture. By default is true
autoQuery: <boolean>, // Enable/Disable automatic query capture. By default is true
autoBody: <boolean> // Enable/Disable automatic body capture. By default is true
}
```
If you're using CommonJS, use:
```js
const swaggerAutogen = require('swagger-autogen')(options)
```
In case, you're using ES modules in your project, rewrite the `swaggerAutogen(...)` function as follows:
```js
import swaggerAutogen from 'swagger-autogen';
// ...
swaggerAutogen(options)(outputFile, endpointsFiles, doc).then(async () => {
await import('./index.js'); // Your project's root file
});
```
**OpenAPI:** _(BETA)_ To enable OpenAPI v3, assign a version, such as "3.0.0" to the *openapi* parameter. In the future, OpenAPI v3 will be the default.
To see the available languages, go to the section [Response Language](#response-language)
## Endpoints
The way to configure the module is done within comments, and can be in the format `// ...` or `/* ... */`. The used pattern will be `#swagger.something` tag. Each comment can contain one or more `#swagger.something` tags. **NOTE:** ALL COMMENTS CONTAINING `#swagger.something` MUST BE WITHIN THE FUNCTIONS.
### Automatic capture
In this case, it is not necessary to do anything. Considering, for example, if the pattern of your API is as follows:
```js
...
app.post('/path', (req, res) => {
...
users.addUser(req.query.obj)
...
if(...)
return res.status(201).send(data)
...
return res.status(500).send(false)
})
...
```
The recognition of the method, path, parameters and status of the response will be automatic.
See an [example here!](#examples)
### Tags
To inform which tags the endpoints belong to, use the `#swagger.tags` tag, for example:
```js
app.get('/path', (req, res) => {
...
// #swagger.tags = ['Users']
...
})
```
### Summary
This is the summary of the Endpoint. To add it, use the `#swagger.summary` tag, for example:
```js
app.get('/path', (req, res) => {
...
// #swagger.summary = 'Some summary...'
...
})
```
### Description
This is the description of the Endpoint. To add it, use the `#swagger.description` tag, for example:
```js
app.get('/path', (req, res) => {
...
// #swagger.description = 'Some description...'
...
})
```
### Operation ID
This is the operationId of the Endpoint. To add it, use the `#swagger.operationId` tag, for example:
```js
app.get('/path', (req, res) => {
...
// #swagger.operationId = 'Your_operationId_here'
...
})
```
### Parameters
It is possible to create or complement automatically detected parameters. Use the `#swagger.parameters['parameterName']` tag to create a new parameter or to complete an existing parameter (automatically detected).
All optional parameters:
```js
/* #swagger.parameters['parameterName'] = {
in: <string>,
description: <string>,
required: <boolean>,
type: <string>,
format: <string>,
schema: <array>, <object> or <string>
} */
```
**in:** 'path', 'header', 'query', 'body', 'formData', etc. // by default is 'query'
**description:** The parameter description
**required:** true or false
**type:** 'string', 'number', 'boolean', 'integer' or 'array'. // by default is 'string' when 'schema' is missing
**format:** 'int64', etc.
**schema:** See section [Schema and Definitions](#schema-and-definitions)
**Some examples:**
```js
app.get('/path/:id', (req, res) => {
...
// #swagger.parameters['id'] = { description: 'Some description...' }
...
})
```
```js
app.post('/users', (req, res) => {
...
/* #swagger.parameters['obj'] = {
in: 'body',
description: 'Add a user',
schema: { $ref: '#/definitions/AddUser' }
} */
...
})
```
```js
app.post('/path', (req, res) => {
...
/* #swagger.parameters['obj'] = {
in: 'body',
description: 'Some description...',
schema: {
$name: 'Jhon Doe',
$age: 29,
about: ''
}
} */
...
})
```
**Referenced parameters (OpenAPI v3 only)**
To reference one or more parameters, use the `parameters` tag passing the `$ref` value, such as:
```js
app.post('/path', (req, res) => {
...
/* #swagger.parameters['$ref'] = ['#/components/parameters/someParameter1', '#/components/parameters/someParameter2']` */
...
})
```
**Examples using upload (Swagger 2.0)**
```js
// (Swagger 2.0) Upload single file using Multer
app.post("/upload", uploader.single("singleFile"), (req, res) => {
/*
#swagger.consumes = ['multipart/form-data']
#swagger.parameters['singleFile'] = {
in: 'formData',
type: 'file',
required: 'true',
description: 'Some description...',
} */
const file = req.file;
});
// (Swagger 2.0) Upload multiple files using Multer
app.post("/uploads", uploader.array("multFiles", 2), (req, res) => {
/*
#swagger.consumes = ['multipart/form-data']
#swagger.parameters['multFiles'] = {
in: 'formData',
type: 'array',
required: true,
description: 'Some description...',
collectionFormat: 'multi',
items: { type: 'file' }
} */
const files = req.files;
});
```
#### Body
The **body** is automatically recognized, for example:
```js
app.post('/users', (req, res) => {
const myItem1 = req.body.item1
const { item2, item3 } = req.body
...
})
```
**NOTE:** But, if there is any `#swagger.parameters[...] = { in: 'body', ... }` with **schema** declared, the recognition of **body** will be ignored, for example:
```js
app.post('/path', (req, res) => {
...
/* #swagger.parameters['parameter_name'] = {
in: 'body',
description: 'Some description...',
schema: {
$name: 'Jhon Doe',
$age: 29,
about: ''
}
} */
const myItem1 = req.body.item1 // Will be ignored by swagger-autogen
const { item2, item3 } = req.body // Will be ignored by swagger-autogen
...
})
```
However, if you wish to add more information to the automatically recognized **body**, declared the `#swagger.parameters` adding **in: 'body'**, BUT without the **schema**, such as:
```js
app.post('/path', (req, res) => {
...
/* #swagger.parameters['any_name'] = {
in: 'body',
description: 'Some description...'
} */
const myItem1 = req.body.item1
const { item2, item3 } = req.body
...
})
```
Automatically the **body** will be recognized and the parameters 'any_name' and 'description' will be assigned to the **body**.
### Responses
It is possible to create or complement automatically detected responses. Use the `#swagger.reponses[statusCode]` tag to create a new answer or to complete an existing answer (automatically detected). If **OpenAPI 3.x** option is enabled ([see how to enable OpenAPI 3.x option](#options)), the *content* will be "application/json" by default. To see more options about OpenAPI 3.x response, see it here [OpenAPI 3.x response](#responses-1).
All optional parameters:
```js
/* #swagger.responses[<number>] = {
description: <string>,
schema: <array>, <object>, <string>, <number> or <boolean>
} */
```
**description:** The parameter description.
**schema:** See section [Schema and Definitions](#schema-and-definitions)
**Endpoint example:**
```js
app.get('/path', (req, res, next) => {
...
/* #swagger.responses[200] = {
description: 'User successfully obtained.',
schema: { $ref: '#/definitions/User' }
} */
return res.status(200).send(data)
...
})
```
**Endpoint example:**
```js
app.get('/path', (req, res, next) => {
...
/* #swagger.responses[200] = {
description: 'User successfully obtained.',
schema: {
name: 'Jhon Doe',
age: 29,
about: ''
}
} */
return res.status(200).send(data)
...
})
```
**Endpoint example:**
```js
app.get('/path', (req, res, next) => {
...
// #swagger.responses[500] = { description: 'Some description...' }
return res.status(500)
...
})
```
**NOTE:** For more information about **schema** and **definitions**, see the section: [Schema and Definitions](#schema-and-definitions)
### Schema and Definitions
Unlike how Swagger writes, the answers in this module are added more simply, that is, in the way you want to see the result. These responses can be added to the *definitions* parameter of the *doc* object seen in the [Usage](#usage) section, or directly to the response via the *schema* parameter.
**About Examples and Types in the schema:** The example comes right in front of the parameter declaration, and the type is abstracted according to the *typeof* of the example. In the code below, the parameter "name" will have as an example "Jhon Doe" and type string, while "age" will have as an example 29 and type number.
**NOTE:** To configure a parameter as **required**, just add the symbol **$** before the parameter, for example: `$name = "Jhon Doe"`.
**For example:**
```js
const doc = {
// { ... },
definitions: {
Parents: {
father: 'Simon Doe',
mother: 'Marie Doe'
},
User: {
name: 'Jhon Doe',
age: 29,
parents: {
$ref: '#/definitions/Parents'
},
diplomas: [
{
school: 'XYZ University',
year: 2020,
completed: true,
internship: {
hours: 290,
location: 'XYZ Company'
}
}
]
},
AddUser: {
$name: 'Jhon Doe',
$age: 29,
about: ''
},
// { ... }
}
};
```
To ignore the swagger-autogen render in the `definitions` (Swagger 2.0) or `components.schemas` (OpenAPI 3) and put the specification Swagger directly, you can use `@definitions` or `@schemas`, such as:
**(Swagger 2.0):**
```js
const doc = {
...
'@definitions': {
someParameter: {
type: 'object',
properties: {
property1: {
type: 'integer',
format: 'int32',
description: 'With no swagger-autogen render...'
}
}
}
}
};
```
**(OpenAPI 3.x):**
```js
const doc = {
...
components:{
'@schemas': {
someParameter: {
type: 'object',
properties: {
property1: {
type: 'integer',
format: 'int32',
description: 'With no swagger-autogen render...'
}
}
}
}
}
};
```
In the parameters using definition:
```js
app.post('/users', (req, res) => {
...
/* #swagger.parameters['obj'] = {
in: 'body',
description: 'Adding new user.',
schema: { $ref: '#/definitions/AddUser' }
} */
...
})
```
or inserting directly, without using definitions:
```js
app.post('/users', (req, res) => {
...
/* #swagger.parameters['obj'] = {
in: 'body',
description: 'Adding new user.',
schema: {
$name: 'Jhon Doe',
$age: 29,
about: ''
}
} */
...
})
```
In the responses using definition:
```js
app.get('/path', (req, res) => {
...
/* #swagger.responses[200] = {
description: 'Some description...',
schema: { $ref: '#/definitions/someDefinition' }
} */
...
})
```
In the responses inserting directly:
```js
app.get('/path', (req, res) => {
...
/* #swagger.responses[200] = {
description: 'Some description...',
schema: {
name: 'Jhon Doe',
age: 29,
about: ''
}
} */
...
})
```
#### Adding examples (only OpenAPI 3.x)
It is possible to add examples as shown in the OpenAPI 3.x specification [click here](https://swagger.io/docs/specification/adding-examples/).
**For example:**
```js
const doc = {
...
definitions: {...},
components: {
...
examples: {
User:{
value:{
name: 'Jhon Doe',
age: 29
},
summary: "Sample for User"
}
}
}
}
```
**Endpoint file:**
It doesn't allow insert directly without reference on `openapi 3.x`. To enable OpenAPI 3.x [See it here](#options).
```js
app.post('/users', (req, res) => {
...
/* #swagger.requestBody = {
required: true,
content: {
"application/json": {
schema: { $ref: "#/definitions/User" },
examples: {
User: { $ref: "#/components/examples/User" }
}
}
}
}
*/
...
})
```
#### @schema
Use the `'@schema'` instead of `schema` if you don't want swagger-autogen to do schema processing. In this case you must build the schema according to Swagger's specs. The result in the _.json_ will be the same in `'@schema'`.
**For example:**
```js
app.get('/path', (req, res) => {
...
/* #swagger.parameters['obj'] = {
in: 'body',
'@schema': {
"required": ["name"],
"properties": {
"name": {
"type": "string",
"minLength": 2,
"maxLength": 250,
"example": "Some example..."
}
}
}
} */
...
})
```
#### Examples of Definitions
The following are some examples of definitions:
**Definitions:**
```js
const doc = {
// { ... },
definitions: {
myBoolean: true,
myNumber: 123,
myString: 'my example',
myObject: {
field: 'my example'
},
myArrayOfBooleans: [true],
myArrayOfNumbers: [123],
myArrayOfStrings: ['my example'],
myArrayOfObjects: [
{
field: 'my example'
}
],
myReferencedObjectArray: [{ $ref: '#/definitions/myObject' }]
}
};
```
**Endpoint:**
```js
app.get('/responses', (req, res) => {
/* #swagger.responses[001] = {
description: 'myBoolean',
schema: { $ref: '#/definitions/myBoolean' }
} */
/* #swagger.responses[002] = {
description: 'myNumber',
schema: { $ref: '#/definitions/myNumber' }
} */
/* #swagger.responses[003] = {
description: 'myString',
schema: { $ref: '#/definitions/myString' }
} */
/* #swagger.responses[004] = {
description: 'myObject',
schema: { $ref: '#/definitions/myObject' }
} */
/* #swagger.responses[005] = {
description: 'myArrayOfBooleans',
schema: { $ref: '#/definitions/myArrayOfBooleans' }
} */
/* #swagger.responses[006] = {
description: 'myArrayOfNumbers',
schema: { $ref: '#/definitions/myArrayOfNumbers' }
} */
/* #swagger.responses[007] = {
description: 'myArrayOfStrings',
schema: { $ref: '#/definitions/myArrayOfStrings' }
} */
/* #swagger.responses[008] = {
description: 'myArrayOfObjects',
schema: { $ref: '#/definitions/myArrayOfObjects' }
} */
/* #swagger.responses[009] = {
description: 'myReferencedObjectArray',
schema: { $ref: '#/definitions/myReferencedObjectArray' }
} */
});
```
The result will be:
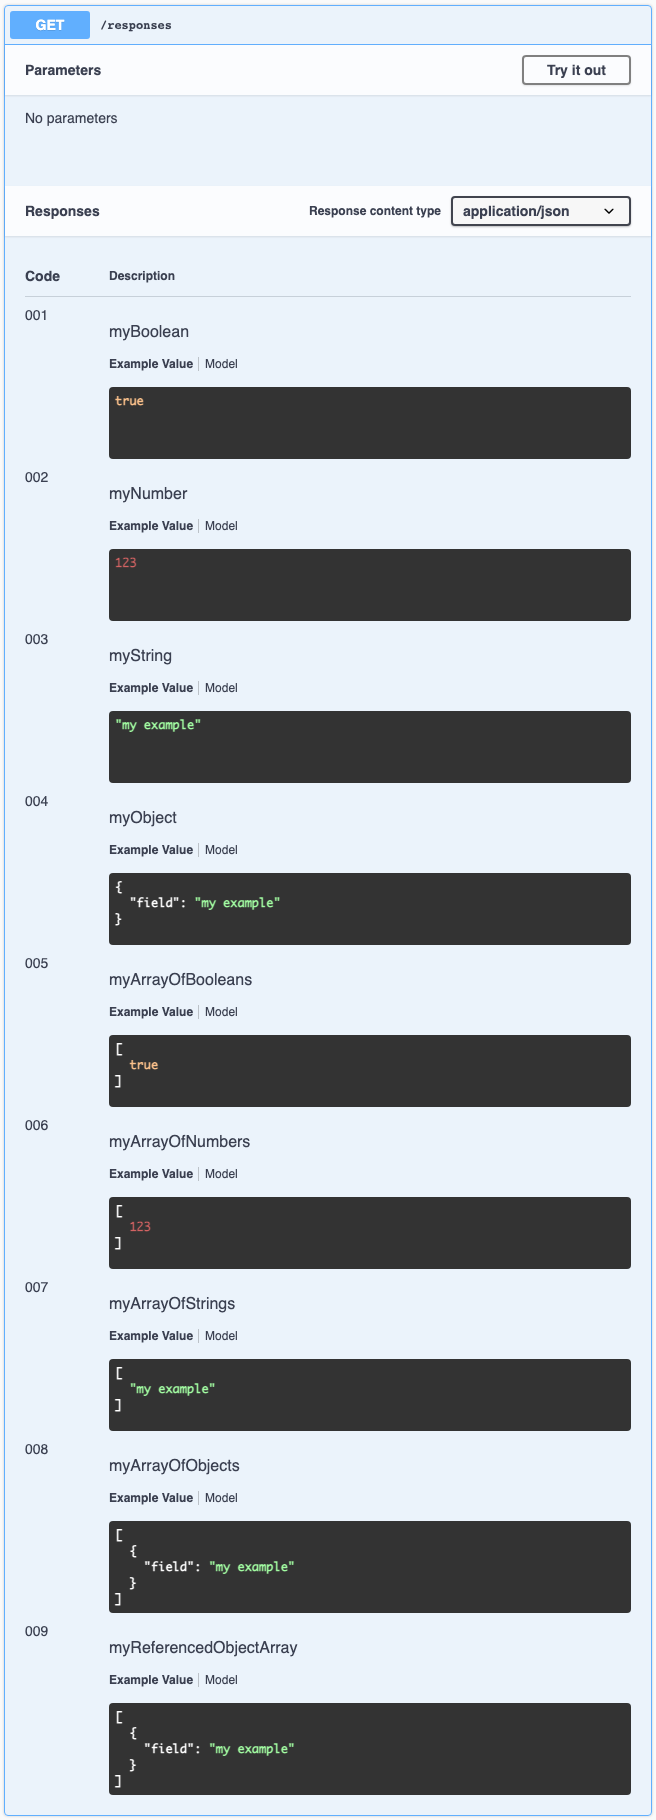
### Endpoint as deprecated
Use the `#swagger.deprecated = true` tag to inform that a given endpoint is depreciated, for example:
```js
app.get('/path', (req, res) => {
...
// #swagger.deprecated = true
...
})
```
### Ignoring endpoint
Use the `#swagger.ignore = true` tag to ignore a specific endpoint. Thus, it will not appear in the documentation, for example:
```js
app.get('/path', (req, res) => {
...
// #swagger.ignore = true
...
})
```
### Properties Inheritance
If you want to pass properties in common to all endpoints belonging to the same route, you can specify those properties in the routes root middleware.
**For example:**
file: routes.js
```js
...
app.use('/v1', routesV1
// #swagger.tags = ['SomeTag']
/* #swagger.security = [{
"apiKeyAuth": []
}] */
/* #swagger.responses[500] = {
schema: { $ref: '#/definitions/someSchema' }
} */
/* #swagger.responses[501] = {
ifStatusPresent: true,
schema: { $ref: '#/definitions/someSchema' }
} */
);
...
```
For the case above, all the enpoints belonging to '/v1' route will received the 'SomeTag' tag, the security property and status code 500. But only endpoints that contain the 501 status code will receive the description and schema declared in `#swagger.responses[501] = ...`.
NOTE: By default, the `ifStatusPresent` parameter is `false`. If true, only endpoints that contain any 501 status code will receive the properties. Otherwise, 501 status code will not be shown.
NOTE: To disable security for some endpoint belonging to route '/v1', declare `// #swagger.security = null `.
### Manual capture
Use the `#swagger.auto = false` tag to disable automatic recognition. With that, all parameters of the endpoint must be informed manually, for example:
```js
...
app.put('/users/:id', (req, res) => {
...
/* #swagger.auto = false
#swagger.path = '/users/{id}'
#swagger.method = 'put'
#swagger.produces = ['application/json']
#swagger.consumes = ['application/json']
#swagger.parameters['id'] = {
in: 'path',
description: 'User ID.',
required: true,
type: 'integer'
}
#swagger.parameters['obj'] = {
in: 'body',
description: 'User data.',
required: true,
schema: {
username: "user",
password: "1234"
}
}
*/
...
if(...) {
// #swagger.responses[201] = { description: 'User registered successfully.' }
return res.status(201).send(data)
}
...
// #swagger.responses[500] = { description: 'Server failure.'}
return res.status(500).send(false)
})
```
### Forced Endpoint Creation
If you want to forcibly create an endpoint, use the `#swagger.start` and` #swagger.end` tags, for example:
```js
function myFunction(param) {
// #swagger.start
...
/*
#swagger.path = '/forcedEndpoint/{id}'
#swagger.method = 'put'
#swagger.description = 'Forced endpoint.'
#swagger.produces = ['application/json']
*/
...
/* #swagger.parameters['id'] = {
in: 'path',
type: 'integer',
description: 'User ID.' } */
const dataId = users.getUser(req.params.id)
...
/* #swagger.parameters['obj'] = {
in: 'query',
description: 'User data.',
schema: { $ref: '#/definitions/AddUser' }
} */
const dataObj = users.getUser(req.query.obj)
...
if (...)
return res.status(200).send(true) // #swagger.responses[200]
...
return res.status(404).send(false) // #swagger.responses[404]
...
// #swagger.end
}
```
## Swagger 2.0
By default, the documentation is generated using Swagger 2.0 features. All of the following features are exclusive to Swagger 2.0. If you want to use **OpenAPI 3.x** features [click here](#openapi-3x).
### Consumes and Produces
Use the `#swagger.produces = ['contentType']` or `#swagger.consumes = ['contentType']` tag to add a new produce or a new consume, respectively. In the **Example (Consumes)** below, the two endpoints will have the same result in the documentation.
**Example (Consumes):**
```js
app.get('/path', (req, res) => {
...
// Recognizes the 'consumes' automatically
res.setHeader('Content-Type', 'application/json')
...
})
```
OR
```js
app.get('/path', (req, res) => {
...
// #swagger.consumes = ['application/json']
...
})
```
**Example (Produces):**
```js
app.get('/path', (req, res) => {
...
// #swagger.produces = ['application/json']
...
})
```
## Security
It is possible to add security to endpoints. The following are some examples, but a complete approach can be seen on the website [swagger.io](https://swagger.io/docs/specification/authentication)
### API Keys (Token) example
The security example below was taken from the original Swagger documentation.
```js
const doc = {
// { ... },
securityDefinitions: {
apiKeyAuth: {
type: 'apiKey',
in: 'header', // can be 'header', 'query' or 'cookie'
name: 'X-API-KEY', // name of the header, query parameter or cookie
description: 'Some description...'
}
}
};
```
To see more about the properties of the **doc**, see the [Usage (With Optionals)](#usage-with-optionals) section.
At the endpoint, add the `#swagger.security` tag, for example:
**Example endpoint:**
```js
app.get('/path', (req, res) => {
...
/* #swagger.security = [{
"apiKeyAuth": []
}] */
...
})
```
### OAuth2 example
The security example below was taken from the original Swagger documentation.
```js
const doc = {
// { ... },
securityDefinitions: {
oAuthSample: {
type: 'oauth2',
authorizationUrl: 'https://petstore.swagger.io/oauth/authorize',
flow: 'implicit',
scopes: {
read_pets: 'read your pets',
write_pets: 'modify pets in your account'
}
}
}
};
```
To see more about the properties of the **doc**, see the [Usage (With Optionals)](#usage-with-optionals) section.
At the endpoint, add the `#swagger.security` tag, for example:
**Example endpoint:**
```js
app.get('/path', (req, res) => {
...
/* #swagger.security = [{
"oAuthSample": [
"write_pets",
"read_pets"
]
}] */
...
})
```
## OpenAPI 3.x
All of the following features are exclusive to OpenAPI 3.x.
*NOTE:* The implementation of OpenAPI 3.x features are in progress. Some features are not yet available in the lib.
To use the OpenAPI 3.x features, you need to enable the OpenAPI v3 in the options:
If you're using CommonJS, use:
```js
const swaggerAutogen = require('swagger-autogen')({openapi: '3.0.0'})
```
In case, you're using ES modules in your project, rewrite the `swaggerAutogen(...)` function as follows:
```js
import swaggerAutogen from 'swagger-autogen';
// ...
swaggerAutogen({openapi: '3.0.0'})(outputFile, endpointsFiles, doc).then(async () => {
await import('./index.js'); // Your project's root file
});
```
### Request Body
_To use this feature, enable OpenAPI [[click here](#openapi-3x)]._
Use the `#swagger.requestBody` tag to impletent [Request Body](https://swagger.io/docs/specification/describing-request-body/).
**Endpoint example:**
```js
app.post('/path', (req, res, next) => {
...
/* #swagger.requestBody = {
required: true,
schema: { $ref: "#/definitions/sample" }
} */
...
})
```
NOTE: The above case, the content will be generated automatically with `application/json` and `application/xml`.
To declare a specific content:
```js
app.post('/path', (req, res, next) => {
...
/* #swagger.requestBody = {
required: true,
content: {
"application/json": {
schema: {
$ref: "#/definitions/User"
}
},
"application/xml": {
schema: {
$ref: "#/definitions/sample"
}
}
}
}
*/
...
})
```
Use the `'@content'` instead of `content` if you don't want swagger-autogen to do the content processing. In this case you must build the content according to Swagger's specs. The result in the _.json_ will be the same in `'@content'`, for example:
```js
app.post('/path', (req, res, next) => {
...
/* #swagger.requestBody = {
required: true,
"@content": {
"multipart/form-data": {
schema: {
type: "object",
properties: {
title: {
type: "string"
},
description: {
type: "string"
},
image: {
type: "string",
format: "binary"
}
},
required: ["title", "image"]
}
}
}
}
*/
...
})
```
### Responses
It is possible to create or complement automatically detected responses. Use the `#swagger.reponses[statusCode]` tag to create a new answer or to complete an existing answer (automatically detected).
All optional parameters:
```js
/* #swagger.responses[<number>] = {
description: <string>,
content:
"<content-type>" application/json, application/xml, etc
schema: <object> or <Array>
} */
```
**description:** The parameter description.
**schema:** See section [Schema and Definitions](#schema-and-definitions)
**Endpoint example:**
```js
app.get('/path', (req, res, next) => {
...
/* #swagger.responses[200] = {
description: "Some description... OpenAPI 3.x",
content: {
"application/json": {
schema:{
$ref: "#/definitions/User"
}
}
}
}
*/
...
})
```
**Endpoint example:**
```js
app.get('/path', (req, res, next) => {
...
/* #swagger.responses[200] = {
description: "Some description... OpenAPI 3.x",
content: {
"application/json": {
schema: {
name: 'Jhon Doe',
age: 29,
about: ''
}
}
}
}
*/
...
})
```
## Security
It is possible to add security to endpoints. The following are some examples, but a complete approach can be seen on the website [swagger.io](https://swagger.io/docs/specification/authentication)
### Bearer Auth example
The security example below was taken from the original Swagger documentation.
```js
const doc = {
// { ... },
securityDefinitions: {
bearerAuth: {
type: 'http',
scheme: 'bearer',
bearerFormat: 'JWT'
}
}
};
```
To see more about the properties of the **doc**, see the [Usage (With Optionals)](#usage-with-optionals) section.
At the endpoint, add the `#swagger.security` tag, for example:
```js
app.get('/path', (req, res) => {
...
/* #swagger.security = [{
"bearerAuth": []
}] */
...
})
```
### OAuth2 example
The security example below was taken from the original Swagger documentation.
```js
const doc = {
// { ... },
securityDefinitions: {
OAuth2: {
type: 'oauth2',
flows: {
authorizationCode: {
authorizationUrl: 'https://example.com/oauth/authorize',
tokenUrl: 'https://example.com/oauth/token',
scopes: {
read: 'Grants read access',
write: 'Grants write access',
admin: 'Grants access to admin operations'
}
}
}
}
}
};
```
To see more about the properties of the **doc**, see the [Usage (With Optionals)](#usage-with-optionals) section.
At the endpoint, add the `#swagger.security` tag, for example:
**Example endpoint:**
```js
app.get('/path', (req, res) => {
...
/* #swagger.security = [{
"OAuth2": [
'read',
'write'
]
}] */
...
})
```
### oneOf and anyOf
_To use this feature, enable OpenAPI [[click here](#openapi-3x)]._
This section show how to use oneOf and anyOf features of OpenAPI 3. [See more about it here](https://swagger.io/docs/specification/data-models/oneof-anyof-allof-not)
**oneOf example:**
```js
app.get('/path', (req, res) => {
...
/* #swagger.requestBody = {
required: true,
content: {
"application/json": {
schema:{
oneOf: [
{
$ref: "#/definitions/SomeSchema1",
},
{
$ref: "#/definitions/SomeSchema2"
}
]
}
}
}
}
*/
...
})
```
**anyOf example:**
```js
app.get('/path', (req, res) => {
...
/* #swagger.requestBody = {
required: true,
content: {
"application/json": {
schema:{
anyOf: [
{
$ref: "#/definitions/SomeSchema1",
},
{
$ref: "#/definitions/SomeSchema2"
}
]
}
}
}
}
*/
...
})
```
### Enums
_To use this feature, enable OpenAPI [[click here](#openapi-3x)]._
You can use the `'@enum'` reserved keyword to specify possible values of a request parameter or a model property. [See more about it here](https://swagger.io/docs/specification/data-models/enums).
**Enums example:**
```js
app.get('/path', (req, res) => {
...
/* #swagger.parameters['some_param'] = {
in: 'query',
description: 'Some description...',
schema: {
'@enum': ['arc', 'desc']
}
} */
...
})
```
**Enums example (reusable):**
```js
const doc = {
// { ... },
definitions: {
Color: {
'@enum': [
"black",
"white",
"red",
"green"
]
}
}
};
```
```js
app.get('/path', (req, res) => {
...
/* #swagger.parameters['some_param'] = {
in: 'query',
description: 'Some description...',
schema: {
'$ref': '#/definitions/Color'
}
} */
...
})
```
## Response Language
It is possible to change the default language (English) of the description in the automatic response, for example, status code 404, the description will be: 'Not Found'. To change, pass an object with the following parameter:
**English (by default)**
```js
const swaggerAutogen = require('swagger-autogen')();
// In this case, for example, the description of status code 404 will be:
// 'Not Found'
```
OR
**Portuguese (Brazil)**
```js
const swaggerAutogen = require('swagger-autogen')({ language: 'pt-BR' });
// In this case, for example, the description of status code 404 will be:
// 'Não Encontrado'
```
OR
**Chinese (Simplified)**
```js
const swaggerAutogen = require('swagger-autogen')({ language: 'zh-CN' });
// In this case, for example, the description of status code 404 will be:
// '未找到'
```
OR
**Korean**
```js
const swaggerAutogen = require('swagger-autogen')({ language: 'ko' });
// In this case, for example, the description of status code 404 will be:
// '찾을 수 없음'
```
OR
**French**
```js
const swaggerAutogen = require('swagger-autogen')({ language: 'fr' });
// In this case, for example, the description of status code 404 will be:
// 'Non Trouvé'
```
### Examples
Links to projects that cover the simplest use of this module as well as the most complete use. See the links below:
[Example using Router](https://github.com/davibaltar/example-swagger-autogen-with-router)
[Example without Router](https://github.com/davibaltar/example-swagger-autogen)
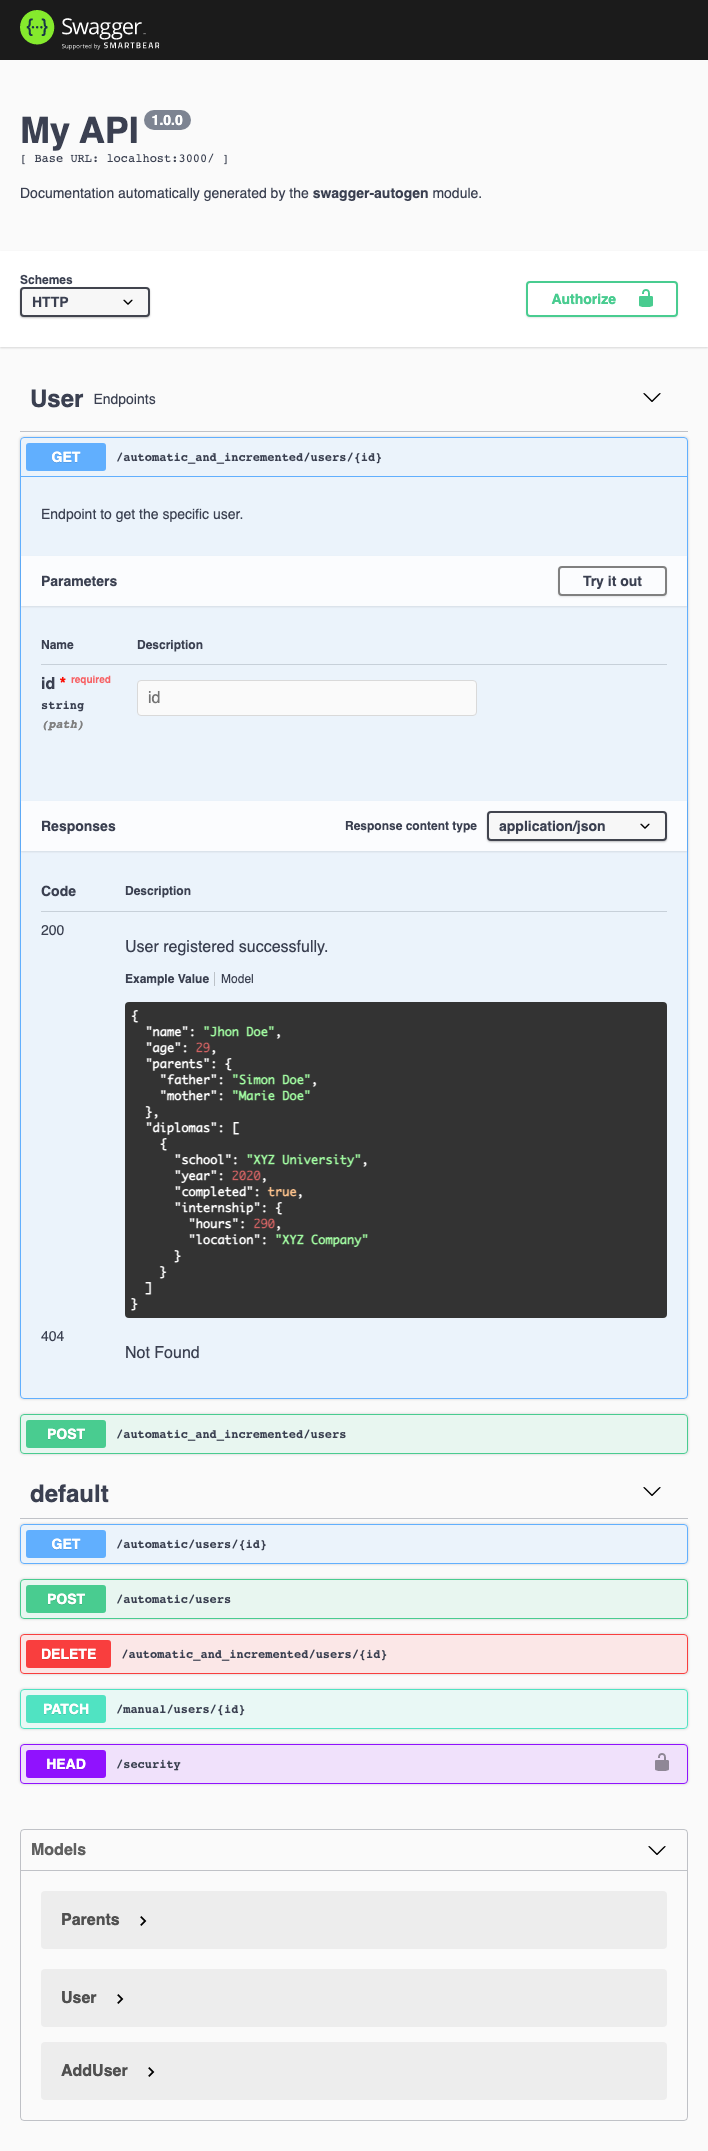
See the result after construction in the image below:
## Compatibility
**Swagger 2.0** and **OpenAPI 3.x**
This module is independent of any framework, but for the recognition to be **automatic**, your framework must follow the *"Express"* pattern, such as **foo.method(path, callback)**, where _foo_ is the variable belonging to the server or the route, such as _app_, _server_, _route_, etc. The _method_ are HTTP methods, such as to get, post, put, use and so on. If the **foo.method(path, callback)** pattern is not found in the files, it will be necessary to **manually** enter the beginning and end of the endpoint using the `#swagger.start` and `#swagger.end` tags (see the section: [Forced Endpoint Creation](#forced-endpoint-creation)). If you use the _Express.js_ framework, the status code and produces will be automaticaly obtained according to the _status()_ and _setHeader()_ functions, respectively. If you use a framework that does not contain these functions, you will need to manually add them with the `#swagger.response[statusCode]` and `#swagger.produces` tags (see the [Responses](#responses) and [Consumes and Produces](#consumes-and-produces) sections).
## Tutorials
Some tutorials with examples:
[Tutorial in English](https://medium.com/@davibaltarx/automatic-api-documentation-in-node-js-using-swagger-dd1ab3c78284)
[Tutorial em Português Brasil](https://medium.com/@davibaltarx/documenta%C3%A7%C3%A3o-autom%C3%A1tica-de-apis-em-node-js-eb03041c643b)
## Changelog
- Version 2.0.x:
- Recognizes of Routes and referenced functions
- Endpoint with referenced callback now it's done automatically
- Multiple patterns now it's done automatically
- Partial TypeScript recognition
- Recognizes middleware and middleware array
- Code refactoring
- Bug fixes
- Version 2.1.x:
- Recognizes different file import patterns
- Recognizes some more features of TypeScript
- Bug fixes
- Version 2.2.x:
- Recognizes some more features of TypeScript
- Performance improvement
- Recognizes regex in endpoint's path
- Recognizes middlewares of routes (partially)
- Options to disable logs
- Bug fixes
- Version 2.3.x:
- Recognizes 'require-dir' lib (partially)
- Recognizes some more features of TypeScript
- Bug fixes
- Version 2.4.x:
- Recognizes direct import, such as: router.use(..., require('./routes.js'))
- Recognizes new Router({ prefix: '...' })
- Added some default parameters values
- Code refactoring
- Bug fixes
- Version 2.5.x:
- New tags: #swagger.summary and #swagger.operationId
- Bug fixes
- Version 2.6.x:
- Recognition of more patterns
- Bug fixes
- Version 2.7.x:
- Automatic body recognition