smooth-signature
Version:
前端H5带笔锋手写签名,支持PC端和移动端,无框架限制,Vue、React等均可使用
234 lines (175 loc) • 7.5 kB
Markdown
# smooth-signature 带笔锋手写签名
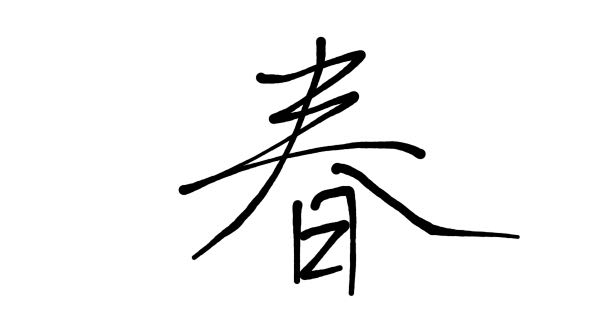
- [Demo在线演示](https://linjc.github.io/smooth-signature/) 以下截图为手机端手写效果图
- [前言](#前言)
- [安装](#安装)
- [使用](#使用)
- [配置](#配置options)
- [实现原理](#实现原理)
- [1、采集坐标](#1采集画笔经过的点坐标和时间)
- [2、计算速度](#2计算两点之间移动速度)
- [3、计算线宽](#3计算两点之间线的宽度)
- [4、画线](#4画线)
- [快捷链接](#快捷链接)
## 前言
受疫情的影响,无纸化流程和电子合同开始普及,电子签名需求也不断增加,签名体验也在逐渐改善,从一开始简单的canvas画线,到追求线条丝滑圆润,再到要求和纸上写字一样的笔锋效果等等。网上不少现成开源的签名库,其中[signature_pad](https://github.com/szimek/signature_pad)笔锋效果实现比较好,但具体使用还是会发现有明显的锯齿感,于是利用工作之余,根据自身理解换了另一种方案实现了一套,同时也为小程序开发了一版,一起分享给有需要的同学。
[mini-smooth-signature](https://github.com/linjc/mini-smooth-signature) 小程序版带笔锋手写签名,支持多平台小程序使用
## 安装
```bash
npm install smooth-signature
# 或
yarn add smooth-signature
```
或通过<script>引用,全局变量 **window.SmoothSignature**
```html
<script src="https://unpkg.com/smooth-signature/dist/index.umd.min.js" />
```
也可自行下载[smooth-signature.js](https://unpkg.com/browse/smooth-signature/dist/)到本地引用
## 使用
```html
<div>
<canvas />
</div>
```
```js
import SmoothSignature from "smooth-signature";
const canvas = document.querySelector("canvas");
const signature = new SmoothSignature(canvas);
// 生成PNG
const url = signature.getPNG() // 或者 signature.toDataURL()
// 生成JPG
const url = signature.getJPG() // 或者 signature.toDataURL('image/jpeg')
// 清屏
signature.clear()
// 撤销
signature.undo()
// 重做
signature.redo()
// 是否为空
signature.isEmpty()
// 生成旋转后的新画布 -90/90/-180/180
signature.getRotateCanvas(90)
```
### 配置[options]
所有配置项均是可选的
```js
const signature = new SmoothSignature(canvas, {
width: 1000,
height: 600,
scale: 2,
minWidth: 4,
maxWidth: 10,
color: '#1890ff',
bgColor: '#efefef'
});
```
**options.width**
画布在页面实际渲染的宽度(px)
* Type: `number`
* Default:canvas.clientWidth || 320
**options.height**
画布在页面实际渲染的高度(px)
* Type: `number`
* Default:canvas.clientHeight || 200
**options.scale**
画布缩放,可用于提高清晰度
* Type: `number`
* Default:window.devicePixelRatio || 1
**options.color**
画笔颜色
* Type: `string`
* Default:black
**options.bgColor**
画布背景颜色,默认透明
* Type: `string`
* Default:
**options.openSmooth**
是否开启笔锋效果,默认开启
* Type: `boolean`
* Default:true
**options.minWidth**
画笔最小宽度(px),开启笔锋时画笔最小宽度
* Type: `number`
* Default:2
**options.maxWidth**
画笔最大宽度(px),开启笔锋时画笔最大宽度,或未开启笔锋时画笔正常宽度
* Type: `number`
* Default:6
**options.minSpeed**
画笔达到最小宽度所需最小速度(px/ms),取值范围1.0-10.0,值越小,画笔越容易变细,笔锋效果会比较明显,可以自行调整查看效果,选出自己满意的值。
* Type: `number`
* Default:1.5
**options.maxWidthDiffRate**
相邻两线宽度增(减)量最大百分比,取值范围1-100,为了达到笔锋效果,画笔宽度会随画笔速度而改变,如果相邻两线宽度差太大,过渡效果就会很突兀,使用maxWidthDiffRate限制宽度差,让过渡效果更自然。可以自行调整查看效果,选出自己满意的值。
* Type: `number`
* Default:20
**options.onStart**
绘画开始回调函数
* Type: `function`
**options.onEnd**
绘画结束回调函数
* Type: `function`
## 实现原理
我们平时纸上写字,细看会发现笔画的粗细是不均匀的,这是写字过程中,笔的按压力度和移动速度不同而形成的。而在电脑手机浏览器上,虽然我们无法获取到触摸的压力,但可以通过画笔移动的速度来实现不均匀的笔画效果,让字体看起来和纸上写字一样有“笔锋”。下面介绍具体实现过程(以下展示代码只为方便理解,非最终实现代码)。
#### 1、采集画笔经过的点坐标和时间
通过监听画布move事件采集移动经过的点坐标,并记录当前时间,然后保存到points数组中。
```js
function onMove(event) {
const e = event.touches && event.touches[0] || event;
const rect = this.canvas.getBoundingClientRect();
const point = {
x: e.clientX - rect.left,
y: e.clientY - rect.top,
t: Date.now()
}
points.push(point);
}
```
#### 2、计算两点之间移动速度
通过两点坐标计算出两点距离,再除以时间差,即可得到移动速度。
```js
const distance = Math.sqrt(Math.pow(end.x - start.x, 2) + Math.pow(end.y - start.y, 2));
const speed = distance / (end.t - start.t);
```
#### 3、计算两点之间线的宽度
得到两点间移动速度,接下来通过简单算法计算出线的宽度,其中maxWidth、minWidth、minSpeed为配置项
```js
const addWidth = (maxWidth - minWidth) * speed / minSpeed;
const lineWidth = Math.min(Math.max(maxWidth - addWidth, minWidth), maxWidth);
```
另外,为了防止相邻两条线宽度差太大,而出现突兀的过渡效果,需要做下限制,其中maxWidthDiffRate为配置项,preLineWidth为上一条线的宽度
```js
const rate = (lineWidth - preLineWidth) / preLineWidth;
const maxRate = maxWidthDiffRate / 100;
if (Math.abs(rate) > maxRate) {
const per = rate > 0 ? maxRate : -maxRate;
lineWidth = preLineWidth * (1 + per);
}
```
#### 4、画线
现在已经知道每两点间线的宽度,接下来就是画线了。为了让线条看起来圆润以及线粗细过渡更自然,我把两点之间的线平均成三段,其中:
1) 第一段(x0,y0 - x1,y1)线宽设置为当前线宽和上一条线宽的平均值lineWidth1 = (preLineWidth + lineWidth) / 2
2) 第二段(x1,y1 - x2,y2)
3) 第三段(x2,y2 - next_x0,next_y0)线宽设置为当前线宽和下一条线宽的平均值lineWidth3 = (nextLineWidth + lineWidth) / 2
开始画线,先来看第一段线,因为第一段线和上一条线相交,为了保证两条线过渡比较圆润,采用二次贝塞尔曲线,起点为上一条线的第三段起点(pre_x2, pre_y2)
```js
ctx.lineWidth = lineWidth1
ctx.beginPath();
ctx.moveTo(pre_x2, pre_y2);
ctx.quadraticCurveTo(x0, y0, x1, y1);
ctx.stroke();
```
第二段线为承接第一段和第三段的过渡线,由于第一段和第三段线宽有差异,所以第二段线使用梯形填充,让过渡效果更自然。
```js
ctx.beginPath();
ctx.moveTo(point1.x, point1.y);
ctx.lineTo(point2.x, point2.y);
ctx.lineTo(point3.x, point3.y);
ctx.lineTo(point4.x, point4.y);
ctx.fill();
```
第三段等画下一条线时重复上述操作即可。
## 快捷链接
- [Example代码](./example)
- [Github仓库](https://github.com/linjc/smooth-signature)
- [Gitee仓库](https://gitee.com/l2j2c3/smooth-signature)