roam-reactnative
Version:
This plugin allows to use the Roam.ai SDK in your React Native mobile application on iOS and Android.
594 lines (435 loc) • 18.2 kB
Markdown
<p align="center">
<a href="https://roam.ai" target="_blank" align="left">
<img src="https://github.com/geosparks/roam-reactnative/blob/master/logo.png?raw=true" width="180">
</a>
<br />
</p>
[](https://badge.fury.io/js/roam-reactnative)
[](https://github.com/geosparks/roam-reactnative/actions/workflows/main.yml)
# Official Roam React Native SDK
This is the official [Roam](https://roam.ai) iOS SDK developed and maintained by Roam B.V
Note: Before you get started [signup to our dashboard](https://roam.ai/dashboard/signup) to get your API Keys.
## Featured Apps
<a href="https://sprintcrowd.com"><img src="https://sprintcrowd.com/wp-content/uploads/2020/08/sc-logo_400.png" width="100"></a>
<a href="https://letstransport.in"><img src="https://i.imgur.com/pDIb2BK.png" width="100"></a>
# Quick Start
The Roam React Native SDK makes it quick and easy to build a location tracker for your React Native app. We provide powerful and customizable tracking modes and features that can be used to collect your users location updates.
### Requirements
To use the Roam SDK, the following things are required:
Get yourself a free Roam Account. No credit card required.
- [x] Create a project and add an iOS app to the project.
- [x] You need the SDK_KEY in your project settings which you’ll need to initialize the SDK.
- [x] Now you’re ready to integrate the SDK into your React Native application.
# Add the Roam React Native SDK to your app
In your project directory, install from npm or yarn, and then link it.
```bash
//npm
npm install --save roam-reactnative
//yarn
yarn add roam-reactnative
```
If using React Native version of 0.60 or greater, autolinking is now done automatically so you can skip this step.
```
//React Native
react-native link roam-reactnative
//Expo
expo install roam-reactnative
```
Minimum supported versions
```
react-native: 0.41.2
react: 15.4.2
```
Before making any changes to your javascript code, you would need to integrate and initialize Roam SDK in your Android and iOS applications.
### Android
1. Add the following to the build script `{repositories {}}` section of the `build.gradle` (Project)file
```java
mavenCentral()
```
2. Install the SDK to your project via `Gradle` in Android Studio, add the maven below in your project `build.gradle` file.
```java
repositories {
maven {
url 'https://com-roam-android.s3.amazonaws.com/'
}
}
```
3. Add the dependencies below in your `app build.gradle` file. Then sync Gradle.
```
dependencies {
implementation 'com.roam.sdk:roam-android:0.1.40'
}
```
4. Before initializing the SDK, the below must be imported in your Main Activity.
```java
import com.roam.sdk.Roam;
```
5. After import, add the below code under the Application class `onCreate()` method. The SDK must be initialised before calling any of the other SDK methods.
```java
Roam.initialize(this, "YOUR-SDK-KEY-GOES-HERE");
```
### iOS
1. Run `cd ios` && `pod install`
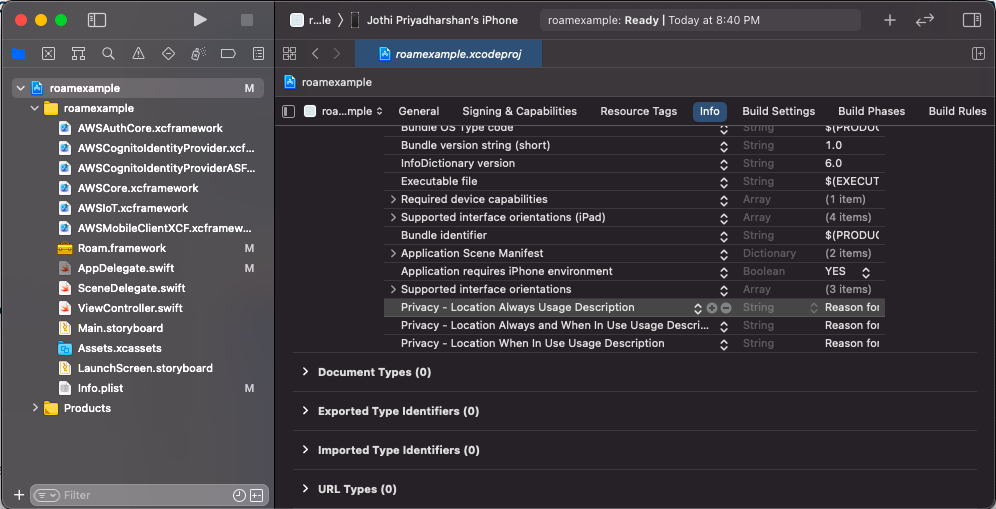
2. Then, configure the information property list file `Info.plist` with an XML snippet that contains data about your app. You need to add strings for `NSLocationWhenInUseUsageDescription` in the `Info.plist` file to prompt the user during location permissions for foreground location tracking. For background location tracking, you also need to add a string for `NSLocationAlwaysUsageDescription` and `NSLocationAlwaysAndWhenInUseUsageDescription` in the same` Info.plist` file.
```xml
<key>NSLocationWhenInUseUsageDescription</key>
<string>Add description for foreground only location usage.</string>
<key>NSLocationAlwaysUsageDescription</key>
<string>Add description for background location usage. iOS 10 and below"</string>
<key>NSLocationAlwaysAndWhenInUseUsageDescription</key>
<string>Add description for background location usage. iOS 11 and above</string>
```
3. Next you need to enable`Background fetch` and` Location updates` under `Project Setting` > `Capabilities` > `Background Modes`.

4. Import Roam into your `AppDelegate` file.
```objective-c
#import <Roam/Roam.h>
```
5. Initialize the SDK in your `AppDelegate` class before calling any other Roam methods under this `application:didFinishLaunchingWithOptions:`
```objective-c
- (BOOL)application:(UIApplication *)application didFinishLaunchingWithOptions:(NSDictionary *)launchOptions
{
[Roam initialize:@"YOUR-PUBLISHABLE-KEY" :NULL :NULL];
}
```
### Manual Linking
1. Open the iOS module files, located inside `node_modules/roam-reactnative/ios/`.
2. Open the app workspace file `(AppName.xcworkspace)` in Xcode.
3. Move the `RNRoam.h` and `RNRoam.m` files to your project. When shown a popup window, select `Create groups`.
# Finally, lets do some javascript
## Import module
First, import the module.
```javascript
import Roam from "roam-reactnative";
```
## Creating Users
Once the SDK is initialized, we need to _create_ or _get a user_ to start the tracking and use other methods. Every user created will have a unique Roam identifier which will be used later to login and access developer APIs. We can call it as Roam userId.
```javascript
Roam.createUser(
"SET-USER-DESCRIPTION-HERE",
(success) => {
// do something on success
},
(error) => {
// do something on error
},
);
```
The option _user description_ can be used to update your user information such as name, address or add an existing user ID. Make sure the information is encrypted if you are planning to save personal user information like email or phone number.
You can always set or update user descriptions later using the below code.
```javascript
Roam.setDescription("SET-USER-DESCRIPTION-HERE");
```
If you already have a Roam userID which you would like to reuse instead of creating a new user, use the below to get user session.
```javascript
Roam.getUser(
"ROAM-USER-ID",
(success) => {
// do something on success
},
(error) => {
// do something on error
},
);
```
## Request Permissions
Get location permission from the App user on the device. Also check if the user has turned on location services for the device.
```javascript
// Call this method to check Location Permission for Android & iOS
Roam.checkLocationPermission( status => {
// do something with status
});
// Call this method to request Location Permission for Android & iOS
Roam.requestLocationPermission();
```
### Android
```javascript
// Call this method to check Location services for Android
Roam.checkLocationServices( status => {
// do something with status
});
// Call this method to request Location services for Android
Roam.requestLocationServices();
```
In case of devices running above Anroid 10, you would need to get background location permissions to track locations in background.
```javascript
// Call this method to check background location permission for Android
Roam.checkBackgroundLocationPermission((status) => {
// do something with status
});
// Call this method to request background location Permission for Android
Roam.requestBackgroundLocationPermission();
```
### SDK Configurations
#### Accuracy Engine
For enabling accuracy engine for Passive, Active, and Balanced tracking.
```javascript
Roam.enableAccuracyEngine();
```
For Custom tracking mores, you can pass the desired accuracy values in integers ranging from 25-150m.
```javascript
Roam.enableAccuracyEngine(50);
```
To disable accuracy engine
```javascript
Roam.disableAccuracyEngine();
```
#### Offline Location Tracking
To modify the offline location tracking configuration, which will enabled by default.
```javascript
Roam.offlineLocationTracking(true);
```
#### Allow Mock Location Tracking
To allow mock location tracking during development, use the below code. This will be disabled by default.
```javascript
Roam.allowMockLocation(true);
```
## Location Tracking
### Start Tracking
Use the tracking modes while you use the startTracking method `Roam.startTracking`
```javascript
Roam.startTracking(TrackingMode);
```
### Tracking Modes
Roam has three default tracking modes along with a custom version. They differ based on the frequency of location updates and battery consumption. The higher the frequency, the higher is the battery consumption. You must use [foreground service](https://developer.android.com/about/versions/oreo/background-location-limits) for continuous tracking.
| **Mode** | **Battery usage** | **Updates every** | **Optimised for/advised for** |
| -------- | ----------------- | ----------------- | ----------------------------- |
| ACTIVE | 6% - 12% | 25 ~ 250 meters | Ride Hailing / Sharing |
| BALANCED | 3% - 6% | 50 ~ 500 meters | On Demand Services |
| PASSIVE | 0% - 1% | 100 ~ 1000 meters | Social Apps |
```javascript
// active tracking
Roam.startTracking("ACTIVE");
// balanced tracking
Roam.startTracking("BALANCED");
// passive tracking
Roam.startTracking("PASSIVE");
```
### Custom Tracking Modes
The SDK also allows you define a custom tracking mode that allows you to
customize and build your own tracking modes.
#### Android
| **Type** | **Unit** | **Unit Range** |
| ----------------- | -------- | -------------- |
| Distance Interval | Meters | 1m ~ 2500m |
| Time Interval | Seconds | 10s ~ 10800s |
**Android: Distance between location updates:**
```javascript
//Update location based on distance between locations.
Roam.startTrackingDistanceInterval(
"DISTANCE IN METERS",
"STATIONARY DURATION IN SECONDS",
Roam.DesiredAccuracy.HIGH,
);
```
Here, the `DISTANCE IN METERS` refers to distance interval for location tracking and `STATIONARY DURATION IN SECONDS` refers to duration for which location update is determined as stationary.
Below is the example for distance based tracking with distance interval as 10m and stationary duration as 2 minutes.
```javascript
//Update location based on distance between locations.
Roam.startTrackingDistanceInterval(10, 120, Roam.DesiredAccuracy.HIGH);
```
**Android: Time between location updates:**
```javascript
//Update location based on time interval.
Roam.startTrackingTimeInterval(
"INTERVAL IN SECONDS",
Roam.DesiredAccuracy.HIGH,
);
```
Here, the `INTERVAL IN SECONDS` refers to time interval for location tracking.
Below is the example for time based tracking with time interval as 10s.
```javascript
//Update location based on time interval.
Roam.startTrackingTimeInterval(10, Roam.DesiredAccuracy.HIGH);
```
#### iOS
We have a single method for iOS which can perfrom both time and distance based tracking based on the input parameters.
```javascript
// Update location on distance interval
Roam.startTrackingCustom(
allowBackground,
pauseAutomatic,
activityType,
desiredAccuracy,
showBackIndicator,
distanceFilter,
accuracyFilter,
updateInterval,
);
```
**iOS: Distance between location updates:**
Here, the `distanceFilter` refers to distance interval for location tracking which should be in meters. To achieve distance based tracking, the `updateInterval` value should be 0.
Below is the example for distance based tracking with distance interval as 20 meters.
```javascript
Roam.startTrackingCustom(
true, // allowBackground
false, // pauseAutomatic
Roam.ActivityType.FITNESS, // activityType
Roam.DesiredAccuracyIOS.BEST, // desiredAccuracy
true, // showBackIndicator
20, // distanceFilter
10, // accuracyFilter
0, // updateInterval
);
```
**iOS: Time between location updates:**
```javascript
// Update location on time interval
Roam.startTrackingCustom(
allowBackground,
pauseAutomatic,
activityType,
desiredAccuracy,
showBackIndicator,
distanceFilter,
accuracyFilter,
updateInterval,
);
```
Here, the `updateInterval` refers to time interval for location tracking which should be in seconds. To achieve time based tracking, the `distanceFilter` value should be 0.
Below is the example for time based tracking with time interval as 120s.
```javascript
Roam.startTrackingCustom(
true, // allowBackground
false, // pauseAutomatic
Roam.ActivityType.FITNESS, // activityType
Roam.DesiredAccuracyIOS.BEST, // desiredAccuracy
true, // showBackIndicator
0, // distanceFilter
10, // accuracyFilter
120, // updateInterval
);
```
### Update Location When Stationary
By using this method updateLocationWhenStationary , location will update every x seconds when device goes to stationary state.
Note: It will work on all tracking modes ie. active, passive, balance and distance based custom tracking except time based custom tracking.
```javascript
Roam.updateLocationWhenStationary(interval);
```
For example, to update location every 60s when the user becomes stationary, use the below code.
```javascript
Roam.updateLocationWhenStationary(60);
```
## Stop Tracking
To stop the tracking use the below method.
```javascript
Roam.stopTracking();
```
## Publish Messages
It will both publish location data and these data will be sent to Roam servers for further processing and data will be saved in our database servers.
We will now have an option to send meta-data as a parameter along with location updates in the below json format.
```javascript
Roam.publishAndSave(metadataJSON);
```
Example
```javascript
//Metadata is not mandatory
let metadataJSON = { METADATA: { 1: true, 2: true, 3: true } };
Roam.publishAndSave(metadataJSON);
optional;
Roam.publishAndSave(null);
```
## Stop Publishing
It will stop publishing the location data to other clients.
```javascript
Roam.stopPublishing();
```
## Subscribe Messages
Now that you have enabled the location listener, use the below method to subscribe to your own or other user's location updates and events.
### Subscribe
```javascript
Roam.subscribe(TYPE, "USER-ID");
```
| **Type** | **Description** |
| -------- | ----------------------------------------------------------------------------- |
| LOCATION | Subscribe to your own location (or) other user's location updates. |
| EVENTS | Subscribe to your own events. |
| BOTH | Subscribe to your own events and location (or) other user's location updates. |
### UnSubscribe
```javascript
Roam.unSubscribe(TYPE, "USER-ID");
```
You can pass `user_id` as empty string to unsubscribe from all the users.
## Listeners
Now that the location tracking is set up, you can subscribe to locations and events and use the data locally on your device or send it directly to your own backend server.
To do that, you need to set the location and event listener to `true` using the below method. By default the status will set to `false` and needs to be set to `true` in order to stream the location and events updates to the same device or other devices.
```javascript
Roam.toggleListener(
true,
true,
(success) => {
// do something on success
},
(error) => {
// do something on error
},
);
```
Once the listener toggles are set to true, to listen to location updates and events.
Note: The location data received will be an array with either single or multiple location data.
```javascript
Roam.startListener("location", (location) => {
// do something on location received
console.log("Location", location);
// Console Output:
// [{"activity": "S", "location": {"accuracy": 22.686637856849305, "altitude": 288.10509490966797, "latitude": 10.356502722371895, "longitude": 78.00075886670541, "speed": -1}, "recordedAt": "2022-03-22T11:18:04.928Z", "timezone": "+0530", "userId": "6239b06506df1f5c1c375353"},{..}...]
});
```
You can also configure batch setting for the location receiver. To set the batch configuration, you need to pass batch count and batch window.
```javascript
Roam.setBatchReceiverConfig(NETWORK_STATE, BATCH_COUNT, BATCH_WINDOW, success => {
// do something on success
//success.batchCount,
//success.batchWindow,
//success.networkState
},
error => {
// do something on error
//error.code
//error.message
}););
```
| **Type** | **Description** |
| ------------- | --------------------------------------- |
| NETWORK_STATE | online (or) offline (or) both |
| BATCH_COUNT | Integer value from 1-1000. Default as 1 |
| BATCH_WINDOW | Integer value. Default as 0 |
You can get the current configured settings with the below code.
```javascript
Roam.getBatchReceiverConfig(
(success) => {
// do something on success
//success.batchCount,
//success.batchWindow,
//success.networkState
},
(error) => {
// do something on error
//error.code
//error.message
},
);
```
You can reset the batch configuration to default values with the below code.
```javascript
Roam.resetBatchReceiverConfig(
(success) => {
// do something on success
//success.batchCount,
//success.batchWindow,
//success.networkState
},
(error) => {
// do something on error
//error.code
//error.message
},
);
```
## Documentation
Please visit our [Developer Center](https://github.com/geosparks/roam-reactnative/wiki) for instructions on other SDK methods.
## Contributing
- For developing the SDK, please visit our [CONTRIBUTING.md](https://github.com/geosparks/roam-reactnative/blob/master/CONTRIBUTING.md) to get started.
## Need Help?
If you have any problems or issues over our SDK, feel free to create a github issue or submit a request on [Roam Help](https://geosparkai.atlassian.net/servicedesk/customer/portal/2).