rerumaccusamus
Version:
The meta-framework suite designed from scratch for frontend-focused modern web development.
176 lines (124 loc) • 5.13 kB
Markdown
---
title: 调试代理和 Mock
sidebar_position: 1
---
## 使用 Mock 功能
Modern.js 提供了快速生成 Mock 数据的功能,能够让前端独立自主开发,不被后端接口阻塞。
### Mock 文件
约定当 `config/mock` 目录下存在 `index.[jt]s` 时,会自动开启 Mock 功能,如下:
```bash
.
├── config
│ └── mock
│ ├── a.json
│ └── index.js
├── src
│ └── App.jsx
└── modern.config.js
```
### Mock 文件编写
`./config/mock/index.js` 文件只需要导出一个包含所有 Mock API 的对象,对象的属性由请求配置 `method` 和 `url` 组成,对应的属性值可以为 `Object`、`Array`、`Function`:
```js
module.exports = {
/* 属性为具体的 method 和 请求 url,值为 object 或 array作为请求的结果 */
'GET /api/getInfo': { data: [1, 2, 3, 4] },
/* method 默认为 GET */
'/api/getExample': { id: 1 },
/* 可以使用自定义函数根据请求动态返回数据,返回值参考 express middleware */
'POST /api/addInfo': (req, res, next) => {
res.setHeader('Access-Control-Allow-Origin', '*');
res.end('200');
},
};
```
代码中访问 `http://localhost:8080/api/getInfo` 时,接口会返回 JSON 格式数据:`{ "data": [1, 2, 3, 4] }`。
### 返回随机数据
可以在 `./config/mock/index.js` 中自主引入 [Mock.js](https://github.com/nuysoft/Mock/wiki/Getting-Started)、[faker.js](https://github.com/marak/Faker.js/) 等库生成随机数据,例如:
```js
const Mock = require('mockjs');
const faker = require('faker');
module.exports = {
'/api/getInfo': Mock.mock({
'data|1-10': [{ name: '@cname' }]
}) /* => {data: [{name: "董霞"}, {name: "魏敏"}, {name: "石磊"}} */
'/a/b': {
name: faker.fake("{{name.lastName}}, {{name.firstName}} {{name.suffix}}")
} /* => { name: 'Marks, Dean Sr.'} */
}
```
:::info 更多随机数据生成库
* [Faker.js](https://github.com/marak/Faker.js/)
* [Chancejs](https://github.com/chancejs/chancejs)
* [Mock](https://github.com/nuysoft/Mock/wiki/Getting-Started)
* https://www.npmtrends.com/mockjs-vs-faker-vs-chance
:::
### 延迟返回
- 可以使用浏览器「 弱网模拟 」的功能实现。
- 可以通过 `setTimeout` 为单个接口设置延迟,例如:
```js
module.exports = {
'api/getInfo': (req, res) => {
setTimeout(() => {
res.end('delay 2000ms');
}, 2000);
},
};
```
## 使用开发代理
### devServer 代理
Modern.js 在 [`tools.devServer`](/docs/apis/config/tools/dev-server) 中提供了配置开发环境代理的方式。例如,将本地开发接口,代理到线上某个地址:
```js title="modern.config.js"
import { defineConfig } from '@modern-js/app-tools';
export default defineConfig({
tools: {
devServer: {
proxy: {
'/go/api': {
target: 'http://www.example.com/',
changeOrigin: true,
},
},
},
},
});
```
请求 `http://localhost:8080/go/api` 时,会从 [http://www.example.com/](http://www.example.com/) 返回响应内容。
:::info 补充信息
配置格式可参考:【[http-proxy-middleware](https://github.com/chimurai/http-proxy-middleware)】。
:::
### 全局代理
Modern.js 提供了开箱即用的全局代理插件 `@modern-js/plugin-proxy`,该插件底层基于 [whistle](https://github.com/avwo/whistle),可用来查看、修改 HTTP/HTTPS 的请求和响应,也可作为 HTTP 代理服务器使用。
#### 设置代理规则
引入代理插件并填写规则后,执行 `pnpm run dev`,Modern.js 会在开发服务器启动之后,自动启用代理服务器。
具体代理规则,可通过 [`dev.proxy`](/docs/apis/config/dev/proxy) 选项或 `config/proxy.js` 文件进行设置。
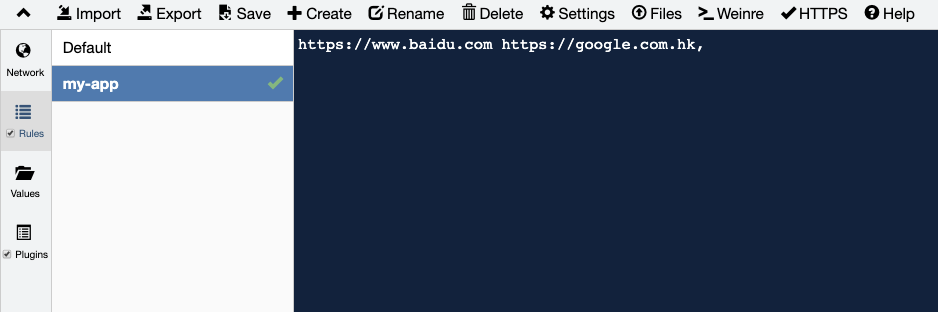
#### 代理服务器 UI 界面
安装代理插件并配置代理规则后, 执行 `pnpm run dev` 命令:
```bash
Compiled successfully in 3178ms
App running at:
Local: http://localhost:8080/
Network: http://10.2.210.160:8080/
Note that the development build is not optimized.
To create a production build, execute build command.
ℹ info Starting the proxy server.....
✔ success Proxy Server start on localhost:8899
```
在控制台中可以看到代理服务器成功启动。
访问 `http://localhost:8899`,显示下图所示的 UI 界面后,即可通过界面设置规则。
### BFF 代理
通过配置 [`bff.proxy`](/docs/apis/config/bff/proxy) 可以代理 BFF API 请求到指定的服务上,和[开发环境代理](/docs/apis/config/dev/proxy)不同的是,它同样可以用在生产环境:
```js title="modern.config.js"
export default defineConfig({
bff: {
proxy: {
'/api/v1': 'https://cnodejs.org',
},
},
});
```
例如代码中使用一体化 BFF 调用时,最终请求 `http://localhost:8080/api/v1/topics` 会自动代理到 `https://cnodejs.org/api/v1/topics`:
```js
import getTopics from '@api/v1/topics'
getTopics();
```