rerumaccusamus
Version:
The meta-framework suite designed from scratch for frontend-focused modern web development.
143 lines (108 loc) • 4.09 kB
Markdown
---
sidebar_position: 3
title: 定制 BFF Server
---
BFF Server 与应用一体,共同开发、调试、部署,开发者通常只需要写函数即可。但有时,应用中会存在一些 BFF 函数的通用前置逻辑,例如权限校验。
在[一体化 Web 专题](/docs/guides/features/server-side/web/web-server)中提到过,Modern.js 支持定制 Web Server。同样,Modern.js 也为 BFF Server 提供了扩展能力。
Modern.js 允许开发者创建 `api/_app.ts` 文件,在该文件中对定制自己的 BFF Server。
和 Web Server 相同,默认支持了 4 种主流的 Node.js Server 框架:Express、Koa、Egg、Nest,开发者可以根据自身偏好,选择合适的框架来编写 `api/_app.ts`。
这里先以 Express 为例来展示一下用法,下一章节会详细介绍各个框架扩展的写法。
首先创建项目,并[开启 BFF 功能](/docs/guides/tutorials/c09-bff/9.2-enable-bff),这时项目的目录结构是:
```md
.
├── README.md
├── api
│ ├── _app.ts
│ ├── index.ts
│ └── info
│ └── [type].ts
├── modern.config.ts
├── package.json
├── pnpm-lock.yaml
├── src
│ ├── App.css
│ ├── App.tsx
│ ├── index.test.ts
│ └── modern-app-env.d.ts
└── tsconfig.json
```
创建一个 `api/login.ts` 文件用于实现登录:
```ts
import { useContext } from '@modern-js/runtime/server';
export const post = async () => {
const ctx = useContext();
ctx.res.cookie('sid', Math.random());
return { code: 0, message: 'OK' };
};
```
:::info 补充信息
`useContext` API 用于获取请求上下文,具体用法可以看 [API 文档](/docs/apis/runtime/bff-server/use-context)。
:::
接下来修改 `api/_app.ts`,手写一个中间件用于权限校验:
```ts
import { hook } from '@modern-js/runtime/server';
import { Request, Response, NextFunction } from 'express';
export default hook(({ addMiddleware }) => {
addMiddleware(async (req: Request, res: Response, next: NextFunction) => {
if (req.url !== '/api/login') {
const sid = req?.cookies?.sid;
if (!sid) {
res.status(400);
res.json({ code: -1, message: 'need login' });
} else {
next();
}
} else {
next();
}
});
});
```
然后添加一个普通的接口函数文件 `/api/hello.ts`:
```ts
export default async () => {
return 'Hello Modern.js';
};
```
最后在前端 `/src/App.tsx` 添加接口的访问代码,直接使用一体化调用的方式:
```ts
import { useState, useEffect } from 'react';
import { get as hello } from '@api/hello';
export default () => {
const [text, setText] = useState('');
useEffect(() => {
async function fetchMyApi() {
const { message } = await hello();
setText(message);
}
fetchMyApi();
}, []);
return <p>{text}</p>;
};
```
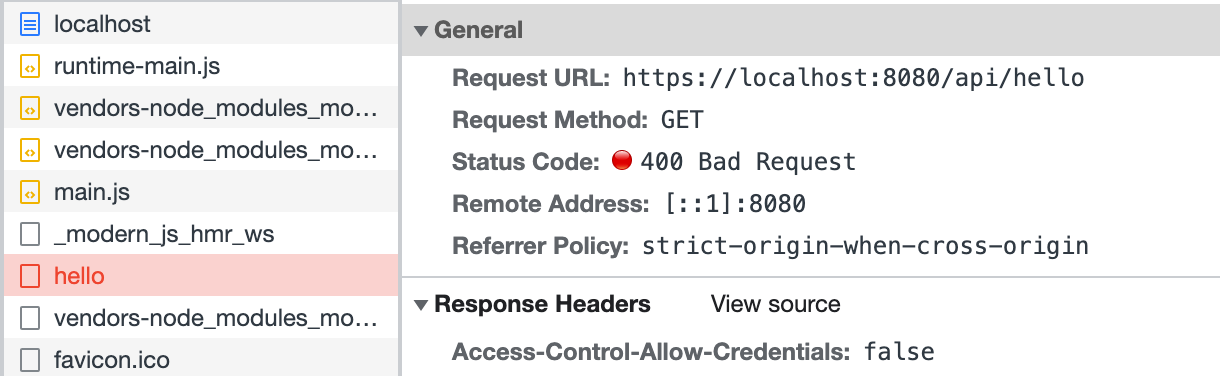
然后 `pnpm run dev` 启动项目,访问 [http://localhost:8080/](http://localhost:8080/) 会发现 `/api/hello` 的请求被拦截了:
我们再修改前端代码 `src/App.tsx`,在访问 `/api/hello` 前先调用登录接口:
```ts
import { useState, useEffect } from 'react';
import { get as hello } from '@api/hello';
import { post as login } from '@api/login';
export default () => {
const [text, setText] = useState('');
useEffect(() => {
async function fetchAfterLogin() {
const { code } = await login();
if (code === 0) {
const { message } = await hello();
setText(message);
}
}
fetchAfterLogin();
}, []);
return <p>{text}</p>;
};
```
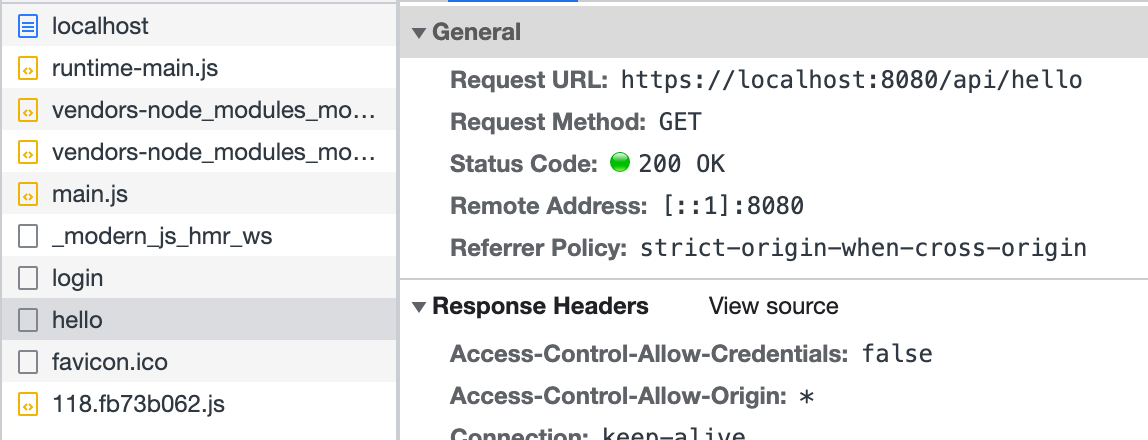
刷新页面,可以看到 `/api/hello` 访问成功:
以上代码模拟了在 `/api/_app.ts` 中添加中间件的方式,实现了简易的登录功能。
同样,可以在这个钩子文件中实现其他功能来扩展 BFF Server。