react-native-sqlcipher-storage
Version:
SQLCipher bindings for React Native (Android & iOS)
215 lines (155 loc) • 7.35 kB
Markdown
# react-native-sqlcipher-storage
SQLCipher plugin for React Native. Based on the hard work already put in on the react-native-sqlite-storage project and on cordova-sqlcipher-adapter, this is a minor change to the former in order to use the sqlcipher backend from the latter.
Features:
1. iOS and Android supported via identical JavaScript API.
2. Android in pure Java and Native modes
3. SQL transactions
4. JavaScript interface via plain callbacks or Promises.
5. Pre-populated SQLite database import from application sandbox
#How to use (iOS):
#### Step 1. NPM install
```shell
npm install --save react-native-sqlcipher-storage
```
#### Step 2. XCode SQLite project dependency set up
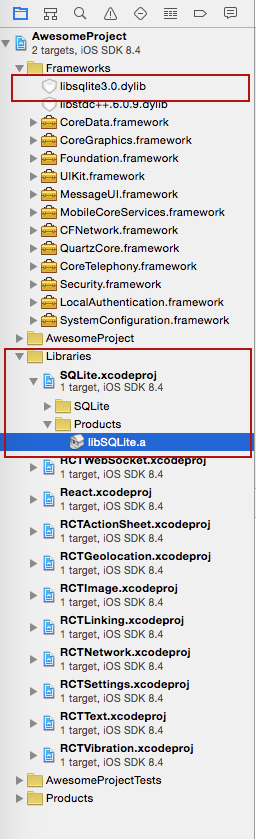
Drag the SQLite Xcode project as a dependency project into your React Native XCode project
#### Step 3. XCode SQLite libraries dependency set up
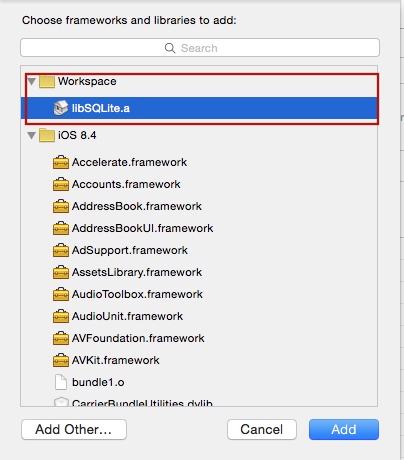
Add libSQLite.a (from Workspace location) to the required Libraries and Frameworks. Also add Security.framework (XCode 7) in the same fashion using Required Libraries view (Do not just add them manually as the build paths will not be properly set)
#### Step 4. Application JavaScript require
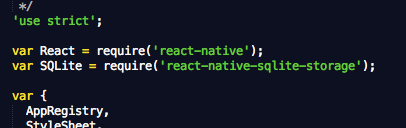
Add var SQLite = require('react-native-sqlcipher-storage') to your index.ios.js
#### Step 5. Application JavaScript code using the SQLite plugin
Add JS application code to use SQLite API in your index.ios.js etc. Here is some sample code. For full working example see test/TestRunner/index.ios.js.
```javascript
errorCB(err) {
console.log("SQL Error: " + err);
},
successCB() {
console.log("SQL executed fine");
},
openCB() {
console.log("Database OPENED");
},
var db = SQLite.openDatabase({"name": "test.db", "key": "password"}, openCB, errorCB);
db.transaction((tx) => {
tx.executeSql('SELECT * FROM Employees a, Departments b WHERE a.department = b.department_id', [], (tx, results) => {
console.log("Query completed");
// Get rows with Web SQL Database spec compliance.
var len = results.rows.length;
for (let i = 0; i < len; i++) {
let row = results.rows.item(i);
console.log(`Employee name: ${row.name}, Dept Name: ${row.deptName}`);
}
// Alternatively, you can use the non-standard raw method.
/*
let rows = results.rows.raw(); // shallow copy of rows Array
rows.map(row => console.log(`Employee name: ${row.name}, Dept Name: ${row.deptName}`));
*/
});
});
```
#How to use (Android):
#### Step 1 - NPM Install
```shell
npm install --save react-native-sqlcipher-storage
```
#### Step 2 - Update Gradle Settings
```gradle
// file: android/settings.gradle
...
include ':react-native-sqlcipher-storage'
project(':react-native-sqlcipher-storage').projectDir = new File(rootProject.projectDir, '../node_modules/react-native-sqlcipher-storage/src/android')
```
#### Step 3 - Update app Gradle Build
```gradle
// file: android/app/build.gradle
...
dependencies {
...
compile project(':react-native-sqlcipher-storage')
}
```
#### Step 4 - Register React Package (this should work on React version but if it does not , try the ReactActivity based approach
```java
...
import org.pgsqlite.SQLitePluginPackage;
public class MainActivity extends Activity implements DefaultHardwareBackBtnHandler {
private ReactInstanceManager mReactInstanceManager;
private ReactRootView mReactRootView;
@Override
protected void onCreate(Bundle savedInstanceState) {
super.onCreate(savedInstanceState);
mReactRootView = new ReactRootView(this);
mReactInstanceManager = ReactInstanceManager.builder()
.setApplication(getApplication())
.setBundleAssetName("index.android.bundle") // this is dependant on how you name you JS files, example assumes index.android.js
.setJSMainModuleName("index.android") // this is dependant on how you name you JS files, example assumes index.android.js
.addPackage(new MainReactPackage())
.addPackage(new SQLitePluginPackage(this)) // register SQLite Plugin here
.setUseDeveloperSupport(BuildConfig.DEBUG)
.setInitialLifecycleState(LifecycleState.RESUMED)
.build();
mReactRootView.startReactApplication(mReactInstanceManager, "AwesomeProject", null); //change "AwesomeProject" to name of your app
setContentView(mReactRootView);
}
...
```
Alternative approach on newer versions of React Native (0.18+):
```java
import org.pgsqlite.SQLitePluginPackage;
public class MainActivity extends ReactActivity {
......
/**
* A list of packages used by the app. If the app uses additional views
* or modules besides the default ones, add more packages here.
*/
@Override
protected List<ReactPackage> getPackages() {
return Arrays.<ReactPackage>asList(
new SQLitePluginPackage(this)) // register SQLite Plugin here
new MainReactPackage());
}
}
```
#### Step 5 - Require and use in Javascript - see full examples (callbacks and Promise) in test directory.
```js
// file: index.android.js
var React = require('react-native');
var SQLite = require('react-native-sqlcipher-storage')
...
```
#How to use (Windows Universal Platform):
Preceding steps
Its assumed you have a winjs project and have done the following
```shell
npm install -g react-native-winjs-cli
react-native-winjs init
```
#### Step 1 - NPM Install
```shell
npm install --save react-native-sqlcipher-storage
```
#### Step 2 - Build OpenSSL
Download and build OpenSSL (static library variant) from here: https://github.com/Microsoft/openssl/ following the instructions in INSTALL.WINUNIVERSAL. You'll also need to create an environment variable OPENSSL to point at the install location
#### Add SqlCipher to your windows project
1. File -> Add -> Existing Project
2. Select project in src\windows\SQLite3-WinRT\SQLite3\SqlCipher\SqlCipher\SQLCipher.vcxproj
3. In your main windows universal application, Select References and add SqlCipher
4. The webpack process will not bundle the file in src\windows\SQLite3-WinRT\SQLite3JS. Add that file to your visual studio project and to the html file that drives the project.
# TestRunner
in test/TestRunner there is an example ready to go. From that directory do :
1. npm install
2. android : react-native run-android
3. ios : react-native run-ios
4. windows : (After building OpenSSL); open src\windows\SQLite3-WinRT\SQLite3\SqlCipher\SqlCipher.sln. Run the TestRunner app
Enjoy!
#Original react-native-sqlite-storage plugin from andpor
https://github.com/andpor/react-native-sqlite-storage
#Original Cordova SQLite Bindings from Chris Brody
https://github.com/litehelpers/Cordova-sqlite-storage
#Cordova SQLCipher Bindings from Chris Brody
https://github.com/litehelpers/Cordova-sqlcipher-adapter
The issues and limitations for the actual SQLite can be found on these sites.
https://msdn.microsoft.com/en-us/windows/uwp/debug-test-perf/windows-runtime-components-and-optimizing-interop