react-native-idosdk
Version:
Getui ido sdk plugin for react-native
300 lines (239 loc) • 12.8 kB
Markdown
# iOS 手动集成方式
在 react-native link 之后,打开 iOS 工程。
Xcode 工程中需要注册个推 SDK 、注册 deviceToken 、监听消息回调,才能正常使用推送服务,只需要通过以下几步即可集成:
1、AppDelegate.h 中添加如下代码,导入头文件并实现两个 Delegate:
````
// 导入头文件
// 以下三个参数需要到个推官网注册应用获得
// 这里需要实现 UNUserNotificationCenterDelegate,GeTuiSdkDelegate 两个 Delegate
@interface AppDelegate : UIResponder <UIApplicationDelegate,UNUserNotificationCenterDelegate,GeTuiSdkDelegate>
@property (nonatomic, strong) UIWindow *window;
@end
````
2、AppDelegate.m 的didFinishLaunchingWithOptions 方法里面添加如下代码:
````
- (BOOL)application:(UIApplication *)application didFinishLaunchingWithOptions:(NSDictionary *)launchOptions
{
// 接入个推
[GeTuiSdk startSdkWithAppId:kGtAppId appKey:kGtAppKey appSecret:kGtAppSecret delegate:self];
// 注册远程通知
[self registerRemoteNotification];
}
/** 注册远程通知 */
- (void)registerRemoteNotification {
/*
警告:Xcode8的需要手动开启“TARGETS -> Capabilities -> Push Notifications”
*/
/*
警告:该方法需要开发者自定义,以下代码根据APP支持的iOS系统不同,代码可以对应修改。
以下为演示代码,注意根据实际需要修改,注意测试支持的iOS系统都能获取到DeviceToken
*/
if ([[UIDevice currentDevice].systemVersion floatValue] >= 10.0) {
UNUserNotificationCenter *center = [UNUserNotificationCenter currentNotificationCenter];
center.delegate = self;
[center requestAuthorizationWithOptions:(UNAuthorizationOptionBadge | UNAuthorizationOptionSound | UNAuthorizationOptionAlert | UNAuthorizationOptionCarPlay) completionHandler:^(BOOL granted, NSError *_Nullable error) {
if (!error) {
NSLog(@"request authorization succeeded!");
}
}];
[[UIApplication sharedApplication] registerForRemoteNotifications];
UIUserNotificationType types = (UIUserNotificationTypeAlert | UIUserNotificationTypeSound | UIUserNotificationTypeBadge);
UIUserNotificationSettings *settings = [UIUserNotificationSettings settingsForTypes:types categories:nil];
[[UIApplication sharedApplication] registerUserNotificationSettings:settings];
[[UIApplication sharedApplication] registerForRemoteNotifications];
} else if ([[[UIDevice currentDevice] systemVersion] floatValue] >= 8.0) {
UIUserNotificationType types = (UIUserNotificationTypeAlert | UIUserNotificationTypeSound | UIUserNotificationTypeBadge);
UIUserNotificationSettings *settings = [UIUserNotificationSettings settingsForTypes:types categories:nil];
[[UIApplication sharedApplication] registerUserNotificationSettings:settings];
[[UIApplication sharedApplication] registerForRemoteNotifications];
} else {
UIRemoteNotificationType apn_type = (UIRemoteNotificationType)(UIRemoteNotificationTypeAlert |
UIRemoteNotificationTypeSound |
UIRemoteNotificationTypeBadge);
[[UIApplication sharedApplication] registerForRemoteNotificationTypes:apn_type];
}
}
````
3、在AppDelegate.m 的didRegisterForRemoteNotificationsWithDeviceToken 方法中注册 DeviceToken,如下所示:
````
- (void)application:(UIApplication *)application
didRegisterForRemoteNotificationsWithDeviceToken:(NSData *)deviceToken {
// [ GTSDK ]:(新版)向个推服务器注册deviceToken
[GeTuiSdk registerDeviceTokenData:deviceToken];
// [ 测试代码 ] 日志打印DeviceToken
NSLog(@"[ TestDemo ] [ DeviceToken(NSData) ]: %@\n\n", deviceToken);
}
````
4、为了在收到推送点击进入应用能够获取该条推送内容需要在 AppDelegate.m didReceiveRemoteNotification 方法里面添加 [[NSNotificationCenter defaultCenter] postNotificationName: object:] 方法,注意:这里需要在两个方法里面加一个是iOS7以前的一个是iOS7即以后的,如果AppDelegate.m 没有这个两个方法则直接复制这两个方法,如下所示:
````
/** APP已经接收到“远程”通知(推送) - 透传推送消息 */
- (void)application:(UIApplication *)application didReceiveRemoteNotification:(NSDictionary *)userInfo fetchCompletionHandler:(void (^)(UIBackgroundFetchResult result))completionHandler {
// [ GTSdk ]:将收到的APNs信息传给个推统计
[GeTuiSdk handleRemoteNotification:userInfo];
// 控制台打印接收APNs信息
NSLog(@"\n>>>[Receive RemoteNotification]:%@\n\n", userInfo);
[[NSNotificationCenter defaultCenter]postNotificationName:GT_DID_RECEIVE_REMOTE_NOTIFICATION object:@{@"type":@"apns",@"userInfo":userInfo}];
completionHandler(UIBackgroundFetchResultNewData);
}
// iOS 10: App在前台获取到通知
- (void)userNotificationCenter:(UNUserNotificationCenter *)center willPresentNotification:(UNNotification *)notification withCompletionHandler:(void (^)(UNNotificationPresentationOptions))completionHandler {
NSLog(@"willPresentNotification:%@", notification.request.content.userInfo);
[[NSNotificationCenter defaultCenter]postNotificationName:GT_DID_RECEIVE_REMOTE_NOTIFICATION object:@{@"type":@"apns",@"userInfo":notification.request.content.userInfo}];
// 根据APP需要,判断是否要提示用户Badge、Sound、Alert
completionHandler(UNNotificationPresentationOptionBadge | UNNotificationPresentationOptionSound | UNNotificationPresentationOptionAlert);
}
// iOS 10: 点击通知进入App时触发
- (void)userNotificationCenter:(UNUserNotificationCenter *)center didReceiveNotificationResponse:(UNNotificationResponse *)response withCompletionHandler:(void (^)())completionHandler {
NSLog(@"didReceiveNotification:%@", response.notification.request.content.userInfo);
// [ GTSdk ]:将收到的APNs信息传给个推统计
[GeTuiSdk handleRemoteNotification:response.notification.request.content.userInfo];
[[NSNotificationCenter defaultCenter]postNotificationName:GT_DID_CLICK_NOTIFICATION object:response.notification.request.content.userInfo];
completionHandler();
}
````
5、在 AppDelegate.m 实现 GetuiDelegate 的代理方法并接受推送消息:
````
/** SDK启动成功返回cid */
- (void)GeTuiSdkDidRegisterClient:(NSString *)clientId {
// [4-EXT-1]: 个推SDK已注册,返回clientId
[[NSNotificationCenter defaultCenter]postNotificationName:GT_DID_REGISTE_CLIENTID object:clientId];
NSLog(@"\n>>[GTSdk RegisterClient]:%@\n\n", clientId);
}
/** SDK遇到错误回调 */
- (void)GeTuiSdkDidOccurError:(NSError *)error {
// [EXT]:个推错误报告,集成步骤发生的任何错误都在这里通知,如果集成后,无法正常收到消息,查看这里的通知。
NSLog(@"\n>>[GTSdk error]:%@\n\n", [error localizedDescription]);
}
/** SDK收到透传消息回调 */
- (void)GeTuiSdkDidReceivePayloadData:(NSData *)payloadData andTaskId:(NSString *)taskId andMsgId:(NSString *)msgId andOffLine:(BOOL)offLine fromGtAppId:(NSString *)appId {
// [ GTSdk ]:汇报个推自定义事件(反馈透传消息)
[GeTuiSdk sendFeedbackMessage:90001 andTaskId:taskId andMsgId:msgId];
// 数据转换
NSString *payloadMsg = nil;
if (payloadData) {
payloadMsg = [[NSString alloc] initWithBytes:payloadData.bytes length:payloadData.length encoding:NSUTF8StringEncoding];
}
// 控制台打印日志
NSString *msg = [NSString stringWithFormat:@"taskId=%@,messageId:%@,payloadMsg:%@%@", taskId, msgId, payloadMsg, offLine ? @"<离线消息>" : @""];
NSLog(@"\n>>[GTSdk ReceivePayload]:%@\n\n", msg);
NSDictionary *userInfo = @{@"taskId":taskId,@"msgId":msgId,@"payloadMsg":payloadMsg,@"offLine":offLine?@"YES":@"NO"};
[[NSNotificationCenter defaultCenter]postNotificationName:GT_DID_RECEIVE_REMOTE_NOTIFICATION object:@{@"type":@"payload",@"userInfo":userInfo}];
}
/** SDK收到sendMessage消息回调 */
- (void)GeTuiSdkDidSendMessage:(NSString *)messageId result:(int)result {
// 发送上行消息结果反馈
NSString *msg = [NSString stringWithFormat:@"sendmessage=%@,result=%d", messageId, result];
NSLog(@"\n>>[GTSdk DidSendMessage]:%@\n\n", msg);
}
/** SDK运行状态通知 */
- (void)GeTuiSDkDidNotifySdkState:(SdkStatus)aStatus {
// 通知SDK运行状态
NSLog(@"\n>>[GTSdk SdkState]:%u\n\n", aStatus);
}
/** SDK设置推送模式回调 */
- (void)GeTuiSdkDidSetPushMode:(BOOL)isModeOff error:(NSError *)error {
if (error) {
NSLog(@"\n>>[GTSdk SetModeOff Error]:%@\n\n", [error localizedDescription]);
return;
}
NSLog(@"\n>>[GTSdk SetModeOff]:%@\n\n", isModeOff ? @"开启" : @"关闭");
}
````
#JS 使用及接口
主要的消息通知回调使用如下,其他的接口均可在 [index.js](https://github.com/GetuiLaboratory/react-native-getui/blob/master/index.js) 查看。
````
//订阅消息通知
var { NativeAppEventEmitter } = require('react-native');
var resigsteClientIdSub = NativeAppEventEmitter.addListener(
'registeClientId',
(clientId) => {
Alert.alert(clientId);
}
)
var receiveRemoteNotificationSub = NativeAppEventEmitter.addListener(
'receiveRemoteNotification',
(notification) => {
//消息类型分为 APNs 和 payload 透传消息,具体的消息体格式会有差异
switch (notification.type) {
case "apns":
Alert.alert('APNs 消息通知',JSON.stringify(notification))
break;
case "payload":
Alert.alert('payload 消息通知',JSON.stringify(notification))
break;
default:
}
}
);
var clickRemoteNotificationSub = NativeAppEventEmitter.addListener(
'clickRemoteNotification',
(notification) => {
Alert.alert('点击通知',JSON.stringify(notification))
}
);
<!-- VoIP 推送通知回调 -->
var voipPushPayloadSub =
NativeAppEventEmitter.addListener(
'voipPushPayload',
(notification) => {
Alert.alert('VoIP 通知: ',JSON.stringify(notification))
}
);
````
**注意**
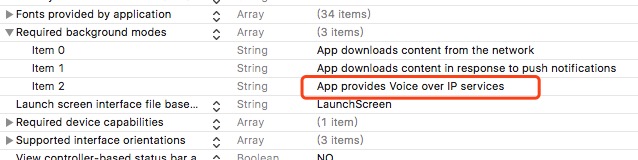
为保证正确收到 VoIP 推送回调,需要先调用注册 VoIP 接口 `Getui.voipRegistration()`,并且需要打开推送统治权限,并且开启 VoIP 后台运行权限。
````
componentWillUnMount() {
//记得在此处移除监听
receiveRemoteNotificationSub.remove()
clickRemoteNotificationSub.remove()
resigsteClientIdSub.remove()
voipPushPayloadSub.remove()
}
````
其他接口:
````
import Getui from 'react-native-getui'
// 注册 VoIP 通知,只有注册后才能收到 VoIP 通知。
Getui.voipRegistration();
Getui.clientId((param)=> {
this.setState({'clientId': param})
})
Getui.version((param)=> {
this.setState({'version': param})
})
Getui.status((param)=> {
let status = ''
switch (param){
case '0':
status = '正在启动'
break;
case '1':
status = '启动'
break;
case '2':
status = '停止'
break;
}
this.setState({'status': status})
})
//Getui...
````
**注意:**
Apple 在 iOS 10 中新增了Notification Service Extension机制,可在消息送达时进行业务处理。为精确统计消息送达率,在集成个推SDK时,可以添加 Notification Service Extension,并在 Extensions 中添加 GTExtensionSDK 的统计接口,实现消息展示回执统计功能。具体可参考[个推集成文档](https://docs.getui.com/getui/mobile/ios/xcode/)。