react-native-elements
Version:
React Native Elements & UI Toolkit
639 lines (410 loc) • 20.4 kB
Markdown
---
title: React Native Web
author: Havit Rovik
authorURL: https://github.com/haruelrovix
---
> Comprehensive Guide to create simple app using React Native Web and React Native Elements
Case study: `gitphone`, GitHub repository checker for your smartphone.
<img src="https://cdn-images-1.medium.com/max/1000/1*PHcPxP963ascQkeZOqy-rQ.png" />
## ToC
- Initialize the project using [CRNWA](https://github.com/VISI-ONE/create-react-native-web-app)
- Make sure everything works: Android, iOS and Web
- Add RNE latest ( 1.0.0-beta7 ) to the project
- Add 2 screens
Screen 1 RNE components:
1. Input
1. Button with Icon
Screen 2 RNE components:
1. Header
1. ListItem
1. Avatar
1. Text
`gitphone` should have:
- routing, [react-router](https://reacttraining.com/react-router). It works great both on Native and Web.
- calls to GitHub API. See https://developer.github.com/v3/.
## 0️⃣ Initial Step
Install create-react-native-web-app
```
$ npm i -g create-react-native-web-app
```
## 1️⃣ First Step
Create `gitphone` project.
```
λ create-react-native-web-app gitphone
⏳ Creating React Native Web App by the name of gitphone ...
✅ Created project folder.
✅ Added project files.
⏳ Installing project dependencies...
yarn install v1.10.1
[1/4] Resolving packages...
[2/4] Fetching packages...
info fsevents@1.2.4: The platform "win32" is incompatible with this module.
info "fsevents@1.2.4" is an optional dependency and failed compatibility check. Excluding it from installation.
[3/4] Linking dependencies...
[4/4] Building fresh packages...
success Saved lockfile.
Done in 797.66s.
✅ Installed project dependencies.
✅ Done! 😁👍 Your project is ready for development.
* change directory to your new project
$ cd gitphone
$ Then run the these commands to get started:
* To run development Web server
$ yarn web
* To run Android on connected device (after installing Android Debug Bridge "adb" - https://developer.android.com/studio/releases/platform-tools)
$ yarn android
* To run ios simulator (after installing Xcode - only on Apple devices)
$ yarn ios
* To run tests for Native and Web
$ yarn test
* To run build for Web
$ yarn build
```
Change to `gitphone` directory and test the web app by running `yarn web`.
```
Starting the development server...
Compiled successfully!
You can now view create-react-native-web-app in the browser.
Local: http://localhost:3001/
On Your Network: http://172.26.235.145:3001/
Note that the development build is not optimized.
To create a production build, use yarn build.
```
<img src="https://cdn-images-1.medium.com/max/800/1*tmq9VHw3S4cgxfWg8xN3gQ.png" width=300 />
Now, test the `gitphone` android app by running `yarn android`.
```
Installing APK 'app-debug.apk' on 'Redmi 4X - 7.1.2' for app:debug
Installed on 1 device.
BUILD SUCCESSFUL
Total time: 21.783 secs
Starting: Intent { cmp=com.creaternwapp/.MainActivity }
✨ Done in 25.64s.
```
If the build successful, you'll see the app installed on your Android (emulator) device.
<img src="https://cdn-images-1.medium.com/max/800/1*BddouTisdXvDzY5vB9U3pQ.png" width=300 />
But if you got an error when run `yarn android`, please see Troubleshooting section below.
The last part for First Step, make sure it can be run on iOS without any problem. Run `yarn ios` and _voila!_
<img src="https://cdn-images-1.medium.com/max/800/1*6AHlumHN29RANlXsrXDu4g.png" width=300 />
## 2️⃣ Step Two
Installing React Native Elements (RNE).
```
$ yarn add react-native-elements@beta
```
Installing React Native Vector Icons (RNVI).
```
$ yarn add react-native-vector-icons
```
Linking:
```
$ react-native link react-native-vector-icons
```
Both RNE and RNVI are written using es6. If you run `yarn web` at this point, you'll got an error.
```
./node_modules/react-native-elements/src/config/withTheme.js
Module parse failed: Unexpected token (12:28)
You may need an appropriate loader to handle this file type.
```
We need to tell webpack to transpile them.
1. Open `config/webpack.config.dev.js`
1. On line 141 `Process JS with babel`, add RNE and RNVI to include
1. Do the same for `config/webpack.config.prod.js` as well 👌
If you get lost, see this [gist](https://gist.github.com/haruelrovix/01d335dfcabec17a6aa5bc7a53fef277) or commit [8c0e603](https://github.com/haruelrovix/gitphone/commit/8c0e6036d9231cc934285502528a2061b848ce2d).
## 3️⃣ Give it a try
Now, let's grasp the idea how RNE works.
1. Open src/App.js
1. Import Button from RNE
```
import { Button } from 'react-native-elements';
```
1. On render, change TouchableHighlight to use RNE's Button
1. Run yarn ios, yarn android and yarn web to see it in action! 👏
Note: If you got an error `Could not find com.android.tools.build.appt2` when running `yarn android`, add `google` on the gradle repositories.
See this [gist](https://gist.github.com/haruelrovix/51a695a4fe292767bedc32ec638f9736) or commit for the details: [a2ebba1](https://github.com/haruelrovix/gitphone/commit/a2ebba14aef533925b593933fa885e2f990b2ace).
## 4️⃣ Add Home component
Our first component will be `Home`. On this component, there are two input fields and one Submit button.
1. Inside `src`, create new folder: `Components`
1. Add new file called `Home.js` [gist](https://gist.github.com/haruelrovix/04eeb6c4d8d0cc56e041e5be2c20bc97)
1. On `App.js`, import `Home` component [gist](https://gist.github.com/haruelrovix/15cd4badc3a9ec949037b19d9195d6bc)
1. Run `yarn ios`, `yarn android` and `yarn web` to see it in action! 🎇
### Styling for Home component
You should notice that our `Home` doesn’t look good in term of UI. Let’s add styling for it.
1. Inside `Components`, create `Shared.style.js` file [gist](https://gist.github.com/haruelrovix/7fee3c03b9fead9b74739e28a24effa9)
1. Import the style and update `Home` component as below [gist](https://gist.github.com/haruelrovix/4fb2e695d1562ff3475ebc91e6c27fcd)
1. Looks better now\*, commit for adding Home component: [2e510c4](https://github.com/haruelrovix/gitphone/commit/2e510c462c68d7c68433f2706cf8fbb847d6541e).
_Wait a minute…_ \*Seems there is a problem with RNVI on the web version. You can check this [Web (with webpack)](https://github.com/oblador/react-native-vector-icons#web-with-webpack) article or just following steps bellow.
1. Open `config/webpack.config.dev.js`
1. Add url-loader on line 162 [gist](https://gist.github.com/haruelrovix/edd520f4bf4268e17ef56f40314080a5)
1. Do the same for `config/webpack.config.prod.js` as well 👌
1. Open `src/index.js` file
1. Add `iconFont` and append `style` to document’s head [gist](https://gist.github.com/haruelrovix/b291e8a4f34577d94e85570d304b82fe)
_Our RNE x RNW progress so far~_
## 5️⃣ Routing
Next, let’s add second component: `CommitList`.
1. Create new folder inside `Components` named `Commit`
1. Add new file: `CommitList.js` [gist](https://gist.github.com/haruelrovix/4cece6275cf40d97defb036756bab82b)
On our app, user goes to second screen by click on `Submit` button. How do we implement it?
_“react-router comes to the rescue”_ - [https://reacttraining.com/react-router/](https://reacttraining.com/react-router/)
Add react-router-dom and react-router-native
$ yarn add react-router-dom react-router-native
Web needs `BrowserRouter` while native `NativeRouter`. We need to separate it based on the platform.
1. On `src`, create `Utils` folder
1. Add two files on `Utils`: `Routing.native.js` and `Routing.web.js` [gist](https://gist.github.com/haruelrovix/3d7e26df6bb2d6056e2f4612a77fd2fc)
Those file’s content differ only on the second line. [gist](https://gist.github.com/haruelrovix/32353543e417373a770365f855701c37)
Now, glue it together.
1. Open `App.js`, import `CommitList` component
1. Import `Route`, `Router` and `Switch` from `Utils/Routing`
1. Implement routing inside `render` method [gist](https://gist.github.com/haruelrovix/d5bf357efbbf094b26549f40709ec74f)
1. Now for the action on `Submit` button, open `Home.js`
1. Import `withRouter` from `Utils/Routing`
```
import { withRouter } from '../Utils/Routing';
```
1. `WithRouter` is an HOC. Use it to wrap `Home` component
```
export default withRouter(Home);
```
1. Add `onPress` property for the button
```
onPress={this.onPressButton}
```
1. Implement the `onPressButton` event handler
```
onPressButton = () => this.props.history.push('/commit');
```
1. All `Home` together [gist](https://gist.github.com/haruelrovix/8fc8ae9dab580c5e79f24a59a2c195b6) | [commit](https://github.com/haruelrovix/gitphone/commit/f193aa3c268e7be263ae529de0f719ffd443e26d)
Test it on `web` and `android`, you should be able to go back and forth between screens using `Submit` and pressing `Back` button.
_“How can I go back on iOS?”_ 😂
### Implement withHeader
We will create a `withHeader` HOC. Why HOC? We can reuse it easier _if we add more screens later._
1. On `src`, create `HOCs` folder
1. Add `withHeader.js` file
1. Import `Header` from RNE and `Icon` from `RNVI/FontAwesome`
```
import { Header } from 'react-native-elements';
import Icon from 'react-native-vector-icons/FontAwesome';
```
1. `withHeader` accepts one prop: `title`
```
const withHeader = ({ title = '' }) => (WrappedComponent) => {
```
1. Event handler to go back / go home
```
goBack = () => this.props.history.goBack();
goHome = () => this.props.history.replace('/');
```
1. Import and use `withHeader` in `CommitList` component [gist](https://gist.github.com/haruelrovix/b1608f9f010caa47c18ebc71d87106ae) | [commit](https://github.com/haruelrovix/gitphone/commit/0cf995bde91f5958e252188f1343de923069e7f3)
## 6️⃣ Fetch data from GitHub API
Let’s fetch a real-live data: list commit on repository by [GitHub](https://developer.github.com/v3/repos/commits/#list-commits-on-a-repository) and render it on our second screen, `CommitList`.
GET /repos/:owner/:repo/commits
Ideally, the :owner and :repo are form values from our first screen. Since the objective of this article is RNE x RNW, talk about that form (and state-management) later on.
To fetch GitHub API, we will use [fetch-hoc](https://github.com/esphen/fetch-hoc) package and also need [compose](https://redux.js.org/api/compose) from `redux`, to handle multiple HOCs on the same component.
$ yarn add fetch-hoc redux
1. Open `CommitList.js`
1. Import `{ compose }` from `redux` and `fetch` from `fetch-hoc`
1. Use it as below [gist](https://gist.github.com/haruelrovix/1c3affbfd585c3b8acfc1c156164fd1f) | [commit](https://github.com/haruelrovix/gitphone/commit/334197c7c05bd1bdb1b648ca56cfe69c8b496eed)
Now run `yarn web`, open `network` tab of `DevTools` and click `Submit` button, you’ll see bunch of commit data. By default GitHub API returning 30 commits.
### Render commit data
Commit data that will be displayed on the screen:
author.avatar_url
commit:
author.name
message
Let’s modify `CommitList.js`
1. Add new imports
```
import { ActivityIndicator, Dimensions, FlatList, Platform, View } from 'react-native';
import { Avatar, ListItem } from 'react-native-elements';
```
1. On main render, modify it as below
```
<View style={styles.container}>
{this.renderContent()}
</View>
```
1. Create `renderContent` method
```
renderContent = () => (
this.props.loading ?
<ActivityIndicator color='#87ceeb' /> :
<FlatList
keyExtractor={this.keyExtractor}
data={this.props.data}
renderItem={this.renderItem}
/>
)
```
1. Create `renderItem` method
```
renderItem = ({ item }) => (
<ListItem
title={item.commit.author.name}
subtitle={item.commit.message}
leftElement={this.renderLeftElement(item)
/>
)
```
1. Create `renderLeftElement` method
```
renderLeftElement = (item) => (
<View>
<Avatar
source={{ uri: item.author.avatar_url }}
size='medium'
rounded
/>
</View>
)
```
1. Here is our new `CommitList` including the styling to make it prettier [gist](https://gist.github.com/haruelrovix/e4b02328766efd1491338d5111becff7) | [commit](https://github.com/haruelrovix/gitphone/commit/27a78672958f0caaa34b3e93c934685b9dcebd50)
**Here they are!**
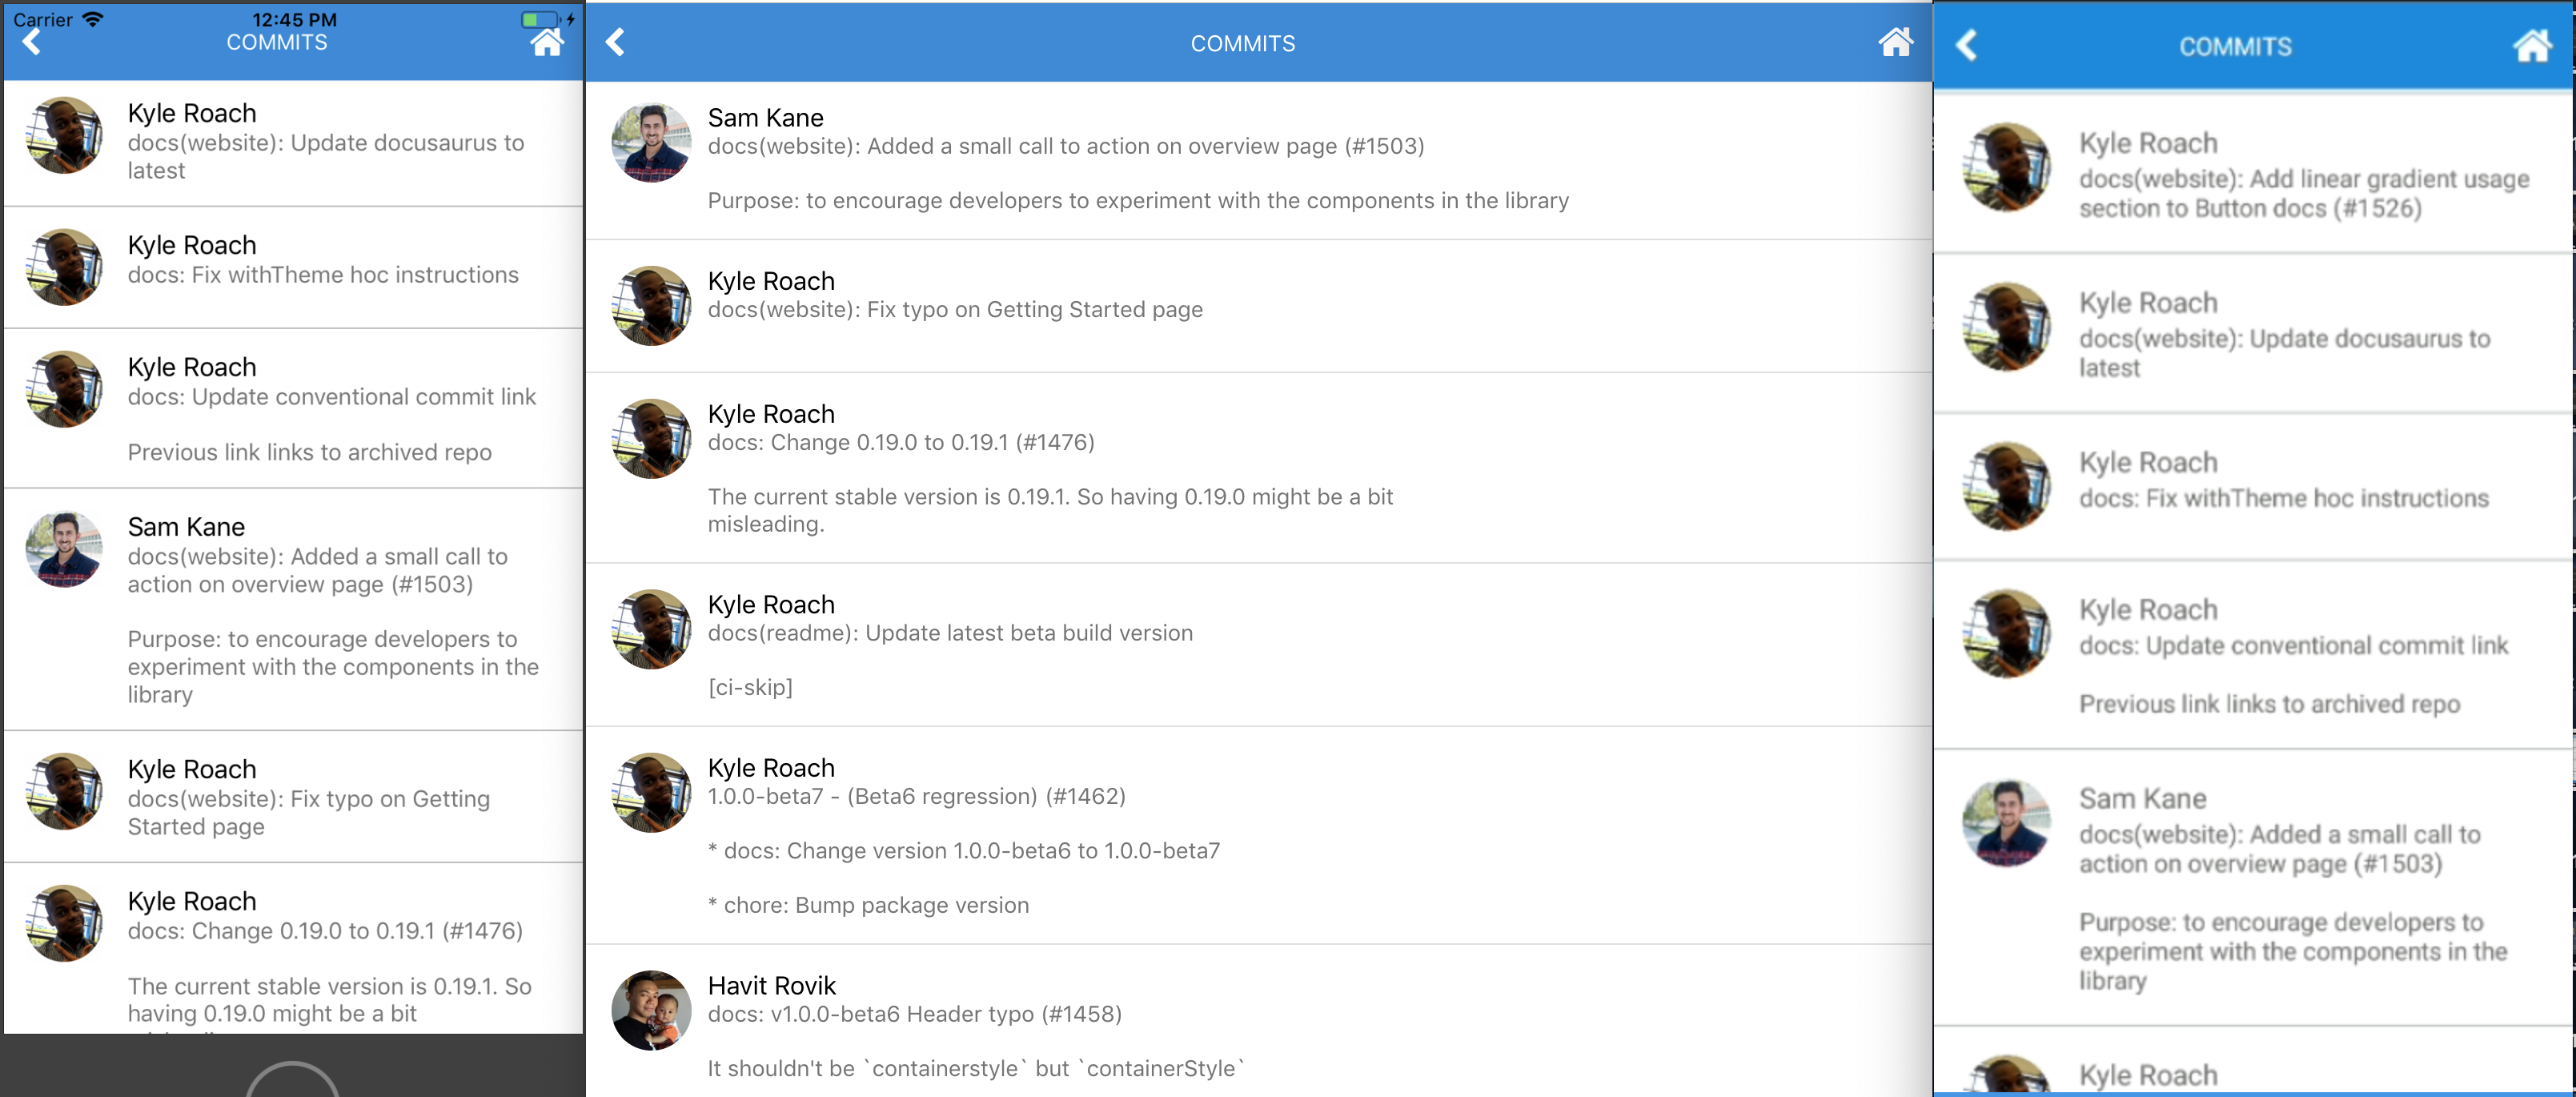_awesome, eh?_
## 7️⃣ Handle form submission
Our app looks great so far. But we are not passing values from first to second screen. Let’s do it.
1. To handle form, we’ll use [formik](https://github.com/jaredpalmer/formik)
```
$ yarn add formik
```
1. Open `Home.js` and import it
```
import { Formik } from 'formik';
```
1. Wrap main `View` with `formik`
```
<Formik initialValues={{ owner: '', repo: '' }}
onSubmit={this.onPressButton}>
{({ handleChange, handleSubmit, values }) => (
<View style={styles.container}>
```
1. Add `onChangeText` handler to the `Input`
```
<Input ... onChangeText={handleChange('owner')} value={values.owner}
<Input ... onChangeText={handleChange('repo')} value={values.repo}
```
1. Change `Button` `onPress` props to `handleSubmit`
```
<Button ... onPress={handleSubmit}
```
1. Don’t forget to close the main `View`
```
</View>
)}
</Formik>
```
Form submission: done 👌 Next question: How do we pass these values to second screen? _Send them when we redirect to second screen!_
1. Inside `onPressButton` method, send an object instead of `pathname` only.
```
this.props.history.push({
pathname: '/commit',
state: { owner, repo }
});
```
1. Open `CommitList`, import `withRouter`
```
import { withRouter } from '../../Utils/Routing';
```
1. Add `withRouter` inside `compose`
1. Get the values passed down to `withRouter` and use it to `fetch`
```
withHeader({ title: 'Commits' }),
withRouter,
fetch(({ location: { state = {} } }) => (
`https://api.github.com/repos/${state.owner}/${state.repo}/commits`
))
```
HOC’s order does matter. So, make sure it the same as snippet above. In case you lost, here is the commit: [1d83c5e](https://github.com/haruelrovix/gitphone/commit/1d83c5e1487d2d99c00cc1b18f563ed4497d87b9).
Test the app. Now we should able to fetch any GitHub repository, _with some caveats._ 👀
## 8️⃣ Polishing the app
What happens if we fetch repository which doesn’t exist? _Red screen on native, blank screen on web!_ 😹
`fetch-hoc` returns an error if it has. Let’s use it.
1. On `CommitList`, modify `renderContent`
```
this.props.loading ?
<ActivityIndicator color='#87ceeb' /> :
this.renderFlatList()
```
1. Import `Text` from RNE
```
import { ..., Text } from 'react-native-elements';
```
1. Add `renderFlatList` method
```
this.props.error ?
<Text h4>Error: {this.props.data.message || '😕'}</Text> :
<FlatList ... />
```
Test it. Instead of _red or blank_ screen, now `Error: Not Found` displayed.
What’s else? Try to fetch `facebook/react-native`. We got another error 🙀
Cannot read property 'avatar_url' of null
Not all of `author` have `avatar_url`. We should do this for the Avatar `source`.
source={{uri: (item.author && item.author.avatar_url) || undefined}}
So, our app renders nothing if it has no url? It doesn’t look good. _Solution: render author initial name._
With the help of RegEx and Avatar `title` props, `renderLeftElement` should look like this now:
renderLeftElement = (item) => {
const initials = item.commit.author.name.match(/\b\w/g) || [];
return (
<View style={leftElementStyle}>
<Avatar
title={((initials.shift() || '') + (initials.pop() || ''))}
...
Commit for Polishing the app section: [943974b](https://github.com/haruelrovix/gitphone/commit/943974b285635884dc3ec1d7981146307dfd98d3).
When I wrote this, fetch `facebook/react-native` returning following:
.](https://cdn-images-1.medium.com/max/3812/1*OYTvJP0RLLQemyT0ukb1Iw.png)_Why no love for regex? Thanks to [Sanoor](https://stackoverflow.com/a/33076482)._
## Conclusion
We have created a simple app using RNE + RNW 👏
- Works great on iOS, web and android? ✅
- Use components from react-native-elements? ✅
- Move between screens? ✅
- API calls? ✅
Some improvements for `gitphone`:
If you go back from `Commits` screen, input form on `Home` screen are empty. If you want preserve previous values, this can be fixed easily by introducing redux to the app. References here: [48108dd](https://github.com/haruelrovix/rnw-github/pull/1/commits/48108ddc3e80669b9d57b2f998a5073d5e5eabb0).
Can we fetch more commits data once we reach the most bottom of the list? Infinite scroll?
For web, we can use [react-visibility-sensor](https://github.com/joshwnj/react-visibility-sensor). Check it out: [6c1f689](https://github.com/haruelrovix/rnw-github/pull/1/commits/6c1f6894d78840648a11bbdf2d0e841fb6dad12d).
For native, it’s easier. We can use `FlatList` `onEndReached` props. To give you an idea how, see this: [9d2e1f2](https://github.com/haruelrovix/rnw-github/pull/2/commits/9d2e1f2a3e8605f8184f1f8950eb0175045bb67a).
## Troubleshooting 💺
**#1** **Build failed when running `yarn android`**
:app:compileDebugAidl FAILED
FAILURE: Build failed with an exception.
* What went wrong:
Execution failed for task ':app:compileDebugAidl'.
> java.lang.IllegalStateException: aidl is missing
* Try:
Run with --stacktrace option to get the stack trace. Run with --info or --debug option to get more log output.
BUILD FAILED
Here is how to fix #1:
1. Open Android Studio.
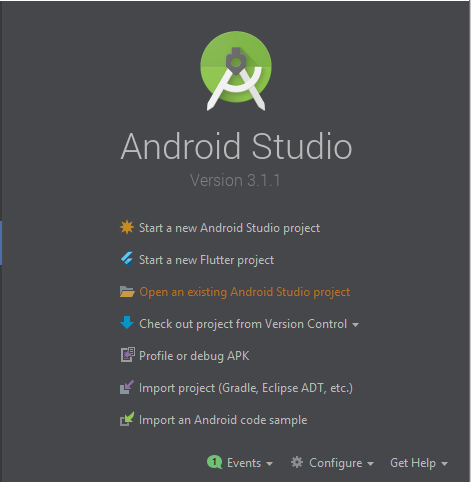
2. Open `android` project under `gitphone`.
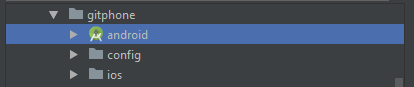
3. Click Update on this prompt.
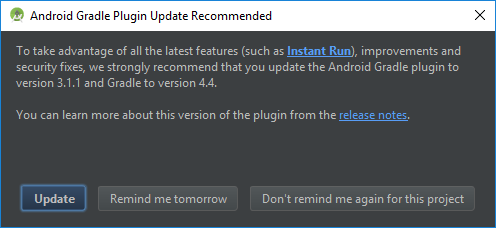
Wait for Android Studio syncing the project.
4. It synced successfully with two errors.
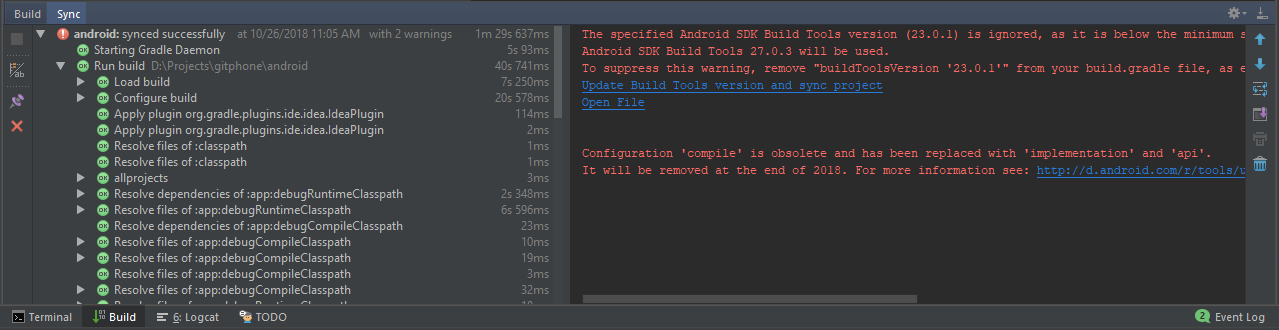
5. At this stage, just click `Update Build Tools version and sync project` on the sync window.
6. Now, the remaining warning is the `Configuration 'compile'...`
7. To fix that, open `app/build.gradle` file, change `dependencies` section (line 139) to use `implementation` instead of `compile`.
dependencies {
implementation fileTree(dir: "libs", include: ["*.jar"])
implementation "com.android.support:appcompat-v7:23.0.1"
implementation "com.facebook.react:react-native:+"
}
8. Sync it again and close Android Studio.

Troubleshooting for android is done. Now, you should be able to run `yarn android` successfully.
**#2 Build failed when running `yarn ios`**
** BUILD FAILED **
The following build commands failed:
CompileC /gitphone/ios/build/Build/Intermediates.noindex/React.build/Debug-iphonesimulator/double-conversion.build/Objects-normal/x86_64/strtod.o /gitphone/node_modules/react-native/third-party/double-conversion-1.1.5/src/strtod.cc normal x86_64 c++ com.apple.compilers.llvm.clang.1_0.compiler
Here is how to fix #2:
Inside the project, run script below from your favourite terminal
$ curl -L https://git.io/fix-rn-xcode10 | bash
If you run `yarn ios` again, and you got this error
The following build commands failed:
Libtool /gitphone/ios/build/Build/Products/Debug-iphonesimulator/libRCTWebSocket.a normal x86_64
(1 failure)
Please run this script:
$ cp ios/build/Build/Products/Debug-iphonesimulator/libfishhook.a node_modules/react-native/Libraries/WebSocket
Troubleshooting for iOS is done. Now, you should be able to run `yarn ios` successfully.
### Authors
- [haruelrovix](https://github.com/haruelrovix)
- [andangrd](https://github.com/andangrd)