rapido
Version:
Rápido is an extensible command line interface that enables rapid development for any technology stack. Rápido is written in JavaScript and is built on top of Node.js and npm.
364 lines (305 loc) • 13.6 kB
Markdown
Rápido
======
Rápido is an extensible command line interface that enables rapid development for any technology stack.
Rápido is written in JavaScript and is built on top of [Node.js](http://nodejs.org/) and [npm](https://npmjs.org/).
# Features
* Custom commands and stacks
* Scaffolding
* Command line argument parsing
* Configuration loading
* User input
* Colorized output
* Command-line auto-completion
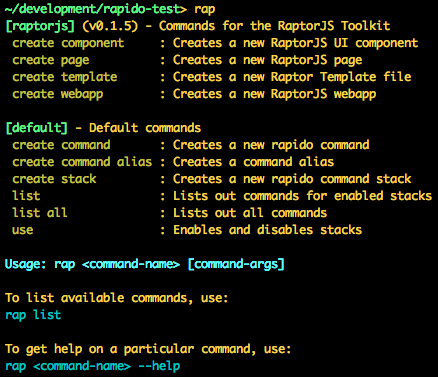
# Screenshot
# Installation
The only prerequisite for Rápido is Node. After Node has been installed, Rápido should be installed as a
global script using `npm` as shown below:<br>
```
$ npm install rapido --global
```
# Overview
## Commands
Rápido is extensible and supports any number of commands that can easily be invoked from the command line.
Commands are bundled as part of "stacks" and new stacks can easily be installed using `npm` (described later).
Based on the arguments passed to the Rápido command line interface, Rápido will delegate the work to the
appropriate command handler. A simple command invocation is shown below:<br>
```
$ rap create component ui/buttons/Button --no-testing
```
In the above example, `"create component"` is the command name and `"ui/buttons/Button"` and `"--no-testing"` are additional
arguments to the command handler.
NOTE: Rápido uses `rap` by default, but you can change it to whatever you want. See [Custom Command Line Tools using Rápido](#custom-command-line-tools-using-r%C3%A1pido)
Details on creating your own commands are described in the "Creating Custom Commands" section below.
## Stacks
A stack is a collection of commands that are all related to a particular technology stack. Rápido supports
using multiple stacks, and new stacks can easily be installed using `npm`.
When running a command, the command is searched for in the stacks that are currently enabled.
### Installing Stacks
A new stack should be installed just like any other Node module using `npm`. For example:<br>
```
$ npm install rapido-raptorjs
```
Stacks can also be installed globally using the `--global` switch for `npm`
(e.g. `npm install rapido-raptorjs --global`). When launched, Rápido
will search for Rápido stacks and commands in all of the first-level Node modules found in any of the available
`node_modules` directories. Rápido uses the same module search path that Node uses and will begin its
search in the current working directory and ending in the global `node_modules` direcotry.
A Rápido stack is indicated by the existence of a `rapido-stack.json` configuration
file in the root directory of the module.
### Enabling Stacks
Stacks can be enabled and disabled using the `rap use` command as shown in the sample below:<br>
```
$ rap use raptorjs
```
It is also possible to enable multiple stacks:<br>
```
$ rap use raptorjs jquery backbone
```
NOTE: If multiple enabled stacks support the same command then you will be prompted to choose a stack when invoking
the ambiguous command.
NOTE: The currently enabled stacks are stored in the `rapido.json` configuration that is discovered first
(see the "Configuration" section below). If a `rapido.json` file is not found, one is created in
the current directory.
### Listing Commands and Stacks
To get a list of available commands for the currently enabled stacks, simply run the following command:<br>
```
$ rap list
```
To get a list of all commamnds for all stacks that have been installed (not just the ones that are enabled), the
following command should be used:
```
$ rap list all
```
## Configuration
Rápido, and all of the commands, can be configured using `rapido.json` files that can be loaded
from multiple locations.
**Sample rapido.json config file:**
```javascript
{
"scaffold.component.dir": "scaffolds/component",
"scaffold.page.dir": "scaffolds/page",
"scaffold.webapp.dir": "scaffolds/webapp",
"modules.dir": "modules",
"components.base.dir": "modules",
"pages.base.dir": "modules/pages",
"app.rtld.file": "modules/taglibs/app/app.rtld"
}
```
NOTE: Any configuration properties that have the suffix "file" or "dir" will result in a property value of type
[raptor/file/File](https://github.com/raptorjs/raptorjs/blob/master/lib/raptor/files/File_node.js) that
references the file resolved relative to the directory containing the `rapido.json` file that the
configuration property is defined in.
Configuration files are merged together, and Rápido supports configuration
overrides at the directory/project-level and at the user or system level using a simple configuration search path.
Rápido will look for a `rapido.json` file in the current working directory, and then search in the parent directory,
all the way up to the root. It will then search in the home directory. Lastly, Rápido will search
for `rapido-stack.json` files in all of the `node_modules` directories using the same search
path that Node uses to find and load modules (starting in the current working directory).
# Creating a Stack
Rápido provides commands for creating stacks and commands. To create a new stack simply do the following:
```
$ mkdir my-stack
$ cd my-stack
$ rap create stack
```
You will be prompted for information about the new stack, and the command then will generate all of the files
for your stack in the current directory. Stacks are defined in a `rapido-stack.json` file as shown in the following
sample code:
```javascript
{
"name": "raptorjs",
"description": "Commands for the RaptorJS Toolkit",
"commands": {
"create component": {
"description": "Create a RaptorJS UI component",
"file": "command-create-component.js"
},
"create page": {
"description": "Create a RaptorJS page",
"file": "command-create-page.js"
},
"rename component": {
"description": "Rename an existing UI component",
"file": "command-rename-component.js"
}
}
}
```
You can then share your stack by publishing it to the npm repository by simply running `npm publish`.
# Creating a Command
New commands can be added to a stack using the `rap create command`. You will be prompted for
some information about the command, and then the command implementation will be created
and automatically registered in the stack by updating the `rapido-stack.json` for the stack.
A command handler is implemented as a CommonJS module as shown in the following sample code:
```javascript
module.exports = {
usage: 'Usage: $0 say hello <name>',
options: {
'upper-case': {
describe: 'Convert name to upper case'
}
},
validate: function(args, rapido) {
var name = args._[0];
if (!name) {
throw 'name is required';
}
return {
name: name,
upperCase: args['upper-case']
};
},
run: function(args, config, rapido) {
var name = args.name;
if (args.upperCase) {
name = name.toUpperCase();
}
rapido.log.success('Command says: ' + name);
}
}
```
## Command Line Argument Parsing
A command should declare which options it allows using the `options` property of the exported
command module as shown in the previous section. In addition, the `usage` property should be
used to provide basic information for the command.
Internally, Rápido uses the [optimist](https://github.com/substack/node-optimist) module to
parse the command line arguments using the option definitions. Please see the documentation for
the `optimist` module on the format for defining options.
## Reading Configuration Properties
The loaded configuration is passed as the second argument to the `run` method exported by
a command. Configuration properties can easily be read as shown in the following sample code:
```javascript
module.exports = {
...
run: function(args, config, rapido) {
var scaffoldDir = config["scaffold.page.dir"];
if (!scaffoldDir) {
throw new Error('"scaffold.page.dir" not defined in "' + rapido.configFilename + '" config file');
}
...
}
}
````
## Scaffolding
Rápido provides support for scaffolding which allows for commands to generate a set of files
from a template directory. Rápido uses [dust-linkedin](http://linkedin.github.com/dustjs/) to
support variables, conditionals and other structural logic inside template files. Only files with
the ".dust" extension will be treated as Dust templates and other files will be copied directly
to the output directory. In addition,
variables are supported in filenames using `_<var-name>_` syntax. If a variable inside a filename
resolves to a `false` value then the file will be ignored, thus allowing for conditional files.
The generation of files using a scaffold can be done as shown in the following sample code:
```javascript
rapido.scaffold({
scaffoldDir: scaffoldDir, // Location of the input scaffold directory
outputDir: outputDir, // Output directory
overwrite: true, // Files will only be overwritten if true
data: { // Input data for the templates
name: 'Frank',
count: 30
},
beforeFile: function(outputFile, content) { // Invoked before writing a file
return true; // If false is returned then the file will not be written
},
afterFile: function(outputFile) { // Invoked after writing a file
}
});
```
## User Input
Rápido makes it easy to accept user input from the command line using the [prompt](https://github.com/flatiron/prompt)
module for Node as shown in the following sample code:
```javascript
var prompt = rapido.prompt;
prompt.start();
prompt.get(
{
properties: {
'name': {
description: 'Name',
required: false
},
'count': {
description: 'Count',
required: false
},
}
}
,
function (err, result) {
if (err) {
rapido.log.error(err);
return;
}
var name = result.name || 'Default';
var count = result.count || 0;
//...
});
```
## Colorized Output
The following commands should be used to produce colorized output:
```javascript
rapido.log.success('Completed successfully');
rapido.log.success('success', 'Completed successfully'); // With label: [success] Completed successfully!
rapido.log.info('Some info message');
rapido.log.info('info', 'Some info message'); // With label: [info] Some info message
rapido.log.warn('Some warning message');
rapido.log.warn('warn', 'Some warning message'); // With label: [warn] Some warning message
rapido.log.error('Some error message');
rapido.log.error('error', 'Some error message'); // With label: [error] Some warning message
rapido.log('Message with no color');
```
# Command-line Auto-Completion
Rápido provides support for auto-completion in a shell. Auto-completion allows the TAB character to be used
to complete a command name or a command option. To enable this feature, the following command must
be added to your shell initialization scripts (typically `~/.profile`) after installing Rápido globally.
```
complete -C rap rap
```
The above command will use the `rap` command itself to handle auto-completion. The `rap` script detects
when it is being invoked in the context of auto-completion based on special environment variables
that get set by the shell. For more info, please see [Bash: Programmable Completion Builtins](http://www.gnu.org/software/bash/manual/bash.html#Programmable-Completion-Builtins).
# Custom Command Line Tools using Rápido
Don't like the name `rap` or what to create your own custom command line tool
that utilizes the power or Rápido? No problem! Just add a Node bin script to project similar to the following:
```javascript
#!/usr/bin/env node
var path = require('path');
var rapido = require('rapido').create();
// Want to use something other than "rapido.json"?
rapido.configFilename = "raptor.json";
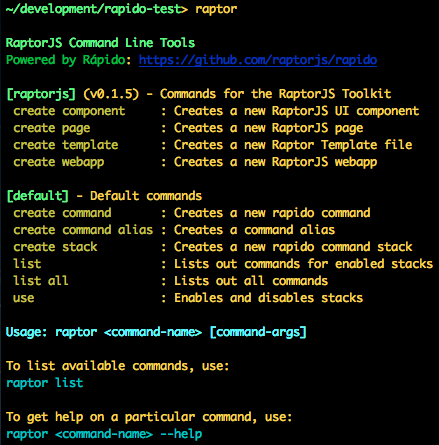
// Give your command line tool a name:
rapido.title = 'RaptorJS Command Line Tools';
// Does your project have its own Rápido that were installed from npm?
// If so, you'll need to tell Rápido where to find them:
rapido.addNodeModulesDir(path.join(__dirname, '../node_modules'));
// Enable any stacks you need for your Command Line Tool
rapido.enableStack('raptorjs');
// Add a specific directory that contains a Rápido stack
rapido.addStackDir(path.join(__dirname, '..'));
// Multiple stacks with the same command names? Make one of the stacks
// exclusive to avoid ambigous commands
rapido.exclusiveStackCommands('raptorjs');
// Don't want to list a command in one of the enabled stacks?
// Then hide it:
rapido.hideCommand('another-stack', 'useless command');
// Now run Rápido and let it take care of the rest!
rapido.run(process.argv);
```
You'll then want to register your script in the `package.json` file for your Node module so that it
can be installed globally:
```javascript
{
"bin": {
"raptor": "bin/raptor",
...
}
...
}
```
Your command line tool is ready to be installed:
```
npm install raptor --global
```
Now, when you launch your custom script, you will be shown something similar to the following: