rabbitmq-event-manager
Version:
A nodeJS Event Manager to emit, and listen event through RabbitMQ
387 lines (281 loc) • 17.4 kB
Markdown
# RabbitMQ Event Manager
[](https://travis-ci.org/mimiz/rabbitmq-event-manager) [](https://codeclimate.com/github/mimiz/rabbitmq-event-manager/maintainability) [](https://codeclimate.com/github/mimiz/rabbitmq-event-manager/test_coverage)
A Node Event Manager using RabbitMQ to exchange events.
Exchanges and Queues are automatically created.
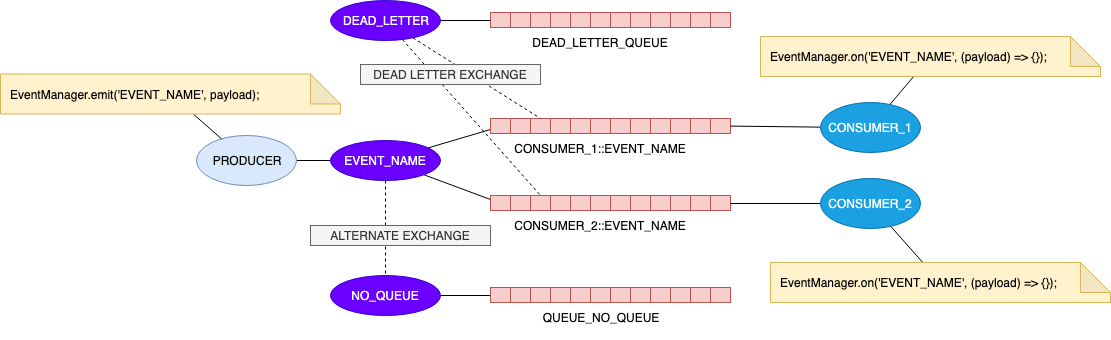
Here is a small schema :
## Install
```
npm install rabbitmq-event-manager
```
Or with Yarn
```
yarn add rabbitmq-event-manager
```
## Basic Example
- **Initialize**
```js
import EventManager from 'rabbitmq-event-manager';
const myEventManager = new EventManager({
url: 'amqp://localhost',
application: 'CONSUMER'
});
myEventManager.initialize()
.then(()=>{
/** Do something after initialization */
})
.catch((err)=> {
/** An error occured while initialization */
});
```
- **Consumer**
```js
import EventManager from 'rabbitmq-event-manager';
const myEventManager = new EventManager({
url: 'amqp://localhost',
application: 'CONSUMER'
});
myEventManager.on('MY_EVENT_NAME', async (payload)=>{
console.log(payload);
});
```
The handler function, by default will tell RabbitMQ to _"acknowledge"_ the message.
:warning: If you want to **flush** the message you can simply throw an exception ...
This will create the following elements in RabbitMQ :
- An Exchange of type **fanout** named : `MY_EVENT_NAME` **(the application name is not USED)**
- One Queue `CONSUMER::MY_EVENT_NAME` bound to the Exchange `MY_EVENT_NAME` **(the application name _IS_ USED)**
- **Producer**
```js
import EventManager from 'rabbitmq-event-manager';
const myEventManager = new EventManager({ url: 'amqp://localhost', application: 'PRODUCER_1' });
myEventManager.emit('MY_EVENT_NAME', payload);
```
**Note:** Since version **1.1.0** the `emit` function return a promise that resolves with the payload effectively sent to RabbitMQ (ie: you can access the `_metas` informations).
This will create the following elements in RabbitMQ :
- An Exchange of type **fanout** named : `MY_EVENT_NAME` **(the application name is not USED)**
> NOTE: :warning: A very good convention will be to prefix the name of the __event name__ with the emitter application name, for example : `PRODUCER_1.MY_EVENT_NAME` but it's not mandatory.
If a new Consumer is created and listen the same event :
```js
import EventManager from 'rabbitmq-event-manager';
const myEventManager = new EventManager({url:'amqp://localhost'}, appName:'OTHER_CONSUMER');
myEventManager.on('MY_EVENT_NAME', async (payload)=>{
console.log(payload);
return true;
});
```
It will add a queue `OTHER_CONSUMER::MY_EVENT_NAME` bound to the Exchange `MY_EVENT_NAME`.
## Emit And Wait
This feature has been introduced in version **1.1.0**, and allow you to emit an event and wait for a response (from another event, or from a generated event name).
```js
import EventManager from 'rabbitmq-event-manager';
const myEventManager = new EventManager({ url: 'amqp://localhost', application: 'PRODUCER_1' });
const payload = { a: 42, b: 58 };
myEventManager.on('add', async eventPayload => {
return { result: eventPayload.a + eventPayload.b };
});
const response = await myEventManager.emitAndWait('add', payload);
console.log(response.result); // 100
```
The above code, will generate a queue with a name : `add.RESPONSE.$$GUID$$` where guid is the value of `_metas.correlationId`.
This queue should be deleted after event is received, if something wrong happened, the message may be flushed to the Dead letter queue.
## Options
| Name | Type | Default | Description |
| -------------------------- | --------------------- | ---------------------- | ----------------------------------------------------------------------------------------------------------------------------------------------------------------------- |
| url | String | `amqp://localhost` | The connection URL of the RabbitMQ Server |
| application | String | n/a | The name of the application (used for naming exchanges and queues). |
| metas | boolean or (function) | true | Weither or not to add `_metas` infirmations in the event, If a function this returned value, will become the `_metas` object (see <Metas Informations>) |
| alternateExchangeName | String | `DEAD_LETTER_EXCHANGE` | The name of the dead letter exchange you would like to use, (:warning: remember this must be the same value for producer and consumers) |
| alternateQueueName | String | `DEAD_LETTER_QUEUE` | The name of the dead letter queue (bound to the dead letter exhange) you would like to use, (:warning: remember this must be the same value for producer and consumers) |
| deadLetterExchangeName | String | `NO_QUEUE_EXCHANGE` | The name of the alternate exchange you would like to use, (:warning: remember this must be the same value for producer and consumers) |
| deadLetterQueueName | String | `QUEUE_NO_QUEUE` | The name of the alternate exchange queue you would like to use, (:warning: remember this must be the same value for producer and consumers) |
| ttl | Number | `86400000` (24h) | The default TTL before flushing event to the Dead Letter Exchange |
| maxNumberOfMessagesRetries | Numbner | `100` | The number of tries the consumer will treat one specific message, before flushing it to the dead letter exhange. |
| logPrefix | string | [RABBITMQ] | The text that will be printed before the error log |
| logLevel | string | error | The log Level [(see winston logLevels)](https://github.com/winstonjs/winston#logging-levels) |
| logTransportMode | string | console | Mute (no log), or output to console. Possible values are (_"console"_ or _"mute"_) |
| emitAndWaitTimeout | number | 30000 (30s) | Define the maximum time to wait for a event |
| defaultResponseSuffix | string | `.RESPONSE` | The suffix to add to response event name when waiting for a response |
## Metas Informations
By defaut, some metas data are added to the payload :
- guid : A unique id generated, to be able to debug for example, or for following the event.
- timestamp : A number of milliseconds elapsed since January 1, 1970 00:00:00 UTC. (`Date.now()`)
- name : A string which is the name of the emitted event.
- applicationName: The value of the application which emits the Event.
- correlationId: _(optional)_ a unique ID (guid) to be used when waiting for a response when using `emitAndWait`
- replyTo: _(optional)_ the event to reply to when waiting for a response when using `emitAndWait`
So if your payload is :
```js
{
userId: 42;
}
```
With Metas data it will be :
```js
{
_metas:{
guid: '465e008c-d37f-4e31-b494-023e6d187946',
name: 'MY_EVENT_NAME',
timestamp: 1519211809934,
applicationName: 'PRODUCER_1'
},
userId:42
}
```
You can remove metas informations by settings the option value "metas" to false.
You can also override the metas generation by giving a function as _metas_ options value (on the emitter side only, as the event is generated there).
### With no metas
```js
import EventManager from 'rabbitmq-event-manager';
const myEventManagerWithNoMetas = new EventManager({
url: 'amqp://localhost',
appName: 'PRODUCER_1',
metas: false,
});
const payload = { userId: 42 };
myEventManagerWithNoMetas.emit('MY_EVENT_NAME', payload);
// Payload will be
// {
// userId:42
// }
```
### Override Metas
```js
import EventManager from 'rabbitmq-event-manager';
const myEventManagerOverrideMetas = new EventManager({
url: 'amqp://localhost',
appName: 'PRODUCER_1',
metas: sourceMetas => {
// sourceMetas contains the default metaa
return {
...sourceMetas,
otherProperty: 'MyValue',
};
},
});
const payload = { userId: 42 };
myEventManagerOverrideMetas.emit('MY_EVENT_NAME', payload);
// Payload will be
// {
// _metas: {
// guid : '465e008c-d37f-4e31-b494-023e6d187947'
// name: 'MY_EVENT_NAME',
// timestamp: 1519211809934,
// otherProperty:'MyValue'
// }
// userId:42
// }
```
### Add metas per events
Since version **1.1.0** you can add (or override) the `_metas` property by setting it in the event paylaod :
```js
import EventManager from 'rabbitmq-event-manager';
const myEventManagerOverrideMetas = new EventManager({
url: 'amqp://localhost',
appName: 'PRODUCER_1',
});
const payload = { _metas: { newKey: 'value' }, userId: 42 };
myEventManagerOverrideMetas.emit('MY_EVENT_NAME', payload);
// Payload will be
// {
// _metas: {
// guid : '465e008c-d37f-4e31-b494-023e6d187947'
// name: 'MY_EVENT_NAME',
// timestamp: 1519211809934,
// newKey:'value'
// }
// userId:42
// }
```
This will be added only for this `emit`.
## DEAD LETTER QUEUE
From the RabbitMQ documenation, the [Dead Letter Exchange](https://www.rabbitmq.com/dlx.html) is a RabbitMQ Exchange, that is attached to a queue. And message in that queue can be _"dead-lettered"_ if the queue reach its _length limit_, or, if the messages has _expired_ (TTL).
By default, The Exchange `DEAD_LETTER_EXCHANGE` (and its bound queue `DEAD_LETTER_QUEUE`) is automatically created and attached to all queues.
The names of the queue and the exchange can be changed by setting the options properties.
See <Acknowledge / N-Acknowledge> to see how to send an event to the _Dead Letter Exchange_
> :warning: Be carefull, if you change the names of the `DEAD_LETTER_EXCHANGE` and the `DEAD_LETTER_QUEUE`, remember that you will have to do it for all producers and all consumers, as they will all use the same RabbitMQ server.
## QUEUE NO QUEUE
When an _Event Exchange_ is created, an exchange `NO_QUEUE_EXCHANGE` is created and a queue named `QUEUE_NO_QUEUE` is created and bound to it.
When an event is emitted to the _Event Exchange_ if the exchange has no queue bounded to it, all the messages are routed to the `NO_QUEUE_EXCHANGE`
The names of the queue and the exchange can be changed by setting the options properties.
> :warning: Be carefull, if you change the names of the `DEAD_LETTER_EXCHANGE` and the `DEAD_LETTER_QUEUE`, remember that you will have to do it for all producers and all consumers, as they will all use the same RabbitMQ server.
## Acknowledge / N-Acknowledge
The `return` statement at the end of the handler function, will tell RabbitMQ to _"acknowledge"_ the message.
You can _"negatively acknowledge"_ and **Requeue** the message by returning `false` (rejecting the Promise).
If you don't want to **requeue** the message you can simply throw an exception ...
### Acknowledge the message
```js
import EventManager from 'rabbitmq-event-manager';
const myEventManager = new EventManager({url:'amqp://localhost'}, appName:'OTHER_CONSUMER');
myEventManager.on('MY_EVENT_NAME', async (payload)=>{
return {payload}; // the message will be acknowledge
// or even
// return;
// or nothing
});
```
After the message is acknowledged, it will be removed from the queue and deleted.
### Flush the message
```js
import EventManager from 'rabbitmq-event-manager';
const myEventManager = new EventManager({url:'amqp://localhost'}, appName:'OTHER_CONSUMER');
myEventManager.on('MY_EVENT_NAME', async (payload)=>{
throw new Error('This will flush the message to DEAD LETTER QUEUE')
});
```
After the message is negatively acknowledged, it will be send to the Dead Letter Exhange, so in the queue DEAD_LETTER_QUEUE.
## NOTES :
### Should we integrate the application name in the event name
In a world of _events_ an event is fired, and some listeners will listen some events.
So with events sent by "Application", if we have an Application `UserAdminApp` which will send the event 'USER_CREATED', and we have an other application (WelcomeEmail) (or service) wanted to send on email to new users ...
So let's define that `WelcomeEmail` is listening USER_CREATED, it should knows that the event was fired by the `UserAdminApp`, but does we need to add the name of the application in event payload (\_metas), or in the event name.
On the `WelcomeEmail` side :
```ts
myEventManager.on('UserAdminApp.USER_CREATED', payload => {
/* ... */
});
```
Or
```ts
myEventManager.on('USER_CREATED', payload => {
/*
payload._metas.application = UserAdminApp
*/
});
```
If we consider **RabbitMQ** it means that the Exchange name will be `UserAdminApp.USER_CREATED` or `USER_CREATED`, so listening queues will be bound to the exchange.
Regarding this, I really think that the event should be `USER_CREATED` without any consideration of the application name, but as it is important to be able to know which application fires wich event, we may add the application name in the \_metas information of the event's payload;
### Alternate Exchange notes
- If the _"Alternate Exchange"_ was not created first it's not a problem, as it's configured, the only thing is that if one message is sent to the exchange 'My*EVENT', and the *"Alternate Exchange"\_ does not exists (if no queues are bound to the exchange 'My_EVENT'), the message will be lost !
- When we listen to an event :
```ts
import EventManager from 'rabbitmq-event-manager';
const myEventManager = new EventManager({url:'amqp://localhost'}, appName:'CONSUMER');
myEventManager.on('MY_EVENT_NAME', async (payload)=>{
console.log(payload);
return true;
});
```
It will automatically create an exchange of name `MY_EVENT_NAME`, and a Queue : `CONSUMER::MY_EVENT_NAME` bound to that exchange.
The Queue `CONSUMER::MY_EVENT_NAME` is configured with the _DEAD LETTER EXHANGE_, even if that exchange does not exists yet. It means that if a `MY_EVENT_NAME` is emmited, and the "listener" mark the event to be flush (dead lettered), the message will be lost (as no _DEAD LETTER EXHANGE_ is define, so ne queue are bound to it...).
:warning: In RabbitMQ only queue store messages, not exchangesso it's important that you initialize your rabbitMQ instance with the values of _alternateExchangeName_, _alternateQueueName_, _deadLetterExchangeName_, and _deadLetterQueueName_
### Requeue with delay
It could be very intersting to _"negatively acknowledge"_ a message and ask to be requeue after a delay, but this will be (if can) in version 2 !
:warning: Remember that the purpose of RabbitMQ is to deliver messages not to store them, so _"requeing with delay"_ should be done in a specific application.
### Delete a message
I recently wrote another npm package [rabbitmq-delete-message](https://www.npmjs.com/package/rabbitmq-delete-message) to be able to delete a message from a RabbitMQ Queue, this package aimed to delete some messages from the _DEAD_LETTER_QUEUE_ or the _QUEUE_NO_QUEUE_.
## Demos
You can find two dummies examples in the `/demo` folder, here is how to run them.
### Using Docker
If you have docker on your laptop, you can create a RabbitMQ instance running tthe following command :
```
docker run -d --hostname my-rabbit --name rabbitmq -p 5672:5672 -p 15672:15672 rabbitmq:3-management
```
and then run (from root folder)
```
yarn demo:docker
```
### Using CloudAMQP
You need to have an account on the https://www.cloudamqp.com/ website and to have created an instance, ones it's done you can run the folowwing command (from root folder) :
```
RABBITMQ_URL=amqp://user:password@bullfrog.rmq.cloudamqp.com/home yarn demo:cloudamqp
```