qps-client
Version:
Quantum Programming Studio client
103 lines (56 loc) • 4.02 kB
Markdown
QPS Client
==========

QPS Client allows you to connect <a href="https://quantum-circuit.com" target="_blank">Quantum Programming Studio</a> UI with <a href="https://www.rigetti.com/qcs" target="_blank">Rigetti QCS</a>, <a href="https://www.rigetti.com/forest" target="_blank">Rigetti Forrest SDK</a>, <a href="https://qiskit.org/" target="_blank">IBM Qiskit</a>, and <a href="https://quantastica.com#simulators" target="_blank">Quantastica Qubit Toaster</a>.
## How it works?
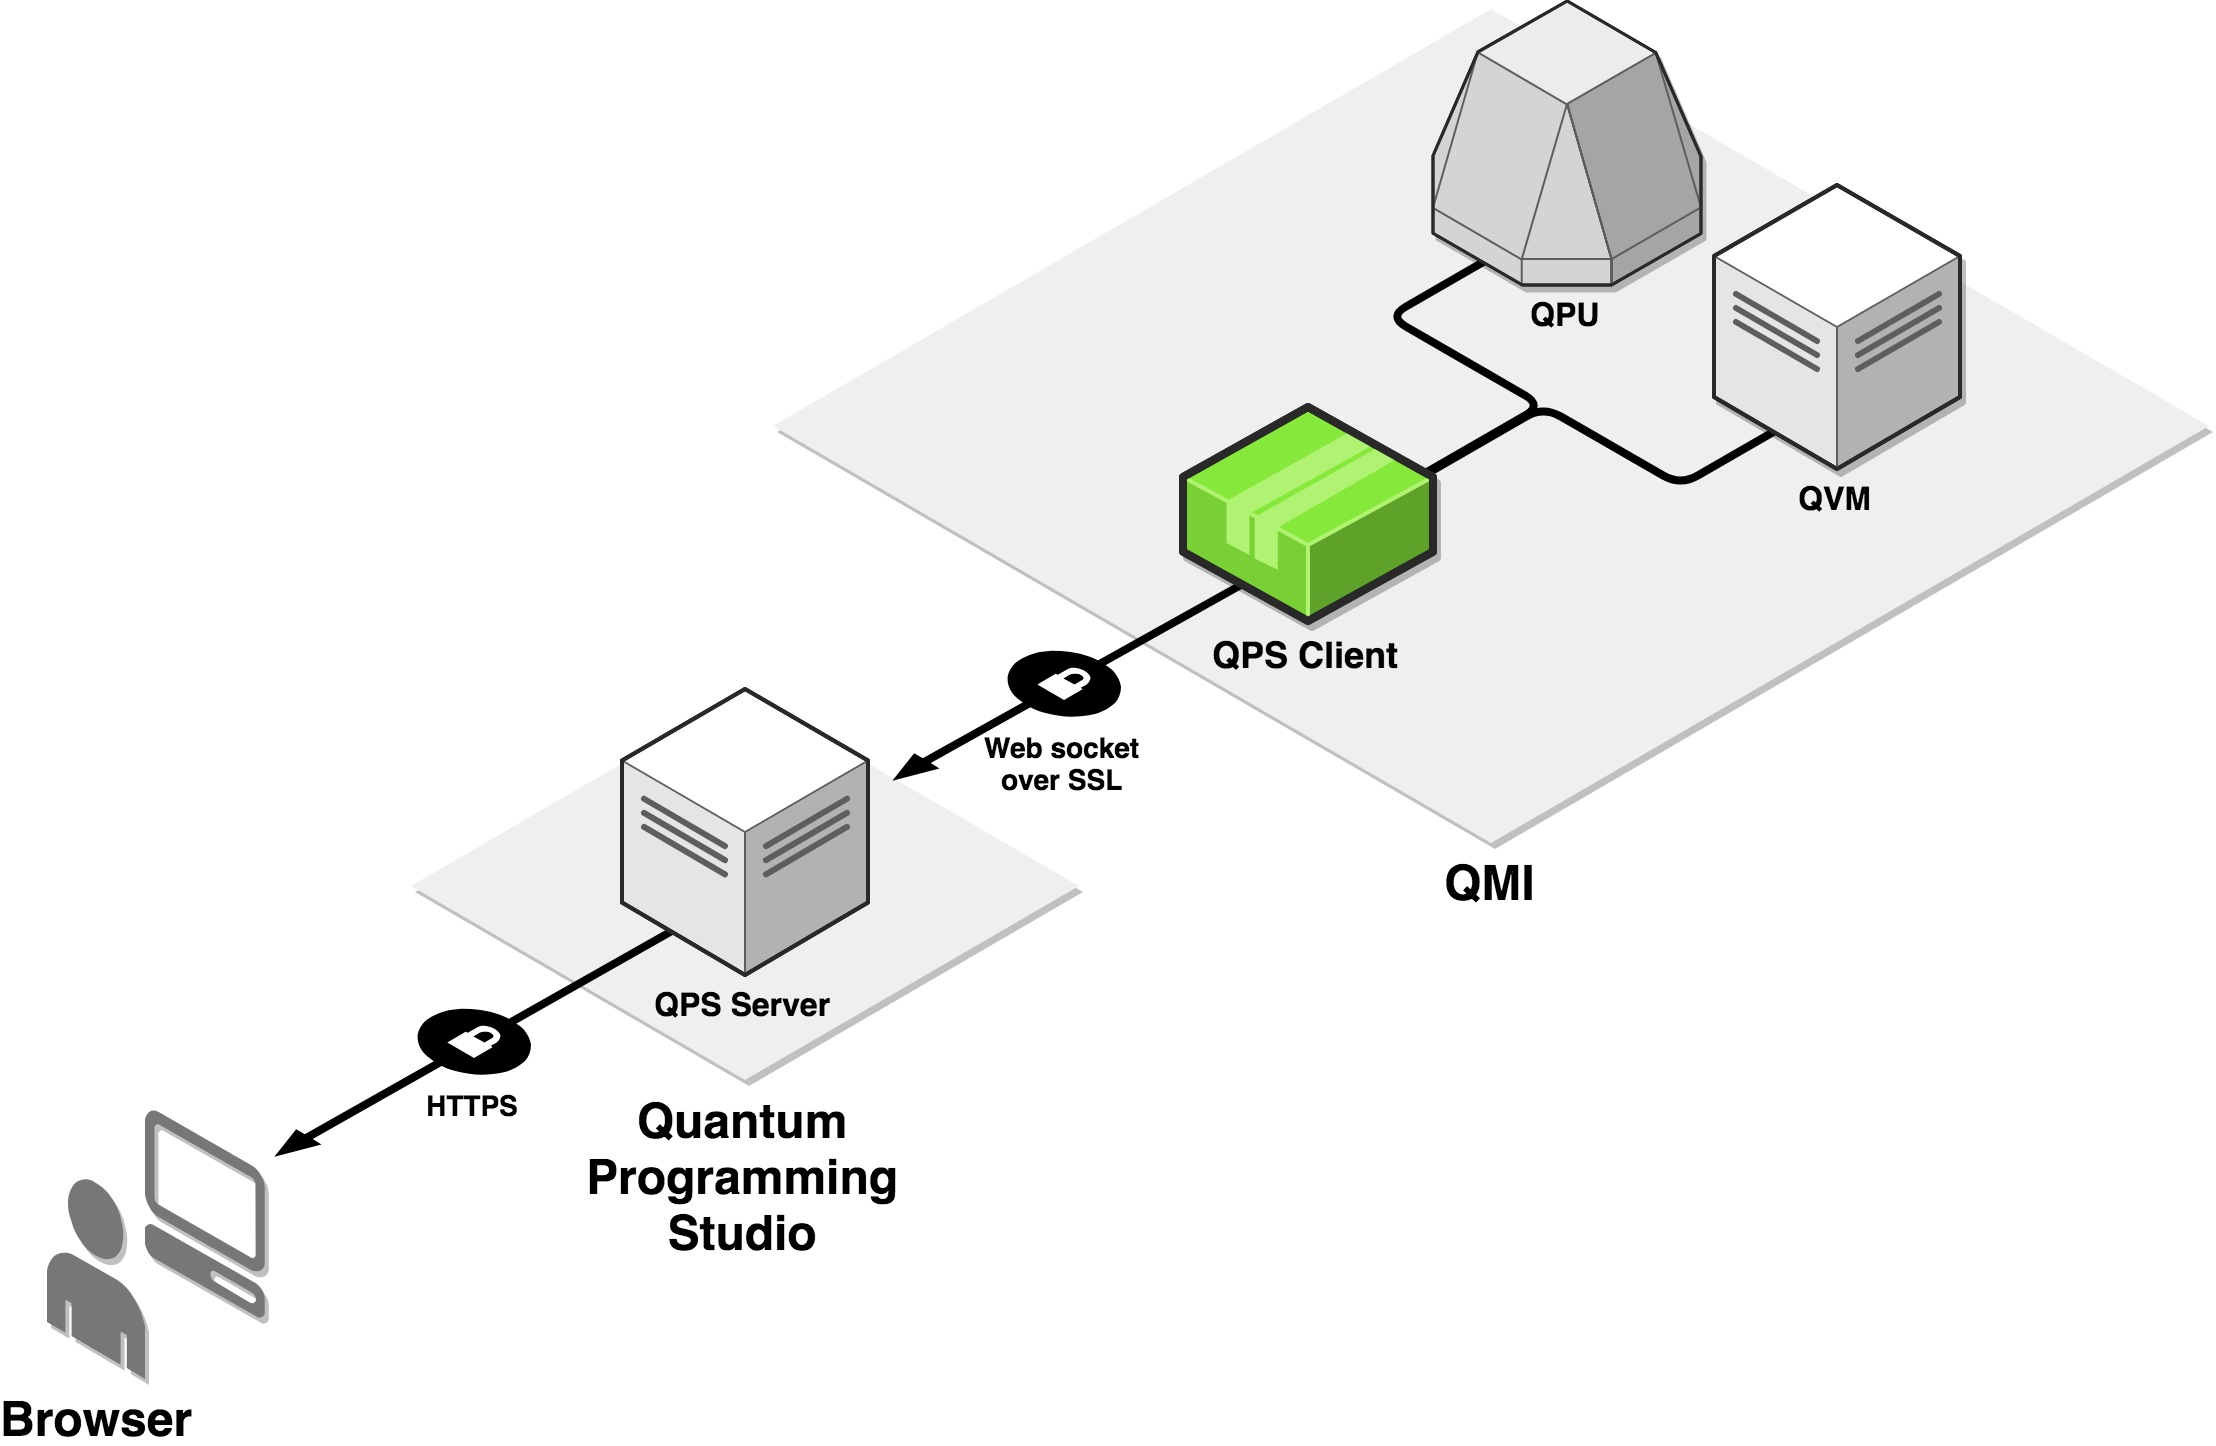
QPS Client is running on your local machine (or in the cloud) where your quantum programming environment is installed. It opens secure websocket connection with Quantum Programming Studio server and executes quantum circuits (that you design in the web UI) on your local simulator or on real quantum computer.
## Install (or upgrade to latest version)
1. Make sure you have <a href="https://nodejs.org" target="_blank">node.js</a> and <a href="https://www.npmjs.com/" target="_blank">npm</a> installed (it is installed by default in Rigetti QMI).
2. Run following terminal command:
```
npm install -g qps-client
```
When installing in Rigetti QMI, you need to run install command as privileged user:
```
sudo npm install -g qps-client
```
## Usage
### Using with Rigetti Forest SDK on your local machine (QVM only)
1. Install <a href="https://www.rigetti.com/forest" target="_blank">Rigetti Forrest SDK</a>
2. Run QVM (Quantum Virtual Machine) with:
```
qvm -S
```
3. Open one more terminal window and execute:
```
qps-client
```
When started, qps-client will ask you to enter your <a href="https://quantum-circuit.com" target="_blank">Quantum Programming Studio</a> username and password. When successfully authenticated, you will be able to run circuits on your locally running QVM directly from Quantum Programming Studio UI.
### Using with Rigetti QCS (QVM and QPU)
1. Get access to <a href="https://www.rigetti.com/qcs" target="_blank">Rigetti QCS</a> and SSH to your <a href="https://www.rigetti.com/qcs/docs/intro-to-qcs#qmi" target="_blank">QMI</a> (Quantum Machine Image).
2. SSH to your QMI and execute following terminal command:
```
qps-client
```
When started, qps-client will ask you to enter your <a href="https://quantum-circuit.com" target="_blank">Quantum Programming Studio</a> username and password. When successfully authenticated, you will be able to run circuits on QPU and QVM directly from Quantum Programming Studio UI.
See video:
<a href="http://www.youtube.com/watch?feature=player_embedded&v=tbuvzv4Do6k" target="_blank"><img src="http://img.youtube.com/vi/tbuvzv4Do6k/0.jpg" alt="QPS Client" width="480" height="360" border="10" /></a>
### Using with Qiskit (IBMQ or Aer)
1. Install <a href="https://qiskit.org/" target="_blank">Qiskit</a>
2. Open your terminal and execute following terminal command:
```
qps-client
```
When started, qps-client will ask you to enter your <a href="https://quantum-circuit.com" target="_blank">Quantum Programming Studio</a> username and password. When successfully authenticated, you will be able to run circuits on your backend (simulator and/or quantum computer) directly from Quantum Programming Studio UI.
### Using with Qubit Toaster
1. Install <a href="https://quantastica.com#simulators" target="_blank">Qubit Toaster</a>
2. Open your terminal and execute following terminal command:
```
qps-client
```
When started, qps-client will ask you to enter your <a href="https://quantum-circuit.com" target="_blank">Quantum Programming Studio</a> username and password. When successfully authenticated, you will be able to run circuits on your backend directly from Quantum Programming Studio UI.
## Support
If you find bugs **please report** here: https://github.com/quantastica/qps-client/issues
## License
[MIT](LICENSE.txt)