ondemand-react-chat-bot
Version:
OnDemandChatBot is a React library that provides an easy-to-use AI-powered chatbot component for your application. Built on top of the OnDemand platform, it allows full customization and seamless AI integration.
135 lines (87 loc) • 5.25 kB
Markdown
# OnDemandChatBot
OnDemandChatBot is a React library that provides an easy-to-use AI-powered chatbot component for your application. Built on top of the **OnDemand platform**, it allows full customization and seamless AI integration.
## Features
- **Fully Configurable** – Customize the chatbot’s **logo, name, welcome message, input placeholder**, and more.
- **Agent System** – Assign specialized AI agents for different tasks. For example, use a **LinkedIn agent** to search for users on LinkedIn.
- **AI Model Selection** – Choose from **10+ AI models**, including **ChatGPT, Gemini, DeepSeek, Claude**, and more.
- **OnDemand Platform Integration** – Manage all configurations directly from the **OnDemand platform** without code changes.
## Installation
Install the package using npm or yarn:
```sh
npm install ondemand-react-chat-bot
```
or
```sh
yarn add ondemand-react-chat-bot
```
## Props
| Prop Name | Type | Required | Description |
| ------------------ | ------------------- | -------- | -------------------------------------------------------------------------------------------- |
| `apiKey` | `string` | ✅ | Your API key obtained from [On-Demand.io](https://app.on-demand.io/). |
| `botId` | `string` | ✅ | The ID of your chatbot created on [On-Demand.io](https://app.on-demand.io/). |
| `contextVariables` | `contextVariable[]` | ❌ | Attach metadata or user-specific context to a session. You can add up to 10 key-value pairs. |
## Types
````typescript
type contextVariable = {
key: string;
value: string;
};
````
## Usage
Import and use the `OnDemandChatBot` component in your project:
```tsx
import { OnDemandChatBot } from "ondemand-react-chat-bot";
const App = () => {
const contextVariables = [
{ key: "name", value: "John Deo" },
{ key: "email", value: "example@gmail.com" },
];
return (
<OnDemandChatBot
apiKey="your-api-key"
botId="your-bot-id"
contextVariables={contextVariables}
/>
);
};
export default App;
````
## Configuring the Chatbot
All chatbot configurations (logo, name, welcome message, input placeholder, agents, AI models) can be managed through the **OnDemand platform**:
1. Log in to your account on [On-Demand.io](https://app.on-demand.io/).
2. Navigate to the **Chatbot Settings** section.
3. Adjust your chatbot’s appearance and functionality as needed.
4. Copy your API key and Bot ID, and use them in your React project.
# OnDemandChatBot API Key Guide
## Getting an API Key
To use `OnDemandChatBot`, you need an API key from [On-Demand.io](https://app.on-demand.io/). Follow the steps below to obtain your API key:
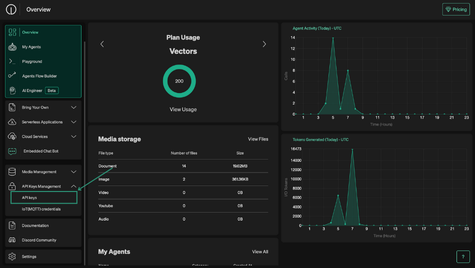
### Step 1: Navigate to API Key Management
1. Log in to your account on [On-Demand.io](https://app.on-demand.io/).
2. From the sidebar, click on **API Key Management**.
### Step 2: Create a New API Key
1. Click on the **Create New Secret Key** button.
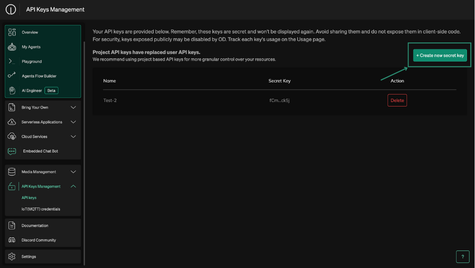
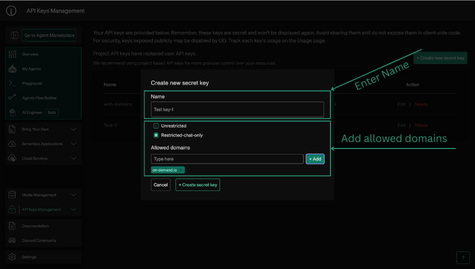
2. Enter a name for your API and click on **Create API Key**.
3. **We strongly suggest you use "Restricted Chat Only" to restrict the functionality of this key and add allowed domains**. This prevents unauthorized access and ensures your key is not misused. For example, specifying `yourdomain.com` ensures that only your website can use the key.
4. `⚠️ Warning: If you do not set allowed domains and use an unrestricted key, bad actors could exploit it for malicious activities.`
### Step 3: Copy and Store Your API Key
1. Once the key is generated, copy it immediately as it will not be shown again.
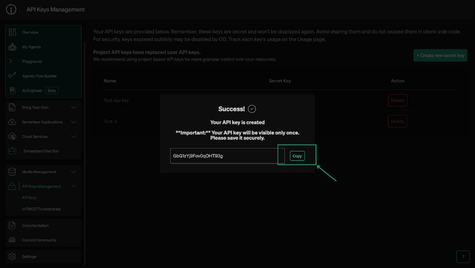
2. Store the key securely as you will need it to authenticate requests in `OnDemandChatBot`.
# OnDemandChatBot Creation Guide
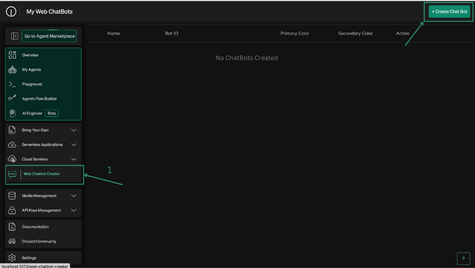
## Step 1: Navigate to Web Chat Bot Creator
1. Go to [On-Demand.io](https://app.on-demand.io/).
2. Click on **Web Chat Bot Creator**.
3. Click on **Create Chat Bot**.
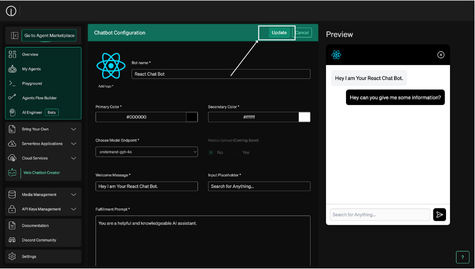
## Step 2: Configure Your Chatbot
1. Fill in all the details like **Primary Color** , **Secondary Color** , **Logo** , **Bot Name** ,
2. Click **Save** to store your chatbot configuration.
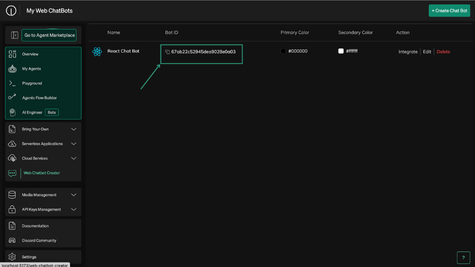
## Step 3: Copy and Store Your Bot ID
1. After saving, copy the **Bot ID**.
2. Store it securely as you will need it to integrate with your application.
Now your chatbot is ready to use!