node-red-contrib-ui-svg
Version:
A Node-RED widget node to show interactive SVG (vector graphics) in the dashboard
66 lines (51 loc) • 6.74 kB
Markdown
# "Binding" tab sheet
As explained in the section [Control via messages](#control-via-messages) below, this node can be controlled via input messages. For example, to change the fill colour of circle with id "mycircle" to green. As a result, the input messages need to contain a lot of information (element id, attribute name, attribute value ...), to let this node know what you want it to do. This means the flow will become quite complex, since a lot of extra nodes are required to put all that information in the message.
Another way to control this node is by using bindings. This means that you must specify most of the information in the binding, so the input message will only need to contain the new value itself. Since the input messages need to contain less information, the flow can be simplified ...
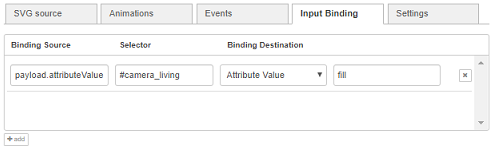
Input bindings can be added to link sources (= input message fields) to destinations (= element attribute/text values).
Several properties need to be entered:
+ ***Binding source***: the field of the input message that will contain the new value.
+ ***Selector***: the selection of (one or more) SVG elements on which the new attribute value will be applied. See the syntax of [CSS selectors](https://www.w3schools.com/cssref/css_selectors.asp).
+ ***Binding destination***: on which attribute of those selected SVG elements the new values will be applied.
+ *Text content*: when this option is selected, the value (from the input message) will be applied to the inner text content of the element.
For example, set the text content in `<text x="20" y="20">Some text content</text>`.
+ *Attribute value*: when this option is selected, the value (from the input message) will be applied to an attribute. This means an extra "attribute name" will have to be specified, to make sure the new value will be applied to the attribute with that name.
For example, set the fill colour value in `<circle fill="yellow"/>`.
+ *Style value*: when this option is selected, the value (from the input message) will be applied to a style attribute. This means an extra style "attribute name" will have to be specified, to make sure the new value will be applied to the attribute with that name.
For example, set the fill colour value in `<circle style="fill: yellow;"/>`.
For example:

When e.g. the input message contains ```msg.payload.position.x```, then that value (250) will be set to the "x" attribute of SVG element with id "camera_living".
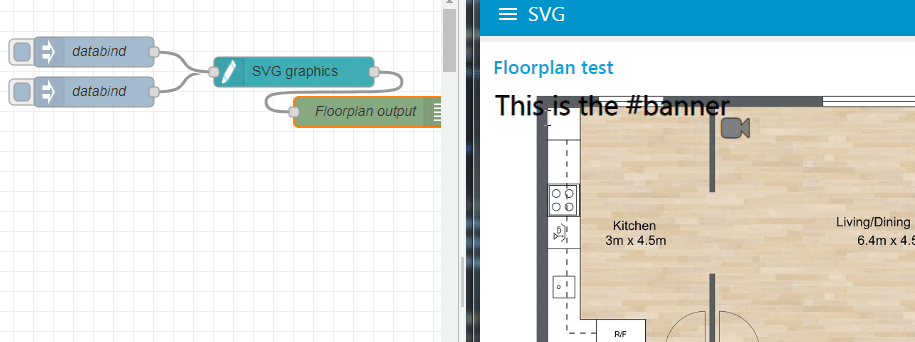
The following flow shows the above binding example in action:
```
[{"id":"c9ab8554.337588","type":"debug","z":"60ad596.8120ba8","name":"Floorplan output","active":true,"tosidebar":true,"console":false,"tostatus":false,"complete":"true","x":1380,"y":440,"wires":[]},{"id":"56869c57.d65c74","type":"ui_svg_graphics","z":"60ad596.8120ba8","group":"d4ee73ea.a7676","order":1,"width":"14","height":"10","svgString":"<svg preserveAspectRatio=\"none\" x=\"0\" y=\"0\" viewBox=\"0 0 900 710\" xmlns=\"http://www.w3.org/2000/svg\" xmlns:svg=\"http://www.w3.org/2000/svg\" xmlns:xlink=\"http://www.w3.org/1999/xlink\">\n <image width=\"889\" height=\"703\" id=\"background\" xlink:href=\"https://www.roomsketcher.com/wp-content/uploads/2016/10/1-Bedroom-Floor-Plans.jpg\" />\n <text id=\"banner\" x=\"10\" y=\"16\" fill=\"black\" stroke=\"black\" font-size=\"35\" text-anchor=\"left\" alignment-baseline=\"middle\" stroke-width=\"1\">This is the #banner</text>\n <circle id=\"pir_living\" cx=\"310\" cy=\"45\" r=\"5\" stroke-width=\"0\" fill=\"#FF0000\" />\n <text id=\"camera_living\" x=\"310\" y=\"45\" font-family=\"FontAwesome\" fill=\"grey\" stroke=\"black\" font-size=\"35\" text-anchor=\"middle\" alignment-baseline=\"middle\" stroke-width=\"1\"></text>\n</svg> ","clickableShapes":[{"targetId":"#camera_living","action":"click","payload":"camera_living","payloadType":"str","topic":"camera_living"}],"smilAnimations":[],"bindings":[{"selector":"#banner","bindSource":"payload.title","bindType":"text","attribute":""},{"selector":"#camera_living","bindSource":"payload.position.x","bindType":"attr","attribute":"x"},{"selector":"#camera_living","bindSource":"payload.camera.colour","bindType":"attr","attribute":"fill"}],"showCoordinates":false,"autoFormatAfterEdit":false,"outputField":"","editorUrl":"http://drawsvg.org/drawsvg.html","directory":"","name":"","x":1180,"y":440,"wires":[["c9ab8554.337588"]]},{"id":"62a285fb.bd046c","type":"inject","z":"60ad596.8120ba8","name":"databind","topic":"databind","payload":"{\"camera\":{\"colour\":\"yellow\"},\"position\":{\"x\":320},\"title\":\"databind strikes again\"}","payloadType":"json","repeat":"","crontab":"","once":false,"onceDelay":0.1,"x":980,"y":460,"wires":[["56869c57.d65c74"]]},{"id":"132d184e.ff0ab8","type":"inject","z":"60ad596.8120ba8","name":"databind","topic":"databind","payload":"{\"camera\":{\"colour\":\"green\"},\"position\":{\"x\":250},\"title\":\"New banner title by databind\"}","payloadType":"json","repeat":"","crontab":"","once":false,"onceDelay":0.1,"x":980,"y":420,"wires":[["56869c57.d65c74"]]},{"id":"d4ee73ea.a7676","type":"ui_group","z":"","name":"Floorplan test","tab":"b4bb5633.ba92b8","disp":true,"width":"14","collapse":false},{"id":"b4bb5633.ba92b8","type":"ui_tab","z":"","name":"SVG","icon":"dashboard","disabled":false,"hidden":false}]
```
Note that there is another way to implement data binding (without using the *"Binding"* tabsheet), by using user attributes inside the SVG source:
+ Use a `data-bind-text` to set the text content of an element For example:
```
<svg ...>
<text data-bind-text="payload.SystemStateDesc" ...>Temporary text content</text>
</svg>
```
Then the text content can be updated by injecting the following message:
```
"payload": {
"SystemStateDesc": "Updated text content"},
"topic": "databind"
}
```
+ Use `data-bind-attributes` to specify which SVG element attributes need to be binded to which message fields (specified in `data-bind-values`). For example:
```
<svg ...>
<circle data-bind-attributes="fill,r" data-bind-values="payload.circleColour,payload.size" ...>;
</svg>
```
Then the circle fill color and radius attributes can be updated by injecting following message:
```
"payload": {
"fill": "circleColour",
"size": 25
},
"topic":"databind"
```