node-red-contrib-ui-svg
Version:
A Node-RED widget node to show interactive SVG (vector graphics) in the dashboard
48 lines (39 loc) • 3.79 kB
Markdown
# "Animation" tab sheet
SVG allows users to animate element attributes over time. For example, you can make the radius of a circle grow in 3 seconds from 10 pixels to 40 pixels.
Adding animations to your SVG graphics can be done in different ways:
+ *Via the "SVG" tab sheet* manually, for die-hard SVG fanatics:
```
<circle id="mycircle" ... r="5" ...>
<animate id="myanimation" attributeName="r" begin="0s" dur="3s" repeatCount="1" from="10" to="40"/>
</circle>
```
The animation will be applied by the browser to the parent element (in this example the circle).
However it is also possible to add an animation element on its own (i.e. not as child element), with a link to the SVG element it needs to be applied to:
```
<circle id="mycircle" ... r="5" .../>
<animate xlink:href="#mycircle" id="myanimation" attributeName="r" begin="0s" dur="3s" repeatCount="1" from="10" to="40"/>
```
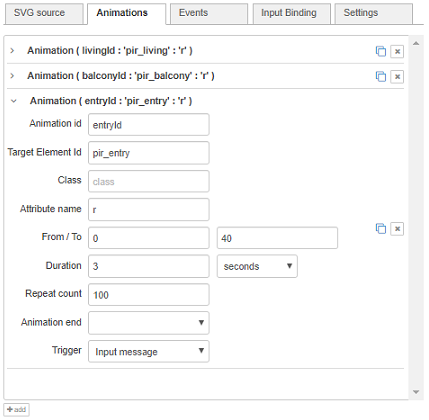
+ *Via the "Animation" tab sheet*, to keep the drawing and the animations separated. Click the *'add'* button to create a new animation record, where following properties need to be entered:
+ ***Animation id***: The id of this SVG animate element (in this example *"myanimation"*).
+ ***Target element id***: The id of the SVG element that you want to animate (in this example *"mycircle"*).
+ ***Class***: By setting a value in class, you can use a selector to start or stop multiple animations.
+ ***Attribute name***: The name of the element's attribute that you want to animate (in this example *"r"*).
+ ***From***: The attribute value at the start of the animation (in this example *"10"*).
+ ***To***: The attribute value at the end of the animation (in this example *"40"*).
+ ***Duration***: How long the animation will take.
+ ***Repeat count***: How many times the animation needs to be repeated (in this example *"1" which means only once). Caution: when *"0"* is selected, this means that the animation will be repeated ***"indefinite"***!
+ ***Animation end***: What to do with the new value when the animation is ended.
+ *Freeze new value*: the attribute value will keep the new *'To'* value (in this example *"40"*).
+ *Restore original value*: the attribute value will be restored to its original value (in this example *"5"*), from the start of the animation.
+ ***Trigger***: Which trigger will result in the animation being started.
+ Input message: the animation will be started by injecting an input message (see below).
+ Time delay: the animation will be started after a specified time.
+ Custom: the animation will be started using standard [begin](https://developer.mozilla.org/en-US/docs/Web/SVG/Attribute/begin) options. For example:
```
2s; myRect.click; myAnim.end-400ms
```
Creating animations via this tab sheet has the advantage that the SVG source and the animations are being kept separate. More specifically when the SVG is being created in a third-party SVG editor (which most of the time don't support animations), your manually inserted animation elements would be overwritten each time you need to update your SVG...
Remark: it is also possible to animate transformations. Indeed, when the attribute name is *"transform"* an extra "animation type" dropdown will appear:

+ *Via an input message* as explained in the [Control via messages](https://github.com/bartbutenaers/node-red-contrib-ui-svg/tree/master/docs/msg_control.md#startstop-animations-via-msg) section below.