native-forms-test
Version:
Build your own forms, surveys and polls for your React Native apps.
293 lines (221 loc) • 9.58 kB
Markdown
# [NativeForms.com](https://nativeforms.com)
## Build **forms, surveys and polls** for React Native apps.
### Why this product was created?
We created NativeForms to save you countless hours of boring development of forms. Our product offers advanced solutions to all your problems and let you focus on things that are really important in your app.
- [Installation](#installation)
- [Basic Usage](#basic-usage)
- [Full Example](#full-example)
- [Demo](#demo)
- [Props](#props)
- [File Upload for React Native](#file-upload-for-react-native)
- [Offline Forms](#offline-forms)
- [Webhooks](#webhooks)
- [Live Preview](#live-preview)
- [Support](#support)
## Installation
```js
npm install native-forms --save
// or
yarn add native-forms
```
## Basic Usage
1. Import component.
```js
import NativeForms from "native-forms";
```
2. Use this component in your **render()** method.
```js
<NativeForms form="https://my.nativeforms.com/vVDct0mcvZWPmZic4JlRvpmNy0Db" />
```
This code will display form in your application. Replace **form prop** with your form's address. You can create your own forms [here](https://app.nativeforms.com).
## Full Example
Basic flow of **NativeForms** in your application.
```js
import React, { useState } from "react";
import { Button, StyleSheet, Text, View } from "react-native";
import NativeForms from "native-forms";
const App = () => {
const [hasForm, showForm] = useState(false);
const show = () => showForm(true);
const hide = () => showForm(false);
return (
<View style={styles.container}>
<Text>NativeForms.com</Text>
<Button title="Show Form" onPress={show} color="#20f" />
{hasForm && (
<NativeForms
form="https://my.nativeforms.com/vVDct0mcvZWPmZic4JlRvpmNy0Db"
onClose={hide}
/>
)}
</View>
);
};
const styles = StyleSheet.create({
container: {
flex: 1,
backgroundColor: "#fff",
alignItems: "center",
justifyContent: "center"
}
});
export default App;
```
Replace **form prop** with your form's address. You can create your own forms [here](https://app.nativeforms.com).
## Demo

## Props
| Name | Type | Required | Note |
| ------------------------ | -------- | -------- | ------------------------------------------------------------------------------------------------------------------------------------------------------------------------------- |
| **form** | String | **Yes** | URL of **form** to display. |
| **formJSON** | Object | No | You can use JSON format of form instead of _form URL_. You can get this format by clicking "Export Form to JSON" in dashboard. Can be used for [offline forms](#offline-forms). |
| **onClose** | Function | No | Called when user decides to close the form. |
| **onSend** | Function | No | Called when user **completes** form. |
| **onBeforeSend** | Function | No | Called before sending form. Can be used to provide extra data based on user's input. |
| **noInternetConnection** | Function | No | Called when user tries to send a form but is offline. Can be used for [offline forms](#offline-forms). |
| **email** | String | No | Email of person that will complete form (it will be displayed in the admin panel). |
| **name** | String | No | Name of person that will complete form. |
| **extraData** | Object | No | Extra data fields that will be sent along with the completed form. This data will not be visible by users. |
Example of using props:
```js
<NativeForms
form="https://my.nativeforms.com/vVDct0mcvZWPmZic4JlRvpmNy0Db"
onSend={formData => console.log("Completed form data", formData)}
onClose={() => console.log("User cancels forms")}
onBeforeSend={formData => {
//extra data that will be added to form
return {
"Account Type": "Free"
};
}}
name="John Smith"
email="customer@gmail.com"
extraData={{
"Account Type": "Premium"
}}
/>
```
## File Upload for React Native
Uploading files for React Native is a little bit tricky.
If you are using [Expo](https://expo.io/) you have to add this component: [https://docs.expo.io/versions/latest/sdk/webview/](https://docs.expo.io/versions/latest/sdk/webview/)
**Adding it is as simple as running this command:**
```js
expo install react-native-webview
```
---
If you created your project with [React Native Cli](https://github.com/react-native-community/cli) you need to install this library:
[https://github.com/react-native-community/react-native-webview](https://github.com/react-native-community/react-native-webview)
**It is as simple as running those 2 commands:**
```js
npm install --save react-native-webview
// and
react-native link react-native-webview
```
### File Upload - code example
```js
import React, { useState } from "react";
import { Button, StyleSheet, Text, View } from "react-native";
import { NativeFormsWebView } from "native-forms";
import { WebView } from "react-native-webview";
const App = () => {
const [hasForm, showForm] = useState(false);
const show = () => showForm(true);
const hide = () => showForm(false);
return (
<View style={styles.container}>
<Text>NativeForms.com</Text>
<Button title="Show Form" onPress={show} color="#20f" />
{hasForm && (
<NativeFormsWebView onClose={hide}>
<WebView
source={{
uri: "https://my.nativeforms.com/AdnJHOt0mcvZWPmZic4JlRvpmNy0Db"
}}
/>
</NativeFormsWebView>
)}
</View>
);
};
const styles = StyleSheet.create({
container: {
flex: 1,
backgroundColor: "#fff",
alignItems: "center",
justifyContent: "center"
}
});
export default App;
```
**That's all :)**
## Offline Forms
It can happen that user is offline while completing the form.
NativeForms gives option to send form later when user is back online.
The best way to understand how to use forms offline is by looking at the snippet below.
### Offline Forms - code example
```js
import React, { useState } from "react";
import { Button, StyleSheet, Text, View } from "react-native";
import NativeForms, { sendCompletedForm } from "native-forms"; // must be version >= 1.1.4
// must be JSON object exported from Dashboard
const OFFLINE_FORM = {
/* label: 'Offline Form'... */
};
const App = () => {
const [savedForm, updateSavedForm] = useState(null);
const [hasForm, showForm] = useState(false);
const show = () => showForm(true);
const hide = () => showForm(false);
const sendSavedForm = async () => {
if (savedForm) {
await sendCompletedForm(savedForm);
console.warn("Form sent successfully");
} else {
console.warn("No saved form to send");
}
};
return (
<View style={styles.container}>
<Text>Offline forms test</Text>
<Button title="Show Form" onPress={show} color="#20f" />
<Button title="Send Saved Form" onPress={sendSavedForm} />
{hasForm && (
<NativeForms
formJSON={OFFLINE_FORM}
onClose={hide}
noInternetConnection={formJSON => {
updateSavedForm(formJSON);
return true; // yes, I will send form once user is online
// return false; <- No, don't send a thing
}}
/>
)}
</View>
);
};
const styles = StyleSheet.create({
container: {
flex: 1,
backgroundColor: "#fff",
alignItems: "center",
justifyContent: "center"
}
});
export default App;
```
I know it is little bit tricky :) If you have any problems, please email me at: [hello.com](mailto:hello.com)
## Webhooks
Need full control over your data? No problem we got you.
**We provide simple webhooks solution:**
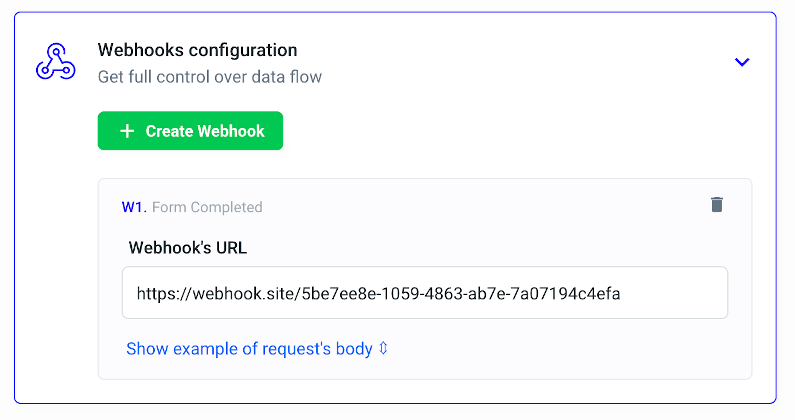
You can attach multiple webhooks for each form 🎉
## Live Preview
Full code examples are available here:
1. [Codesandbox](https://codesandbox.io/embed/native-forms-web-p5k7u)
2. [Expo](https://expo.io/@venits/native-forms)
3. [Codepen](https://codepen.io/venits/pen/QWLOmMV)
## Support
In case of any questions or problems, please contact me at:
[hello.com](mailto:hello.com)
### Happy Coding 💖
### [NativeForms.com](https://nativeforms.com)