jsdomiot
Version:
Document Object Model for IoT. Node.js library that extends the popular `jsdom` library to support Internet of Things systems. The DOM for IoT (DOMIoT) fully preserves the original DOM API, exposing exactly the same methods as those used in web developmen
140 lines (96 loc) • 5.78 kB
Markdown
# jsDOMIoT: Document Object Model for IoT, a Node.js implementation.
**jsdomiot** is a Node.js library that extends the popular `jsdom` library to support Internet of Things (IoT) elements and hardware bindings. It creates a virtual DOM environment where you can interact with physical IoT devices using familiar HTML/DOM APIs.
The DOM for IoT (DOMIoT) fully preserves the original DOM API, exposing exactly the same methods as those used in web development such as `getElementById`, `setAttribute` and `addEventListener`.
## Installation
### DOMIoT packages
```bash
npm install jsdomiot iot-bindings-node
```
*Note: `iot-elements-node` is automatically installed as a dependency of `jsdomiot`.*
### Testing drivers
You will also need to install drivers, you can test using drivers for testing.
This drivers will simulate button inputs and outputs to a relay controling lights.
```
git clone git@github.com:domiot-io/drivers.git
```
```
cd linux/ihubx24-sim
make clean
make
make load
ls /dev/ihubx24-sim0
```
and
```
cd linux/ohubx24-sim
make clean
make
make load
ls /dev/ihubx24-sim0
```
You are ready to run the example.
## Usage
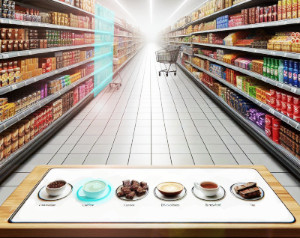
You can find the full example code in the [examples](https://github.com/domiot-io/jsdomiot/tree/main/examples/0-retail-buttons-shelving-units) of jsdomiot.
```
// collection of factories for domain-specific IoT elements.
import { retailElementFactoryCollection } from 'iot-elements-node';
// collection of factories for binding elements.
import { linuxBindingFactoryCollection } from 'iot-bindings-node';
// DOM for IoT
import { DOMIoT } from 'jsdomiot';
const html = `
<html>
<iot-aisle id="aisle6" name="Coffee, Hot Beverages, Cookies & Chocolate">
<iot-ihubx24-button-binding id="a6ButtonBinding" location="/dev/ihubx24-sim0">
<iot-ohubx24-color-binding id="a6ColorBinding" channels-per-element="2" colors-channel="white;blue" location="/dev/ohubx24-sim0">
<iot-button id="a6Product1Button" shelving-unit-id="a6L1" binding="a6ButtonBinding:0">
<iot-button id="a6Product2Button" shelving-unit-id="a6L2" binding="a6ButtonBinding:1">
<iot-button id="a6Product3Button" shelving-unit-id="a6L3" binding="a6ButtonBinding:2">
<iot-button id="a6Product4Button" shelving-unit-id="a6R1" binding="a6ButtonBinding">
<iot-button id="a6Product5Button" shelving-unit-id="a6R2" binding="a6ButtonBinding:4">
<iot-button id="a6Product6Button" shelving-unit-id="a6R3" binding="a6ButtonBinding:5">
<iot-shelving-unit id="a6L1" name="Ground Coffee" style="color:white;" binding="a6ColorBinding:0">
<iot-shelving-unit id="a6L2" name="Coffee Pods & K-Cups" style="color:white;" binding="a6ColorBinding:1">
<iot-shelving-unit id="a6L3" name="Cookies and Biscuits" style="color:white;" binding="a6ColorBinding:2">
<iot-shelving-unit id="a6R1" name="Premium Chocolate & Candy" style="color:white;" binding="a6ColorBinding:3">
<iot-shelving-unit id="a6R2" name="Tea Selection" style="color:white;" binding="a6ColorBinding:4">
<iot-shelving-unit id="a6R3" name="Snack Cakes, Muffins, Mini Pastries" style="color:white;" binding="a6ColorBinding:5">
</iot-aisle>
</html>`;
// Create virtual IoT DOM
const domiot = new DOMIoT(html, [retailElementFactoryCollection, linuxBindingFactoryCollection]);
const document = domiot.window.document;
// Use standard DOM APIs
const button = document.getElementById('product1Button');
const shelvingUnit = document.GetElementById('a6L1`);
button.addEventListener('press', (ev) => {
// physical button press triggers this:
console.log(`Button ${ev.target.id} pressed, change color of the ${shelvingUnit.id} shelving unit to blue`);
shelvingUnit.style.setProperty('color','blue'); // changes physical lights.
});
button.addEventListener('release', (ev) => {
// physical button release triggers this:
console.log(`Button ${ev.target.id} released, change color of the ${shelvingUnit.id} shelving unit to white`);
shelvingUnit.style.setProperty('color','white'); // changes physical lights.
});
```
Run the code:
```
node main.mjs
```
Then you can see how the simulated buttons' inputs trigger `press` and `realease` events, how the color of the shelving-units is updated accordingly (logs) and how these color changes translate into outputs:
```
watch -n 1 cat /tmp/ohubx24-output0
```
## Key Components
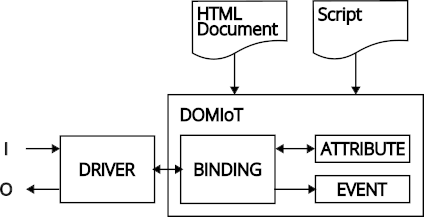
- **DOMIoT: DOM for IoT**: Wraps jsdom and adds IoT functionality.
- **Elements**: Domain-specific HTML elements for real-world objects (`<iot-room>`, `<iot-door>`, `<iot-button>`, `<iot-shelving-unit>`, etc.). You can find element collections on [GitHub: iot-elements-node](https://github.com/domiot-io/iot-elements-node) and on [npm: iot-elements-node](https://www.npmjs.com/package/iot-elements-node).
- **Bindings**: HTML elements that connect virtual DOM elements to physical hardware devices. You can find binding collections on [GitHub: iot-bindings-node](https://github.com/domiot-io/iot-bindings-node) and on [npm: iot-bindings-node](https://www.npmjs.com/package/iot-bindings-node).
- **Drivers**: Drivers are programs that enable communication with physical I/O components. The DOM for IoT uses bindings to allow communication between the DOM elements and the drivers. You can find drivers for testing on [GitHub: drivers](https://github.com/domiot-io/drivers).
jsDOMIoT provides **high-level, semantic abstractions** that represent real-world objects and concepts.
## Website
[domiot.org](https://domiot.org)
## License
MIT.