homebridge-bondbridge
Version:
Plugin to integrate BondBridge units by Bond to Homekit
103 lines (70 loc) • 7.96 kB
Markdown
<span align="center">
<p align="center">
<img src="homebridge-ui/public/images/Homebridge-bondbridge.png" width="300">
</p>
# homebridge-bondbridge
[](https://github.com/homebridge/homebridge/wiki/Verified-Plugins)
[](https://www.npmjs.com/package/homebridge-bondbridge)
[](https://www.npmjs.com/package/homebridge-bondbridge)
[](https://github.com/uswong/homebridge-bondbridge/blob/master/LICENSE)
This plugin is to bring your <B>Ceiling Fan with multi-tiers Dimmable Light</B> that is fitted with a RF remote control to Homekit via **Bond Bridge RF Controller**.
</span>
## Introduction
This `homebridge-bondbridge` plugin is specifically designed to bring <B>Ceiling Fans with multi-tiers Dimmable Light</B> that is fitted with a RF remote control to Homekit via **[Bond Bridge RF Controller](https://bondhome.io/product/bond-bridge/)**. If your ceiling fan does not have a multi-tiers dimmer, then you should use the **[homebridge-bond](https://github.com/aarons22/homebridge-bond)** plugin instead.
The RF remote control I am having here is **Hunter Pacific LOGIC remote control A2003** (left image below). Any ceiling fan that is fitted with a RF remote control and has a multi-tiers dimmable Light should be able to take advantage of this plugin by following strictly the following rules in programming your RF remote control functions onto your Bond Bridge RF Controller.

## How to programme your RF remote control functions onto Bond Bridge RF Controller
To work as intended, the RF remote control functions need to be programmed onto the Bond Bridge RF Controller as two separate "Celing Fan" devices, <B>one for the Fan and one for the Light</B>:
1. Add a **"Ceiling Fan"** device onto Bond Bridge RF Controller and programme the `Fan Off` function and the `Fan Speed` functions under "Fan". Name the device ending with " Fan" (e.g. "Bed 4 Fan"). Do not programme the `Light On/Off` functions here.
Note that the Fan Speed has intrinsic "On" function, as such the "Fan On" function is not required, only the "Fan Off" function need to be programmed. No harm done also if you do programme both "On/Off" functions.
2. Add another **"Ceiling Fan"** device onto Bond Bridge RF Controller and programme the `Light On/Off` functions under "Light" and programme the multi-tiers `Light Dimmer` functions under "Fan" as "Fan Speed". For example, the LOGIC RF remote control has 7-tiers dimmer, you should programme them as "Speed 1", "Speed 2", etc. Name this device ending with " Light" (e.g. "Bed 4 Light").
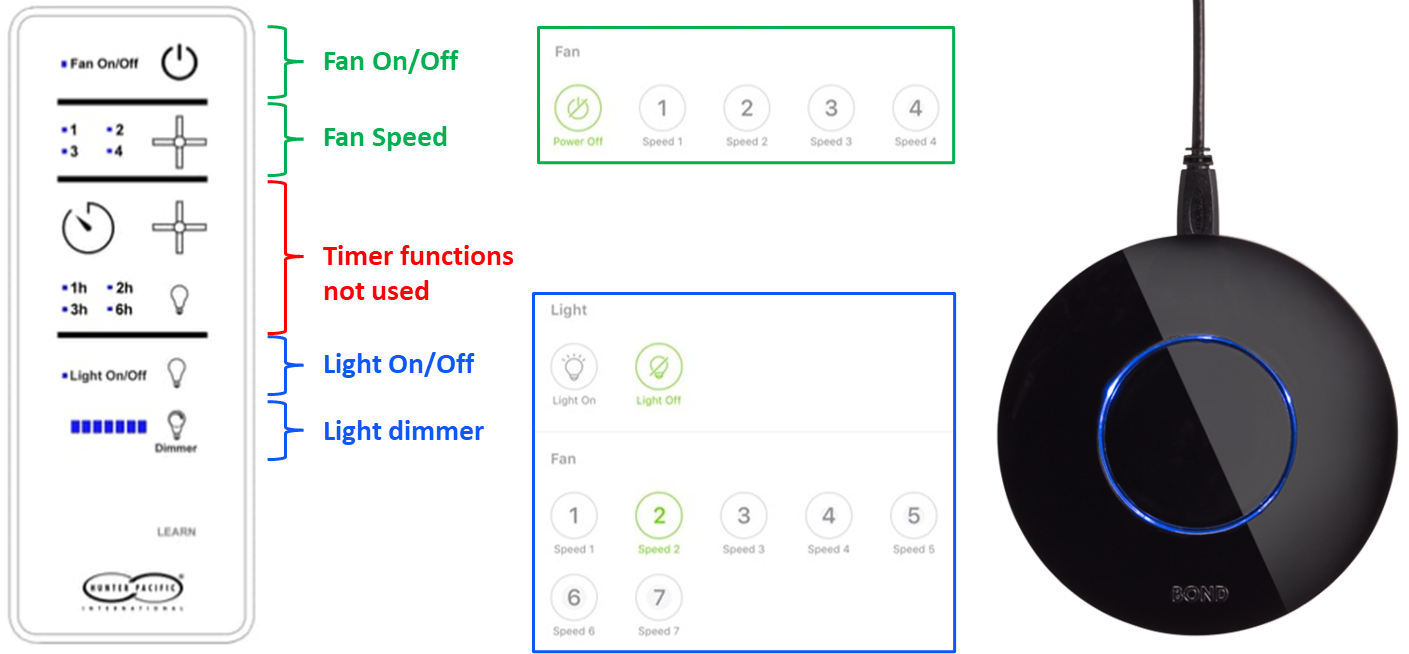
This plugin does not use the built-in timers but use custom-built timers within a bash script. These custom-built timers have greater flexibility and capability to turn on or off the fan and the light.
## Installation
1. If you have not already, install Homebridge via these instructions for [Raspbian](https://github.com/homebridge/homebridge/wiki/Install-Homebridge-on-Raspbian), [HOOBS](https://support.hoobs.org/docs), [macOS](https://github.com/homebridge/homebridge/wiki/Install-Homebridge-on-macOS) or [Windows](https://github.com/homebridge/homebridge/wiki/Install-Homebridge-on-Virtual-Machine).
2. Make sure that <B>jq</B> and <B>curl</B> are installed on your system. Install <B>jq-1.7</B> if you can, it is much faster than <B>jq-1.6</B>
3. Install `homebridge-bondbridge` plug-in via the Homebridge UI `Plugins` tab search function.
## Configuring the Plugin
<B>(A) Users who have access to the Homebridge UI</B> can go to the 'Plugins' tab in Homebridge UI, locate your newly installed `Homebridge Bondbridge` plugin and click the three dots on the bottom right, select `Plugin Config` and it should launch the <B>Bond Bridge Device Settings</B> UI.
Fill up the `Bond ID or IP Address` and `Local Token` of your Bond Bridge device, check/uncheck `Enable detailed debug log for this device` checkbox, then expand the `Ceiling Fan and its associated Light specific settings` and select an `Ceiling Fan Setup Option` from a drop down menu*, check/uncheck the `Include timers` checkbox, click `SAVE` then `RESTART`.
For advanced users, you can check/uncheck the `Enable detailed debug log for this plugin` under <B>Global Plugin Settings</B> to turned on the debugging log to diagnostic any issue with the plugin.
<img width="700" alt="image" src="https://github.com/user-attachments/assets/db92a4d3-6371-43d9-bbd2-768a27d10844" />
*The `Ceiling Fan Setup Option` from a drop down menu has the following options:
1. Configure a Ceiling fan with SpeedControl [`fan`]
2. Configure a Ceiling fan with SpeedControl and a Light switch [`fanLight`]
3. Configure a Ceiling fan with SpeedControl and a Light with Dimmer [`fanLightDimmer`]
4. Configure only a light Dimmer [`lightDimmer`]
5. Do not configure this ceiling Fan [`doNotConfigure`]
The key words within the square brackets are the possible values to the `setupOption` in the config.json (see example below).
<B>(B) Users who do not have access to Homebridge UI</B> need to make sure that the homebridge config.json contain a BondBridge config looks like the following:
```shell
{
"name": "BondBridge",
"debug": false,
"devices": [
{
"ipAddress": "<your Bond ID or ip address>",
"token": "<your Bond Bridge Local Token>",
"debug": false,
"CFsettings": {
"setupOption": "lightDimmer",
"timerSetup": true
}
}
],
"platform": "BondBridge"
}
```
## What You Expect to See in Homekit
For 'Full Setup' with 'Timers', you should expect to see 4 Homekit tiles per ceiling fan/light; one for the Fan with speed control, one for the Light with brightness control, one for the Fan Timer and another for the Light Timer (not shown, it is similar to the Fan Timer).

The Timers are custom-built timers and used 'Lightbulb' accessory as a proxy and 'Brightness' in % have a scale of 6 minutes per 1%, or 10% = 1.0 hour and a maximum of 10 hours timer can be set. You can set either **`time-to-on`** or **`time-to-off`** timer. Setting the Fan or Light Timer when the Fan or Light is in "Off" state will be a **`time-to-on`** timer and vice versa.
## How You Can Help
* Report Bugs/Errors by opening Issues/Tickets.
* Suggest Improvements and Features you would like to see!
## Special Thanks
1. Many thanks to [Mitch Williams](https://github.com/mitch7391) who has initiated the [homebridge-cmd4-AdvantageAir](https://github.com/mitch7391/homebridge-cmd4-AdvantageAir) plugin and has allowed me to participate in its development and in the process I have leant a lot about GitHub and on **bash** and **javascript** coding in homebridge environment.
2. Many thanks also to [John Talbot](https://github.com/ztalbot2000) for his fantastic [homebridge-cmd4](https://github.com/ztalbot2000/homebridge-cmd4) plugin which I forked and reused most of the original logic, with some modifications and adjustments to meet the requirements of this plugin.
3. And never forget to thank my beautiful wife who has put up with my obsession on this.....
## LICENSE
This plugin is distributed under the MIT license. See [LICENSE](https://github.com/uswong/homebridge-myplace/blob/main/LICENSE) for details.