grnsight
Version:
Web app and service for visualizing models of gene regulatory networks
233 lines (156 loc) • 13.1 kB
Markdown
# GRNsight Database
Here are the files pertaining to both the network and expression databases. Look within the README.md files of both folders for information pertinent to the schema that you intend to be using.
## Setting up a local postgres GRNsight Database
1. Installing PostgreSQL on your computer
- MacOS and Windows can follow these instructions on how to install postgreSQL.
- Install the software at this [link](https://www.postgresql.org/download/)
- > MacOS users: It is recommended to install with homebrew rather than the interactive installation in order to correctly view the `initdb --locale=C -E UTF-8 location-of-cluster` message in the documentation.
- > Windows users: when prompted for a password at the end of the installation process, save this password. It is the password for the postgres user
- Initialize the database
- If your terminal emits a message that looks like `initdb --locale=C -E UTF-8 location-of-cluster` from Step 1B, then your installer has initialized a database for you.
- Open the terminal and type the command `initdb --locale=C -E UTF-8 location-of-cluster`
- "Cluster" is the PostgreSQL term for the file structure of a PostgreSQL database instance
- You will have to modify location-of-cluster to the folder name you want to store the database (you don't need to create a folder, the command will create the folder for you, just create the name)
- Start and stop the server
- Additionally, your installer may start the server for you upon installation (You can save this command for further reuse).
- To start the server yourself run `pg_ctl start -D location-of-cluster` (You can save this command for further reuse).
- To stop the server run `pg_ctl stop -D location-of-cluster`.
- After installing with homebrew on MacOS, you may receive an error when you try to start the server that the server is unable to be started, and when attempting to stop the server, there terminal states there is no server running. In this case, you have to directly kill the port that the server is running on.
- To double check that this is the issue, you can open the Activity Monitor app on your computer and search for the `postgres` activity. If there is one, that means the server is running, and we have to terminate the port that the server is running on.
- First, we have to check what port the server is running on. Navigate to your homebrew installation, which is the same `location-of-cluster` from when the database was initialized and open that location in VSCode.
- Search for `port =` in the file `postgresql.conf`. By default, the port should be port 5432, but keep note of this port in case it is different.
- Refer to this Stack Overflow documentation on how to kill a server:
- https://stackoverflow.com/questions/4075287/node-express-eaddrinuse-address-already-in-use-kill-server
- If that doesn't work, then refer to the different methods on this link from Stack Overflow:
- https://stackoverflow.com/questions/42416527/postgres-app-port-in-use
- Linux users
- The MacOS and Windows instructions will _probably_ not work for you. You can try at your own risk to check.
- Linux users can try these [instructions](https://www.geeksforgeeks.org/install-postgresql-on-linux/) and that should work for you (...maybe...). If it doesn't try googling instructions with your specific operating system. Sorry!
2. Loading data to your database
1. Adding the Schemas to your database.
1. Go into your database using the following command:
```
psql postgresql://localhost/postgres
```
> For Windows users use this command:
```
psql -U postgres postgresql://localhost/postgres
```
When prompted for the password, use the password you specified earlier during the installation process. For all future commands requiring you to access postgres, you will need to add `-U postgres `
From there, create the schemas using the following commands:
```
CREATE SCHEMA gene_regulatory_network;
```
```
CREATE SCHEMA gene_expression;
```
```
CREATE SCHEMA protein_protein_interactions;
```
Once they are created you can exit your database using the command `\q`.
2. Once your schema's are created, you can add the table specifications using the following commands:
```
psql -f <path to GRNsight/database/network-database>/schema.sql postgresql://localhost/postgres
```
```
psql -f <path to GRNsight/database/expression-database>/schema.sql postgresql://localhost/postgres
```
```
psql -f <path to GRNsight/database/protein-protein-database>/schema.sql postgresql://localhost/postgres
```
Your database is now ready to accept expression and network data!
3. However, before you load the data, follow the steps of grnsettings-database README.md. Instructions are [located here!](https://github.com/dondi/GRNsight/tree/master/database/grnsettings-database)
2. Loading the GRNsight Network Data to your local database
1. Getting Data for Network
GRNsight generates Network Data from SGD through YeastMine. In order to run the script that generates these Network files, you must pip3 install the dependencies used. If you get an error saying that a module doesn't exist, just run `pip3 install <Module Name>` and it should fix the error. If the error persists and is found in a specific file on your machine, you might have to manually go into that file and alter the naming conventions of the dependencies that are used. _Note: So far this issue has only occured on Ubuntu 22.04.1, and certain MacOS versions so you might be lucky and not have to do it!_
```
pip3 install pandas requests intermine tzlocal
```
Once the dependencies have been installed, you can run
```
cd <path to GRNsight/database/network-database/scripts>
python3 generate_network.py
```
> Windows users should use `py` instead of `python3`.
This will take a while to get all of the network data and generate all of the files. This will create a folder full of the processed files in `database/network-database/script-results`.
**Note:** If you get the following error:
ImportError: urllib3 v2.0 only supports OpenSSL 1.1.1+, currently the 'ssl' module is compiled with 'OpenSSL 1.1.0h 27 Mar 2018'. See: Drop support for OpenSSL<1.1.1 urllib3/urllib3#2168
Run `pip install urllib3==1.26.6`
**Note:** If you get an error similar to the following image where it references the in then you are one of the unlucky few who has to edit the intermine.py file directly.
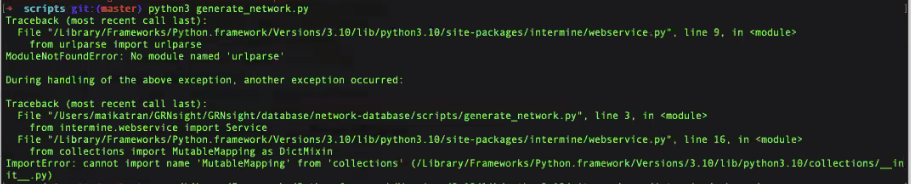
- Navigate the referenced file ( \<path specific to your machine>/intermine/webservice.py )
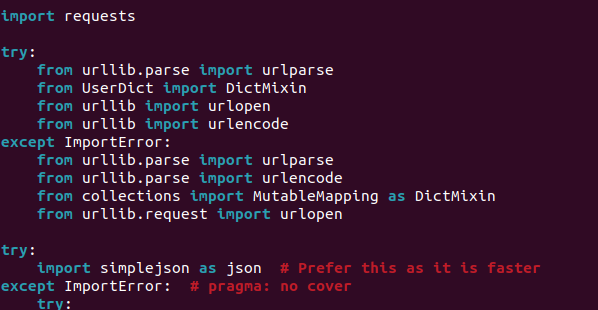
- The try-catch block should look like this:
- 
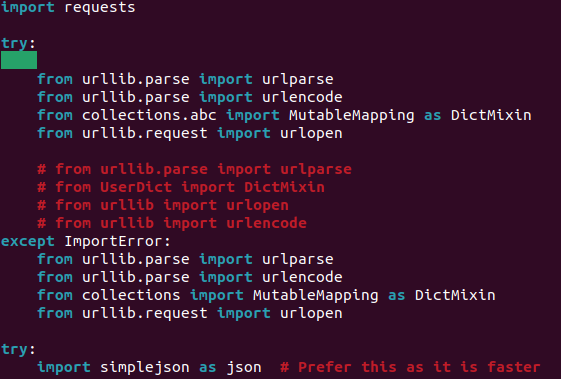
- Change it to the following, rerun the `generate_network.py` command and it should work! If it doesn't you may need to troubleshoot a bit further (´◕ ᵔ ◕`✿)_ᶜʳᶦᵉˢ_.
- 
2. Getting Data for Expression
1. Create a directory (aka folder) in the database/expression-database folder called `source-files`.
```
mkdir <path to GRNsight/database/expression-database>/source-files
```
2. Download the _"Expression 2020"_ folder from Box located in `GRNsight > GRNsight Expression > Expression 2020` to your newly created `source-files` folder. Your the path should look like this: GRNsight > database > expression-database > source-files > Expression 2020 > [the actual csv and xlsx files are here!]
3. Run the pre-processing script on the data. This will create a folder full of the processed files in `database/expression-database/script-results`.
```
cd <path to GRNsight/database/expression-database/scripts>
python3 preprocessing.py
```
**Note:** If you receive a UnicodeEncodeError add `-X utf8` to the beginning of the command
3. Getting Data for Protein-Protein Interactions
1. GRNsight generates Protein-Protein Interactions from SGD through YeastMine. In order to run the script that generates these Network files, you must pip3 install the dependencies used. These are the same dependencies used when creating the Network Database, so if you have completed step 2.2.1, then you should be fine. Once the dependencies have been installed, you can run
```
cd <path to GRNsight/database/protein-protein-database/scripts>
python3 generate_protein_network.py
```
This will take a while {almost 2 hours (´◕ ᵔ ◕\`✿)_ᶜʳᶦᵉˢ_} to get all of the network data and generate all of the files. This will create a folder full of the processed files in `database/protein-protein-database/script-results`.
2. Once you have finished generating the loader files, you need to remove duplicate entries from the physical interactions file. The bash script (`remove_duplicates.sh`) does this for you. The resultant file (`no_dupe.csv`)will be generated in the script-results directory located in the sub-directory processed-loader-files. If your machine doesn't support bash shell scripts, then you have to make a new script that removes duplicate lines from a file and writes the results to a file. Sorry!
Run the following:
```
chmod u+x remove_duplicates.sh
./remove_duplicates.sh
```
3. Loading all processed files into your local database
Need to run the script under `database` folder and run `loader.py`. The file contains scripts to collect union genes from expression, network, and protein-protein interactions. After that, the scripts populate all data from generated files in "Getting Data" section above into database.
```
cd <path to GRNsight/database>
```
To load to local database
```
python3 loader.py | psql postgresql://localhost/postgres
```
To load to production database
```
python3 loader.py | psql <path to database>
```
This should output a bunch of COPY print statements to your terminal. Once complete your database is now loaded with the expression, network, and protein-protein interactions data.
## Instructions for Updating Database
1. Getting new data
1. Generate a new network from Yeastmine using the script `generate_network.py` inside `network-database` folder.
```
cd <path to GRNsight/database/network-database/scripts>
python3 generate_network.py
```
2. Generate a new Protein-Protein Interactions from SGD using Yeastmine
```
cd <path to GRNsight/database/protein-protein-database/scripts>
python3 generate_protein_network.py
```
2. Filter all the missing genes, and updated genes in both Network and Protein-Protein Interactions. Also you need to filter the missing protein, and updated proteins in Protein-Protein Interactions. Everything is done in `filter_update.py`. The script will access the database get all of the genes stored within. From there it will generate a csv file of all genes that are missing from your database, and all genes that have updated their display name (standard like name). After running this script, you will see `missing-genes.csv`, `update-genes.csv` in `processed-loader-files` for both `network-database` and `protein-protein-database`, also `missing-protein.csv` and `update-protein.csv`.
```
cd <path to GRNsight/database/>
DB_URL="postgresql://[<db_user>:<password>]@<address to database>/<database name>" python3 filter_update.py
```
Ex:
```
DB_URL="postgresql://postgres@localhost/postgres" python3 filter_update.py
```
3. Loading all the updates from Network or Protein-Protein Interactions to database.
In the command below, the --network option specifies the network source, which can be either GRN or PPI. Ensure you select the correct network type.
To load to local database
```
python3 loader_update.py --network=[GRN|PPI] | psql postgresql://localhost/postgres
```
To load to production database
```
python3 loader_update.py --network=[GRN|PPI]| psql <path to database>
```
Continue setting up in the [Initial Setup Wiki page](https://github.com/dondi/GRNsight/wiki/Initial-Setup)