generator-nest-js-boilerplate
Version:
This generator will help you to build your own Nest.js Mongodb API using TypeScript 4
352 lines (262 loc) • 11.3 kB
Markdown
[](https://www.buymeacoffee.com/chechavalerii)
# Nest.js boilerplate
[](https://onix-systems.com/)
[](http://commitizen.github.io/cz-cli/)
[](https://www.npmjs.com/package/generator-nest-js-boilerplate)
[](https://www.typescriptlang.org/)
[](https://www.npmjs.com/package/generator-nest-js-boilerplate)
[](https://www.npmjs.com/package/generator-nest-js-boilerplate)
[](https://github.com/Onix-Systems/nest-js-boilerplate/issues)
[](https://www.npmjs.com/package/generator-nest-js-boilerplate)
[](https://www.npmjs.com/package/generator-nest-js-boilerplate)
[](https://github.com/Onix-Systems)
[](https://github.com/Onix-Systems/nest-js-boilerplate)
> Node.js Nest.js API. Supports MongoDB, Mysql, Redis
## Description
This boilerplate will help you bootstrap your own Nest.JS/MongoDB/MySQL/Typescript API quickly with common enterprise configurations done for you.
### Project Overview
- Admin.js
- Support ES6/ES7 features
- Using Eslint followed [Airbnb JavaScript Style Guide](https://github.com/airbnb/javascript)
- Husky
- Commitizen
- MIT license and Code of conduct
- Docker
- Prettier
- Nest.JS 8
## Features
### Authentication
- PassportJS local strategy
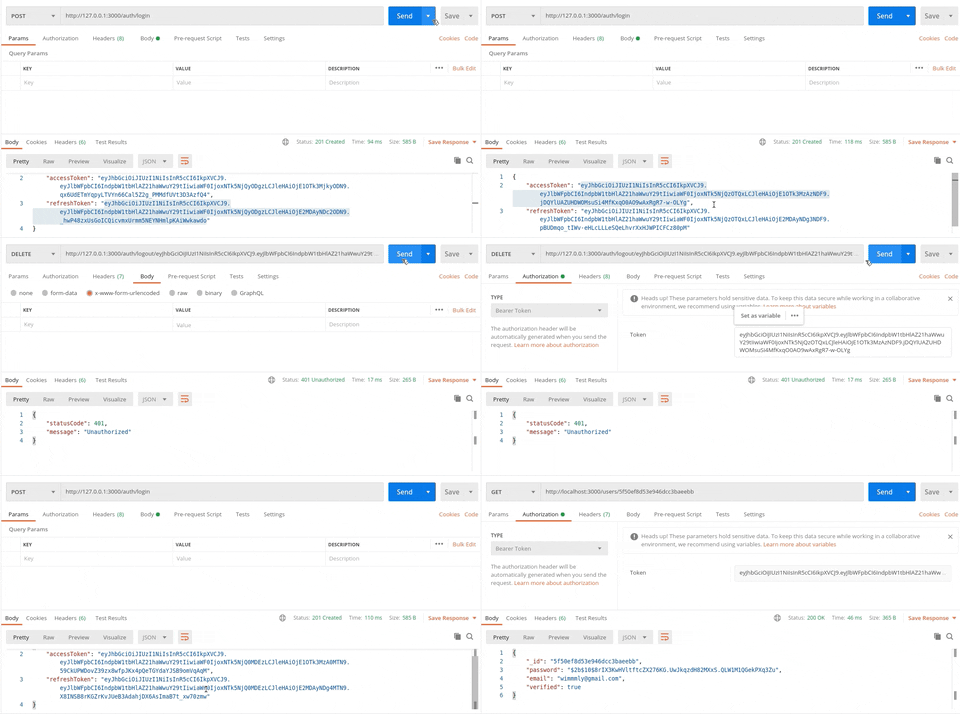
- JWT authentication (using passport-jwt)
- Passport OAuth 2.0 strategy (for Google)
### AdminJS
AdminJS is available to use if you select Mongo + JWT/Passport, on the route:
```bash
http://localhost:3000/admin
```
If you are not logged in, you will be redirected to the admin login page.
```bash
http://localhost:3000/admin/login
```
To login in the admin panel, you should have a **verified user** registered with the `admin` role.
To create a default admin user, run the provided migrations:
```bash
npm install migrate-mongo
npx migrate-mongo up
```
The migrations will create a default admin user in the database with following credentials:
```bash
login: admin@test.com
password: String_12345
```
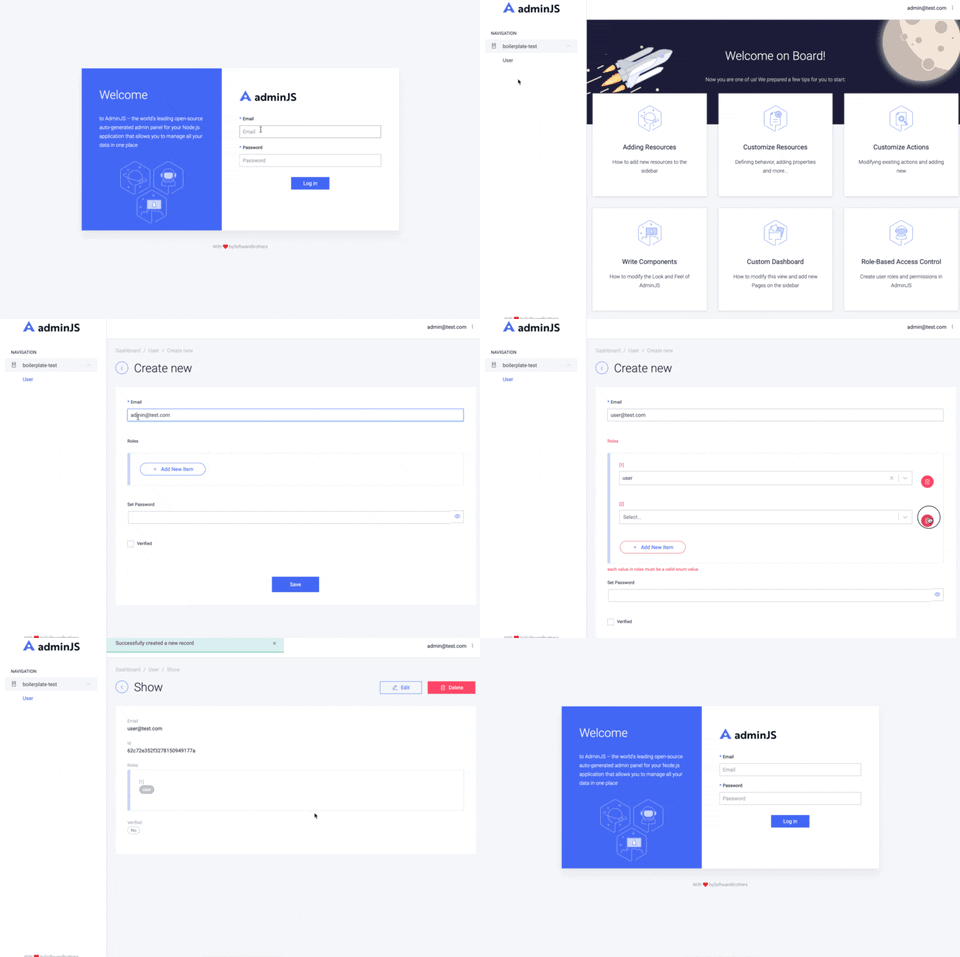
_Note: admin can be generated only with mongo + jwt/passport_
### Roles
For now, we have implemented only two roles: `user` and `admin`
Usage example:
```typescript
@Auth(RolesEnum.ADMIN, RolesEnum.USER)
```
or for all roles:
```typescript
@Auth()
```
_Note: before using it with sql databases, you must run migrations._
### Serialization
Use `@Serialize` decorator to process the objects before they are returned in the network response
Example:
```typescript
@Serialize(UserResponseDto)
```
use `@Exclude` decorator to exclude properties from serialization
```typescript
@Exclude()
password: string = '';
```
### Session Storage
- MongoDB
- Redis
- MySQL
### Email Sending
- Nodemailer
## Requirements
- node >= 14
- npm >= 7
- mongodb >= 4.0
- redis >= 4.0
- mysql >= 2.0
- typescript >= 4.0.3
## Installation
First, install [Yeoman](http://yeoman.io) and generator-nest-js-boilerplate using [npm](https://www.npmjs.com/) (we assume you have pre-installed [node.js](https://nodejs.org/)).
```bash
npm install -g yo
npm install -g generator-nest-js-boilerplate
```
Then generate your new project:
```bash
yo nest-js-boilerplate
```
Example App Skeleton (for Mongo + JWT)
```bash
├── docker
│ └── App.Dockerfile
├── src
│ ├── constants
│ │ └── common.constants.ts
│ ├── decorators
│ │ ├── auth-bearer.decorator.ts
│ │ ├── auth.decorator.ts
│ │ ├── roles.decorator.ts
│ │ └── serialization.decorator.ts
│ ├── exceptions
│ │ └── validation.exceptions.ts
│ ├── filters
│ │ ├── all-exceptions.filter.ts
│ │ ├── bad-request-exception.filter.ts
│ │ ├── forbidden-exception.filter.ts
│ │ ├── index.ts
│ │ ├── not-found-exception.filter.ts
│ │ ├── unauthorized-exception.filter.ts
│ │ ├── validation-exceptions.filter.ts
│ │ └── ws-exceptions.filter.ts
│ ├── guards
│ │ ├── jwt-access.guard.ts
│ │ ├── jwt-refresh.guard.ts
│ │ ├── jwt-ws-access.guard.ts
│ │ └── roles.guard.ts
│ ├── interceptors
│ │ ├── serialization.interceptor.ts
│ │ └── wrap-response.interceptor.ts
│ ├── interfaces
│ │ ├── exception-response.interface.ts
│ │ ├── jwt-decode-response.interface.ts
│ │ ├── paginatedEntity.interface.ts
│ │ └── pagination-params.interface.ts
│ ├── main.ts
│ ├── modules
│ │ ├── app
│ │ │ ├── app.controller.ts
│ │ │ ├── app.gateway.ts
│ │ │ ├── app.module.ts
│ │ │ └── app.service.ts
│ │ └── v1
│ │ ├── auth
│ │ │ ├── auth-constants.ts
│ │ │ ├── auth.controller.spec.ts
│ │ │ ├── auth.controller.ts
│ │ │ ├── auth.module.ts
│ │ │ ├── auth.repository.ts
│ │ │ ├── auth.service.spec.ts
│ │ │ ├── auth.service.ts
│ │ │ ├── dto
│ │ │ │ ├── jwt-tokens.dto.ts
│ │ │ │ ├── refresh-token.dto.ts
│ │ │ │ ├── sign-in.dto.ts
│ │ │ │ ├── sign-up.dto.ts
│ │ │ │ └── verify-user.dto.ts
│ │ │ ├── guards
│ │ │ │ └── local-auth.guard.ts
│ │ │ ├── interfaces
│ │ │ │ ├── decoded-user.interface.ts
│ │ │ │ ├── jwt-strategy-validate.interface.ts
│ │ │ │ ├── login-payload.interface.ts
│ │ │ │ └── validate-user-output.interface.ts
│ │ │ └── strategies
│ │ │ ├── jwt-access.strategy.ts
│ │ │ ├── jwt-refresh.strategy.ts
│ │ │ ├── jwt-ws-access.strategy.ts
│ │ │ └── local.strategy.ts
│ │ ├── users
│ │ │ ├── dto
│ │ │ │ ├── update-user.dto.ts
│ │ │ │ └── user-response.dto.ts
│ │ │ ├── interfaces
│ │ │ │ └── user.interface.ts
│ │ │ ├── schemas
│ │ │ │ └── users.schema.ts
│ │ │ ├── users-constants.ts
│ │ │ ├── users.controller.spec.ts
│ │ │ ├── users.controller.ts
│ │ │ ├── users.module.ts
│ │ │ ├── users.repository.ts
│ │ │ ├── users.service.spec.ts
│ │ │ └── users.service.ts
│ │ └── v1.module.ts
│ ├── pipes
│ │ └── parse-object-id.pipe.ts
│ └── templates
│ └── verify-password.hbs
├── tsconfig.build.json
├── tsconfig.json
├── typedoc.json
├── index.js
├── nest-cli.json
├── package-lock.json
├── package.json
├── docker-compose.yml
└──README.md
```
## Running the API
### Development
To start the application in development mode, run:
```bash
npm run start:dev
```
Start the application in production environment:
Install `pm2` and `typescript` to make pm2 work with typescript codebase:
```bash
npm install -g pm2
pm2 install typescript
```
Here is an example command to start the process with 2 instances and a load-balancer
```bash
pm2 start ./dist/main.js -i 2 --no-daemon
```
Express server listening on http://localhost:3000, in development mode
_In development mode will watch your changes then will transpile the TypeScript code and re-run the node application automatically._
### Docker
1. [Install Docker](https://docs.docker.com/get-docker/)
2. [Install docker-compose](https://docs.docker.com/compose/install/)
To run your app in docker containers, choose "Yes" when the generator asks you about docker.
#### Now, spin up your app in docker
```bash
docker-compose up
```
## Set up environment
In root folder you can find `.env`. You can use this config as a template for your application.
## Deploy
### Heroku
Check all urls to databases if they are true, they must connect to dbs which located at them own servers like mongodb on Mlab
When you'll run npm run deploy:heroku you'll need to sign in on heroku. You will be redirected to login form.
**Check all database URLs to be valid. They should connect to their respective hosted instances (local or otherwise).**
_Note: you may need to sign in on heroku (if not done already). You will be redirected to Heroku login, if required, by the cli._
```bash
npm run deploy:heroku
```
### Jwt auth
### Oauth2 auth
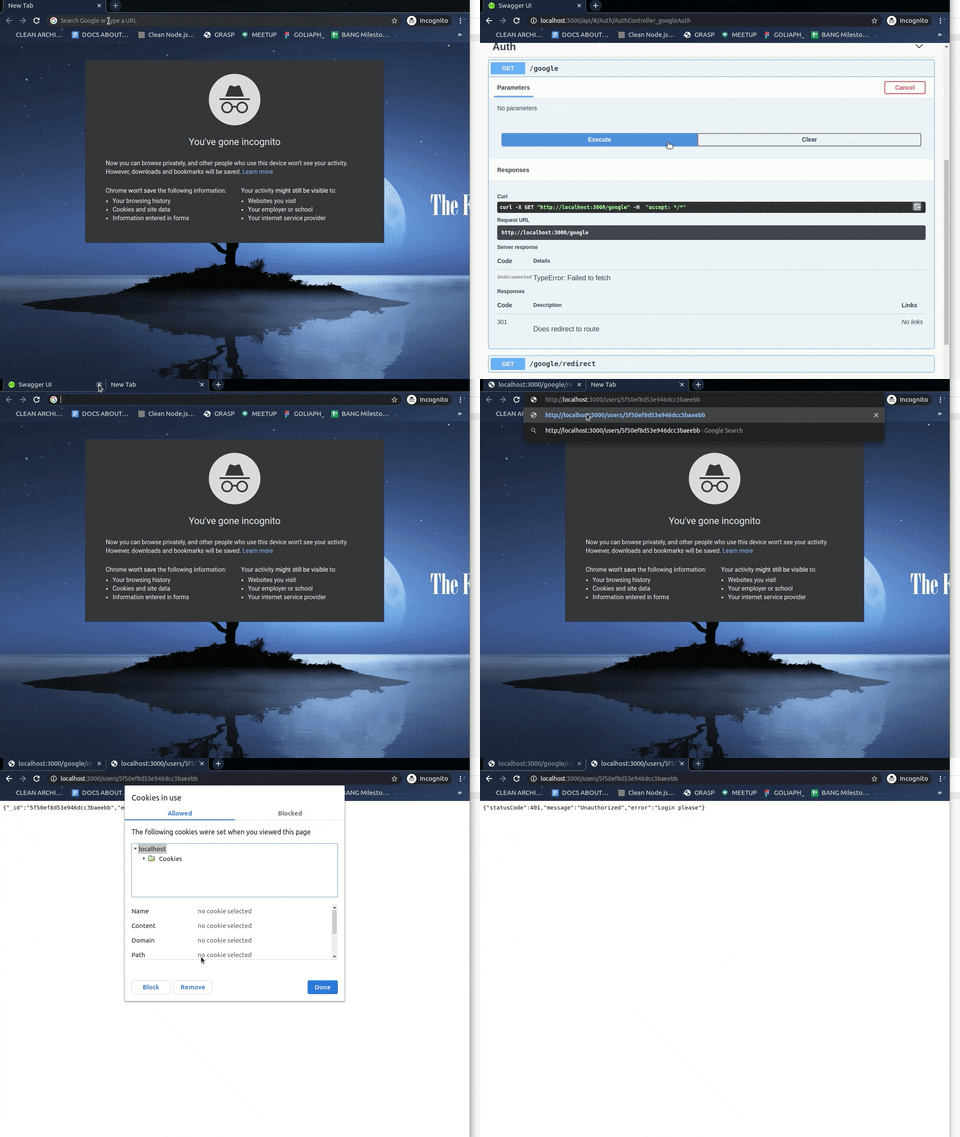
To initiate the google sign-in, use http://localhost:3000/google. Once authorized, you will be redirected to http://localhost:3000/google/redirect.
## Documentation
### WebSocket API
#### TypeDoc
TypeDoc documentation will be available after entering the command:
```bash
npm run docs
```
This will build the documentation in a subfolder with `index.html` as the entrypoint. You can open the `index.html` in a web browser to explore the documentation or host the subdirectory using a simple http server like `lite-server` using the following command.
```bash
npx lite-server ./path/to/documentation/
```
### REST API
#### Swagger
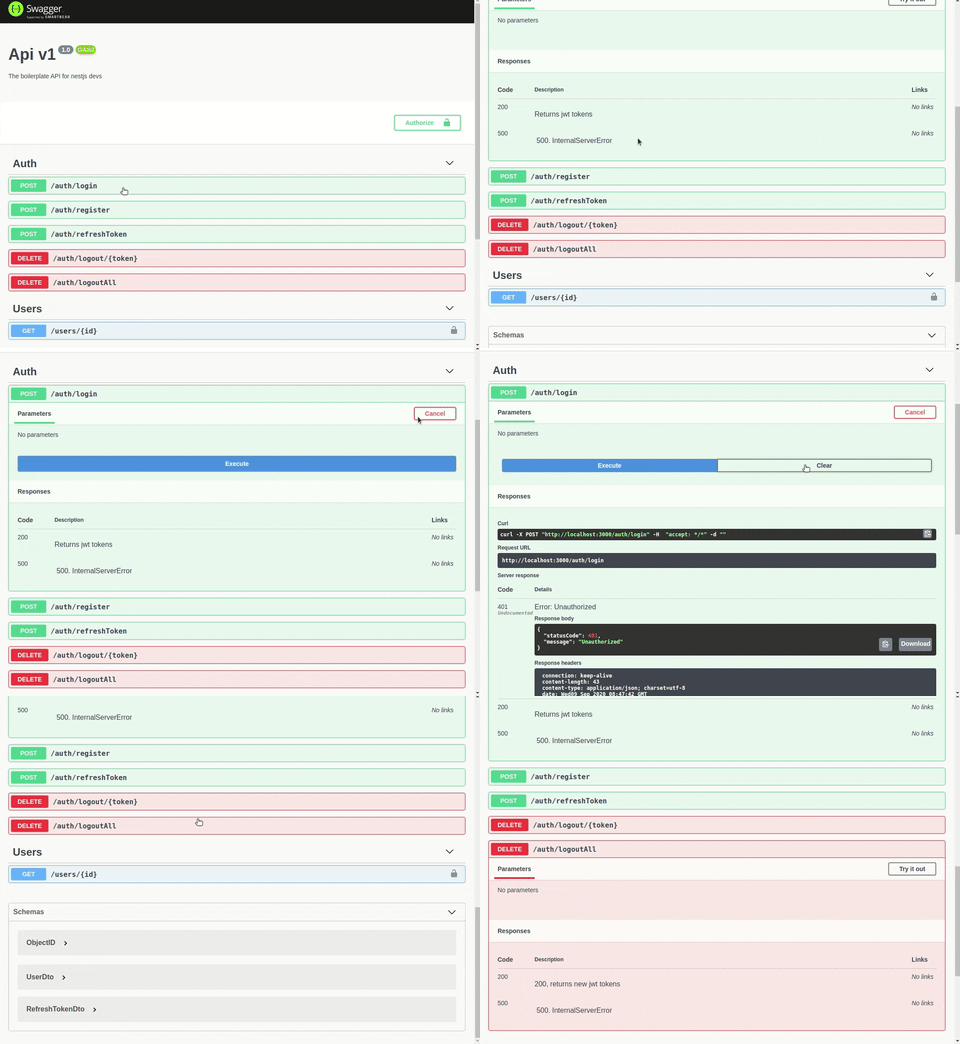
Swagger documentation will be available on route:
```bash
http://localhost:3000/api
```
> Please note: </br>
> Users are not verified by default. Please set ```"verified": true```, for sign-in request.
## Buy me a coffee
You can support by buying a coffee ☕️ here - [https://www.buymeacoffee.com/chechavalerii](https://www.buymeacoffee.com/chechavalerii)