done-autorender
Version:
Autorender CanJS projects
274 lines (190 loc) • 9.04 kB
Markdown
[](https://travis-ci.org/donejs/autorender)
[](http://badge.fury.io/js/done-autorender)
[](https://greenkeeper.io/)
# done-autorender
Automatically renders a template, either to the `<html>` or `<body>` elements.
## Install
Install with NPM and use with StealJS:
```
npm install done-autorender --save
```
## Use
done-autorender enables you to use a [Stache](https://canjs.com/doc/can-stache.html) template as your application entry-point (the main). done-autorender will wait for your page to be fully loaded (including all dependencies) and then will insert the template into the `<head>` and `<body>`. For example:
### index.stache
```handlebars
<html>
<head>
<title>My Site</title>
</head>
<body>
<can-import from="~/main.css" />
<can-import from="~/routes" />
<can-import from="~/state" export-as="viewModel" />
{{#eq(page, "home")}}
<can-dynamic-import from="~/home/">
{{#if(./isResolved)}}
<home-page></home-page>
{{/if}}
</can-dynamic-import>
{{/eq}}
</body>
</html>
```
### index.html
```html
<script src="node_modules/steal/steal.js"
main="app/index.stache!done-autorender" main></script>
```
Then load *index.html* in a browser. After all dependencies are loaded your *index.stache* will be rendered and inserted into the page.
#### No Zone option
If you do not use SSR but still want to use `done-autorender` to bootstrap your application you can use the `no-zone` module:
```html
<script src="node_modules/steal/steal.js"
main="app/index.stache!done-autorender/no-zone" main></script>
```
## API
### export-as
Each done-autorender application is backed by a ViewModel (such as a [DefineMap](https://canjs.com/doc/can-define/map/map.html)) that represents the state of the entire application.
To import this View Model into your application use a [can-import](https://canjs.com/doc/can-view-import.html#_can_importfrom__MODULE_NAME___) tag like so:
```html
<can-import from="todo-app/app" export-as="viewModel" />
```
The __export-as__ attribute specifies that this module represents the viewModel. The `todo-app` module might look like:
```js
import DefineMap from "can-define/map/map";
import route from "can-route";
import RoutePushstate from "can-route-pushstate";
route.urlData = new RoutePushstate();
route.register("{page}", { page: "home" });
const AppViewModel = DefineMap.extend("AppViewModel", {
page: "string"
});
export default AppViewModel;
```
Internally done-autorender will create a new instance of this DefineMap and set it as the [route.data](https://canjs.com/doc/can-route.data.html).
### route-data
Specifies an alternative property on the [ViewModel](https://github.com/donejs/autorender#export-as) to use as the [route data](https://canjs.com/doc/can-route.data.html).
#### Using the default route.data
Starting in [can-route 4.4.0](https://github.com/canjs/can-route/releases/tag/v4.4.0) you can more easily use the default `route.data`, as it is a DefineMap.
To use this pattern, first add a property on your ApplicationViewModel that is the route.data property:
```js
import DefineMap from "can-define/map/map";
import route from "can-route";
import RoutePushstate from "can-route-pushstate";
route.urlData = new RoutePushstate();
route.register("{page}", { page: "home" });
const AppViewModel = DefineMap.extend("AppViewModel", {
routeData: {
default: () => route.data
}
});
export default AppViewModel;
```
Now, in your index.stache, set the __route-data__ attribute to this property name:
```handlebars
<can-import from="todo-app/app" export-as="viewModel" route-data="routeData" />
```
From here you can you use the properties on `route.data` the same way you can any other ViewModel. Here's a fuller example template:
```handlebars
<html>
<head>
<title>{{routeData.page}} | My App</title>
</head>
<body>
<can-import from="todo-app/app" export-as="viewModel" route-data="routeData" />
<h1>My App!</h1>
<h2>{{routeData.page}}</h2>
</body>
</html>
```
#### Using a custom Type
Since __route-data__ allows you to specify any property on your ViewModel, one option is to use a custom type, such as a DefineMap. This allows you to separate properties that you want attached to the route from other properties on the ViewModel that you do not.
Below is an example AppViewModel module:
```js
import DefineMap from "can-define/map/map";
import route from "can-route";
import RoutePushstate from "can-route-pushstate";
route.urlData = new RoutePushstate();
route.register("{page}", { page: "home" });
const MyRouteData = DefineMap.extend("MyRouteData", {
page: "string"
});
const AppViewModel = DefineMap.extend("AppViewModel", {
routeData: {
Default: MyRouteData
}
});
export default AppViewModel;
```
And then to use it, set it as the __route-data__ attribute:
```handlebars
<html>
<head>
<title>{{routeData.page}} | My App</title>
</head>
<body>
<can-import from="todo-app/app" export-as="viewModel" route-data="routeData" />
<h1>My App!</h1>
<h2>{{routeData.page}}</h2>
<p>This is coming from the <strong>MyRouteData</strong> observable!</p>
</body>
</html>
```
### Debugging
In development mode, [can-zone/debug](https://canjs.com/doc/can-zone/debug.html) is enabled to provide debugging information in the case where the Zone times out and the app is never attached to the page.
You can control the timeout by setting the `data-autorender-timeout` attribute on the steal script tag (note that `data-` is optional here) like so:
```html
<script src="./node_modules/steal/steal.js"
data-autorender-timeout="1000"></script>
```
The __timeout__ is specified in milliseconds; in the above example it is 1 second. By default the zone will timeout after __5000 milliseconds__ (5 seconds).
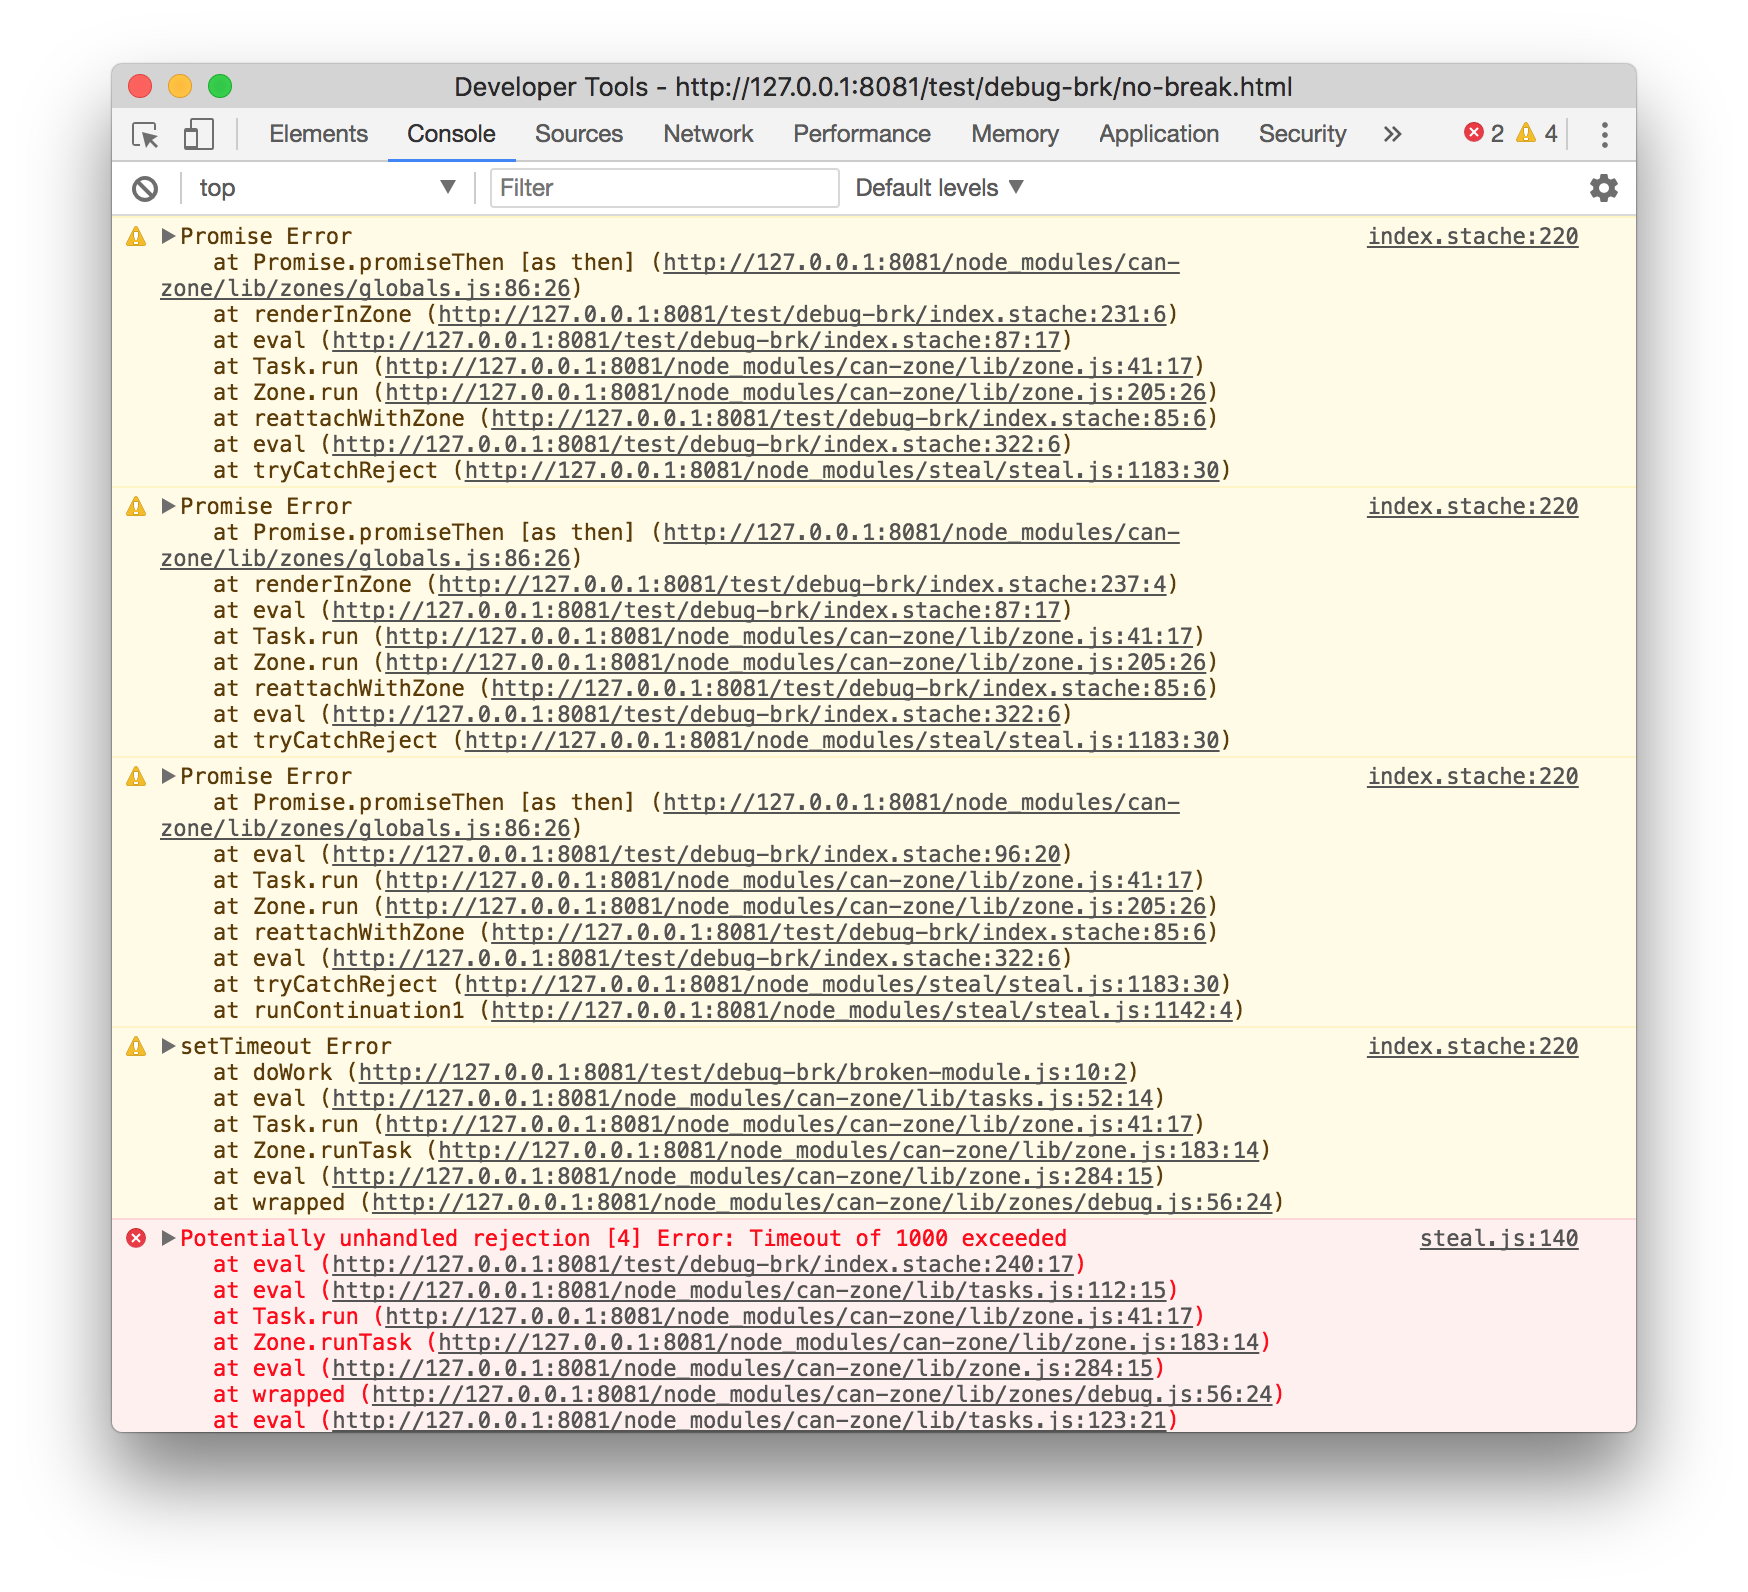
After the Zone has timed out the console will print out stack traces of code that failed to complete. Use these stack traces to figure out what caused reattachment to fail and fix anything that can be fixed (by, for example, using [Zone.ignore](https://canjs.com/doc/can-zone.ignore.html)). These information looks like:
#### Break on timeout
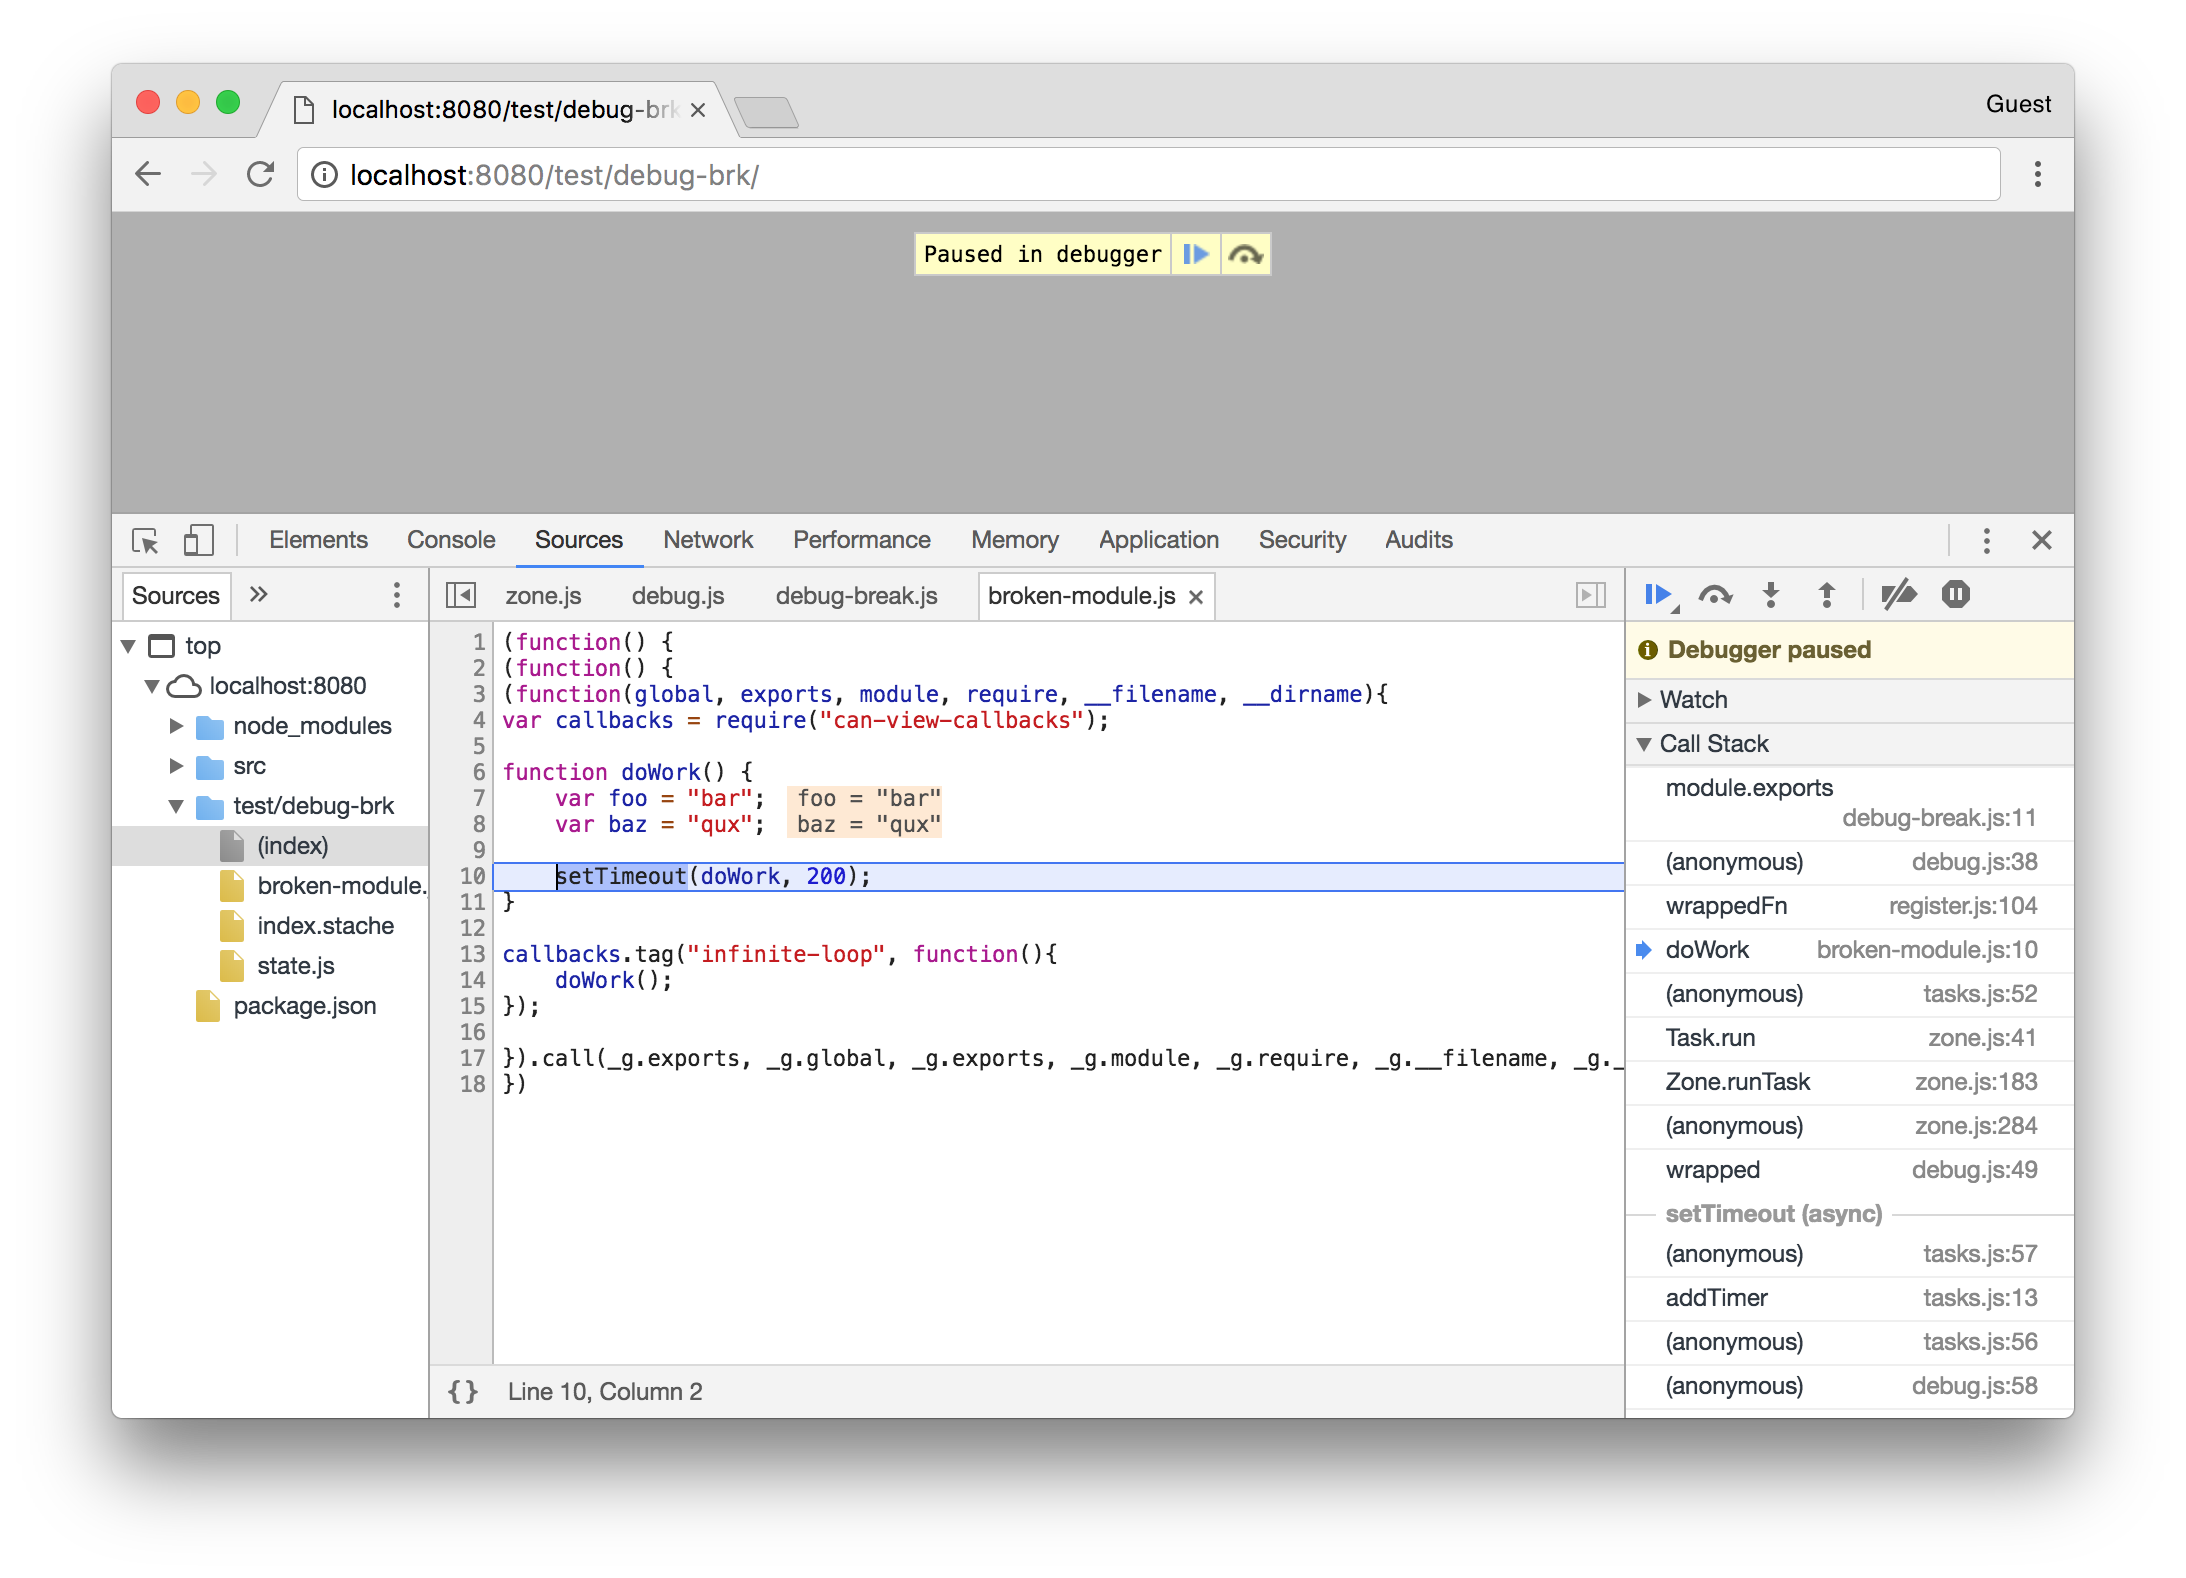
Additionally you can choose to have a `debugger;` breakpoint that is hit *after* the Zone times out. This allows you to more easily figure out which code is still running and see if something can be done about it.
Enable this by setting the `data-autorender-debug-break` option on the steal script tag like so:
```html
<script src="./node_modules/steal/steal.js"
data-autorender-debug-break></script>
```
This is a boolean attribute and doesn't need a value. Instead of logging stack traces you will get a breakpoint from which you can look back in the call stack and inspect the reason why the code continued to run past the timeout.
#### can-view-model
If you install [can-view-model](https://github.com/canjs/can-view-model) you can use it to access the Application ViewModel like so:
```js
var canViewModel = require("can-view-model");
var appVM = canViewModel(document.documentElement);
```
### Keeping elements in the DOM
By default done-autorender removes all elements from the `<head>` and `<body>` and replaces them with the elements from the template. This is to facilitate use with [done-ssr](https://github.com/donejs/done-ssr) which will have duplicated content.
Some times, especially if not using done-ssr, you might want to keep some elements that are in your HTML but not your stache template. Use the __data-keep__ property and done-autorender will leave them alone:
```html
<html>
<head>
<meta name="some-prop" content="some-value" data-keep>
</head>
</html>
```
### connectedCallback
done-autorender supports the `connectedCallback` lifecycle hook, and it works the same way [as in can-component](https://canjs.com/doc/can-component/connectedCallback.html).
The callback function receives the `document.documentElement` (aka the `<html>` element) as its only argument. You can use `this.listenTo` to listen to changes in the DefineMap's properties, or to listen to events in the DOM.
The callback should return a function that will be called when the document is torn down, where cleanup should be done.
The following is an example counter that is implemented using connectedCallback:
```js
import DefineMap from "can-define/map/map";
import route from "can-route";
export default DefineMap.extend({
count: {
type: 'number',
default: 0,
serialize: false
},
connectedCallback(el) {
const button = el.querySelector("#increment");
this.listenTo(button, "click", () => {
this.count++;
});
return () => this.stopListening();
}
});
```