cxltx-styles
Version:
A (hopefully) sensible collection of basic XeLaTeX style sheets
944 lines (717 loc) • 42.4 kB
Markdown
<!-- START doctoc generated TOC please keep comment here to allow auto update -->
<!-- DON'T EDIT THIS SECTION, INSTEAD RE-RUN doctoc TO UPDATE -->
**Table of Contents** *generated with [DocToc](https://github.com/thlorenz/doctoc)*
- [CXLTX Styles](#cxltx-styles)
- [Installation](#installation)
- [Badges](#badges)
- [CXLTX Style: Position Absolute](#cxltx-style-position-absolute)
- [paOriginTo, paOriginToPaper, paOriginToText, and paOriginIs](#paoriginto-paorigintopaper-paorigintotext-and-paoriginis)
- [paLeft, paCenter, paRight, and paTopLeft](#paleft-pacenter-paright-and-patopleft)
- [paGauge](#pagauge)
- [paLeftGauge, paCenterGauge, paRightGauge](#paleftgauge-pacentergauge-parightgauge)
- [Absolute Positioning and Page Breaks](#absolute-positioning-and-page-breaks)
- [paShow and paHide](#pashow-and-pahide)
- [CXLTX Style: PushRaise](#cxltx-style-pushraise)
- [CXLTX Style: Transform](#cxltx-style-transform)
- [CXLTX Style: CJK Glue](#cxltx-style-cjk-glue)
- [CXLTX Style: AccentBox](#cxltx-style-accentbox)
- [CXLTX Style: SmashBox](#cxltx-style-smashbox)
- [CXLTX Style: Convert To](#cxltx-style-convert-to)
- [CXLTX Style: Equals](#cxltx-style-equals)
- [CXLTX Style: OddEven](#cxltx-style-oddeven)
- [CXLTX Style: AbsPos](#cxltx-style-abspos)
- [CXLTX Style: TRM](#cxltx-style-trm)
- [Effects](#effects)
- [Colors](#colors)
<!-- END doctoc generated TOC please keep comment here to allow auto update -->
# CXLTX Styles
An incipient and hopefully sensible collection of basic X<sub>E</sub>L<sub>A</sub>T<sub>E</sub>X style
sheets.
**Pull Requests Are Awesome.**
````latex
\usepackage{cxltx-style-base} % you always want this one
\usepackage{cxltx-style-cjk} % Chinese / Japanese / Korean
\usepackage{cxltx-style-accentbox} % boxed accents as per http://www.eutypon.gr/eutypon/pdf/e2000-05/e05-a04.pdf
\usepackage{cxltx-style-smashbox} % boxed contents to preserve lineheights
\usepackage{cxltx-style-multimulti} % multiple columns and rows on pages and in tables
\usepackage{cxltx-style-position-absolute} % absolute textpositioning
\usepackage{cxltx-style-pushraise} % shove and shift those glyphs
\usepackage{cxltx-style-stackedpushraise} % similar to the pushraise
\usepackage{cxltx-style-convert-to} % simplistic unit conversion
\usepackage{cxltx-style-equals} % equality testing made easy
\usepackage{cxltx-style-oddeven} % checking whether we're on an odd or an even page
\usepackage{cxltx-style-trm} % make a hundred colors glow (in terminal output)
\usepackage{cxltx-style-abspos} % store current (x,y)-position (in mm)
````
<!-- ################################################################################################### -->
## Installation
Simply clone
````bash
git clone https://github.com/loveencounterflow/cxltx-styles.git
````
or [download an archive](https://github.com/loveencounterflow/cxltx-styles/archive/master.zip) to get
the code.
To enable TeX to resolve `\usepackage{cxltx-styles-*}` commands, put a symlink to your
CXLTX Styles directory into a directory that is on LaTeX's search path. On OSX with TeX Live, that can
be achieved by doing
````bash
cd ~/Library/texmf/tex/latex
ln -s route/to/cxltx-styles cxltx-styles
````
In a [more general fashion](http://tex.stackexchange.com/a/1138/28067), you may want to
````bash
kpsewhich -var-value=TEXMFHOME
````
then take that route (e.g. `/Users/$USER/Library/texmf`) and append `/tex/latex` (which gets you
`/Users/$USER/Library/texmf/tex/latex`) to obtain a suitable location. It may be necessary to first create
that location using `mkdir -p ~/texmf/tex/latex`. Confusing it certainly is.
<!-- =================================================================================================== -->
## Badges
Each CXLTX Style has a particular 'badge', i.e. a prefix, prepended to each of the names defined in that
style. Badges are mostly two lowercase letters out of `[a-z]` that are reminiscent of the style's name.
All names of private members (which are not documented here; see the source) start with the sigil `@`,
followed by the badge, followed by the name proper. Further, all names are written out (no surprising abbr.
pls.) and use CamelCase (coz that dash is no-go in TeX, y'know).
> Badges are necessitated by the fact that all of the huge ecosystem that is TeX & LaTeX lives within one
> single, *enormous* namespace. There's not even so much as a stringent convention to minimize chances of
> naming collisions. As a result, name and package option clashes are a frequently observed nuisance that
> any user of LaTeX has to put up with.
<!-- =================================================================================================== -->
## CXLTX Style: Position Absolute
*CXLTX Position Absolute* (PA) is based on
[textpos](http://www.tex.ac.uk/ctan/macros/latex/contrib/textpos/textpos.pdf). **It is intended to make it
easy to position single lines of text on the page** (much easier than using `textpos` directly), using
absolute coordinates that take the left edge, the center point, or the right edge of the baseline of the
text and the edges of the paper, the text area, or custom coordinates as reference points.
PA loads `textpos` as
````latex
\usepackage[absolute,overlay]{textpos}
````
so all material will be absolutely positioned (rather than relative to the current point of insertion), and
put on top of everything (?) else on the page.
> The latter option has been chosen to ensure `pagegrid`s will
> not cover material typeset with Position Absolute.
PA uses the starred form of the `textblock` environment, `\begin{textblock*}... \end{textblock*}`, which
means that **all dimensions must be given as lengths rather than pure numbers**. I feel this is an
advantage, as **(1)** pure numbers are only meaningful as 'abstract lengths' when used in geometry, but not as
concrete lengths in the physical world; and **(2)** simple arithmetics in command arguments are only possible
with lengths, not with numbers (`textpos` uses `calc`).
The badge of this style is `pa`. PA defines the following items:
<!-- ................................................................................................... -->
### paOriginTo, paOriginToPaper, paOriginToText, and paOriginIs
These commands are all concerned with the origin (the reference point) of the measurements you will want to
give when using `\paRight`, `\paCenter`, or `\paLeft` (for which see below).
The most basic command is `\paOriginTo`, which you can use to set the origin absolutely; the measurements
given here are always in turn interpreted as being relative to the edge of the paper, so
````latex
\paOriginTo{20mm}{25mm}
````
will set the reference point to 20mm to the right from the left edge and 25mm down from the top edge of the
paper. If your coordinates refer to the paper without any offset, you can, instead of `\paOriginTo{0mm}{0mm}`,
simply say
````latex
\paOriginToPaper
````
However, i anticipate that most of the time people will want to place their text lines relative to the
current text extent, *not* the paper. This can be done by placing
````latex
\paOriginToText
````
somewhere near the beginning of the document (or just leave it with the default settings).
**Important**: in case you want to use the default `\paOriginToText` setting, please
* be aware that **changing
page layout in the middle of the document necessitates re-issuing `\paOriginToText`**. PA caches the positions
of odd and even pages, respectively, and won't detect layout changes unless told to do so.
* bear in mind that since
this option uses [`changepage`](http://ctan.org/pkg/changepage), **LaTeX has to run at least twice** before
you get correct results. You're already used to this, right?
Lastly, there is `\paOriginIs` which is internally used to keep state; it will expand to one of `text` (the
default), `paper`, or some `custom (20mm,25mm)` (for the first example, above).
With these considerations out of the way, let's have a look at how to actually put stuff onto the page.
<!-- ................................................................................................... -->
### paLeft, paCenter, paRight, and paTopLeft
These are the basic commands to place printing material onto absolute positions; unlike their counterpart
in `textpos` (the `textblock` environment), each takes three regular arguments, namely, the `x` position,
the `y` position (growing from the top to the bottom), and the content of the box:
````latex
\pa〚Left|Center|Right|TopLeft〛{$x}{$y}{$text}
````
This code:
````latex
\paLeft{40mm}{10mm}{this text starts at 40mm}
\paCenter{40mm}{15mm}{centered centered}
\paRight{40mm}{20mm}{this text ends at 40mm}
````
produces (with `\usepackage[top-left]{pagegrid}` and `\paShow` in the preamble):
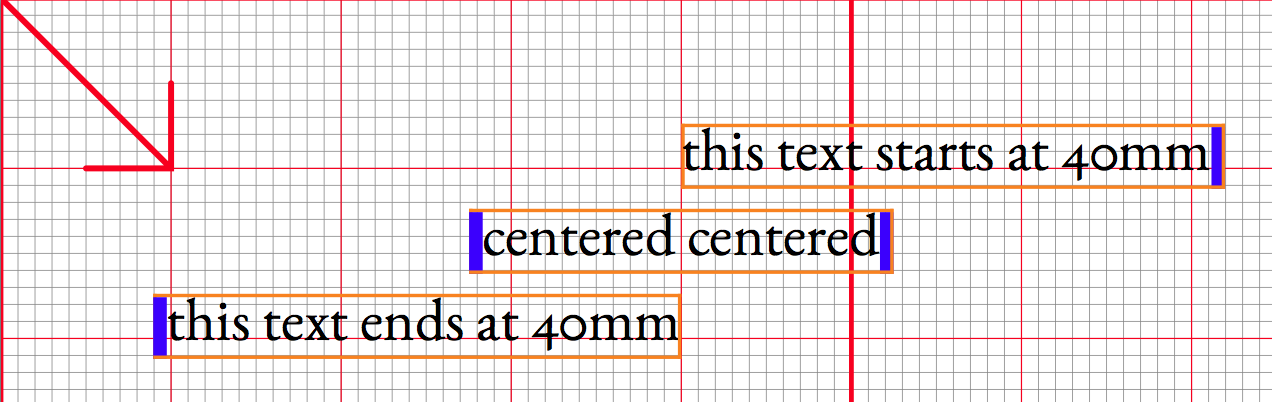
The coordinate system origin and the direction of ascending values is indicated by the arrow; observe how
each text box comes with one or two 'struts' (the blue bars) that regulate box heights.
You can also see that `\paRight` produces a text (the bottommost line) that is set flush right against the
`x = 40mm` vertical, while `\paLeft` text (the topmost one) is set flush left against the same; `paCenter`
centers the text horizontally so the 40mm mark lands smack in the middle. No surprises here, which is really
the purpose of this package! (The boxes and struts are only shown for demonstration; they're of course
absent from the output unless you state to `\paShow` them.)
The `\paTopLeft` command and its starred form, `\paTopLeft*`, are intended to be used when you want to
position material anchored at the top left corner. **The unstarred form includes a strut (like the
commands discussed above); it is intended to be used with text. The starred form does not include a strut
and is intended to be used with images.** Thus:
````latex
\paTopLeft*{10mm}{10mm}{\includegraphics[height=180mm]{/route/to/image.png}}
\paTopLeft{10mm}{10mm+180mm}{An interesting image.}
````
will place an image with a height of 180mm onto the page, with a line of text right beneath it. Observe
the simple math done here right in the macro argument; this may help to enhance readability and also
introduces a way to store component lengths in variables.
<!-- ................................................................................................... -->
### paGauge
CXLTX Position Absolute promises to deliver text positioned with respect to the *baseline* of the text. Now
the baseline is a fickle thing that is different from font to font. There are two ways to get the baseline
right: either ask PA to do it for you, or else do it yourself. The easy way first: use `\paGauge{...}` like
````latex
\paGauge{abcdefghijklmnopqrstuvwxyzABCDEFGHIJKLMNOPQRSTUVWXYZ0123456789!?§\$}
````
(using a suitable selection of characters) or simply
````latex
\paGaugeSample
````
(which will use the sample shown above) in your document to have PA determine the (internal) dimensions
`\@paStrutHeight`, `\@paStrutDepth`, and the ratio
````latex
\@paHeightDepthRatio = \@paStrutHeight / ( \@paStrutHeight + \@paStrutDepth )
````
> Needless to say that you should make sure that both your character sample is representative and that the
> font that `\paGauge` implicitly uses is the same that will appear in your positioned material. `\paGauge`
> does not produce any output.
**Observe that while `\usepackage{cxltx-style-position-absolute}` will run `paGaugeSample` implicitly,
dimensions will at best be approximate in case you change fonts later in your document setup.**
> You may profit from using CXLTX Smashbox in case you want to mix characters from fonts with protruding
> heights and depths in your PA textboxes.
Now for the hard way: if you find you want to do it yourself (maybe because you're mixing typefaces on the
positioned line), you're free to add something like
````latex
\paSetStrut{4mm}{3mm}
````
which will both set the strut's height (the first argument) and depth (the second argument) and calculate
the ratio as detailed above to find the baseline. This feature may prove useful for positioning characters
from symbol fonts. For people who haven't heard of height and depth in type, here's a picture to clarify
those concepts:
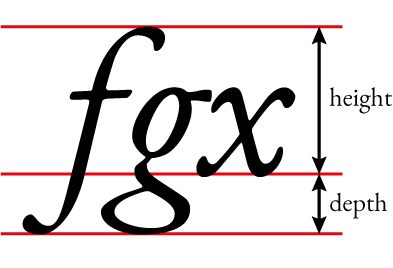
You can see that the 'height' is the length that a given text extends *above* the baseline (i.e. the one in
the middle) and the 'depth' is the length that it it extends *below* the same. Now `textpos` wants to know
the ratio of those with respect to the *total* height (that is, `height + depth`) to position its point of
reference, reckoned from the top—which is, of course, `ratio = height / ( height + depth )`.
**Note** To obtain a correct positioning of text boxes, only the *relative* height and depth of the strut
are important. Since material typeset with PA does not 'take space' on the page (i.e. it can overlap with
other material, just as a HTML `<div/>` with CSS style `position: absolute` would), the absolute height of
the struts (as long as it equal to or greater than the height and depth of any material within the box) is
of little consequence.—Which brings us to the next point.
<!-- ................................................................................................... -->
### paLeftGauge, paCenterGauge, paRightGauge
There are three convenience commands
````latex
\paLeftGauge{40mm}{10mm}{this text starts at 40mm}
\paCenterGauge{40mm}{15mm}{centered centered}
\paRightGauge{40mm}{20mm}{this text ends at 40mm}
````
that work exactly like their counterparts without the `...Gauge` suffix, except that they execute
`\paGauge{#3}` immediately prior to doing the positiong proper; furthermore, since gaugeing happens within
the confines of a TeX group, effects are kept local. These commands allow you to throw in materials set with
other typefaces and/or sizes without worrying much about typeface metrics. If it weren't for the quite
significant overhead and the incredibly log flooding incurred by the `fp` package, `\paLeftGauge` and
friends should be the default commands. When there is a lot of absolutely positioned material in your
document, be sure to make it so that the `\paLeft` commands get the main work to do.
<!-- ................................................................................................... -->
### Absolute Positioning and Page Breaks
As said in the preceding paragraph, material typeset with PA does not take space on the page—it may overlap
without triggering any line justification or word hyphenation action. Since this is so, it may also be the
case that while *you* know you did put printing stuff onto the page, TeX (rather, its output routines) may
be blithely unaware of that—which matters as soon as you have a page full of absolutely positioned material
and nothing else, and you want to use `\newpage` to advance to the next page.
Mind you, *LaTeX in all its incredibly convoluted baroque / byzantine glory does care for you!* It keeps you
from comitting grave blunders such as emitting blank sheets of paper! I mean, you'd totally loose your
street cred if that should ever happen to you, in the Data Center, with everyone and the staff looking at
you, Waster of Computing Cycles! And Paper!!
I know i know. Anyhows, remember this: always use
````latex
\null\newpage
````
when in doubt whether there was non-PA material on that page, but *not* in doubt that a new page is what you
damn want.
> There's probably a gazillion other methods documented how to get that new page but i like the non-chalant
> understatement of this particular incantation. I mean, *null is nought* is what i'm saying, right?—*zilch*,
> *nuthin!* We *can* put printing stuff on the page and TeX will think there's *nil* to print!, but when we
> *explicitly* tell TeX to send *nada* to output, *then* it will act like there *was* something to print...!
> Now i must stop at this or i'll get all worked up again.
<!-- ................................................................................................... -->
### paShow and paHide
You can use
````latex
\paShow
\paHide
````
respectively to show or hide the boxes and the struts that are used by PA. In case you want to muck with
their default appearances (boxes with slender, elegant outlines, whose creamy orange tint contrasts
gleefully with the sober marina blue of the rather sturdy struts that adorn each typeset line), refer to the
[source](https://github.com/loveencounterflow/cxltx-styles/blob/master/cxltx-styles-position-absolute.sty).
Use `\paShow` and `\usepackage[top-left]{pagegrid}` to debug your PA-powered document today! Experience the
Beauty of Simplicity! Never look back to those inferior and clumsy methods of days gone by!
Enough of that.
<!-- =================================================================================================== -->
## CXLTX Style: PushRaise
*CXLTX PushRaise* (PR) provides (mainly) three commands to push a given glyph to the right (or the left) and
to raise or to lower it, all in terms of the current font size and without taking up additional space:
```latex
龍覀龍,龍\prRaise{-0.125}{覀}龍
龍亻龍,龍\prPush{0.5}{亻}龍
龍。龍,龍\prPushRaise{0.5}{0.25}{。}龍
```
Here is the output of the above, running XeLaTeX with xeCJK; the font is Sun-ExtA:

The image illustrates my use-case for these commands: to correct the positioning of glyph shapes in Chinese
fonts. It's a somewhat bad habit of modern CJK font designers that they shift those glyphs that represent
the positional variants of 'radicals' (such as 亻灬氵艹) to wherever they appear most of the time. This is
wrong and printed dictionaries normally don't do that, much less the 康熙字典 which was the first
major work to use the modern sytem of radicals. Looking at the examples above and comparing them with
fine printed matter, it also becomes obvious that 亻 is too narrow and 覀 is too flat—it should really look
like 西 with the vertical lines straightened. That, of course, cannot be fixed with `prPushRaise`, but at
least it's easy now to make the display less offending.
> thx to werner @ http://tex.stackexchange.com/a/51115/28067 who provided the essentials for the `\prPush`
> implementation.
<!-- =================================================================================================== -->
## CXLTX Style: Transform
*CXLTX Transform* (TF) grew out of my new approach to defining formats
(to select font family, type size and so on) as LaTeX commands without text
arguments (call them 'environmental commands'), similar to the `\color`
command. In other words, where I would have written
```latex
Foo \fontA{\extraBig{bar}} baz
```
before, I now write
```latex
Foo {\fontA\extraBig bar} baz
```
using groups instead of text arguments. Not only do I find this syntax somewhat
cleaner; more importantly, it helps to avoid problems with expandability
(key word 'robustness') glitches that TeX macros are so well known for. Also, using
groups instead of arguments might cause less interference with line breaking.
One problem, however, is that I use CXLTX PushRaise extensively, mainly to
correct the placement of Chinese characters; now, PR is implemented using
commands like `\raisebox`—which of course needs a text argument that it sticks
in a box to push it around. This was when I asked, on
[tex.stackexchange.com](http://tex.stackexchange.com): Is it [possible to
vertically shift the baseline *without* using a
box](http://tex.stackexchange.com/questions/282342/possible-to-vertically-shift-baseline-without-using-a-box)?
A very helpful Mr. David Carlisle was so friendly as to [suggest a solution](http://tex.stackexchange.com/a/282359/28067) using LuaTeX's `\pdfliteral`:
Writing
```latex
x\pdfliteral{ 1 0 0 1 0 -2 cm}y
```
puts some literal PostScript code into the PDF file that will cause the `y` and
any ensuing material to be lowered by 2 units. Just what I needed!
Delving deeper I found out the six numbers in front of the PDF `cm` command are
the elements of a 2D transformation matrix; more specifically, they are
responsible for
* x-scaling,
* x-skewing,
* y-skewing (not so sure about the last two),
* y-scaling,
* x-translation, and
* y-translation,
in that order. What's more, this stuff
can be used in XeLaTeX as well, only the call convention is a bit different:
```latex
x\special{pdf:literal 1 0 0 1 0 -2 cm}y
```
Because these PDF literal calls effectively bypass TeX, whatever transformation
you apply will stay valid indefinitely; in particular, it will *not* get
automatically undone when a group ends. The main achievement of CXLTX Transform
lies exactly in this detail: all TF transformations that occur within a group
will be undone when the group ends. For example, `transform-demo.tex` has
this code:
```latex
\usepackage{cxltx-style-transform}
[...]
charm up down color strange\\
charm {\tfRaise{0.5}up} {\tfRaise{-0.5}down \tfPush{-1}color} strange\\
charm up down color strange\\
```
When you look into the corresponding PDF, you will find that the three
occurrences of `charm` and the ones of `strange` all align horizontally and
vertically; only in the middle line, `up` and `down` are shifted up and down by
equal amounts; `color` is somewhat shifted to the left, but appears with the
same baseline shift as `down`.
> Incidentally, this demonstrates that using `tfPush` and `\tfRaise` act a lot
> like CSS `position: relative; right: 0.5em; top: -0.5em;`, except for the
> y-axis orientation: shifted characters do not affect the positioning of surrounding
> material; instead, the whitespace that was allotted for them stays in place and
> their shapes may overlap with other characters.
**Implementation**: The automatic undo facility has been implemented using
[`fifo-stack`](https://github.com/diSimplex/latexFifoStack) and the TeX
`\aftergroup` primitive; floating point arithmetic was kindly provided by the
venerable [`fp`
package](https://www.ctan.org/tex-archive/macros/latex/contrib/fp?lang=en) (yes,
TeX is one of those languages that give you a single global namespace filled
with gazillions of ultra-specific predefined words but needs external 3rd-party
libraries to do stacks(!) and sane multiplication(!!!)).
> To be fair, stacks and floating point arithmetic has rather recently
> become part of the LaTeX3 interfaces; issue `texdoc l3fp` or `texdoc interface3`
> from the command line, which should open a PDF viewer with an extensive
> documentation of the available APIs, or go to http://ctan.mirrorcatalogs.com/macros/latex/contrib/l3kernel/interface3.pdf.
> I haven't gotten around to using these
> things though, and, apparently, these features are still so new you rarely
> see them referred to in StackExchange answers or Google results.
CXLTX Transform provides the following facilities:
* `\tfFactorMoveX`, `\tfFactorMoveY`: These are scaling factors that will be
applied to translations; they're currently defined as `\FPmul\tfFactorMoveX{1}{5}`
and `\FPmul\tfFactorMoveY{1}{10}` (i.e. 5 and 10), respectively, the idea
is to make `\tfPush` and `\tfRaise` scale like `\prPush` and `\prRaise`
(the may change in the future).
* We've already seen `\tfPush` and `\tfRaise`; additionally, there's
`\tfPushRaise` which you have to call with an `x` and a `y` value, analogous
to `\prPushRaise`.
* Scaling can be performed by `\tfScale`, which takes two factors.
* The underlying command for all transformations is `\tfTransform`, which takes
six arguments as detailed above, scales the translations, manages the stack,
and performs an arbitrary 2D transformation composed of scaling, translation,
and shearing.
* `\tfBack`, which takes no arguments, undoes the most recent transformation.
You can call it any number of time without causing an 'empty stack'
exception; it will be called implicitly when the current group ends.
> **Note** Conceivably, CXLTX Transform could be made compatible with LuaTeX
> by switching between the `pdfliteral` and `special` conventions.
> **Note** People who want to implement more transformations should take
> a look at ftp://ftp.nsu.ru/mirrors/ftp.dante.de/pub/tex/macros/generic/pdf-trans
> for examples.
<!-- =================================================================================================== -->
## CXLTX Style: CJK Glue
*CXLTX CJK Glue* (CJKG) is, if you will, an ultra-minimal re-implementation
of the East Asian typesetting facilities for XeTeX provided by
[xeCJK](https://www.ctan.org/pkg/xecjk?lang=en).
> CJK (sometimes also CJKV to include Vietnamese Chữ Nôm 字喃, 𡨸喃, 𡦂喃) is a
> convenient label under which the characteristics of the Chinese, Japanese
> and Korean writing systems are commonly discussed.
When typesetting Chinese or Japanese text, it is important to note that
there are no spaces between the kanji, the kana, or the punctuation—not
between individual characters, not between words, and not between sentences.
(Xe)LaTeX is not prepared for that kind of situation; when no measures are
taken, it will try and set arbitrarily long chains of characters without
ever detecting any suitable spot for line breaking, leading to ridiculous
overflows (or huge gaps in your line when a few kanji appear in the middle
of e.g. Western text). Thus, getting the line breaks right is the prime
concern when you want to typeset Chinese, Japanese, Korean or mixed
text.
In the past, I have mostly relied on the afore-mentioned xeCJK package; but, as
I repeatedly went to study [the xeCJK
manual](http://sunsite.informatik.rwth-aachen.de/ftp/pub/mirror/ctan/macros/xetex/latex/xecjk/xeCJK.pdf)
I was flabbergasted by the sheer amount of material presented, the astounding
complexity of the package. The
package also introduces quite a few CJK-specific font-related commands,¹ adding
to the already somewhat overwhelming array of choices in this field.
> ¹) e.g. `\addCJKfontfeatures`, `\CJKfamily`, `\CJKfamilydefault`,
> `\CJKfontspec`, `\CJKrmdefault`, `\CJKsfdefault`, `\CJKttdefault`,
> `\defaultCJKfontfeatures`, `\newCJKfontfamily`, `\setCJKfallbackfamilyfont`,
> `\setCJKfamilyfont`, `\setCJKmainfont`, `\setCJKmathfont`, `\setCJKmonofont`,
> `\setCJKsansfont`, ...
All told, xeCJK is an ingenious piece of software that can quickly cause
symptoms of a mental 'TeX capacity exceeded' syndrome. If you're
ready to sacrifice the department store for the thrift shop, load your
fonts using run-of-the mill `fontspec` commands and mark up your CJK text
portions yourself (I do it via code generation...), then CXLTX CJK Glue may be your
cup of tea. From `cjkglue-demo.tex`:
```latex
\documentclass{article}
\usepackage{cxltx-style-cjkglue}
\setlength{\parindent}{0mm}
\usepackage{fontspec}
\newfontface{\fontSunexta}{sun-exta.ttf}[Path=../../jizura-fonts/fonts/]
\newfontface{\fontGaramond}{EBGaramond08-Regular.otf}[Path=../../jizura-fonts/fonts/]
\newcommand{\cn}{\fontSunexta\cjkgUseCjkGlue}
\fontGaramond
\begin{document}
Tea bricks ({\cn 砖茶}, {\cn 磚茶}, zhuān chá) or compressed tea
({\cn 紧压茶}, {\cn 緊壓茶}, jǐnyā chá) are blocks of whole or finely ground black tea,
green tea, or post-fermented tea leaves that have been packed in molds and
pressed into block form. {\cn 紧压茶是为了长途运输和长时间保存方便,将茶压缩干燥,压成方砖
状或块状,为了防止途中变质,一般紧压茶都是用红茶或黑茶制作。}
\end{document}
```
The `\cn` is an 'environmental' command (one that assumes it is placed inside a
group) that selects a font and instructs LaTeX to use CJK Glue. Specifically, I
chose Sun-ExtA (available e.g. with the [Jizura Fonts npm
package](https://github.com/loveencounterflow/jizura-fonts)), which makes for a
fine default CJK font as it has appealing (and correct!) character
outlines and a near-100% CJK
[BMP](https://en.wikipedia.org/wiki/Plane_%28Unicode%29#Basic_Multilingual_Plane)
coverage. **Observe that it is recommended to leave a space between Western
and East Asian text, and that that space should be located in the Western, not the
East Asian text.**
CJK Glue does several things:
* It defines a CJK Glue as `\newcommand{\cjkgGlue}{\hskip 0mm plus 0.7mm minus 0.7mm}`;
feel free to `\renewcommand` that definition any time (I think the dimensions
should really be relative to font size, but that is not yet implemented).
* It makes it so that spaces and newlines are re-interpreted as that glue. This
means when you write your CJK text in an editor, you can liberally apply
ASCII spaces and newlines without fearing they'll affect the typeset result.
The Ideographic Space character (U+3000) remains unaffected and will be treated
like any other CJK character.
* Glue is inserted between all characters.
**Note that these rules will cause *any* characters—not only East Asian ones—to
behave like Chinese text: Typesetting English with `\cjkgUseCjkGlue` will cause
all inter-word spaces to vanish; letters will be distributed more or less evenly
across the lines, and line breaks will occur without hyphens and wherever the
right margin happens to fall. As such, `\cjkgUseCjkGlue` might in fact prove
useful outside of CJK typesetting.**
The re-interpretation of spaces and newlines uses a hack that combines, surprisingly,
an `\obeyspaces\obeylines` with an `\lccode` invocation (`lc` stands for 'lower case'(??wt*??),
and the original code is utterly unparsable to me; a big Thank You goes out to [egreg](http://tex.stackexchange.com/a/250559/28067) and [Marcin Woliński](http://www.gust.org.pl/projects/pearls/2007p/index_html) who made this
spell happen).
The handling of inter-character situation takes advantage of XeTeX's
`\XeTeXinterchartoks` and related commands, as suggested by [Leo
Liu](http://tex.stackexchange.com/a/10266/28067), incidentally one of the
authors of the xeCJK package. There [are indications](http://wiki.luatex.org/index.php/Token_filter) that LuaTeX could
re-implement the mechanism in Lua, so this feature might become LuaTeX-compatible
at some point in the future.
Some links:
* ftp://ftp.yzu.edu.tw/CTAN/macros/xetex/latex/interchar proposes macros
to make handling XeTeX character classes easier.
* https://www.ctan.org/pkg/xetexref, the XeTeX reference for developers.
* See ftp://ftp.tu-chemnitz.de/pub/tex/macros/xetex/latex/ucharclasses/ucharclasses.pdf
for a package that simplifies selecting fonts by Unicode block; this could
be a viable alternative to explicit language-by-language markup.
<!-- =================================================================================================== -->
## CXLTX Style: AccentBox
*CXLTX AccentBox* is simply a duplication of an diacritics package authored by A.S. Berdnikov and published
as http://www.eutypon.gr/eutypon/pdf/e2000-05/e05-a04.pdf. I does not appear to be included in TeX Live,
so that's what i did here. An example:
```latex
\documentclass[a4paper,12pt]{book}
\usepackage{cxltx-style-accentbox}
\begin{document}
\textit{Some variations with an asterisk placed above an `i':}
i\upaccent{\tiny *}{\i}i\upaccent{\tiny *}{\i}i\upaccent{\tiny *}{\i}
\textit{i\upaccent{\tiny *}{\i}i\upaccent{\tiny *}{\i}i\upaccent{\tiny *}{\i}}
\end{document}
```
I didn't modify or wrap the original package, so AccentBox does not have a badge like the other CXLTX
styles. The commands defined are:
`\aboxbar`, `aboxbase`, `aboxbaseline`, `aboxframed`, `aboxframestepH`, `aboxframestepV`, `aboxjoin`, `aboxmarker`,
`\aboxnull`, `aboxrule`, `aboxshift`, `aboxsplit`, `aboxsplitdn`, `aboxsplitup`, `akern`, `baseaccent`,
`\baseaccentC`, `baseaccentR`, `dnaccent`, `dnaccentbar`, `dnaccentC`, `makeaccent`, `markchar`, `MARKCHAR`,
`\marktwochar`, `nullaccent`, `nullaccentC`, `nullaccentR`, `upaccent`, `upaccentbar`, `upaccentC`, `upaccentL`,
`\upaccentR`. For details please see the PDF linked above; there's also a copy of the manual in the
`accentbx` folder of this project.
<!-- =================================================================================================== -->
## CXLTX Style: SmashBox
Taken from Seroul & Levy's *Beginner's Book of TeX* (1991), *CXLTX SmashBox* (badge: `sb`) provides a
command `sbSmash` that takes a single argument, boxes it, and sets the box heigth and depth to zero,
thereby preventing it from influencing line height. Alongside with the techniques mentioned in the
[*TUGboat* Article "Removing Vertical Stretch" by Bazargan & Radhakrishnan, 2007](http://www.tug.org/TUGboat/tb28-1/tb88bazargan.pdf),
this may greatly help to keep the layout constrained to a baseline grid, something which can be *very*
tricky to achieve in LaTeX.
Sometimes, when trying to measure the current position, things don't work out as expected; for example, at
the start of a paragraph, `zref-savepos` yields faulty `y` positions because nothing has been typeset yet.
In such cases, `\sbDummy` may be used; it simply puts a zero-width `\makebox` into the stream which isn't
visible, but causes the positioning to be 'initialized'. As such, this command is 'not worth the effort',
as its definition is simply `\makebox[0mm]{}`; however, it's perhaps helpful to name this critter.
<!-- =================================================================================================== -->
## CXLTX Style: Convert To
Simplistic unit conversion routine; see http://tex.stackexchange.com/a/37317/28067. Badge is `ct`; a
single command is defined:
````latex
\ctConvertTo{mm}{\the\@paStrutHeight}mm
````
<!-- =================================================================================================== -->
## CXLTX Style: Equals
Routines to do equality checks. The badge is `eq`. Currently, three commands are defined:
````latex
\eqTextEquals{$valueOne}{$valueTwo}{if branch}{else branch}
\eqIfTextEqualsThen}{$valueOne}{$valueTwo}{if branch}
\eqUnlessTextEqualsThen}{$valueOne}{$valueTwo}{else branch}
````
`\eqTextEquals` checks whether `$valueOne` and `$valueTwo` are equal strings or expand to equal strings; as
such, it combines the functionalities of `\ifdefstrequal`, `\ifdefstring`, and `\ifstrequal` from the
`etoolbox` package. If we go and define the following macros:
````latex
\newcommand{\cmdA}{sometext}
\newcommand{\cmdB}{sometext}
\newcommand{\cmdC}{othertext}
\def\defA{sometext}
\def\defB{sometext}
\def\defC{othertext}
````
then all of the following comparisons work and will print out `OK`:
````latex
\eqTextEquals{sometext}{sometext}{OK}{wrong}
\eqTextEquals{sometext}{othertext}{wrong}{OK}
\eqTextEquals{\cmdA}{sometext}{OK}{wrong}
\eqTextEquals{\cmdA}{othertext}{wrong}{OK}
\eqTextEquals{\defA}{sometext}{OK}{wrong}
\eqTextEquals{\defA}{othertext}{wrong}{OK}
\eqTextEquals{\cmdA}{\cmdB}{OK}{wrong}
\eqTextEquals{\cmdA}{\cmdC}{wrong}{OK}
\eqTextEquals{\cmdA}{\defB}{OK}{wrong}
\eqTextEquals{\cmdA}{\defC}{wrong}{OK}
\eqTextEquals{\defA}{\cmdB}{OK}{wrong}
\eqTextEquals{\defA}{\cmdC}{wrong}{OK}
\eqTextEquals{\defA}{\defB}{OK}{wrong}
\eqTextEquals{\defA}{\defC}{wrong}{OK}
````
For more details, have a look at [The LaTeX String Equality Comparison
Primer](https://github.com/loveencounterflow/cxltx-styles/raw/master/style-demos/string-comparison.pdf)
Sometimes you need only take some action when string equality tests positively or negatively; in these
cases, you can either call `eqTextEquals` with an empty true or false branch:
````latex
\eqTextEquals{\a}{\b}{true branch}{}
\eqTextEquals{\a}{\b}{}{false branch}
````
or use the equivalent commands `\eqIfTextEqualsThen` or `\eqUnlessTextEqualsThen`:
````latex
\eqIfTextEqualsThen{\a}{\b}{true branch}
\eqUnlessTextEqualsThen{\a}{\b}{false branch}
````
<!-- =================================================================================================== -->
## CXLTX Style: OddEven
`cxltx-style-oddeven` is a very thin shim for the `\ifoddpage` command of the
[`changepage`](http://www.ctan.org/pkg/changepage) package. It exists to abbreviate the
incantation
````latex
\strictpagecheck\checkoddpage\ifoddpage
odd branch
\else
even branch
\fi%
````
to one of these forms:
````latex
\oeIfOddPage{odd branch}{even branch}
\oeIfEvenPage{even branch}{odd branch}
````
The advantage of `cxltx-style-oddeven` is that **(1)** it always uses the `strict` option so you don't have
to remember that one, and **(2)** it uses the more standards-conformant double-brace-pair syntax instead
of the somewhat unusual `\if ... \else ... \fi` syntax.
<!-- =================================================================================================== -->
## CXLTX Style: AbsPos
Sometimes it's useful to make sure where you are on the page in a human-readable
format. In principle you could use the `zref` package's `\zsavepos` command for
this, but this command somewhat suffers from using TeX's inhumane scaled points
(of which there are no less than 186449.92 to the millimeter) on the one hand,
and, on the other hand, `\zsavepos` measures the `y` coordinate from the
*bottom* of the paper, not from the *top* as people do.
`cxltx-style-abspos` defines two commands: `\apToMm` and `\apSaveXy`.
`\apToMm` lets you convert length literals to millimeters very simply; thanks to
an `\usetikzlibrary{calc}` incantation you can use simple arithmetic in the
argument, so for example `\apToMm{3pt-5in}` will print `-125.94414mm` to the
document.
`\apToMm` is used by `\apSaveXy` together with the `\paperheight` dimension from
the `geometry` package to calculate the current position (of the top of the
current line), relative to the top left edge of the paper, and write it to a
file named `\jobname.cxltx-abspos.txt`. You must provide an individual label
for each invocation. Example:
````latex
\apSaveXy{label-1}Line 1\\
\apSaveXy{label-2}Line 2\\
\apSaveXy{label-3}Line 3\\
\apSaveXy{label-4}Line 4\\
\apSaveXy{label-5}Line 5\\
````
````latex
label-1: (32.38495mm, 33.52794mm)
label-2: (32.38495mm, 41.25996mm)
label-3: (32.38495mm, 45.47743mm)
label-4: (32.38495mm, 49.6949mm)
label-5: (32.38495mm, 53.91237mm)
````
<!-- =================================================================================================== -->
## CXLTX Style: TRM
`cxltx-style-trm` adds color to your console `\typeout{}`s. Thanks to an [ingenious snippet of
code](http://tex.stackexchange.com/a/168477/28067) by one Mr. Oberdiek of LaTeX fame, you can now adorn your
diagnostic messages with colors—which sounds like a toy until you get to see the visual improvement that
colorized terminal outputs afford. It's no coincidence that many of the greatest and latest tools in a new
wave of programming—think `npm`, think `homebrew`, think `git`—embrace both the console and colored output.
**Prerequisites** Run `\trmTest` to get an overview of the colors and effects available with TRM. Chances
are that on first try, you'll get to see something like this:
````bash
^^[[38;05;61m████^^[[0m trmSolViolet
^^[[38;05;33m████^^[[0m trmSolBlue
^^[[38;05;37m████^^[[0m trmSolCyan
^^[[38;05;64m████^^[[0m trmSolGreen
````
This is because traditionally, TeX is a bit tight on *everything* that is not strictly a US-ASCII printable
character. You'll see a helpful message below the (un)colorized bars that says
In case you cannot see colors above:
====================================
— make sure your terminal is color-capable
(see http://en.wikipedia.org/wiki/ANSI_escape_code)
— make sure you're running XeLaTeX with the `-8bit` switch
(other TeXs may or may not work; some TeXs would appear to require
a `-translate-file=natural` or `--tcx=natural` switch)
(now terminating so you can read this output.)
With XeLaTeX, i use the `-8bit` switch. I generally do not support anything but Unixish OSes with Tex Live
XeLaTeX, so bad luck if you have another configuration and can't make this work. LaTeX is such a complex
beast, i'm always happy when i'm able to connect the dots using a very narrow range of OS and TeX
incarnation choices and have no way to test on other systems. **That said, please issue a pull request in
case you feel there's a meaningful upgrade to any given command provided here that can make CXLTX styles
more robust in this respect.**
Once you get the test working, you may use e.g.
````latex
\typeout{this is \trmIndigo{indigo} output}
````
or similar to get colorful messages onto the console. Each color command switches a color on for the run
of its argument, and terminates output with `\trmReset` (i.e. switches back to your console base setting).
Not that nesting commands do currently not work the way they should: `\trmRed{A \trmBlink{B} C}` will
give you a red, static `A`, a red, blinking `B`, and a default-colored, static `C` (instead of a red, static
`C`). One could fix that but i'm too lazy for that now.
In addition to the colors and effects listed below, there are some convenience output macros:
````latex
\trmWhisper{helo} % grey message
\trmWarn{a warning message} % an exclamation mark + message in red
\trmAlert{an alert} % a blinking warning sign + message in red
````
### Effects
* trmBlink
* trmBold
* trmReverse
* trmUnderline
* trmNoBlink
* trmNoBold
* trmNoReverse
* trmNoUnderline
* trmReset
### Colors
* trmBlack
* trmBlue
* trmGreen
* trmCyan
* trmSepia
* trmIndigo
* trmSteel
* trmBrown
* trmOlive
* trmLime
* trmRed
* trmCrimson
* trmPlum
* trmPink
* trmOrange
* trmGold
* trmTan
* trmYellow
* trmGrey
* trmDarkgrey
* trmWhite
* trmSolBaseOThree
* trmSolBaseOTwo
* trmSolBaseOOne
* trmSolBaseOO
* trmSolBaseO
* trmSolBaseOne
* trmSolBaseTwo
* trmSolBaseThree
* trmSolYellow
* trmSolOrange
* trmSolRed
* trmSolMagenta
* trmSolViolet
* trmSolBlue
* trmSolCyan
* trmSolGreen