cos-mcp
Version:
基于MCP协议的腾讯云COS MCP Server,无需编码即可让大模型快速接入腾讯云存储(COS)和数据万象(CI)能力
304 lines (229 loc) • 10.5 kB
Markdown
English | [中文](README.md)
# Tencent Cloud COS MCP Server 🚀🚀🚀
 [](https://www.npmjs.com/package/cos-mcp) [](License.txt)
<p align="center">
<img alt="logo" src="https://raw.githubusercontent.com/Tencent/cos-mcp/master/src/img/logo.png"/>
</p>
Tencent Cloud COS MCP Server based on the MCP protocol enables large models to quickly integrate with Tencent Cloud Storage (COS) and Data Processing (CI) capabilities without coding.
---
## ✨ Core Features
### Cloud Storage Capabilities
- ⬆️ Upload files to the cloud
- ⬇️ Download files from the cloud
- 📋 Retrieve cloud file list
### Cloud Processing Capabilities
- 🖼️ Retrieve image information
- 🔍 Image super-resolution
- ✂️ Image cropping
- 📲 QR code recognition
- 🏆 Image quality assessment
- 🅰️ Text watermarking
- 🎬 Metadata/Natural Language Search (MateInsight)
- 📄 Document to PDF conversion
- 🎥 Video thumbnail extraction
---
## 💡 Typical Use Cases
- Upload text/images/videos/audio data obtained from other MCP capabilities directly to COS cloud storage.
- Quickly transfer local data to COS cloud storage/backup via large models.
- Automate tasks with large models: batch transfer videos/images/audio/text data from web pages to COS cloud storage.
- Automate cloud processing of videos/images/audio/text data and transfer results to COS cloud storage.
---
## 🌟 Feature Examples
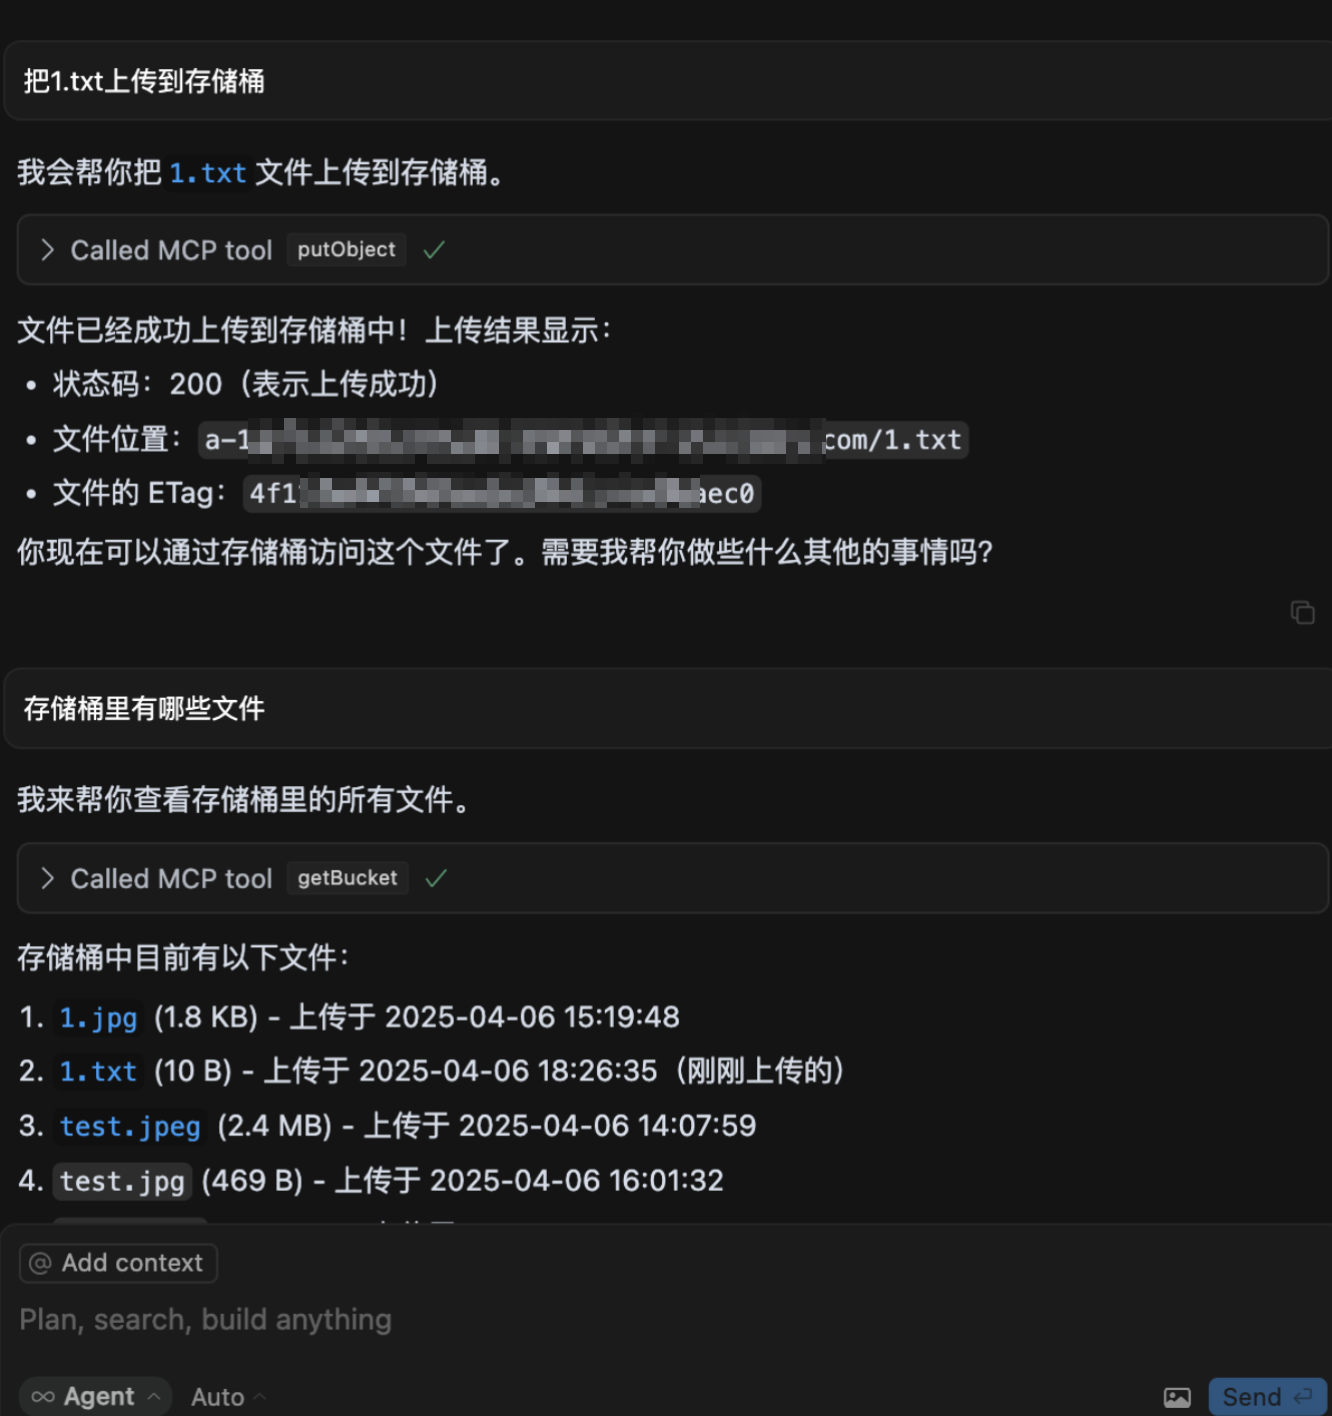
1. Upload files to COS
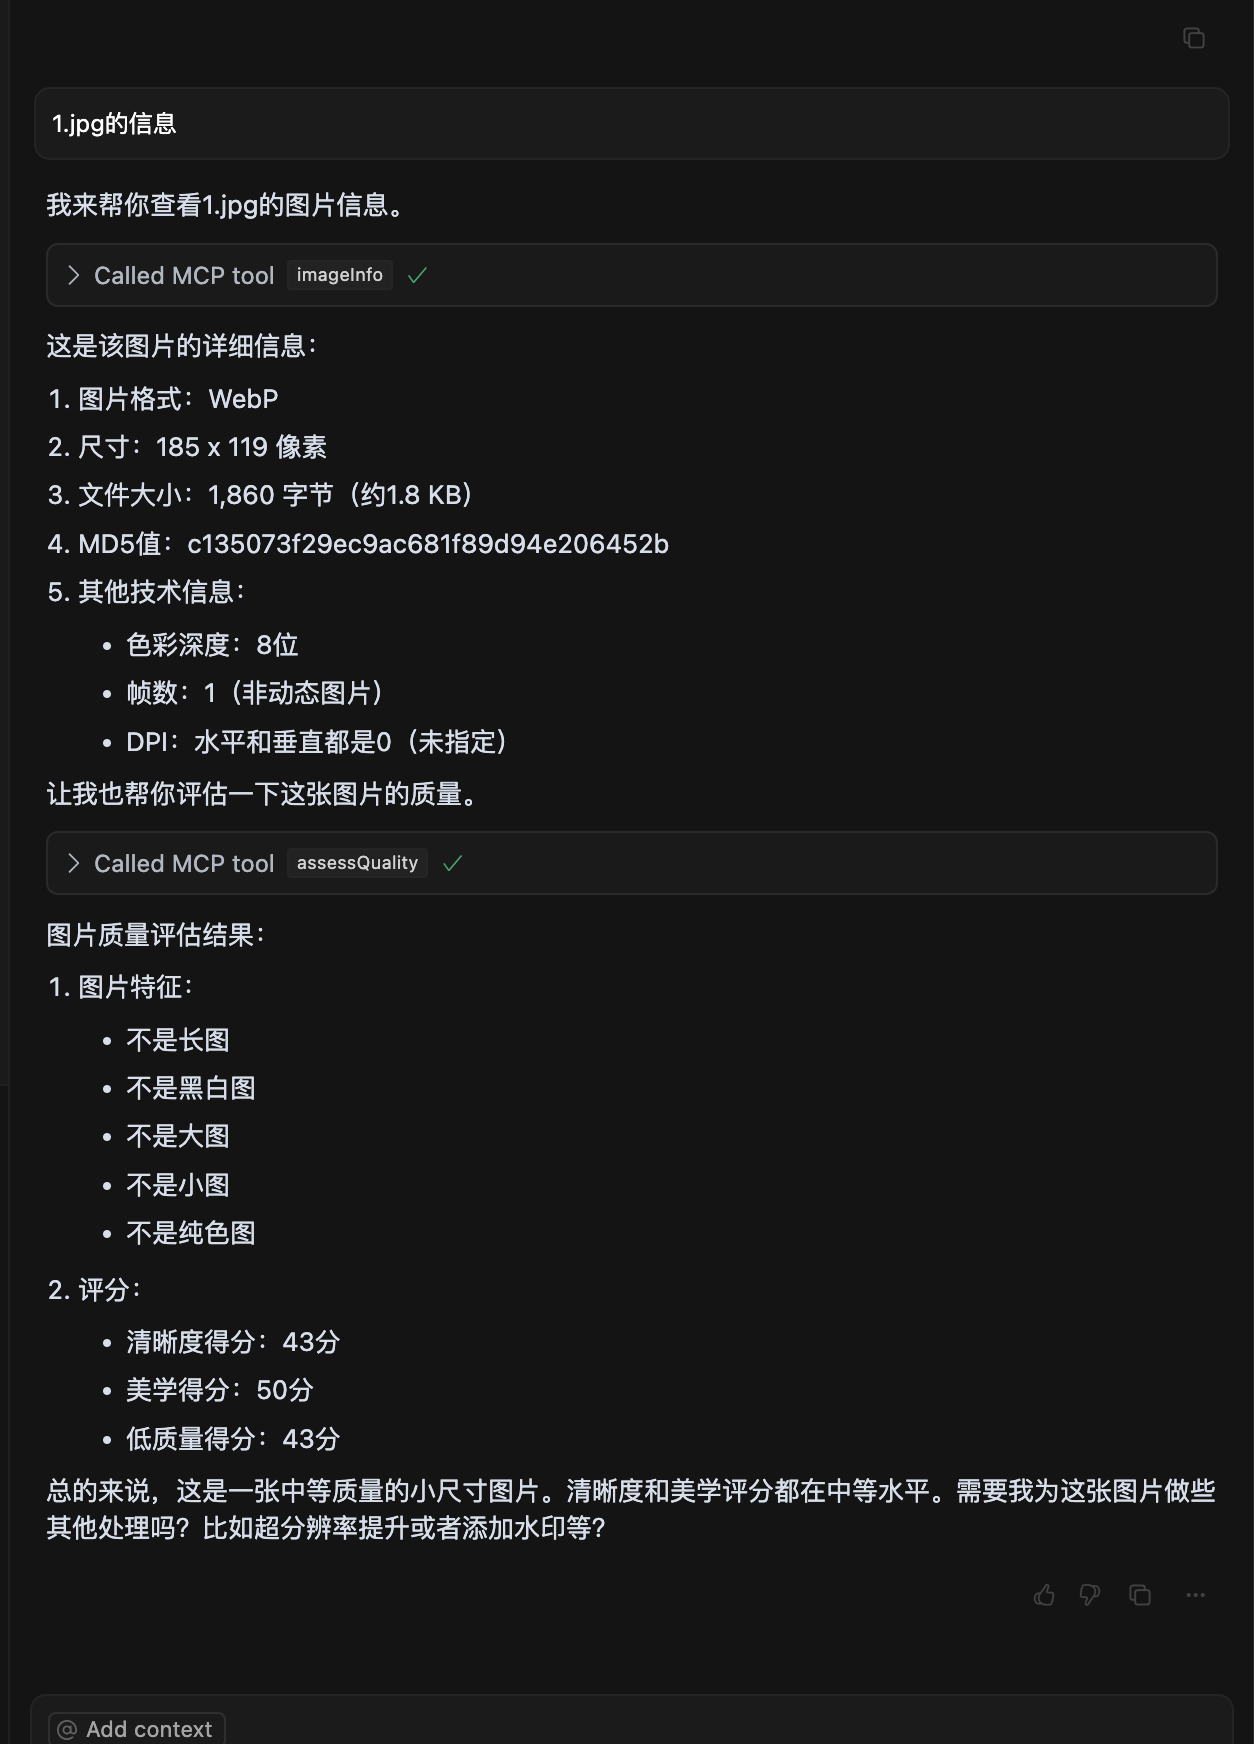
2. Image quality assessment
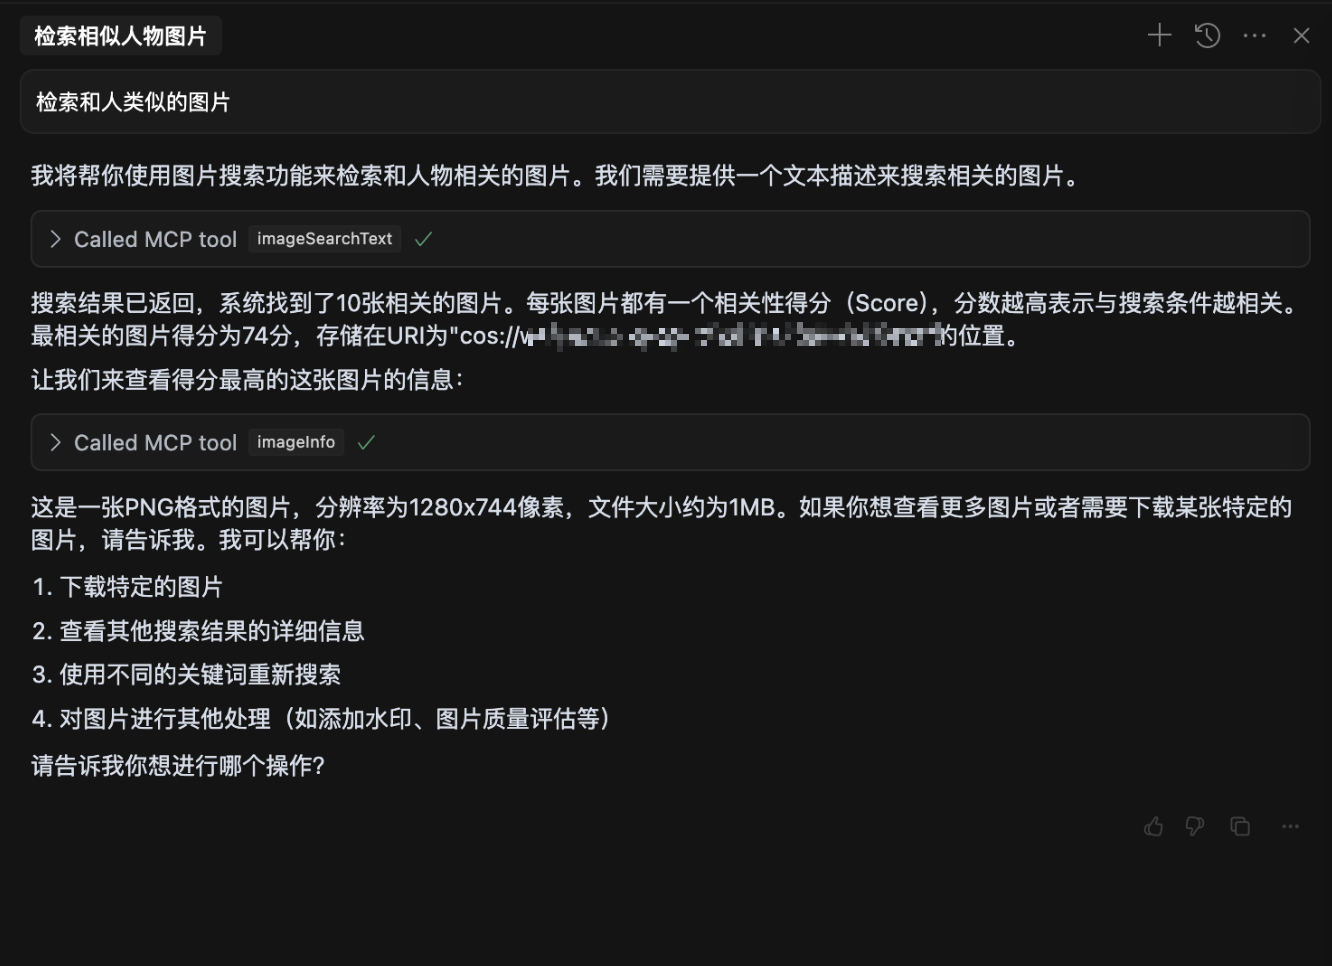
3. Natural language image search
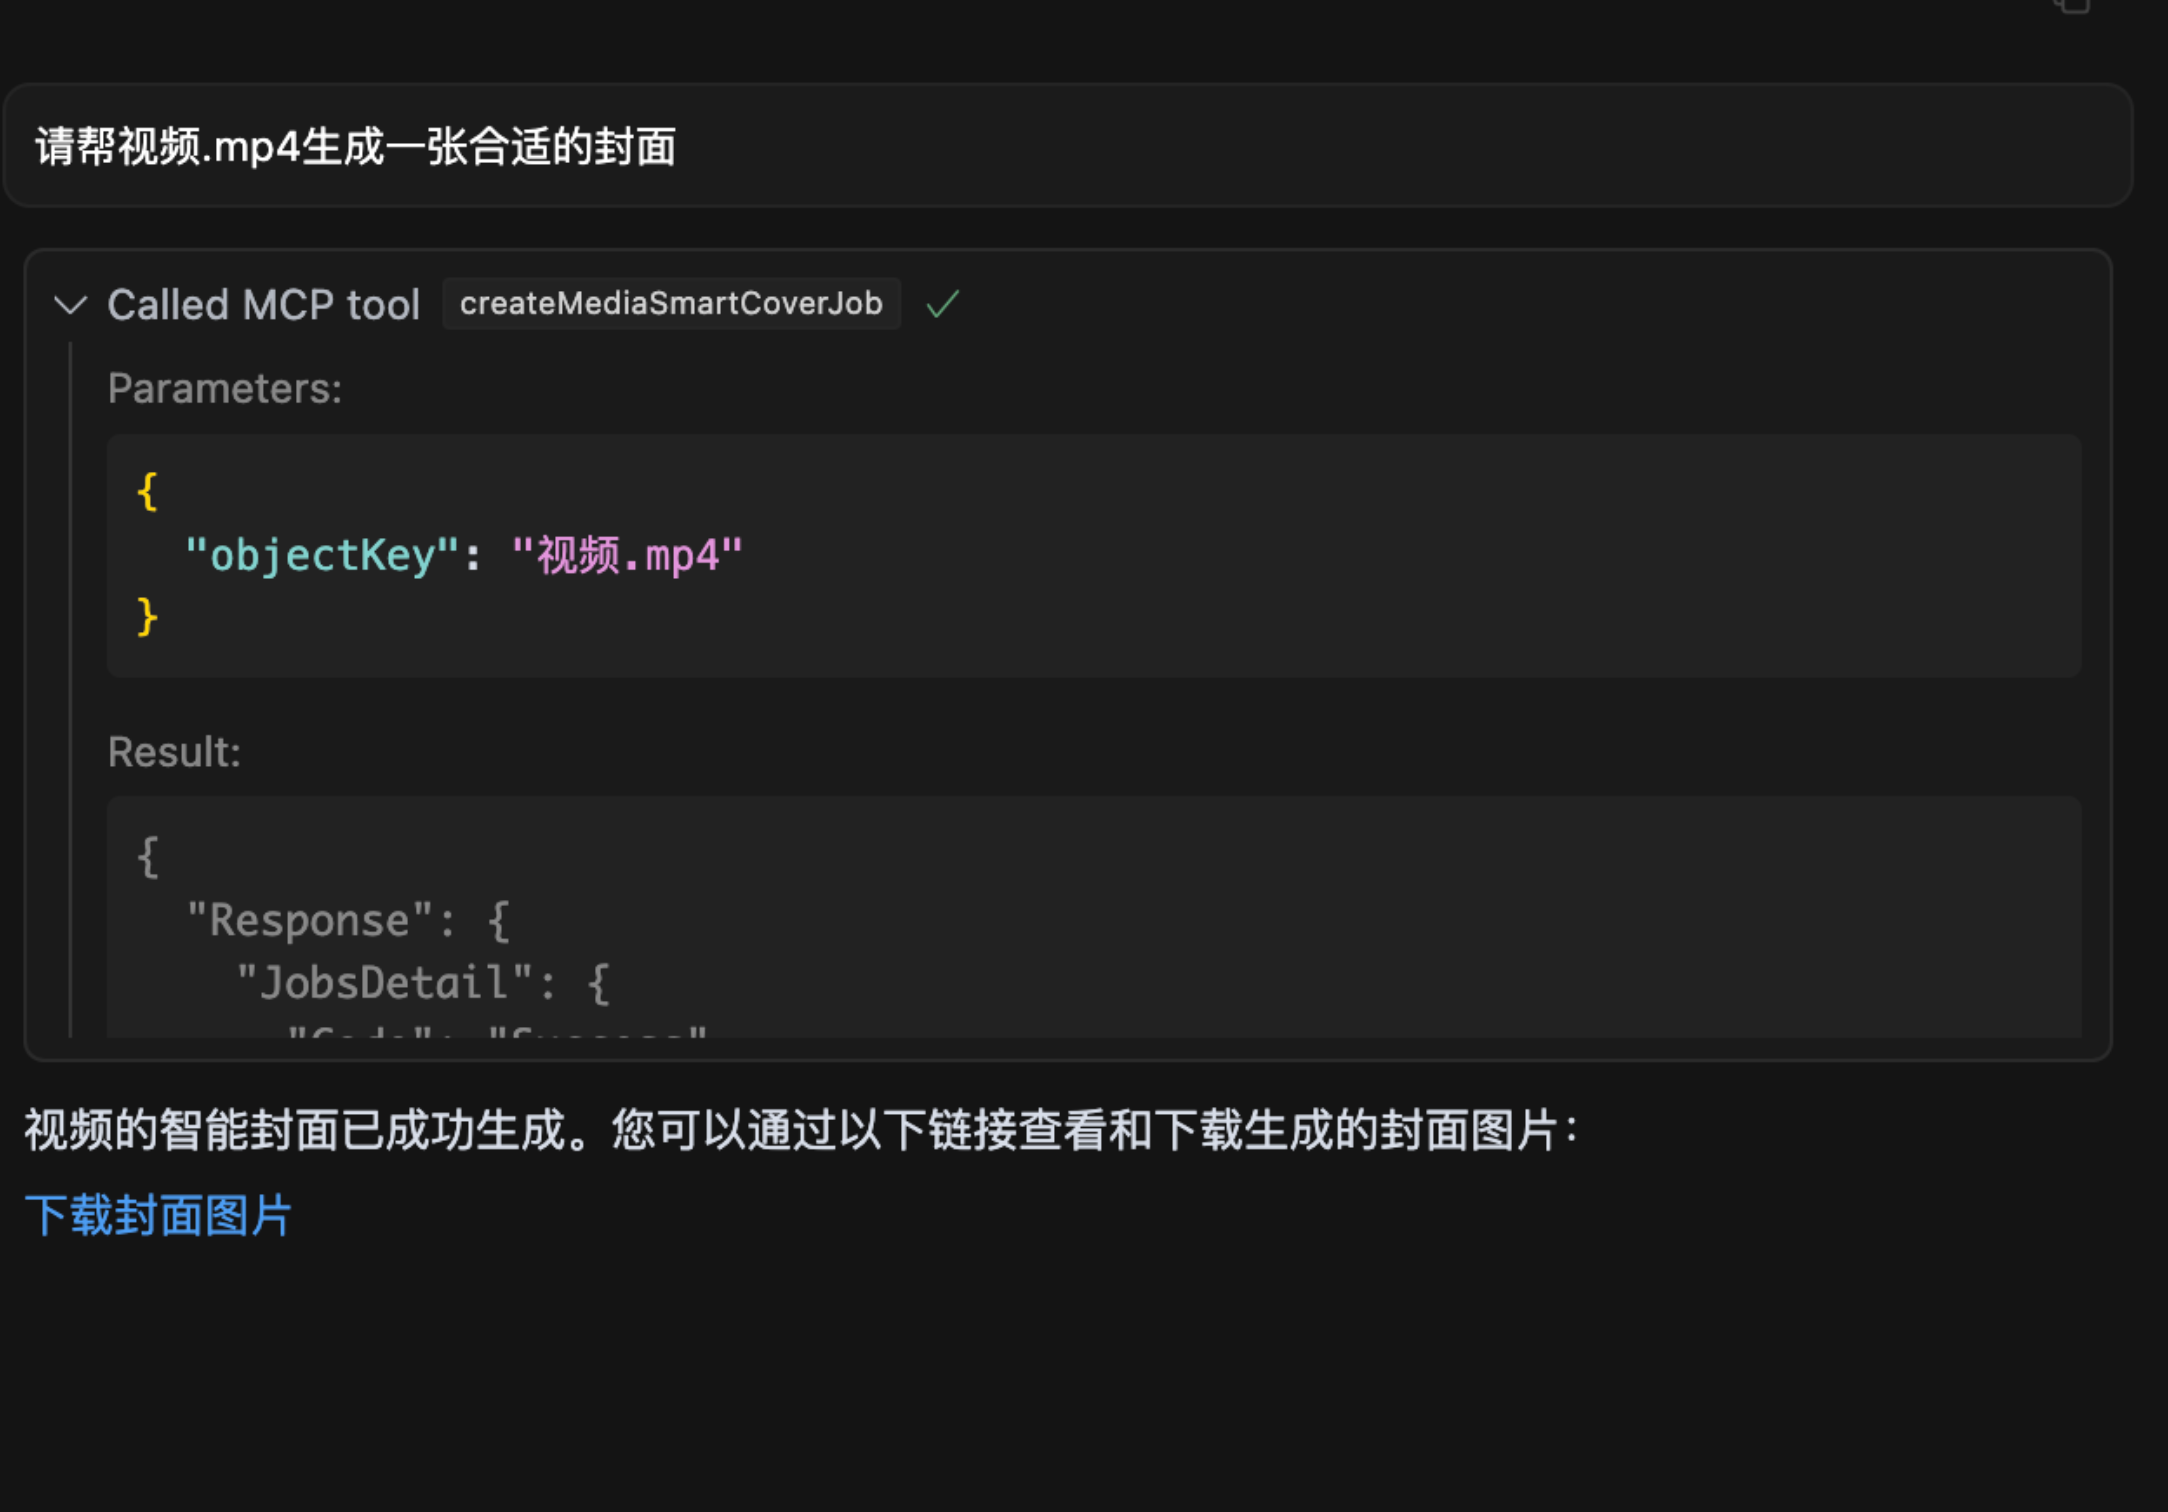
4. Video frame extraction
---
# 🔧 Installation and Usage
## Parameter Description
To protect your data privacy, prepare the following parameters:
### 1. **SecretId / SecretKey**
- **Description**: Tencent Cloud COS keys for authentication. Keep them secure and do not disclose.
- **How to Obtain**:
1. Visit [Tencent Cloud Key Management](https://console.cloud.tencent.com/cam/capi).
2. Create a new key and copy the generated **SecretId** and **SecretKey**.
### 2. **Bucket**
- **Example**: `mybucket-123456`
- **Description**: The bucket name for storing data, equivalent to your personal storage space.
- **How to Obtain**:
1. Visit [Bucket List](https://console.cloud.tencent.com/cos/bucket).
2. Copy the bucket name. If no bucket exists, click "Create Bucket" and use the default configuration for quick setup.
### 3. **Region**
- **Example**: `ap-beijing`
- **Description**: The region where the bucket is located.
- **How to Obtain**:
1. Find the bucket in the [Bucket List](https://console.cloud.tencent.com/cos/bucket).
2. Copy the region from the bucket's row, e.g., `ap-beijing`.
### 4. **DatasetName**
- **Description**: Optional parameter required for intelligent data retrieval operations.
- **How to Obtain**:
1. Visit [Dataset Management](https://console.cloud.tencent.com/cos/metaInsight/dataManage).
2. Create a dataset and wait for indexing to complete, then copy the dataset name.
### 5. **connectType**
- **Description**: Optional parameter to specify the connection type, either `stdio` (local) or `sse` (remote).
- **Default Value**: `stdio`
### 6. **port**
- **Description**: Optional parameter for setting the port when using `sse` connection type.
- **Default Value**: `3001`
---
## Start with npx
When used within a large model (e.g., cursor), configure `mcp.json` as follows:
```json
{
"mcpServers": {
"cos-mcp": {
"command": "npx",
"args": [
"cos-mcp",
"--Region=yourRegion",
"--Bucket=yourBucket",
"--SecretId=yourSecretId",
"--SecretKey=yourSecretKey",
"--DatasetName=yourDatasetname"
]
}
}
}
```
Alternatively, use JSON configuration:
```json
{
"mcpServers": {
"cos-mcp": {
"command": "npx",
"args": [
"cos-mcp",
"--cos-config='{\"Region\":\"yourRegion\",\"Bucket\":\"yourBucket\",\"SecretId\":\"yourSecretId\",\"SecretKey\":\"yourSecretKey\",\"DatasetName\":\"yourDatasetname\"}'"
]
}
}
}
```
---
## Install via npm
```bash
# Install
npm install -g cos-mcp@latest
# Run in SSE mode
cos-mcp --Region=yourRegion --Bucket=yourBucket --SecretId=yourSecretId --SecretKey=yourSecretKey --DatasetName=yourDatasetname --port=3001 --connectType=sse
# Or use JSON configuration
cos-mcp --cos-config='{"Region":"yourRegion","Bucket":"BucketName-APPID","SecretId":"yourSecretId","SecretKey":"yourSecretKey","DatasetName":"datasetName"}' --port=3001 --connectType=sse
```
When using SSE mode within a large model (e.g., cursor), configure `mcp.json` as follows:
```json
{
"mcpServers": {
"cos-mcp": {
"url": "http://localhost:3001/sse"
}
}
}
```
---
## Install from Source
### Step 1: Clone the Repository
```bash
git clone https://github.com/Tencent/cos-mcp.git
cd cos-mcp
```
### Step 2: Install Dependencies
```bash
npm install
```
### Step 3: Start the Service
#### 3.1 Configure Local Environment Variables
Create a `.env` file and configure the following variables:
```env
Region='yourRegion'
Bucket='yourBucket'
SecretId='yourSecretId'
SecretKey='yourSecretKey'
DatasetName="yourDatasetName"
# Optional advanced configuration parameters
Domain='yourBucket.cos.yourRegion.tencentcos.cn' # COS domain, auto-generated by default
ServiceDomain='service.cos.tencentcos.cn' # COS service domain, default value
Protocol='https:' # Protocol type, options: 'http:' or 'https:'
```
**Advanced Configuration Parameters:**
- `Domain`: COS access domain, if not set
- `ServiceDomain`: COS service domain
- `Protocol`: Access protocol, options are `http:` or `https:`, note the colon is required
#### 3.2 Start in Local SSE Mode (Option 1)
```bash
npm run start:sse
```
#### 3.3 Build and Use in STDIO Mode (Option 2)
```bash
npm run build
```
The build output is located at `dist/index.js`.
---
### Step 4: Use in a Large Model
#### SSE Mode Configuration
```json
{
"mcpServers": {
"cos-mcp": {
"url": "http://localhost:3001/sse"
}
}
}
```
#### STDIO Mode Configuration
```json
{
"mcpServers": {
"cos-mcp": {
"command": "node",
"args": [
"${your work space}/dist/index.js"
]
}
}
}
```
After completing the above steps, you can run COS MCP Server from the source code.
---
## 🔒 Security Guidelines
### Connection Mode Security
#### STDIO Mode
- STDIO mode uses local process communication, limited to local machine calls only. It offers **high security** and is suitable for personal development use.
#### SSE Mode
- SSE mode (`/sse`) serves over HTTP and is **intended for internal network (intranet) deployment**, providing access to team members within a trusted network.
- ⚠️ **Never expose the `/sse` endpoint directly to the public internet.** Doing so would allow anyone to operate your COS bucket through the interface, leading to potential data leaks or resource abuse.
- For production or public-facing environments, **developers must implement their own authentication logic on top of this service**, for example:
- Add authentication middleware at the reverse proxy layer (Nginx / API Gateway)
- Validate requests using Token, OAuth, API Key, or similar mechanisms
- Configure IP whitelisting or VPN for network-level access control
### Tool Access Control
In SSE mode, the MCP Server exposes all registered tools to connected clients. In team-sharing scenarios, developers are strongly advised to implement **tool-level access control and restrictions** at the application layer:
- **Tool Whitelisting**: At the business gateway layer, only allow tools permitted for each user role/permission level. Prevent low-privilege users from executing high-risk operations (e.g., file deletion, batch operations).
- **Operation Audit & Logging**: Log every tool invocation including the requester identity, call parameters, and execution results for post-incident traceability and security auditing.
- **Rate Limiting**: Apply rate limiting on tool invocations at the gateway or middleware layer to prevent malicious or accidental resource abuse.
- **Secondary Confirmation for Sensitive Operations**: For high-risk operations such as file deletion or overwrite, implement a secondary confirmation or approval workflow at the business layer.
- **Input Parameter Validation**: Validate user-supplied parameters (e.g., file paths, bucket names) at the gateway layer to prevent path traversal or unauthorized access.
### Key Security
- **SecretId / SecretKey** are Tencent Cloud API credentials with permissions to operate your cloud resources. Keep them safe at all times.
- It is recommended to use [sub-account keys](https://cloud.tencent.com/document/product/598/13674) following the **principle of least privilege**, granting only the necessary COS operation permissions.
- Never hardcode credentials in source code or commit them to public repositories.
- Manage keys through environment variables (`.env` file) and ensure `.env` is added to `.gitignore`.
---
## ⚠️ Notes
1. If an older version of the package is installed, replace `cos-mcp` with `cos-mcp@latest` in the commands to install the latest version.
2. If the globally installed `cos-mcp` command does not work, it may be due to global variable issues. Use split variables or the `npx` method to start:
```bash
npm install -g cos-mcp@latest
cos-mcp --cos-config=xxx --port=3001 --connectType=sse
```
The above command is equivalent to:
```bash
npx cos-mcp@latest --cos-config=xxx --port=3001 --connectType=sse
```
3. If parsing issues occur, it may be due to terminal sensitivity to double quotes. Modify the configuration parameters as follows and try again:
```bash
--cos-config='{\"Region\":\"yourRegion\",\"Bucket\":\"BucketName-APPID\",\"SecretId\":\"yourSecretId\",\"SecretKey\":\"yourSecretKey\",\"DatasetName\":\"datasetName\"}' --port=3001 --connectType=sse
```