cordova-plugin-appsflyer-sdk
Version:
Cordova AppsFlyer SDK Plugin
364 lines (260 loc) • 16.9 kB
Markdown
<img src="https://massets.appsflyer.com/wp-content/uploads/2016/06/26122512/banner-img-ziv.png" width="300">
- [Init SDK](
- [Set plugin for IOS 14](
- [DeepLinking](
- [Deferred Deep Linking (Get Conversion Data)](#deferred-deep-linking)
- [Direct Deeplinking](#handle-deeplinking)
- [Unified Deeplinking](#Unified-deep-linking)
- [Android Deeplink Setup](#android-deeplink)
- [iOS Deeplink Setup](#ios-deeplink)
- [Uninstall](#uninstall)
- [Android Uninstall Setup](#android-uninstall)
- [iOS Uninstall Setup](#ios-uninstall)
- [Send SKAN postback copies](#skanPostback)
- [Demo](#demo)
## <a id="init-sdk"> Init SDK
To initialize the AppsFlyer SDK you need to call `initSdk()`. To see a full list of the `options` check our the API doc [here](./API.md
Example:
```javascript
var onSuccess = function(result) {// handle result };
function onError(err) {
// handle error
}
var options = { devKey: 'd3********wL',
appId: '1******9',
isDebug: false,
waitForATTUserAuthorization: 10
};
window.plugins.appsFlyer.initSdk(options, onSuccess, onError);
```
1. Add ```
2. Add the ATT pop-up for IDFA collection. your ```MainViewController.m``` should look like this:
```javascript
- (void)viewDidLoad {
[]; [self.launchView setAlpha:1];
if @available(iOS 14, *) { [ATTrackingManager requestTrackingAuthorizationWithCompletionHandler:^(ATTrackingManagerAuthorizationStatus status) {
NSLog(@"Status: %lu", (unsigned long)status);
}]; }}
```
3.Add ```Privacy - Tracking Usage Description``` inside your ```.plist``` file in Xcode.<br>
4.For more info visit our Support integration guide [Here](https://support.appsflyer.com/hc/en-us/articles/360011451918#integration)

Since users may or may not have the mobile app installed, there are 2 types of deep linking:
1. Deferred Deep Linking - Serving personalized content to new or former users, directly after the installation.
2. Direct Deep Linking - Directly serving personalized content to existing users, which already have the mobile app installed.
3. Unified deep linking - Unified deep linking sends new and existing users to a specific in-app activity as soon as the app is opened.<br>
For more info please check out the [OneLink™ Deep Linking Guide](https://dev.appsflyer.com/docs/initial-setup-for-deep-linking-and-deferred-deep-linking).
For more info please check out the [OneLink™ Deep Linking Guide](https://support.appsflyer.com/hc/en-us/articles/208874366-OneLink-Deep-Linking-Guide#Intro).
Check out the deferred deeplinkg guide from the AppFlyer knowledge base [here](https://support.appsflyer.com/hc/en-us/articles/207032096-Accessing-AppsFlyer-Attribution-Conversion-Data-from-the-SDK-Deferred-Deeplinking-#Introduction)
Code Sample to handle the conversion data:
```javascript
function onSuccess(result) {
var conversionData = JSON.parse(result);
if (conversionData.data.is_first_launch === true) {
if(conversionData.data.af_status === 'Non-organic') {
var media_source = conversionData.data.media_source;
var campaign = conversionData.data.campaign;
console.log('This is a Non-Organic install. Media source: ' + media_source + ' Campaign: ' + campaign);
} else if(af_status === 'Organic'){
console.log('Organic Install');
}
} else if (conversionData.data.is_first_launch === false) {
// Not first launch }
}
function onError(err) {
console.log(err);
}
var options = { devKey: 'K2aMGPY3SkC9WckYUgHJ99',
isDebug: true,
appId: "4166357985",
onInstallConversionDataListener: true // required for get conversion data };
window.plugins.appsFlyer.initSdk(options , onSuccess , onError);
```
In order to implement deeplink with AppsFlyer, you must call `registerOnAppOpenAttribution` **before** `initSdk`<br>
For more information on deeplinks, please read [here](https://dev.appsflyer.com/docs/getting-started)
```javascript
window.plugins.appsFlyer.registerOnAppOpenAttribution(function(res) {
console.log(res);
var deeplinkData = JSON.parse(res);
if(deeplinkData.type === 'onAppOpenAttribution'){ var link = deeplinkData.data.link;
console.log(link);
// redirect here } else {
console.log('onAppOpenAttribution error');
}}, function onAppOpenAttributionError(err){
console.log(err);
});
```
In order to use the unified deep link you need to send the `onDeepLinkListener: true` flag inside the object that sent to the sdk.<br>
**NOTE:** when sending this flag, the sdk will ignore `onAppOpenAttribution`!<br>
For more information about this api, please check [OneLink Guide Here](https://dev.appsflyer.com/docs/android-unified-deep-linking)
```javascript
window.plugins.appsFlyer.registerDeepLink(function(res) {
console.log('AppsFlyer DDL ==> ' + res);
alert('AppsFlyer DDL ==> ' + res);
});
let options = { devKey: 'UsxXxXxed',
isDebug: true,
appId: '74xXxXx91',
onInstallConversionDataListener: true,
onDeepLinkListener: true // by default onDeepLinkListener is false!
};
window.plugins.appsFlyer.initSdk(options, function(res) {
console.log('AppsFlyer GCD ==>' + res);
alert('AppsFlyer GCD ==> ' + res);
}, function(err) { console.log(`AppsFlyer GCD ==> ${err}`);
});
```
**Note:** The code implementation for `onDeepLink` must be made **prior to the initialization** code of the SDK.
Please follow the instructions [here](https://dev.appsflyer.com/docs/initial-setup-for-deep-linking-and-deferred-deep-linking#deciding-on-a-uri-scheme) <br>
In your app’s manifest add the following intent-filter to your relevant activity:
```xml <intent-filter>
<action android:name="android.intent.action.VIEW" /> <category android:name="android.intent.category.DEFAULT" /> <category android:name="android.intent.category.BROWSABLE" /> <data android:scheme="your unique scheme" /></intent-filter>
```
Please follow the instructions [here](https://dev.appsflyer.com/docs/initial-setup-for-deep-linking-and-deferred-deep-linking#generating-a-sha256-fingerprint) <br>
In your app’s manifest add the following intent-filter to your relevant activity:
```xml
<intent-filter android:autoVerify="true">
<action android:name="android.intent.action.VIEW" />
<category android:name="android.intent.category.DEFAULT" />
<category android:name="android.intent.category.BROWSABLE" />
<data android:host="onelink-basic-app.onelink.me"
android:pathPrefix="/H5hv"
android:scheme="https" />
</intent-filter>
```
Since **V6.3.3**, the plugin will resolve the deep links automatically. If you are using another plugin for deep linking(like `cordova-plugin-deeplinks`, `ionic-plugin-deeplinks`, etc.) , you’ll need to enable method swizzling.
* To enable method swizzling, please add the [preprocessor macro](https://stackoverflow.com/a/26928784) flag `AFSDK_SHOULD_SWIZZLE=1`
* To completely disable AppsFlyer deep links implementation, please add the [preprocessor macro](https://stackoverflow.com/a/26928784) flag `AFSDK_DISABLE_APP_DELEGATE=1`
* Please follow the [URI](
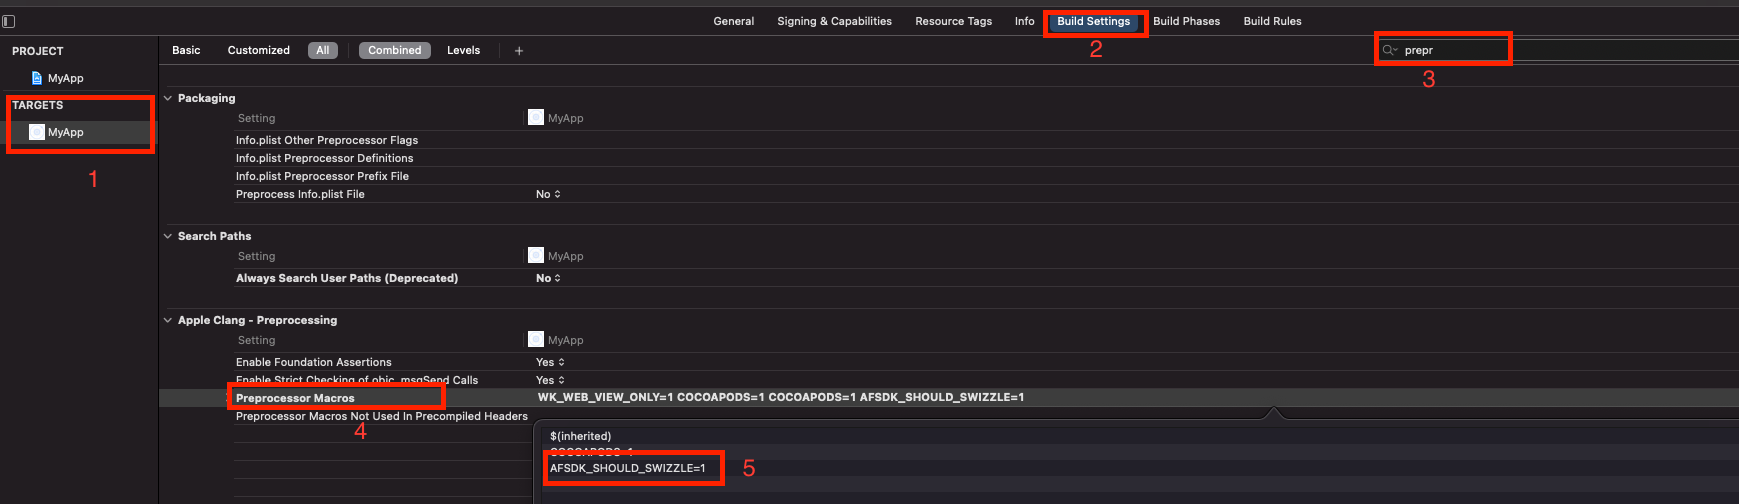
* You can add the Preprocessor Macro using our [Hooks](/docs/Hooks.md).
* Since **V6.3.0**, the plugin will resolve the deep links automatically. (⚠️ Potential conflict with other deep linking plugins ⚠️)
For more on URI-schemes check out the guide [here](https://dev.appsflyer.com/docs/initial-setup-2#deciding-on-a-uri-scheme)
Add the following lines to your code to be able to track deeplinks with AppsFlyer attribution data:
for pure Cordova - add a function 'handleOpenUrl' to your root, and call our SDK as shown:
```javascript
window.plugins.appsFlyer.handleOpenUrl(url);
```
It appears as follows:
```javascript
var handleOpenURL = function(url) {window.plugins.appsFlyer.handleOpenUrl(url);
}
```
Now you will get deep link information in the onAppOpenAttribution callback
`
For plugin version **6.1.30** and less:
`
In both cases, you need to add this code before the `@end` tag:<br>
```
// Deep linking
// Open URI-scheme for iOS 9 and above
- (BOOL)application:(UIApplication *)application openURL:(NSURL *)url options:(NSDictionary *) options {
// version >= 6.2.30 [[AppsFlyerAttribution shared] handleOpenUrl:url options:options];
// version < 6.2.30 [[AppsFlyerLib shared] handleOpenUrl:url options:options];
return YES;}
// Open URI-scheme for iOS 8 and below
- (BOOL)application:(UIApplication *)application openURL:(NSURL *)url sourceApplication:(NSString*)sourceApplication annotation:(id)annotation {
// version >= 6.2.30 [[AppsFlyerAttribution shared] handleOpenUrl:url sourceApplication:sourceApplication annotation:annotation];
// version < 6.2.30 [[AppsFlyerLib shared] handleOpenUrl:url sourceApplication:sourceApplication withAnnotation:annotation]; return YES;}
// Open Universal Links
- (BOOL)application:(UIApplication *)application continueUserActivity:(NSUserActivity *)userActivity restorationHandler:(void (^)(NSArray * _Nullable))restorationHandler {
// version >= 6.2.30 [[AppsFlyerAttribution shared] continueUserActivity:userActivity restorationHandler:restorationHandler];
//version < 6.2.30
[[AppsFlyerLib shared] continueUserActivity:userActivity restorationHandler:restorationHandler]; return YES;}
```
For more on Universal Links check out the guide [here](https://support.appsflyer.com/hc/en-us/articles/208874366-OneLink-Deep-Linking-Guide#setups-universal-links).
Essentially, the Universal Links method links between an iOS mobile app and an associate website/domain, such as AppsFlyer’s OneLink domain (xxx.onelink.me). To do so, it is required to:
1. Configure OneLink sub-domain and link to mobile app (by hosting the ‘apple-app-site-association’ file - AppsFlyer takes care of this part in the onelink setup on your dashboard)
2. Configure the mobile app to register approved domains:
```xml
<?xml version="1.0" encoding="UTF-8"?>
<!DOCTYPE plist PUBLIC "-//Apple//DTD PLIST 1.0//EN" "http://www.apple.com/DTDs/PropertyList-1.0.dtd">
<plist version="1.0">
<dict> <key>com.apple.developer.associated-domains</key> <array> <string>applinks:test.onelink.me</string> </array> </dict></plist>
```
There are 2 main approaches of enabling uninstall measurement for Android:
1. Use FirebaseMessagingService from AppsFlyer SDK - only needs change to AndroidManifest
2. Manually pass token to SDK - should be used if you have custom logic in place when token us updated.
For more info on Android Uninstall setup check out the guide [here](https://support.appsflyer.com/hc/en-us/articles/210289286-Uninstall-Measurement#android-uninstall-android-uninstall-measurement).
In JavaScript level a third party plugin is required to fetch the token and pass it to AppsFlyer. <br>
A known plugin is [cordova-plugin-firebase-messaging](https://github.com/chemerisuk/cordova-plugin-firebase-messaging).
Set-up Steps:<br>
1. Add the plugin - `cordova plugin add cordova-plugin-firebase-messaging --save`<br>
Plugin depends on cordova-support-google-services for setting up google services properly. Please read the plugin documentation carefully in order to avoid common issues with a project configuration.
2. Send the token to AppsFlyer by calling `updateServerUninstallToken`.<br>
```javascript
window.plugins.appsFlyer.initSdk(options , onSuccess , onError);
cordova.plugins.firebase.messaging.onTokenRefresh(function() {
console.log("Device token updated");
cordova.plugins.firebase.messaging.getToken().then(function(token) {
window.plugins.appsFlyer.updateServerUninstallToken(token);
});})
```
Code sample for Classes/AppDelegate.m:
```objectivec
@implementation AppDelegate
- (BOOL)application:(UIApplication*)application didFinishLaunchingWithOptions:(NSDictionary*)launchOptions
{
UIUserNotificationType userNotificationTypes = (UIUserNotificationTypeAlert | UIUserNotificationTypeBadge | UIUserNotificationTypeSound); UIUserNotificationSettings *settings = [UIUserNotificationSettings settingsForTypes:userNotificationTypes categories:nil]; [application registerUserNotificationSettings:settings]; [application registerForRemoteNotifications]; self.viewController = [[MainViewController alloc] init];
return [super application:application didFinishLaunchingWithOptions:launchOptions];}
- (void)application:(UIApplication *)application didRegisterForRemoteNotificationsWithDeviceToken:(NSData *)deviceToken {
[[AppsFlyerTracker sharedTracker] registerUninstall:deviceToken];}
@end
```
Note : If you use this method you will need to collect the APNs token using a third party platform of your choice.
```javascript
window.plugins.appsFlyer.registerUninstall("<token>");
```
*At a glance:* Starting iOS 15, configure your app to send postback copies to AppsFlyer in addition to sending them to ad networks. Doing so enables AppsFlyer to validate the conversion value (CV) and verify postback integrity. Configure AppsFlyer Push API to forward postback copies to an additional selected endpoint.
Related reading: [Apple developer](https://developer.apple.com/documentation/storekit/skadnetwork/configuring_an_advertised_app?changes=latest_minor#see-also)
For more info check out the guide [here](https://support.appsflyer.com/hc/en-us/articles/4402320969617).
**To register the AppsFlyer endpoint:**
1. Open your project's `config.xml` in file.
2. Paste the following snippet inside the `widget` element.
```xml
<config-file platform="ios" target="*-Info.plist" parent="NSAdvertisingAttributionReportEndpoint">
<string>https://appsflyer-skadnetwork.com/</string>
</config-file>
```
3. The element will be added to the `plist` file after the command `cordova prepare ios`.
This plugin has an `examples` folder with `cordova` (pure Cordova (javascript)) and `ionic-cordova` (ionic) projects bundled with it. To give it a try , clone this repo and from root a.e. `cordova-plugin-appsflyer-sdk` execute the following:
For Cordova:
```sh
npm run setupCordova ```
- `npm run runCordovaIos` - run iOS
- `npm run runCordovaAndroid` - run Android
For Ionic-Cordova:
```sh
npm run setupIonicCordova
```
- `npm run runIonicCordovaIos` - run iOS
- `npm run runIonicCordovaAndroid` - run Android