console-table-printer
Version:
Printing pretty tables on console log
193 lines (139 loc) • 6.73 kB
Markdown
<h1 align="center">console-table-printer</h1>
> 🖥️🍭Printing Pretty Tables on your console</h3>

[](https://packagephobia.com/result?p=console-table-printer)
[](https://badge.fury.io/js/console-table-printer)
[](https://codecov.io/gh/console-table-printer/console-table-printer)
## Synopsis
Printing Simple Table with Coloring rows on your console. Its useful when you want to present some tables on console using js.
## Installation
```bash
npm install console-table-printer --save
```
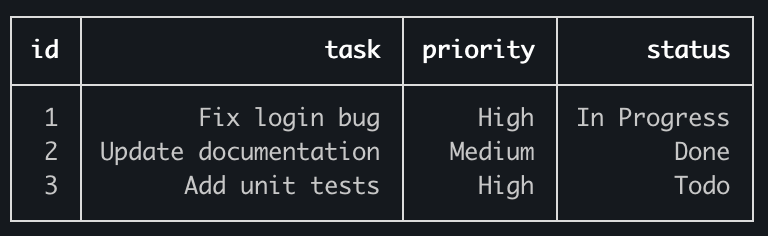
## Basic Example
```typescript
import { printTable } from 'console-table-printer';
// Create a simple task list
const tasks = [
{ id: 1, task: 'Fix login bug', priority: 'High', status: 'In Progress' },
{ id: 2, task: 'Update documentation', priority: 'Medium', status: 'Done' },
{ id: 3, task: 'Add unit tests', priority: 'High', status: 'Todo' },
];
// Print the table
printTable(tasks);
```
## 🚨🚨Announcement🚨🚨 Official Documentation is moved [Here](https://console-table.netlify.app/docs)
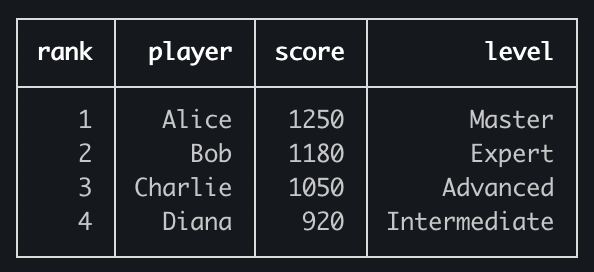
You can also create a Table instance and print it:
```typescript
import { Table } from 'console-table-printer';
// Create a game leaderboard
const leaderboard = new Table();
// Add players with their scores
leaderboard.addRow({ rank: 1, player: 'Alice', score: 1250, level: 'Master' });
leaderboard.addRow({ rank: 2, player: 'Bob', score: 1180, level: 'Expert' });
leaderboard.addRows([
{ rank: 3, player: 'Charlie', score: 1050, level: 'Advanced' },
{ rank: 4, player: 'Diana', score: 920, level: 'Intermediate' },
]);
// Print the leaderboard
leaderboard.printTable();
```
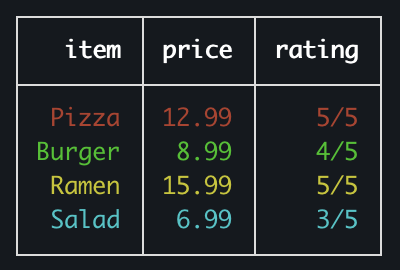
You can also put some color to your table like this:
```typescript
import { Table } from 'console-table-printer';
const p = new Table();
p.addRow({ item: 'Pizza', price: 12.99, rating: '5/5' }, { color: 'red' });
p.addRow({ item: 'Burger', price: 8.99, rating: '4/5' }, { color: 'green' });
p.addRow({ item: 'Ramen', price: 15.99, rating: '5/5' }, { color: 'yellow' });
p.addRow({ item: 'Salad', price: 6.99, rating: '3/5' }, { color: 'cyan' });
p.printTable();
```
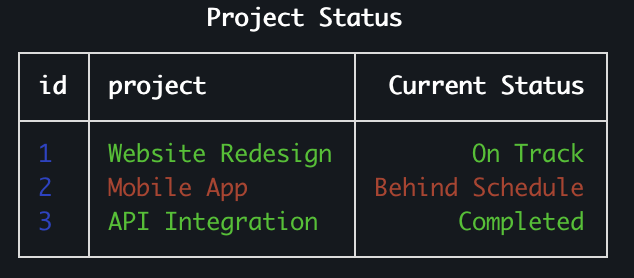
You can also put properties based on columns (color/alignment/title)
```typescript
import { Table } from 'console-table-printer';
const p = new Table({
title: 'Project Status',
columns: [
{ name: 'id', alignment: 'left', color: 'blue' },
{ name: 'project', alignment: 'left' },
{ name: 'status', title: 'Current Status' },
],
colorMap: {
urgent: '\x1b[31m',
on_track: '\x1b[32m',
},
});
p.addRow({ id: 1, project: 'Website Redesign', status: 'On Track' }, { color: 'on_track' });
p.addRow({ id: 2, project: 'Mobile App', status: 'Behind Schedule' }, { color: 'urgent' });
p.addRow({ id: 3, project: 'API Integration', status: 'Completed' }, { color: 'green' });
p.printTable();
```
## CLI
There is also a CLI tool for printing Tables on Terminal directly [table-printer-cli](https://www.npmjs.com/package/table-printer-cli)
## Documentation
Official documentation has been moved here: [console-table-documentation](https://console-table.netlify.app)
### Table instance creation
3 ways to Table Instance creation:
1. Simplest way `new Table()`
2. Only with column names: `new Table(['column1', 'column2', 'column3'])`
3. Detailed way of creating table instance
```typescript
import { Table } from 'console-table-printer';
new Table({
title: '📊 Sales Report Q4 2024', // A text showsup on top of table (optional)
columns: [
{ name: 'region', alignment: 'left', color: 'blue' }, // with alignment and color
{ name: 'sales', alignment: 'right', maxLen: 30 }, // lines bigger than this will be splitted in multiple lines
{ name: 'growth', title: 'Growth %' }, // Title is what will be shown while printing, by default title = name
{ name: 'price', transform: (value) => `$${Number(value).toFixed(2)}` }, // Transform function to format cell values before display
],
rows: [
{ region: 'North America', sales: '$2.5M', growth: '+15%' },
{ region: 'Europe', sales: '$1.8M', growth: '+8%' },
{ region: 'Asia Pacific', sales: '$3.2M', growth: '+22%' },
],
sort: (row1, row2) => row2.sales - row1.sales, // sorting order of rows (optional), this is normal js sort function for Array.sort
filter: (row) => row.growth > '+10%', // filtering rows (optional)
enabledColumns: ['region', 'sales'], // array of columns that you want to see, all other will be ignored (optional)
disabledColumns: ['growth'], // array of columns that you DONT want to see, these will always be hidden
colorMap: {
high_growth: '\x1b[32m', // define customized color
},
charLength: {
'👋': 2,
'😅': 2,
}, // custom len of chars in console
defaultColumnOptions: {
alignment: 'center',
color: 'red',
maxLen: 40,
minLen: 20,
},
});
```
### Functions
- `addRow(rowObjet, options)` adding single row. This can be chained
- `addRows(rowObjects, options)` adding multiple rows. array of row object. This case options will be applied to all the objects in row
- `addColumn(columnObject)` adding single column
- `addColumns(columnObjects)` adding multiple columns
- `printTable()` Prints the table on your console
### possible `color` values for rows
Check Docs: [color-vals](https://console-table.netlify.app/docs/doc-color)
Example usage: To Create a row of color blue
```typescript
table.addRow(rowObject, { color: 'blue' });
```
Example usage: To apply blue for all rows
```typescript
table.addRows(rowsArray, { color: 'blue' });
```
### possible `alignment` values for columns
Check Docs: [alignment-vals](https://console-table.netlify.app/docs/doc-alignment)
### Typescript Support
You can get color / alignment as types. Check Docs: [types-docs](https://console-table.netlify.app/docs/doc-typescript)
## License
[MIT](https://github.com/console-table-printer/console-table-printer/blob/master/LICENSE)