codeceptjs
Version:
Supercharged End 2 End Testing Framework for NodeJS
315 lines (227 loc) • 10.4 kB
Markdown
---
permalink: /puppeteer
title: Testing with Puppeteer
---
# Testing with Puppeteer
Among all Selenium alternatives the most interesting emerging ones are tools developed around Google Chrome [DevTools Protocol](https://chromedevtools.github.io/devtools-protocol/). And the most prominent one is [Puppeteer](https://github.com/puppeteer/puppeteer). It operates over Google Chrome directly without requiring additional tools like ChromeDriver. So tests setup with Puppeteer can be started with npm install only. If you want get faster and simpler to setup tests, Puppeteer would be your choice.
CodeceptJS uses Puppeteer to improve end to end testing experience. No need to learn the syntax of a new tool, all drivers in CodeceptJS share the same API.
Take a look at a sample test:
```js
I.amOnPage('https://github.com')
I.click('Sign in', '//html/body/div[1]/header')
I.see('Sign in to GitHub', 'h1')
I.fillField('Username or email address', 'something@totest.com')
I.fillField('Password', '123456')
I.click('Sign in')
I.see('Incorrect username or password.', '.flash-error')
```
It's readable and simple and works using Puppeteer API!
## Setup
To start you need CodeceptJS with Puppeteer packages installed
```bash
npm install codeceptjs puppeteer --save
```
Or see [alternative installation options](https://codecept.io/installation/)
> If you already have CodeceptJS project, just install `puppeteer` package and enable a helper it in config.
And a basic project initialized
```sh
npx codeceptjs init
```
You will be asked for a Helper to use, you should select Puppeteer and provide url of a website you are testing.
> Puppeteer can also work with Firefox. [Learn how to set it up](/helpers/Puppeteer-firefox)
## Configuring
Make sure `Puppeteer` helper is enabled in `codecept.conf.js` config:
```js
{ // ..
helpers: {
Puppeteer: {
url: "http://localhost",
show: true
}
}
// ..
}
```
> Turn off the `show` option if you want to run test in headless mode.
Puppeteer uses different strategies to detect if a page is loaded. In configuration use `waitForNavigation` option for that:
By default it is set to `domcontentloaded` which waits for `DOMContentLoaded` event being fired. However, for Single Page Applications it's more useful to set this value to `networkidle0` which waits for all network connections to be finished.
```js
helpers: {
Puppeteer: {
url: "http://localhost",
show: true,
waitForNavigation: "networkidle0"
}
}
```
When a test runs faster than application it is recommended to increase `waitForAction` config value.
It will wait for a small amount of time (100ms) by default after each user action is taken.
> ▶ More options are listed in [helper reference](https://codecept.io/helpers/Puppeteer/).
## Writing Tests
CodeceptJS test should be created with `gt` command:
```sh
npx codeceptjs gt
```
As an example we will use `ToDoMvc` app for testing.
### Actions
Tests consist with a scenario of user's action taken on a page. The most widely used ones are:
- `amOnPage` - to open a webpage (accepts relative or absolute url)
- `click` - to locate a button or link and click on it
- `fillField` - to enter a text inside a field
- `selectOption`, `checkOption` - to interact with a form
- `wait*` to wait for some parts of page to be fully rendered (important for testing SPA)
- `grab*` to get values from page sources
- `see`, `dontSee` - to check for a text on a page
- `seeElement`, `dontSeeElement` - to check for elements on a page
> ℹ All actions are listed in [Puppeteer helper reference](https://codecept.io/helpers/Puppeteer/).\*
All actions which interact with elements **support CSS and XPath locators**. Actions like `click` or `fillField` by locate elements by their name or value on a page:
```js
// search for link or button
I.click('Login')
// locate field by its label
I.fillField('Name', 'Miles')
// we can use input name
I.fillField('user[email]', 'miles@davis.com')
```
You can also specify the exact locator type with strict locators:
```js
I.click({ css: 'button.red' })
I.fillField({ name: 'user[email]' }, 'miles@davis.com')
I.seeElement({ xpath: '//body/header' })
```
### Interactive Pause
It's easy to start writing a test if you use [interactive pause](/basics#debug). Just open a web page and pause execution.
```js
Feature('Sample Test')
Scenario('open my website', ({ I }) => {
I.amOnPage('http://todomvc.com/examples/react/')
pause()
})
```
This is just enough to run a test, open a browser, and think what to do next to write a test case.
When you execute such test with `codeceptjs run` command you may see the browser is started
```
npx codeceptjs run --steps
```
After a page is opened a full control of a browser is given to a terminal. Type in different commands such as `click`, `see`, `fillField` to write the test. A successful commands will be saved to `./output/cli-history` file and can be copied into a test.
A complete ToDo-MVC test may look like:
```js
Feature('ToDo')
Scenario('create todo item', ({ I }) => {
I.amOnPage('http://todomvc.com/examples/react/')
I.dontSeeElement('.todo-count')
I.fillField('What needs to be done?', 'Write a guide')
I.pressKey('Enter')
I.see('Write a guide', '.todo-list')
I.see('1 item left', '.todo-count')
})
```
### Grabbers
If you need to get element's value inside a test you can use `grab*` methods. They should be used with `await` operator inside `async` function:
```js
import assert from 'assert'
Scenario('get value of current tasks', async ({ I }) => {
I.fillField('.todo', 'my first item')
I.pressKey('Enter')
I.fillField('.todo', 'my second item')
I.pressKey('Enter')
let numTodos = await I.grabTextFrom('.todo-count strong')
assert.equal(2, numTodos)
})
```
### Within
In case some actions should be taken inside one element (a container or modal window or iframe) you can use `within` block to narrow the scope.
Please take a note that you can't use within inside another within in Puppeteer helper:
```js
await within('.todoapp', () => {
I.fillField('.todo', 'my new item')
I.pressKey('Enter')
I.see('1 item left', '.todo-count')
I.click('.todo-list input.toggle')
})
I.see('0 items left', '.todo-count')
```
### Each Element <Badge text="Since 3.3" type="warning"/>
Usually, CodeceptJS performs an action on the first matched element.
In case you want to do an action on each element found, use the special function `eachElement` which comes from [eachElement](https://codecept.io/plugins/#eachelement) plugin.
`eachElement` function matches all elements by locator and performs a callback on each of those element. A callback function receives [ElementHandle instance](https://pptr.dev/#?product=Puppeteer&show=api-class-elementhandle) from Puppeteer API. `eachElement` may perform arbitrary actions on a page, so the first argument should by a description of the actions performed. This description will be used for logging purposes.
Usage example
```js
await eachElement(
'click all checkboxes',
'input.custom-checkbox',
async (el, index) => {
await el.click();
});
);
```
> ℹ Learn more about [eachElement plugin](/plugins/#eachelement)
## Mocking Network Requests <Badge text="Since 3.5.16" type="warning"/>
Network requests & responses can be mocked and modified. Use `mockRoute` which strictly follows [Puppeteer's `setRequestInterception` API](https://pptr.dev/next/api/puppeteer.page.setrequestinterception).
```js
I.mockRoute('https://reqres.in/api/comments/1', request => {
request.respond({
status: 200,
headers: { 'Access-Control-Allow-Origin': '*' },
contentType: 'application/json',
body: '{"name": "this was mocked" }',
});
})
I.mockRoute('**/*.{png,jpg,jpeg}', route => route.abort());
// To disable mocking for a route call `stopMockingRoute`
// for previously mocked URL
I.stopMockingRoute('**/*.{png,jpg,jpeg}'
```
To master request intercepting [use `HTTPRequest` object](https://pptr.dev/next/api/puppeteer.httprequest) object passed into mock request handler.
## Accessing Puppeteer API
To get Puppeteer API inside a test use [`I.usePupepteerTo`](/helpers/Puppeteer/#usepuppeteerto) method with a callback.
To keep test readable provide a description of a callback inside the first parameter.
```js
I.usePuppeteerTo('emulate offline mode', async ({ page, browser }) => {
await page.setOfflineMode(true)
})
```
> Puppeteer commands are asynchronous so a callback function must be async.
A Puppeteer helper is passed as argument for callback, so you can combine Puppeteer API with CodeceptJS API:
```js
I.usePuppeteerTo('emulate offline mode', async Puppeteer => {
// access internal objects browser, page, context of helper
await Puppeteer.page.setOfflineMode(true)
// call a method of helper, await is required here
await Puppeteer.click('Reload')
})
```
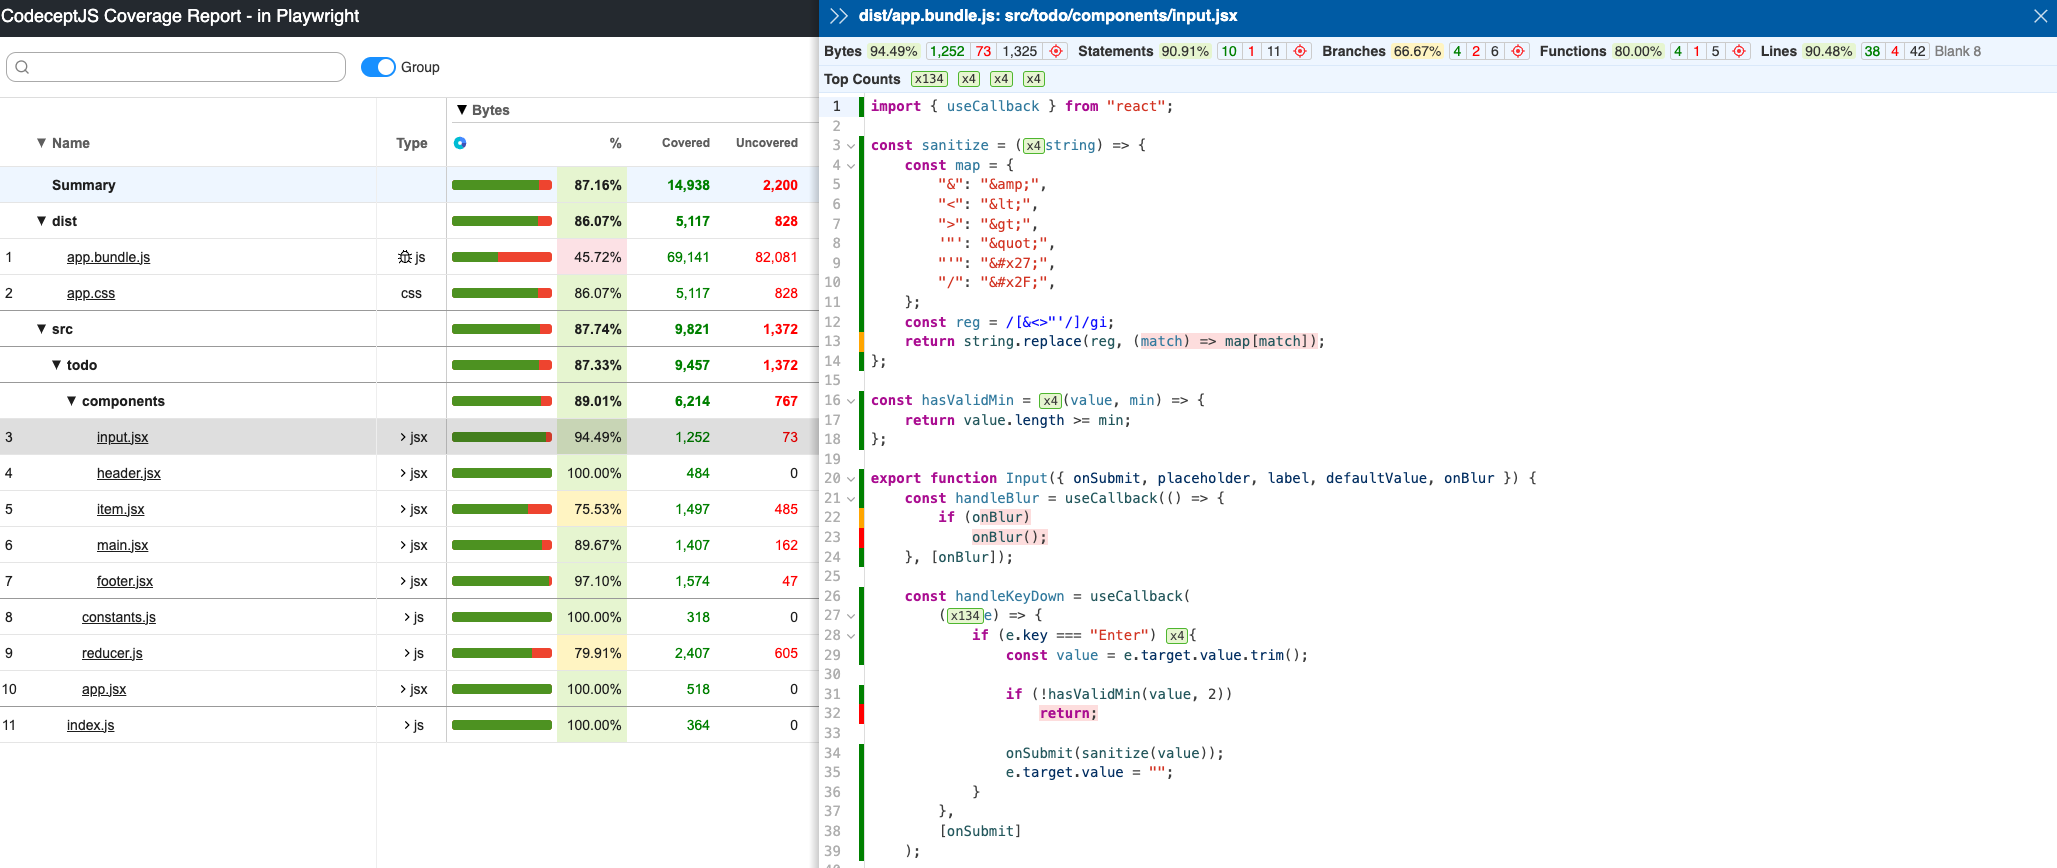
## Capturing Code Coverage
Code coverage can be captured, by enabling the `coverage` plugin in `codecept.config.js`.
```js
{
plugins: {
coverage: {
enabled: true
}
}
}
```
Once all the tests are completed, `codecept` will create and store coverage in `output/coverage` folder, as shown below.
>)
Open `index.html` in your browser to view the full interactive coverage report.

## Extending Helper
To create custom `I.*` commands using Puppeteer API you need to create a custom helper.
Start with creating an `MyPuppeteer` helper using `generate:helper` or `gh` command:
```sh
npx codeceptjs gh
```
Then inside a Helper you can access `Puppeteer` helper of CodeceptJS.
Let's say you want to create `I.renderPageToPdf` action. In this case you need to call `pdf` method of `page` object
```js
// inside a MyPuppeteer helper
async renderPageToPdf() {
const page = this.helpers['Puppeteer'].page;
await page.emulateMedia('screen');
return page.pdf({path: 'page.pdf'});
}
```
The same way you can also access `browser` object to implement more actions or handle events.
> [▶ Learn more about Helpers](https://codecept.io/helpers/)