@tencentcloud/ai-desk-customer-wechat
Version:
AI Desk customer UIKit for wechat mini program
527 lines (368 loc) • 16.5 kB
Markdown
## 介绍
智能客服用户端的微信小程序 UIKit。使用此 UIKit,您可以在一天内将智能客服的能力集成到您的小程序项目。极简接入,用智能客服为您的产品增收提效,提升用户满意度和付费转化。
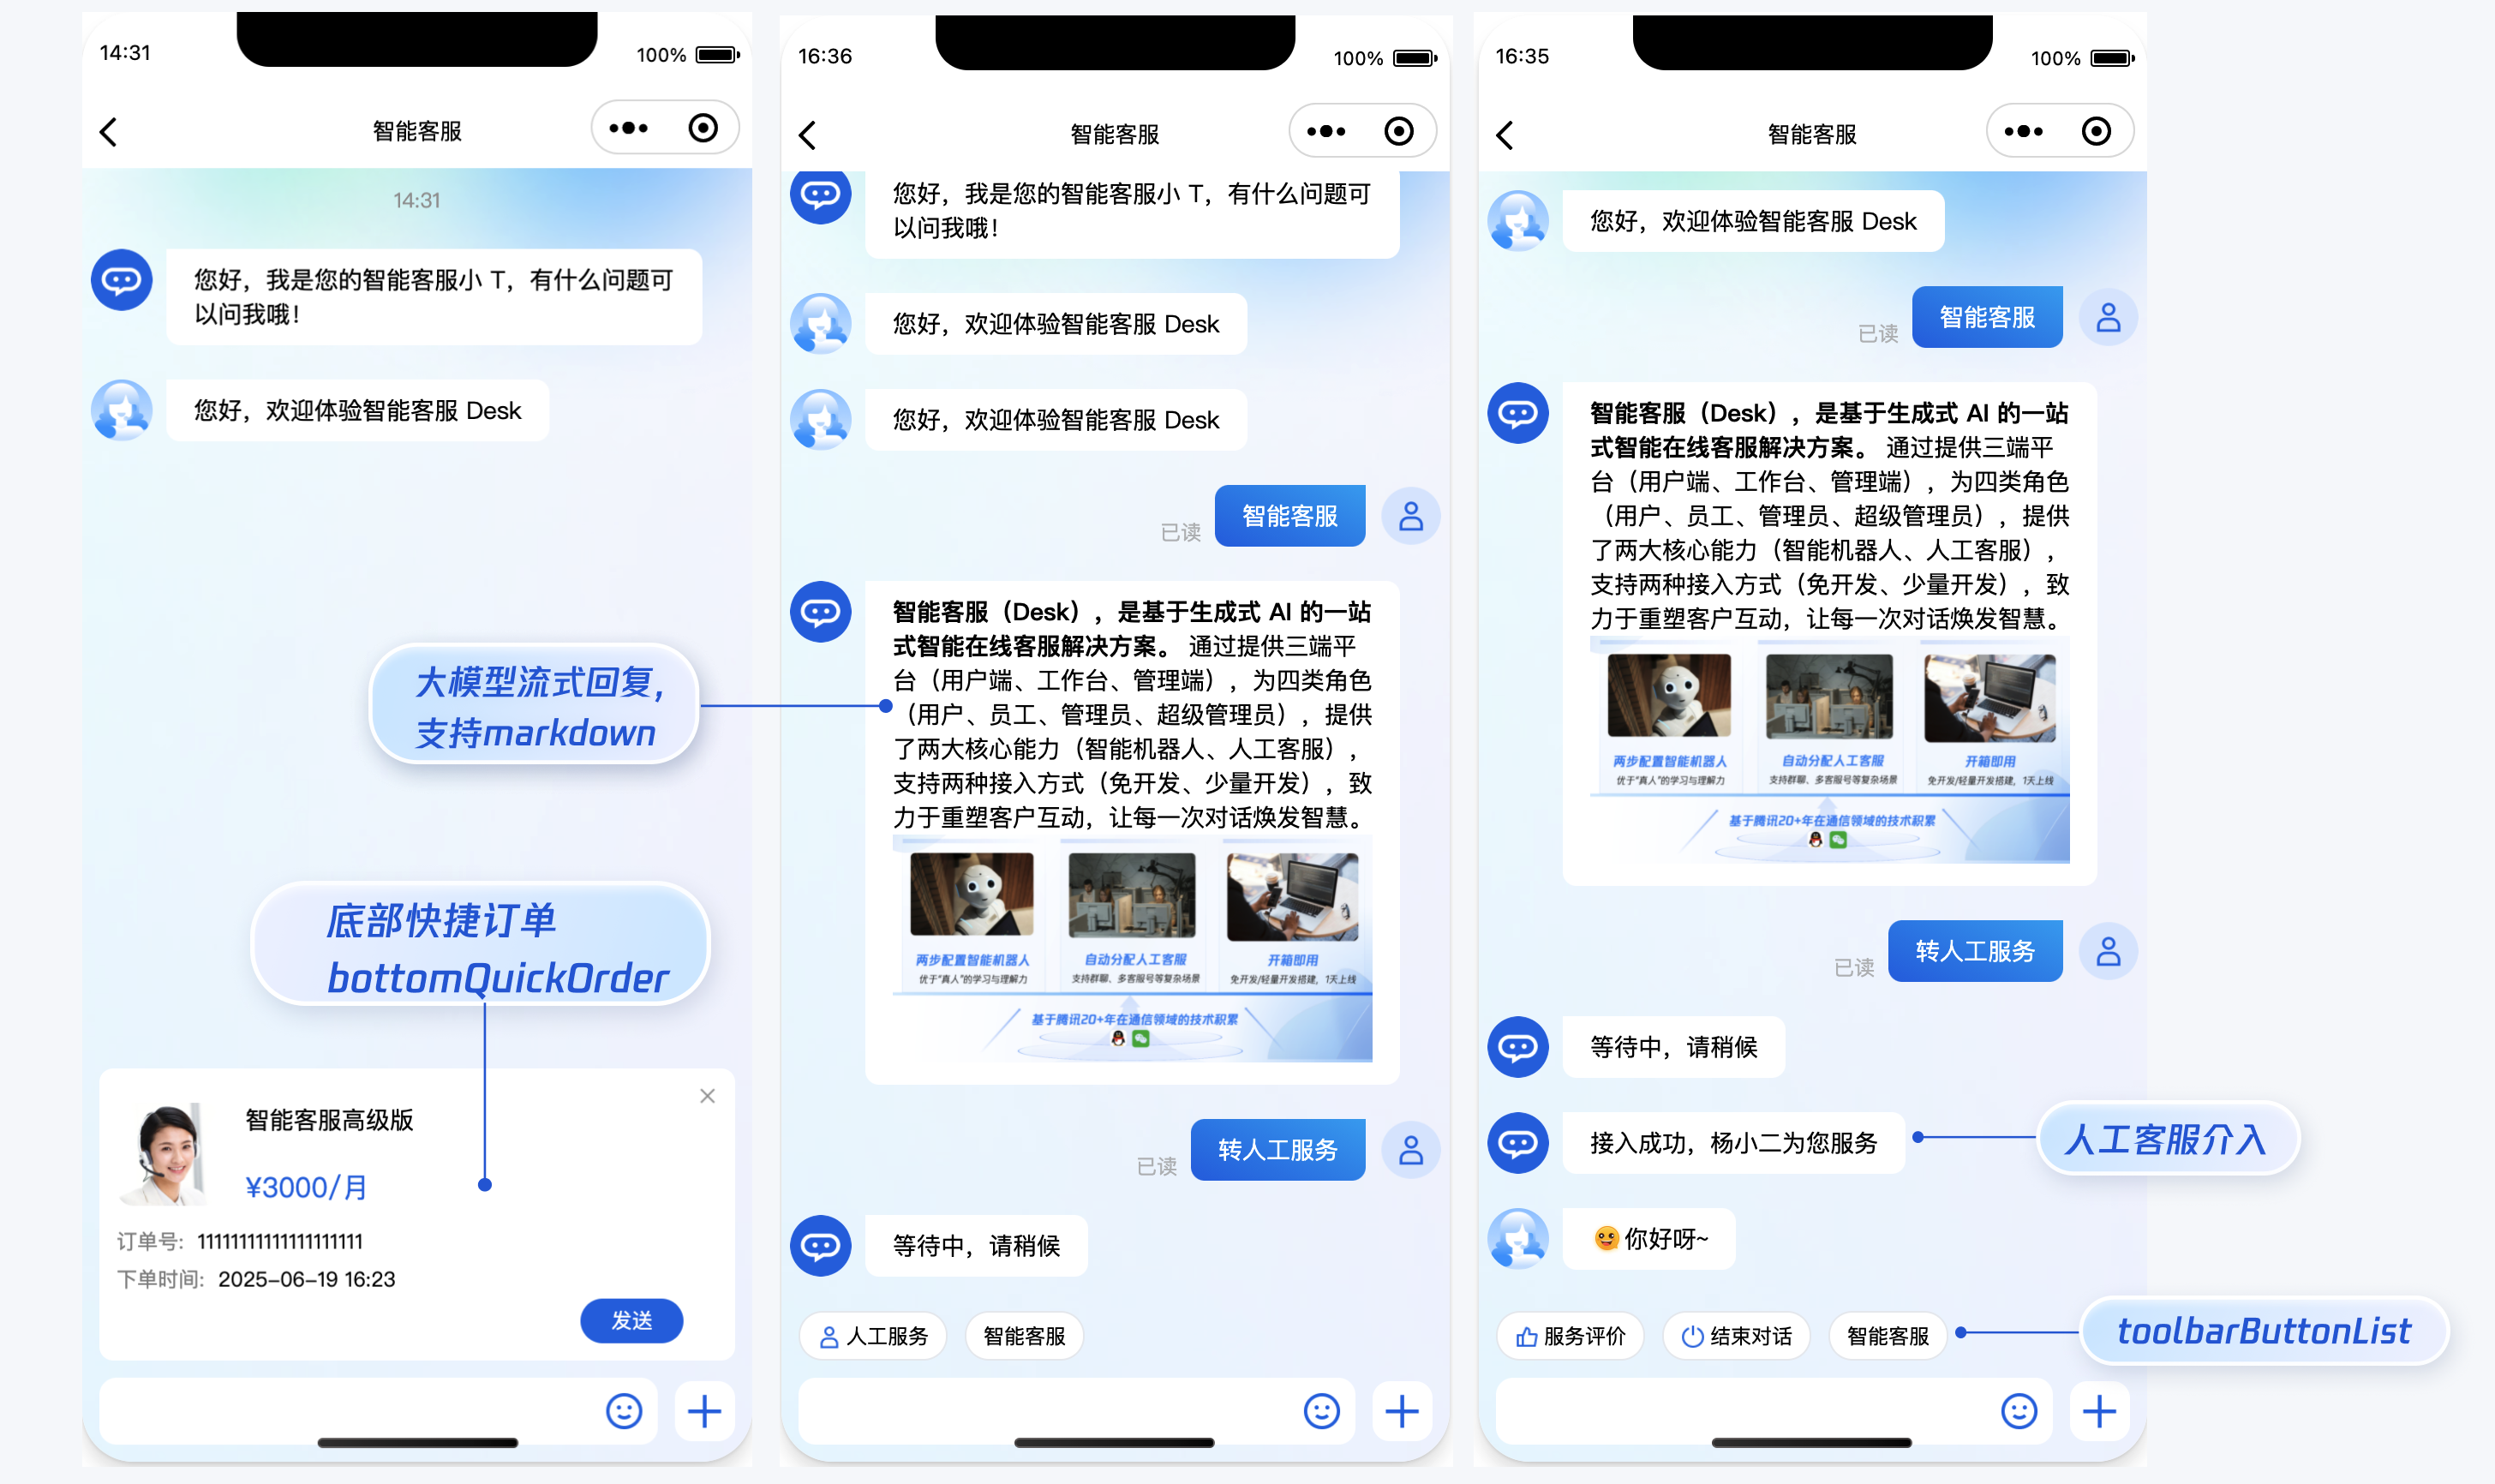
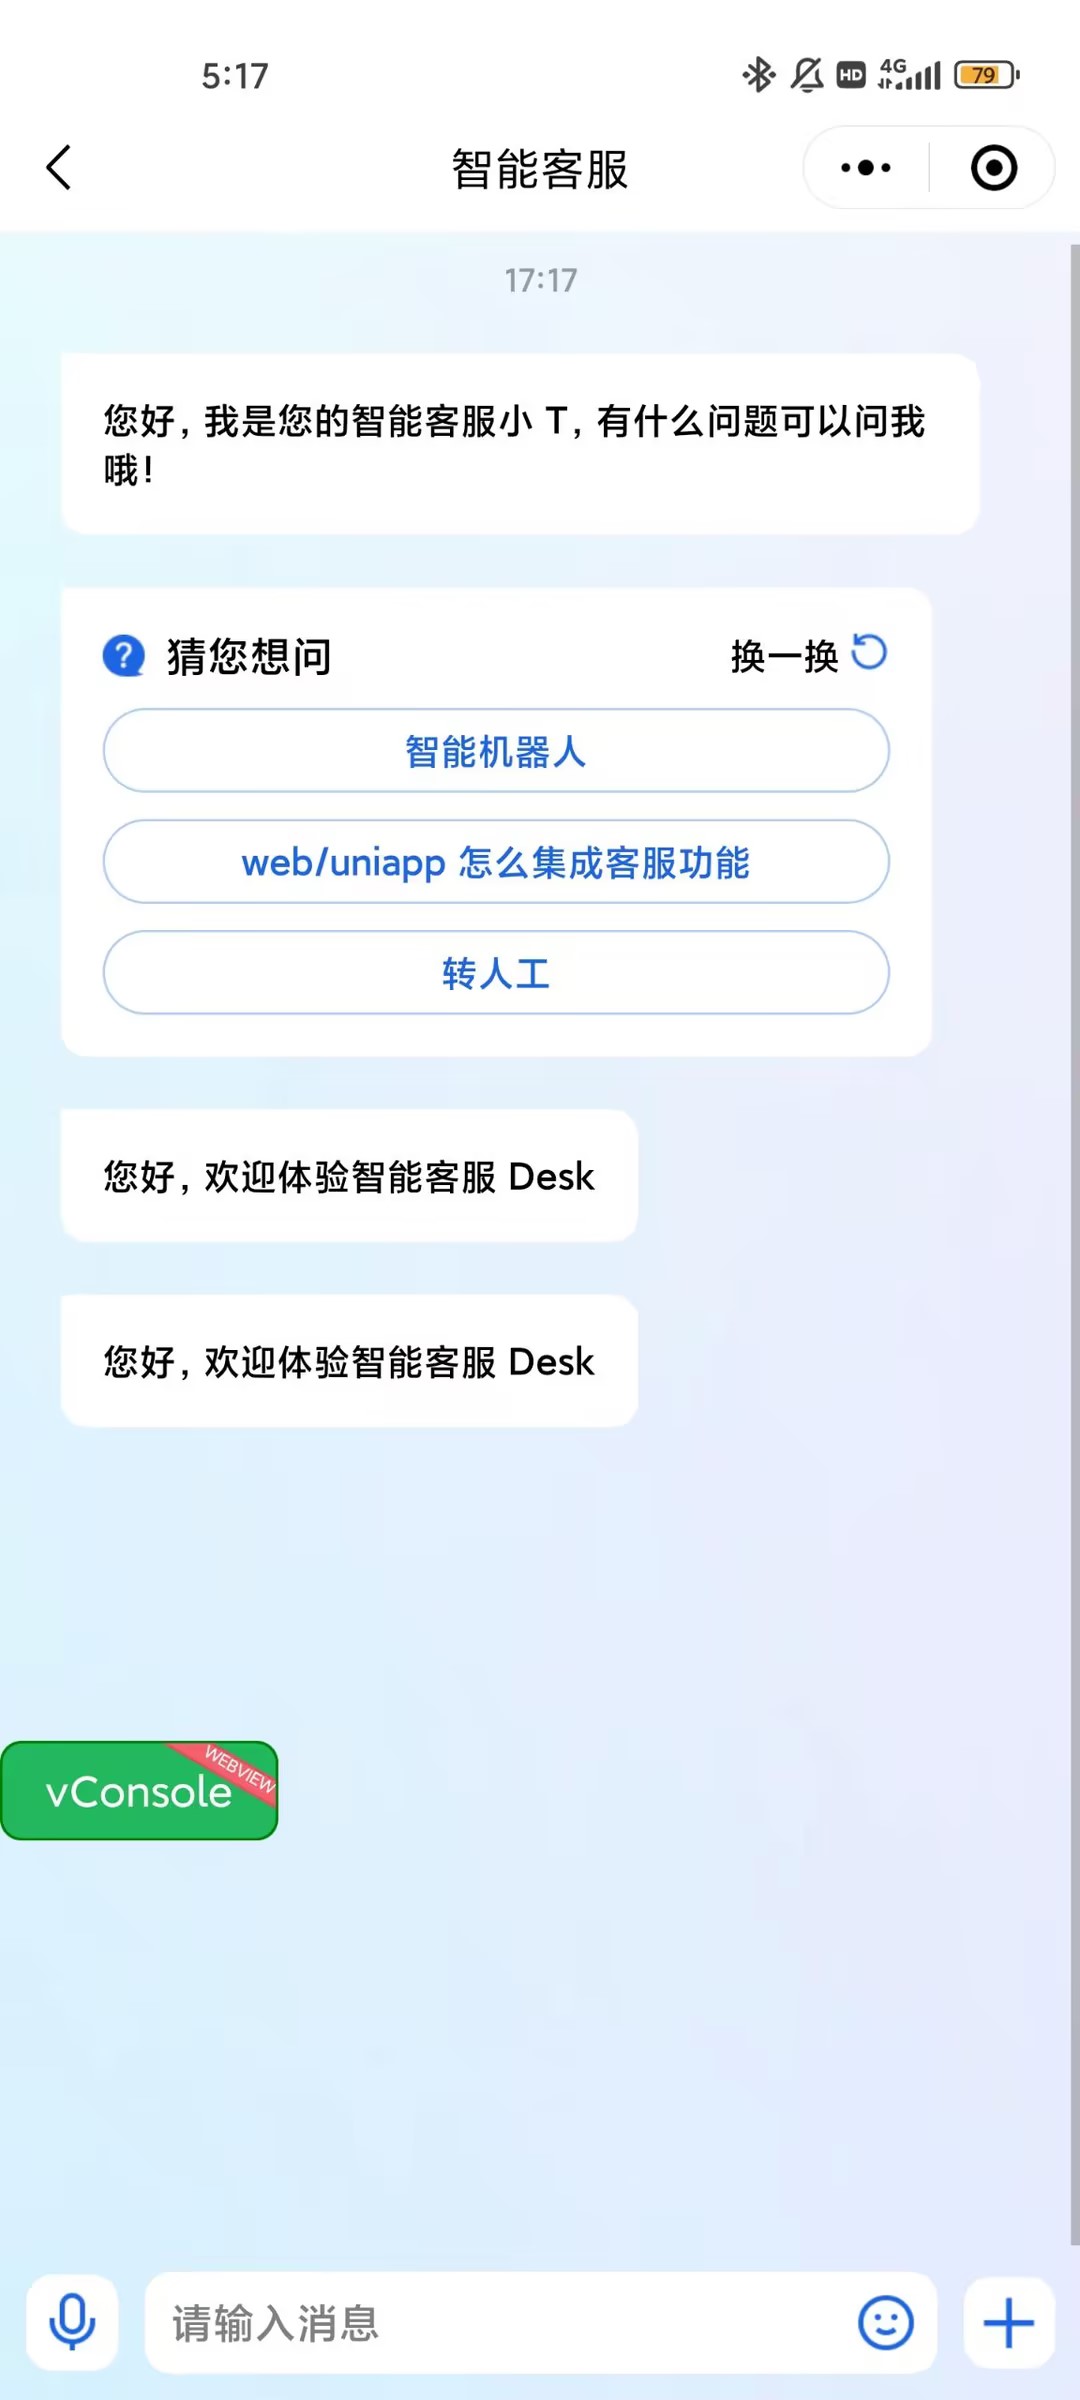
## 效果展示
## 开发环境要求
- 微信开发者工具
- JavaScript 或 TypeScript
- node(node.js ≥ 16.0.0)
- npm(版本请与 node 版本匹配)
## UIKit 源码集成
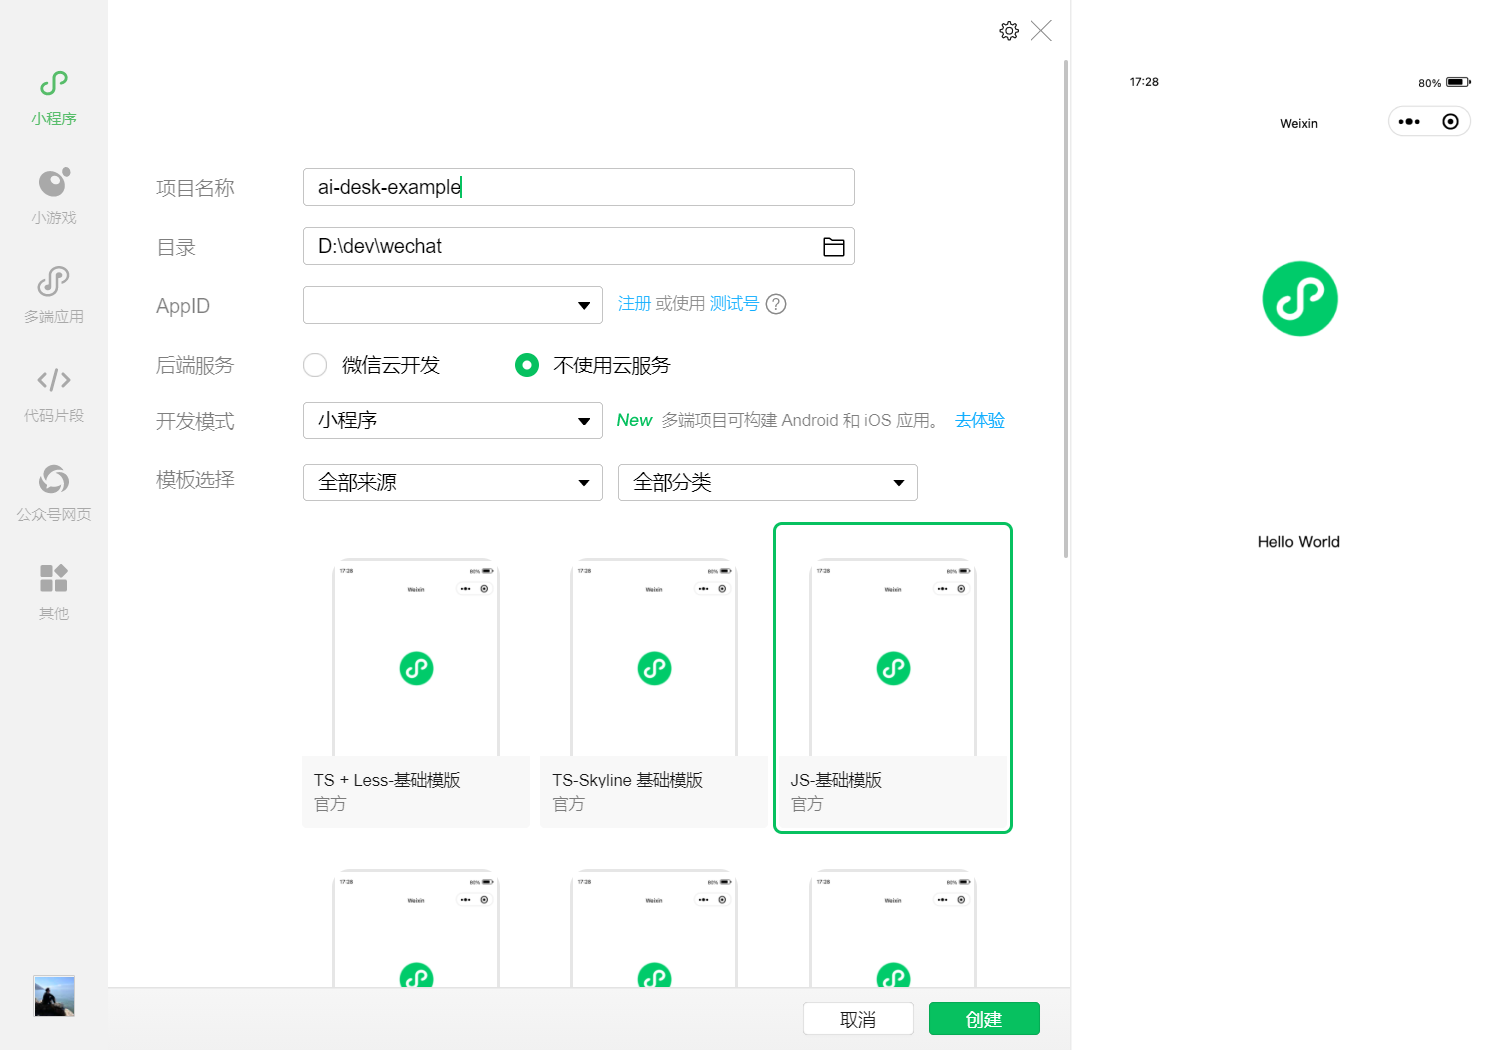
### 步骤1:创建项目
在微信开发者工具上创建一个使用 JS-基础模板的小程序项目(是否使用模板,是否使用 TS 均可),如图所示:
### 步骤2:下载 UIKit
微信开发者工具创建的小程序项目默认没有 package.json,因此您需要先创建 package.json 文件。
``` bash
npm init -y
```
通过 NPM 方式下载 UIKit。
``` bash
npm i /ai-desk-customer-wechat
```
为了方便您对 UI 进行扩展,请在项目的根目录下执行以下命令,将 UIKit 源码复制到项目中。
【macOS 端】
``` bash
mkdir -p ./ai-desk-customer-wechat &&
rsync -av --exclude={'node_modules','excluded-list.txt'} ./node_modules/@tencentcloud/ai-desk-customer-wechat/ ai-desk-customer-wechat/
```
【Windows 端】
``` bash
robocopy .\node_modules\\ai-desk-customer-wechat .\ai-desk-customer-wechat /E
```
### 步骤3:分包引入 UIKit
为了规避小程序主包体积超限问题,我们建议您将客服 UIKit 放入分包。
####
#### 1. 工程配置
【app.js】
> **说明:**
>
> 以下代码使用了[分包异步化](https://developers.weixin.qq.com/miniprogram/dev/framework/subpackages/async.html)的技术方案。
>
``` javascript
"use strict";
Object.defineProperty(exports, Symbol.toStringTag, { value: "Module" });
let common_vendor;
require.async('./ai-desk-customer-wechat/common/vendor').then((res) => {
common_vendor = res;
const _sfc_main = {
onLaunch: function() {
console.log("App Launch");
},
onShow: function() {
console.log("App Show");
},
onHide: function() {
console.log("App Hide");
}
};
function createApp() {
const app = common_vendor.createSSRApp(_sfc_main);
return {
app
};
}
createApp().app.mount("#app");
exports.createApp = createApp;
}).catch(({ errMsg, mod }) => {
console.error(`path: ${mod}, ${errMsg}`)
});
```
【app.json】
> **说明:**
>
> 请务必配置 [subPackages](https://developers.weixin.qq.com/miniprogram/dev/framework/subpackages/basic.html)和 [preloadRule](https://developers.weixin.qq.com/miniprogram/dev/framework/subpackages/preload.html)。
>
``` javascript
{
"pages": [
"pages/index/index"
],
"subPackages": [
{
"root": "ai-desk-customer-wechat",
"pages": [
"pages/index/index"
],
"entry": "index.js"
}
],
"preloadRule": {
"ai-desk-customer-wechat/pages/index/index": {
"network": "all",
"packages": [
"ai-desk-customer-wechat"
]
}
},
"window": {
"navigationBarTextStyle": "black",
"navigationBarTitleText": "Weixin",
"navigationBarBackgroundColor": "#ffffff"
},
"style": "v2",
"componentFramework": "glass-easel",
"sitemapLocation": "sitemap.json"
}
```
####
#### 2. 在项目主包页面中配置智能客服的入口
【主包 pages/index/index.js】
``` javascript
Page({
data: {
},
getSupport() {
// SDKAppID/userID/userSig 的获取请参考步骤4
const SDKAppID = 0;
const userID = '';
const userSig = '';
wx.navigateTo({
url: `/ai-desk-customer-wechat/pages/index/index?SDKAppID=${SDKAppID}&userID=${userID}&userSig=${userSig}`
})
},
})
```
【主包 pages/index/index.wxml】
``` javascript
<button class="get-support" bind:tap="getSupport">咨询客服</button>
```
【主包 pages/index/index.wxss】
``` css
page {
height: 100vh;
display: flex;
flex-direction: column;
}
.get-support {
background-color: #0052d9;
color: #ffffff;
margin: auto;
}
```
### 步骤4:获取 SDKAppID 、userID 、 userSig
设置`pages/index/index.js`中的 `SDKAppID`、`userID`、`userSig` 。
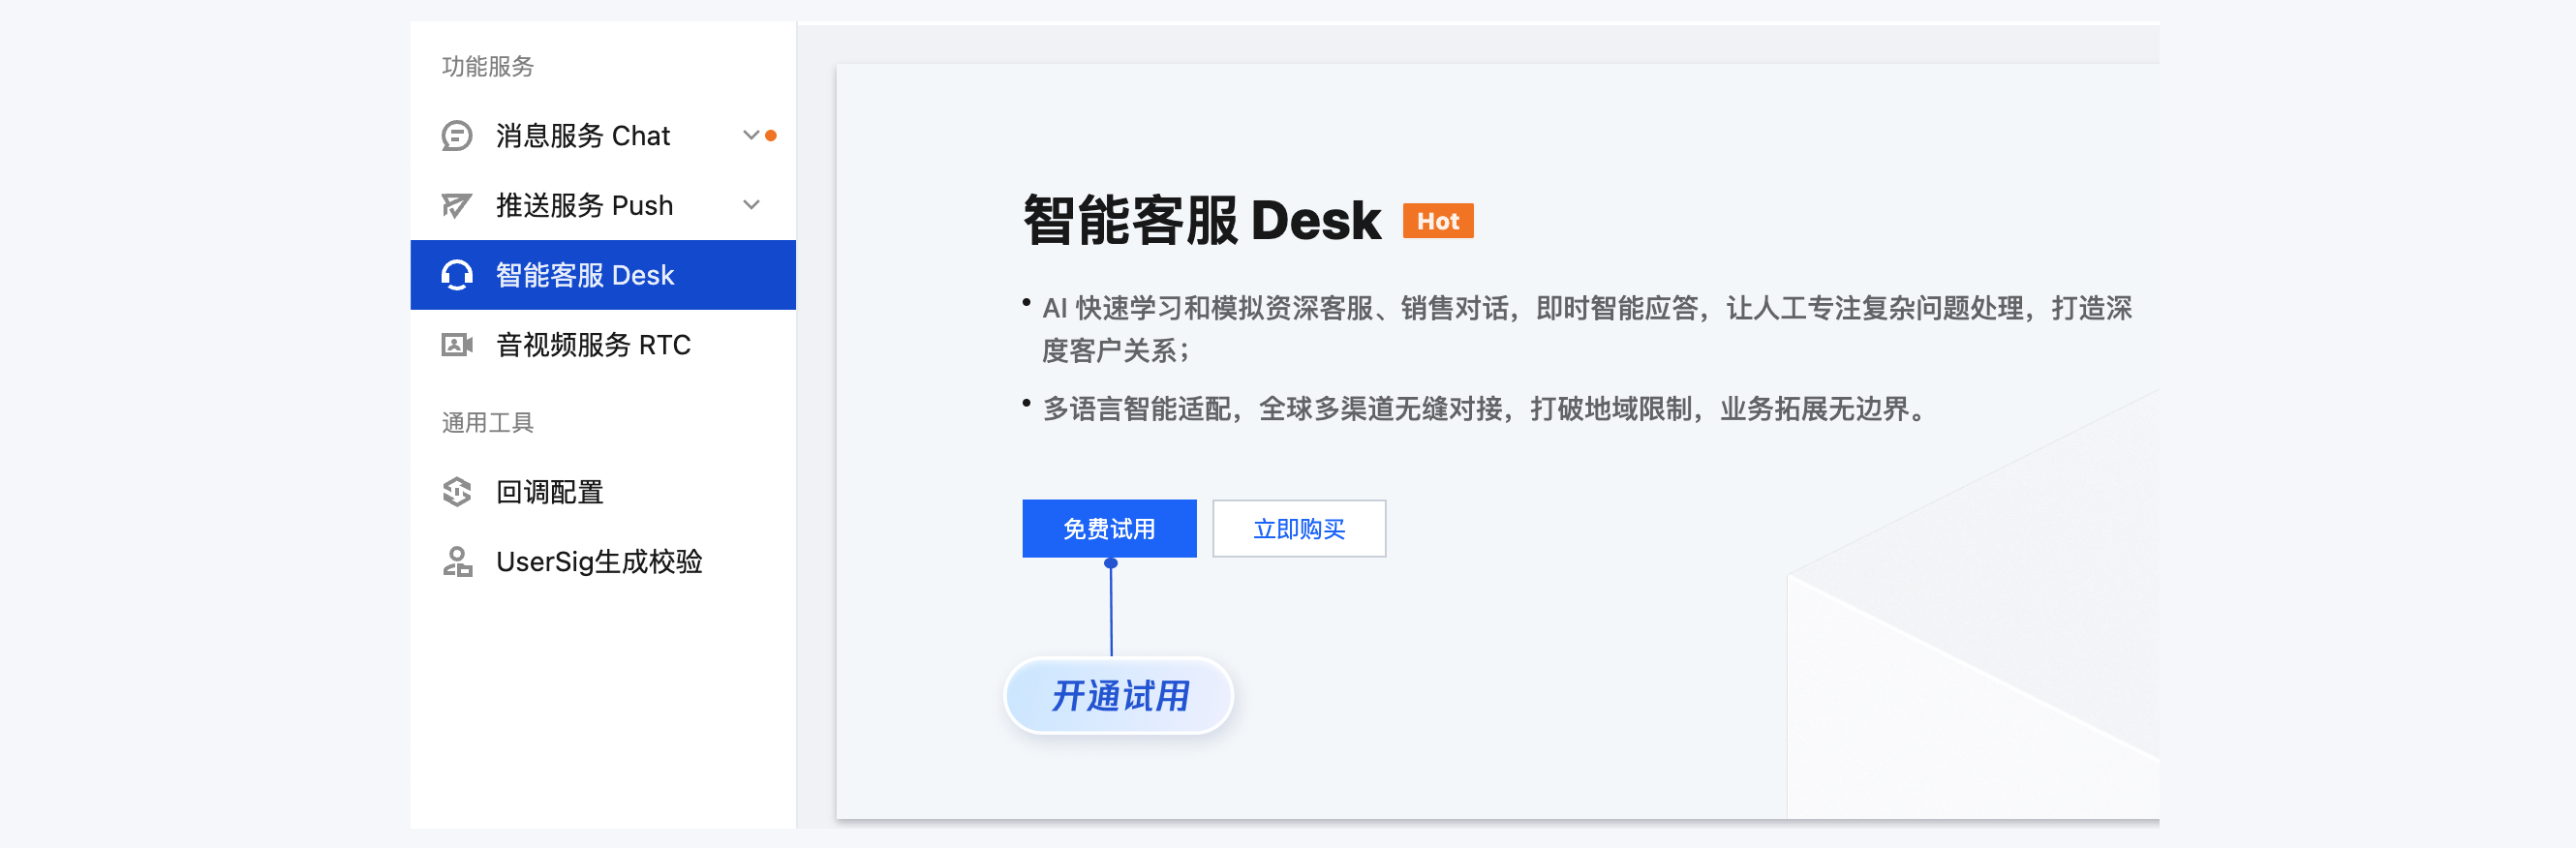
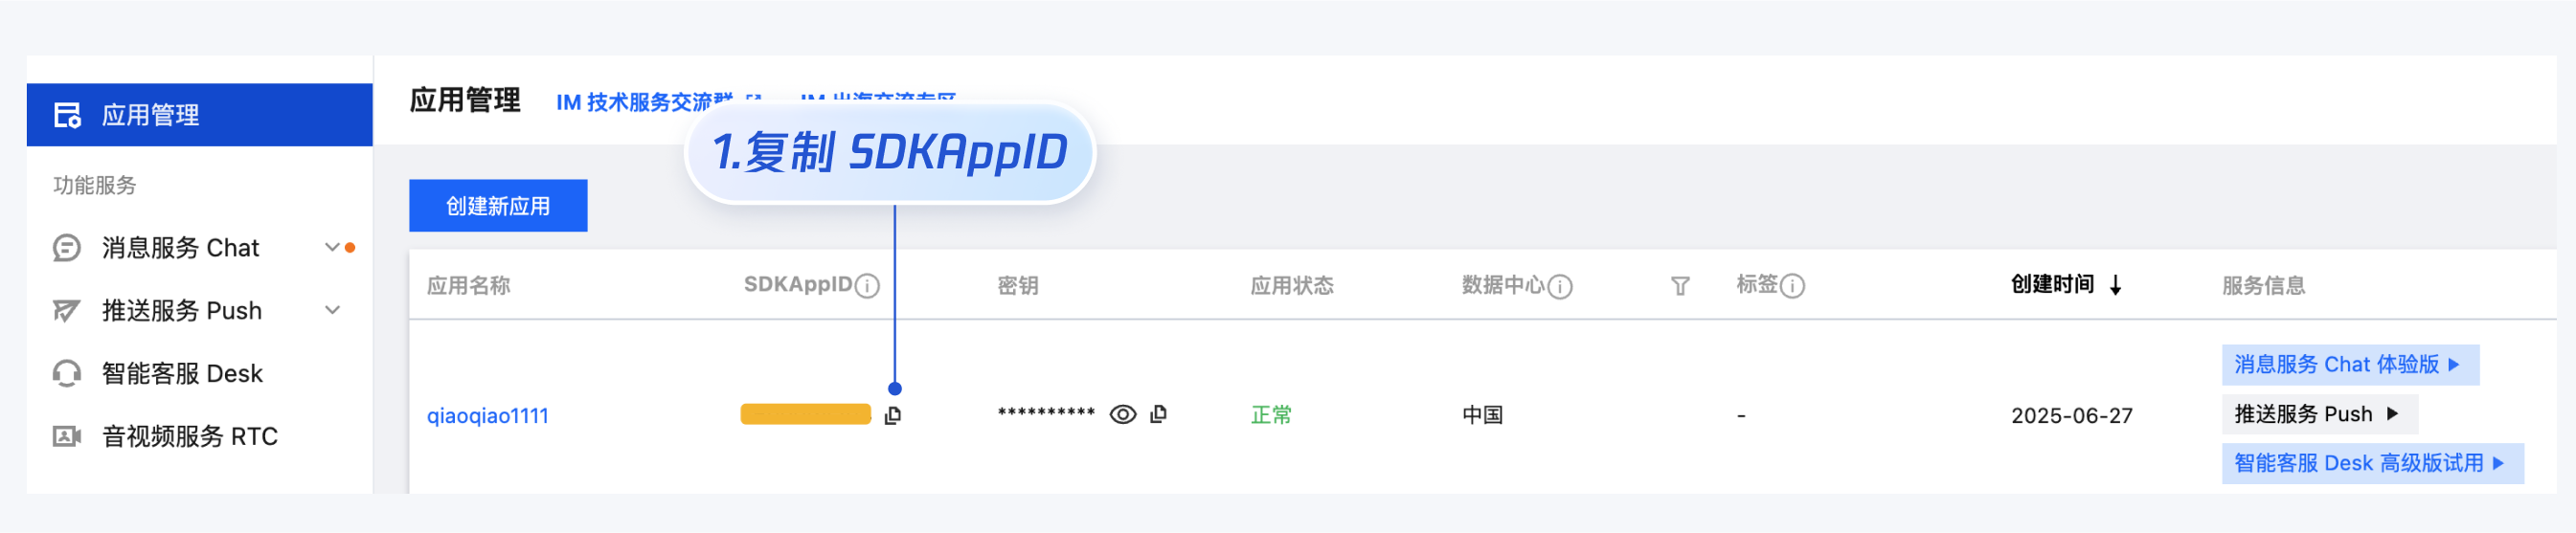
- SDKAppID 信息,可在 [即时通信 IM 控制台](https://console.cloud.tencent.com/im) 单击**应用管理** > **创建新应用**,并选择**智能客服 Desk** , [开通智能客服](https://console.cloud.tencent.com/im/ai-desk) 后获取。
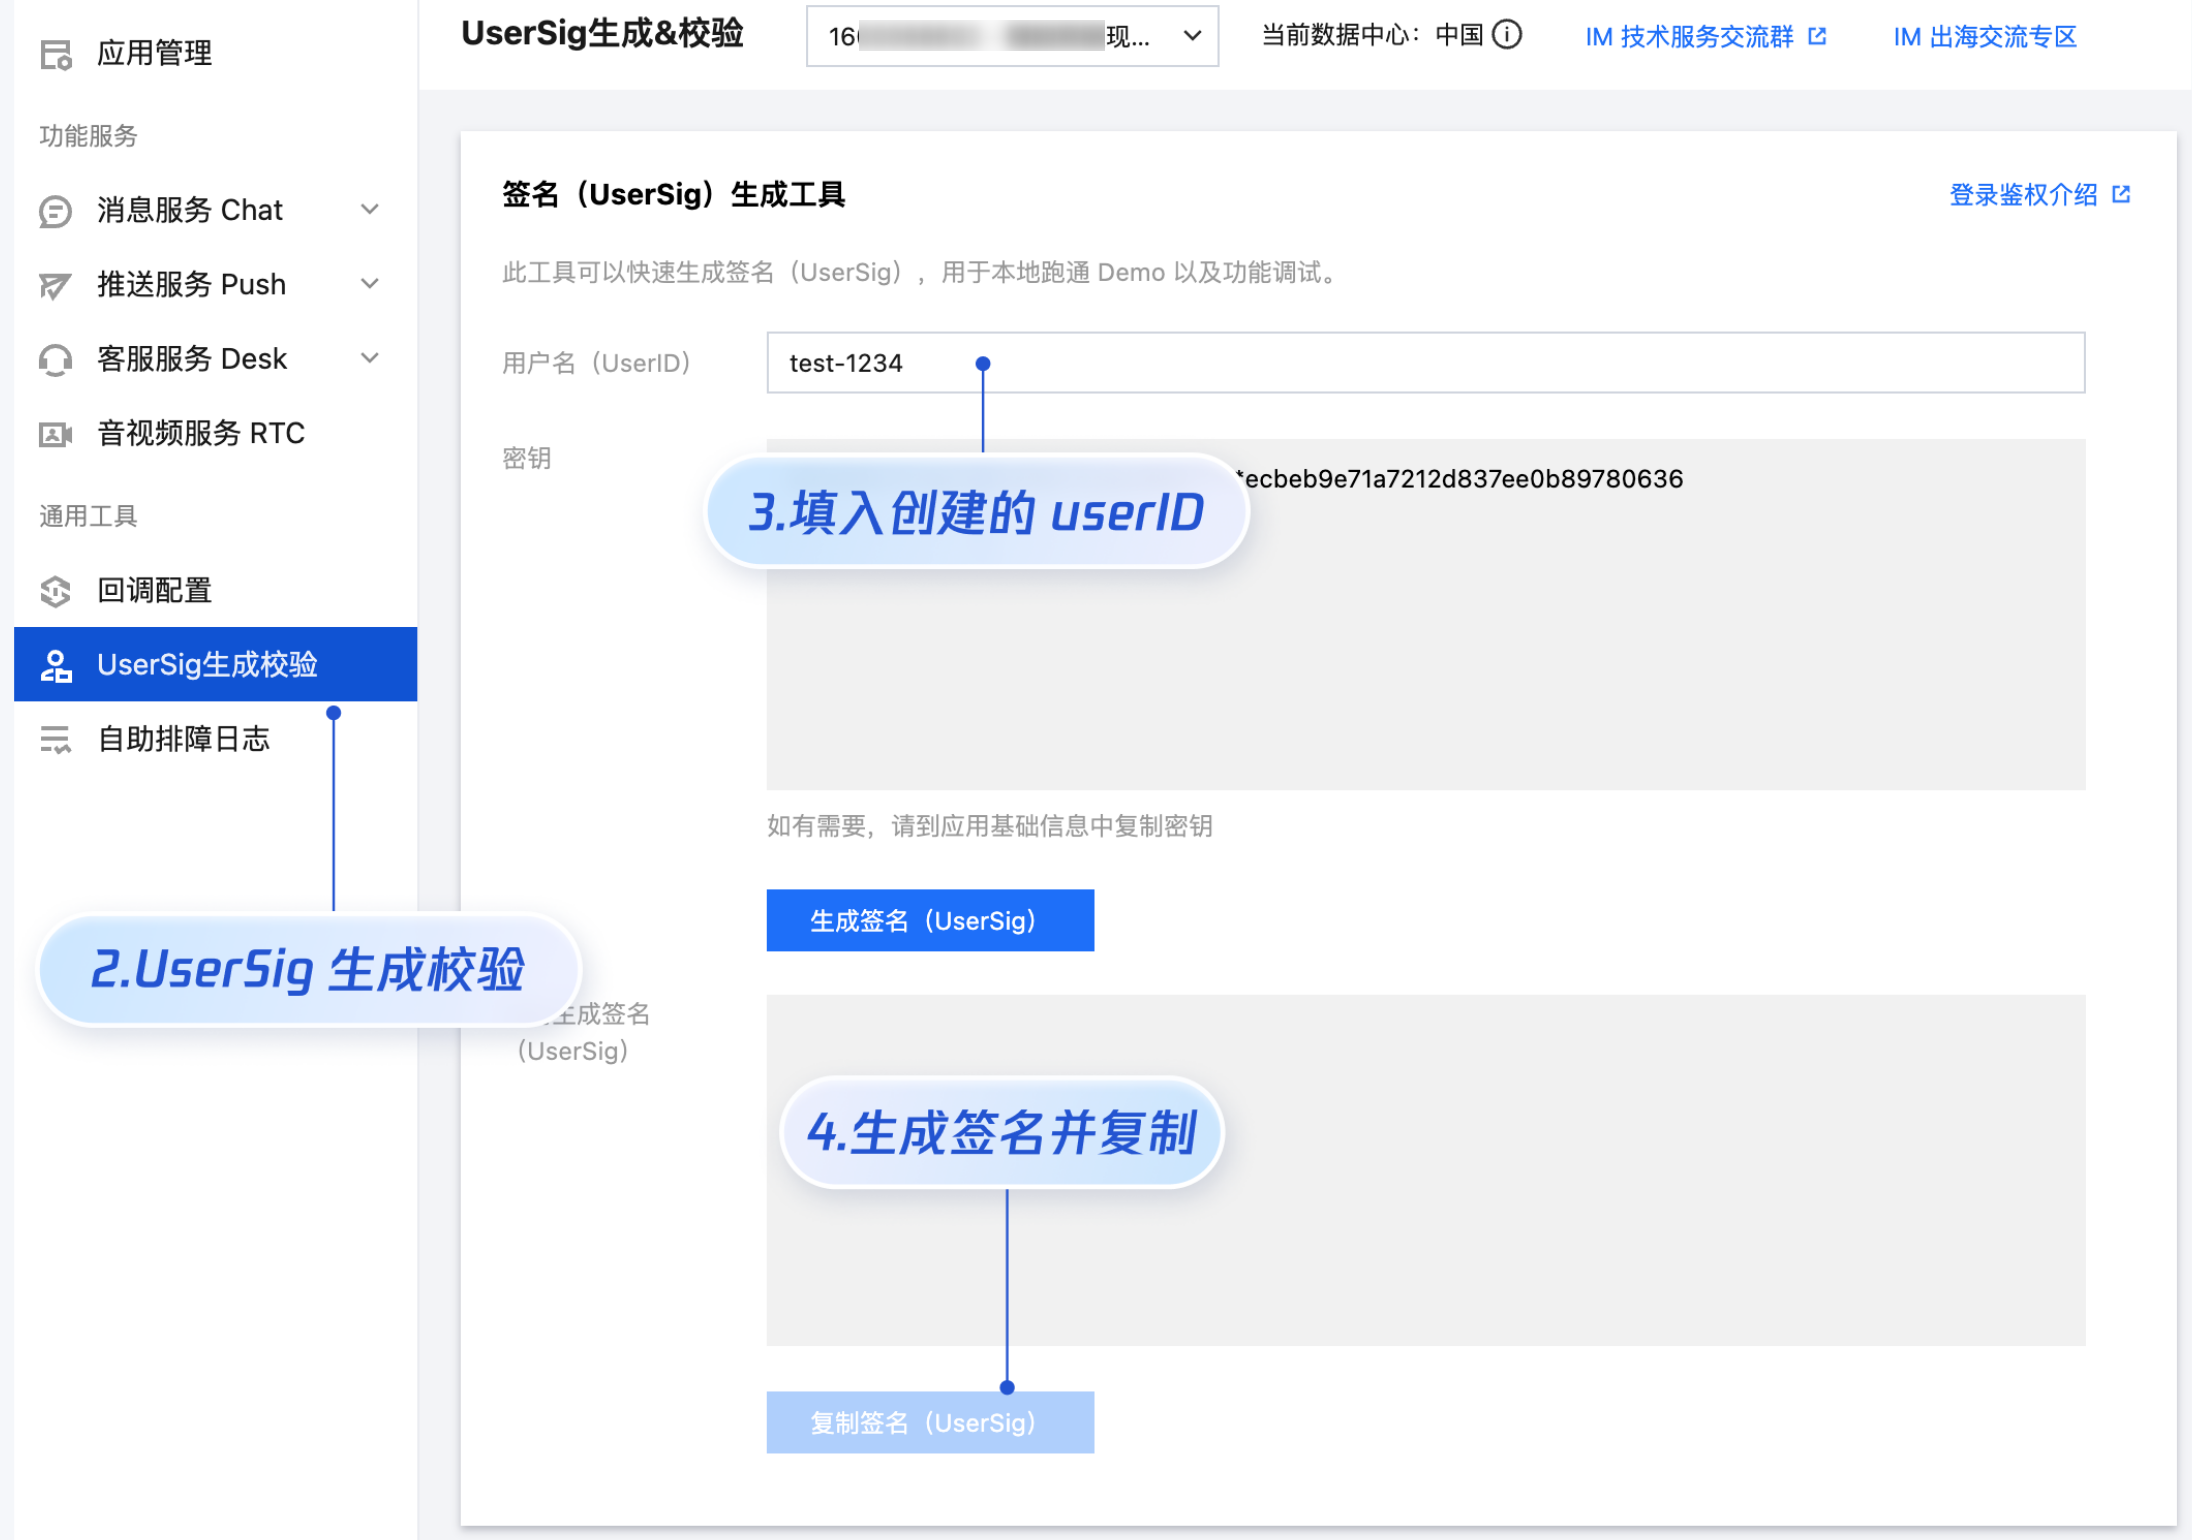
- userID 信息,可本地生成一个随机的字符串,例如 test-1234。
- userSig 信息,可单击 [即时通信 IM 控制台 > UserSig生成校验](https://console.cloud.tencent.com/im/tool-usersig),填写创建的 userID,即可生成 userSig。
### 步骤5:启动项目,并发起您的第一条客服咨询
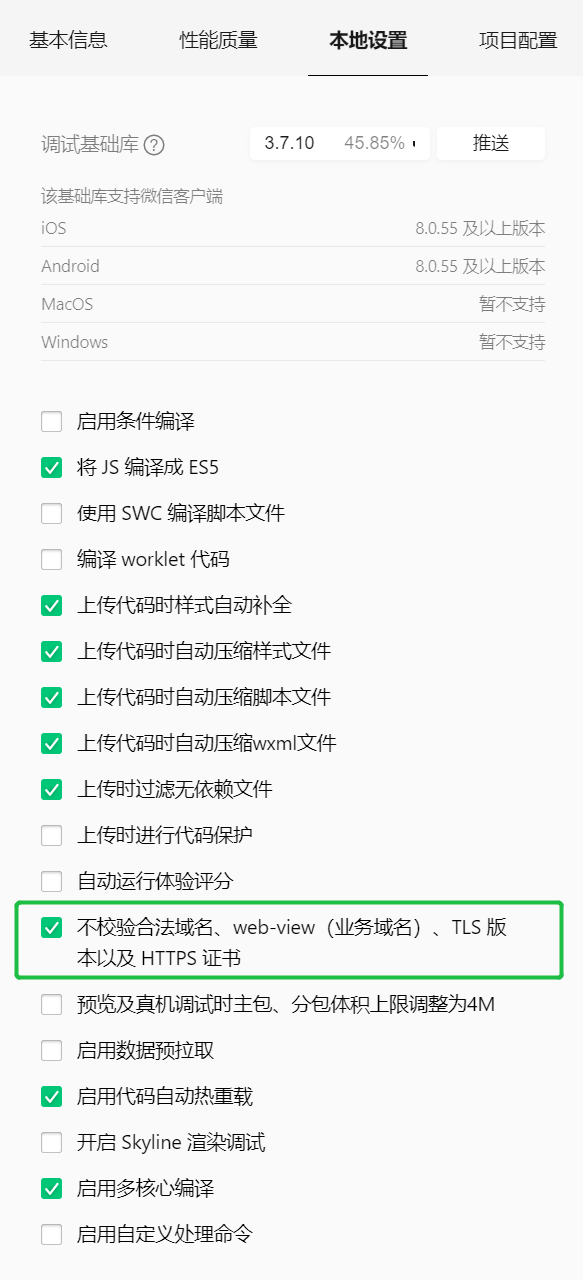
测试前,请先清理微信开发者工具的缓存,并勾选**本地设置** > **不校验合法域名**。
## 高级特性
### 用户端带昵称和头像登录
如果您希望人工客服在工作台接待用户咨询时,能看到用户的昵称、头像等信息以提升沟通效率,效果如下所示:

修改主包 `pages/index/index.js`,设置 `nickName` 和 `avatar` 并将其传递给客服组件。
``` javascript
Page({
data: {
},
getSupport() {
// SDKAppID/userID/userSig 的获取请参考步骤4
const SDKAppID = 0;
const userID = '';
const userSig = '';
const nickName = ''; // 用户昵称
const avatar = ''; // 用户头像
wx.navigateTo({
url: `/ai-desk-customer-wechat/pages/index/index?SDKAppID=${SDKAppID}&userID=${userID}&userSig=${userSig}`
+ `&nickName=${nickName}`
+ `&avatar=${avatar}`
});
},
})
```
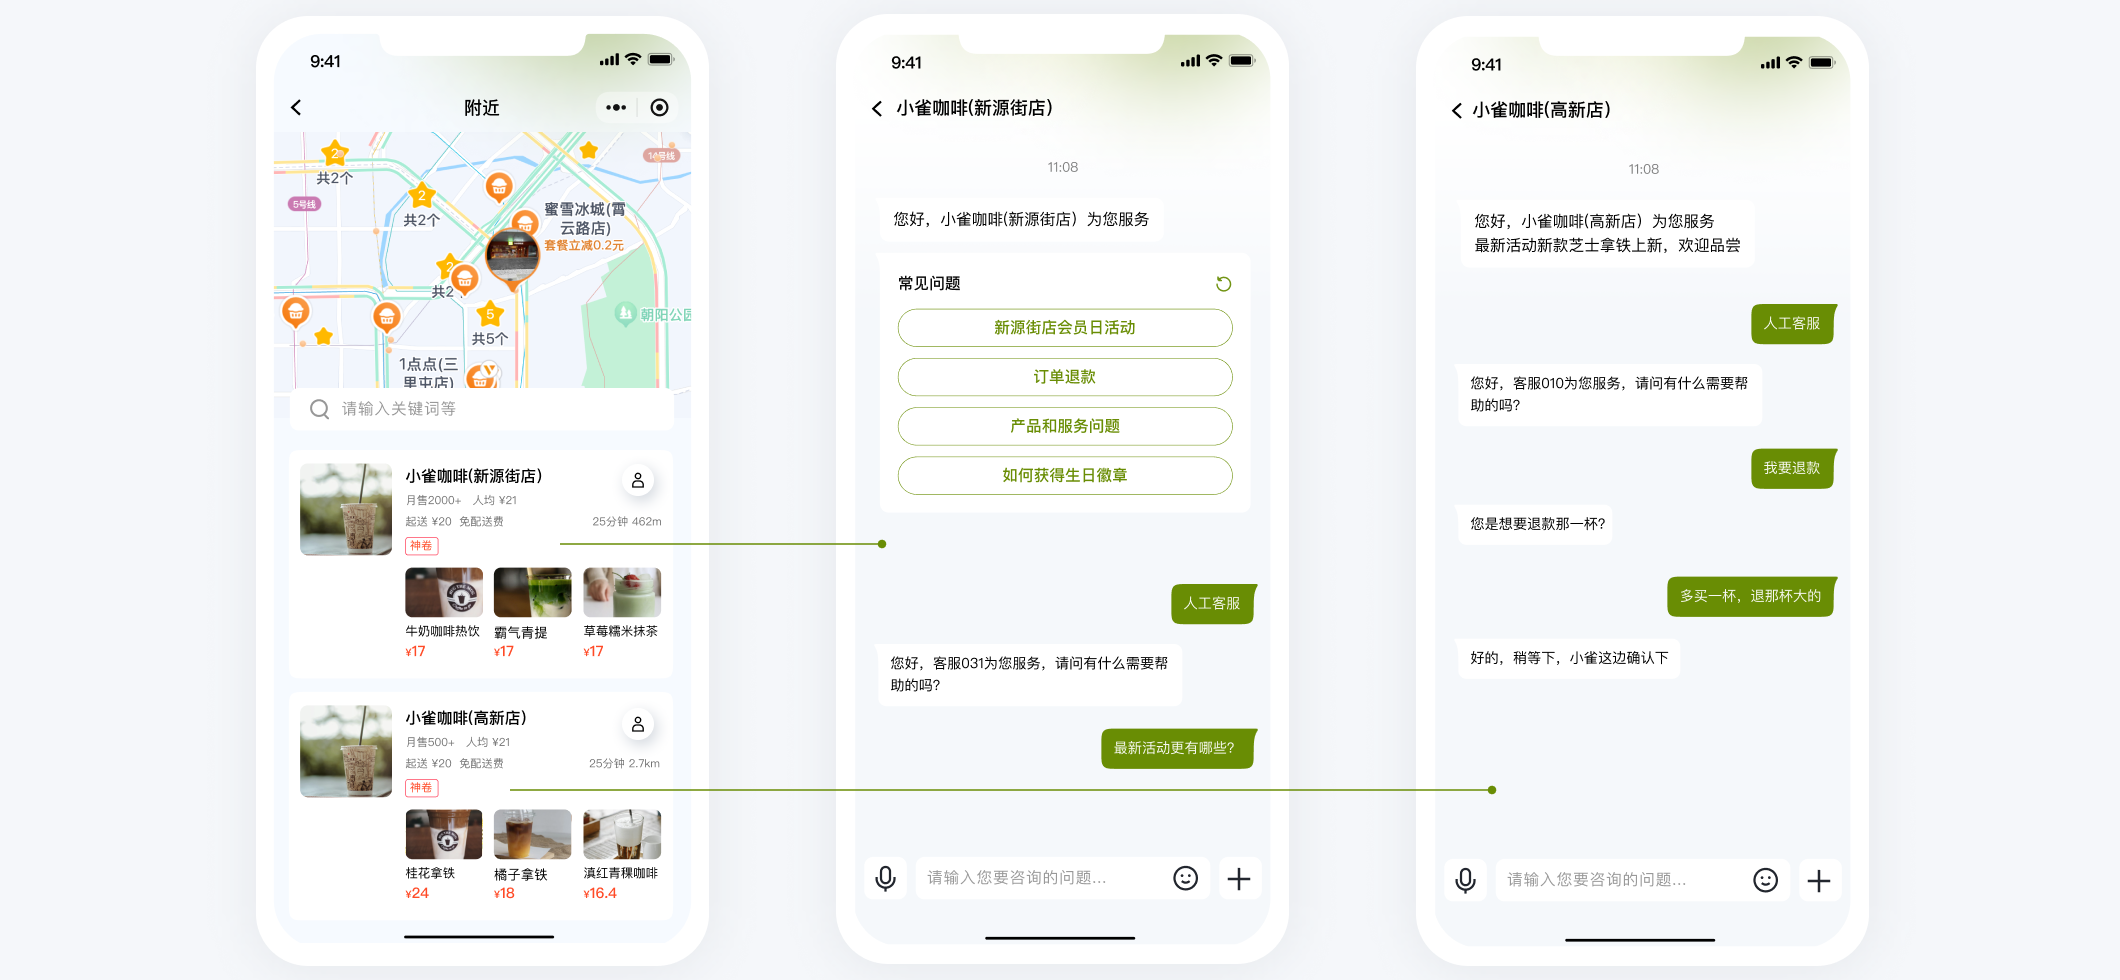
### 工具栏快捷按钮
如果您想实现输入框上方增加快捷按钮方便用户使用,例如增加“人工客服”,“查询包裹”等,效果如下所示:
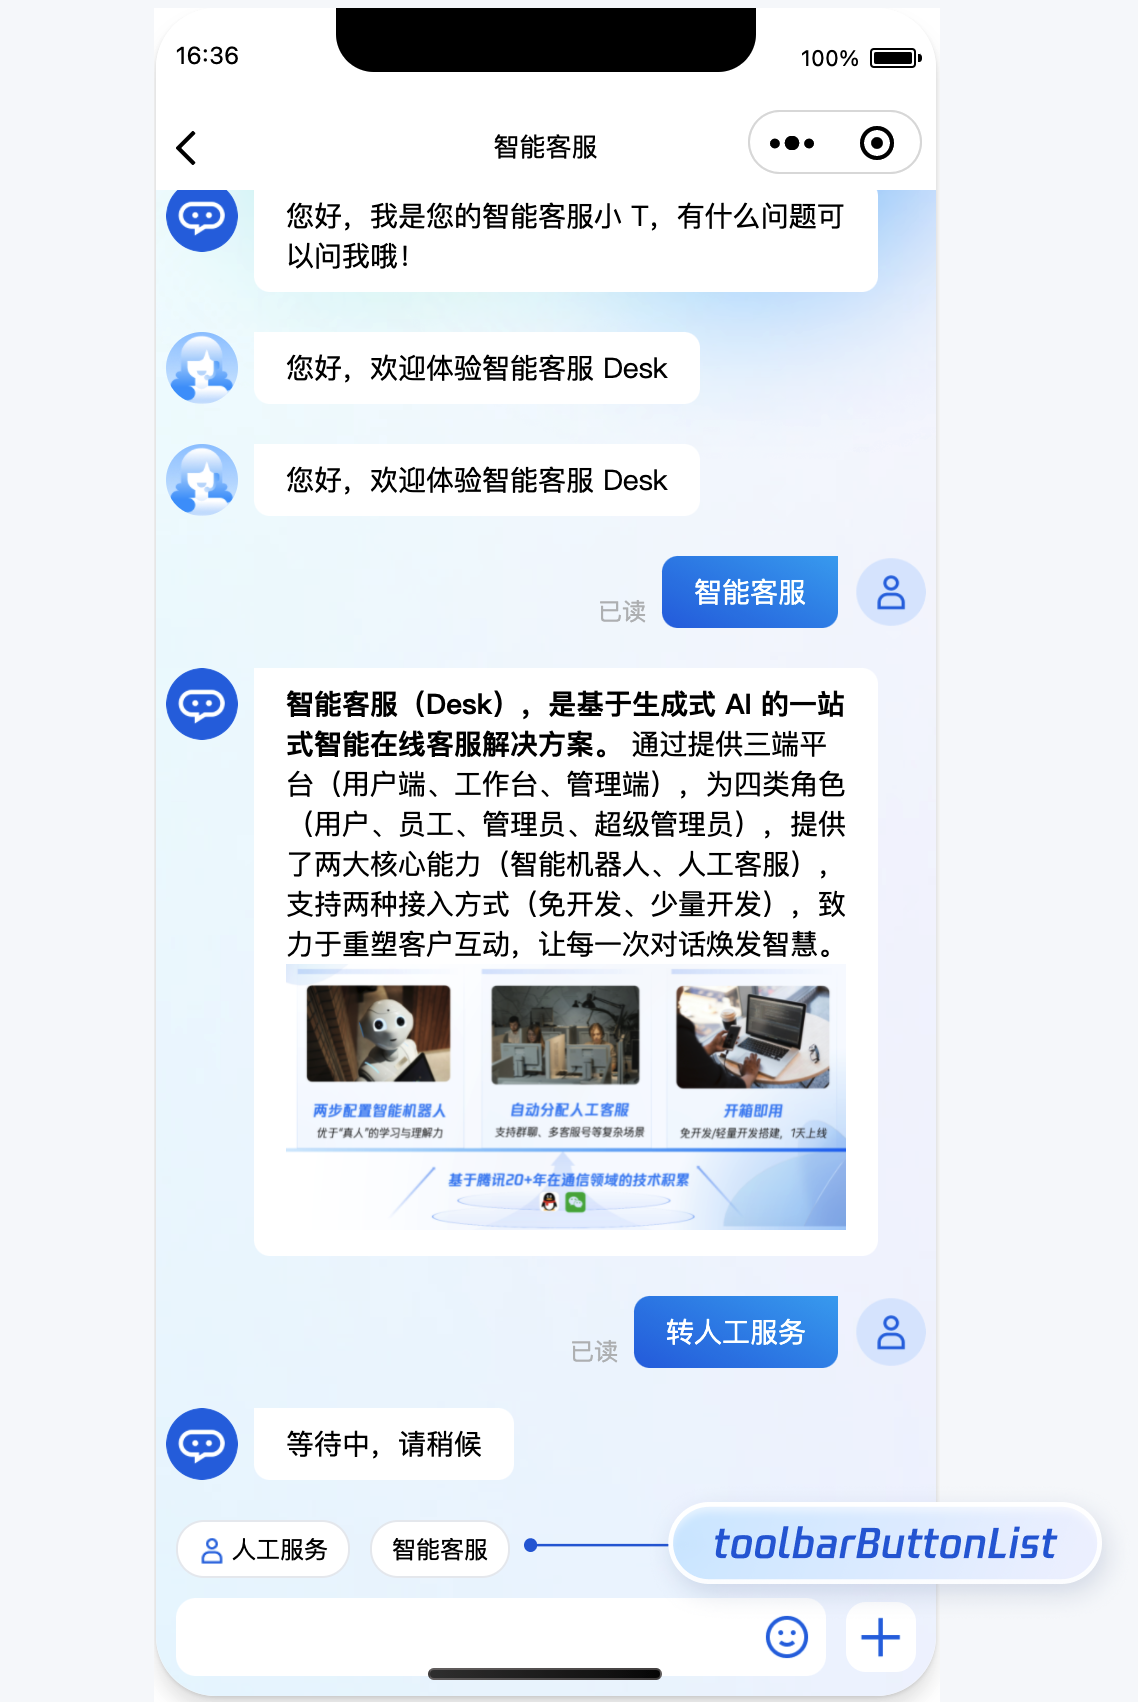
修改主包 `pages/index/index.js`,设置 `toolbarButtonList` 并将其转成 json 字符串后传递给客服组件。`toolbarButtonList` 是一个包含了一个或多个配置的数组,配置的描述如下:
<table>
<tr>
<td rowspan="1" colSpan="1" >参数</td>
<td rowspan="1" colSpan="1" >类型</td>
<td rowspan="1" colSpan="1" >是否必填</td>
<td rowspan="1" colSpan="1" >说明</td>
</tr>
<tr>
<td rowspan="1" colSpan="1" >title</td>
<td rowspan="1" colSpan="1" >String</td>
<td rowspan="1" colSpan="1" >Yes</td>
<td rowspan="1" colSpan="1" >button 标题</td>
</tr>
<tr>
<td rowspan="1" colSpan="1" >icon</td>
<td rowspan="1" colSpan="1" >String</td>
<td rowspan="1" colSpan="1" >No</td>
<td rowspan="1" colSpan="1" >button 图标 url</td>
</tr>
<tr>
<td rowspan="1" colSpan="1" >isPreset</td>
<td rowspan="1" colSpan="1" >Number</td>
<td rowspan="1" colSpan="1" >Yes</td>
<td rowspan="1" colSpan="1" >- 1 - 客服组件内置功能<br>- 0 - 非内置功能</td>
</tr>
<tr>
<td rowspan="1" colSpan="1" >presetId</td>
<td rowspan="1" colSpan="1" >String</td>
<td rowspan="1" colSpan="1" >No</td>
<td rowspan="1" colSpan="1" >当 isPreset 为 1 时,可选值如下:<br>- humanService - 人工服务<br>- serviceRating - 服务评价<br>- endHumanService - 结束对话</td>
</tr>
<tr>
<td rowspan="1" colSpan="1" >isEnabled</td>
<td rowspan="1" colSpan="1" >Number</td>
<td rowspan="1" colSpan="1" >Yes</td>
<td rowspan="1" colSpan="1" >- 1 - 渲染<br>- 0 - 不渲染</td>
</tr>
<tr>
<td rowspan="1" colSpan="1" >content</td>
<td rowspan="1" colSpan="1" >String</td>
<td rowspan="1" colSpan="1" >No</td>
<td rowspan="1" colSpan="1" >当 isPreset 为 0 时,填入文本内容或者 url</td>
</tr>
<tr>
<td rowspan="1" colSpan="1" >type</td>
<td rowspan="1" colSpan="1" >Number</td>
<td rowspan="1" colSpan="1" >Yes</td>
<td rowspan="1" colSpan="1" >- 1 - 点击 button 后客服组件发送 content 对应的文本<br>- 2 - 点击 button 后客服组件打开 content 对应的 url(小程序打开 url 可能会受限,请提前参考相关文档解决)。</td>
</tr>
</table>
``` javascript
Page({
data: {
},
getSupport() {
// SDKAppID/userID/userSig 的获取请参考步骤4
const SDKAppID = 0;
const userID = '';
const userSig = '';
const toolbarButtonList = [
{"title":"人工服务","icon":"https://tccc-im-agent-avatar-1258344699.cos.ap-nanjing.myqcloud.com/toolbar_button_1.png","type":1,"content":"","isPreset":1,"presetId":"humanService","isEnabled":1},
{"title":"服务评价","icon":"https://tccc-im-agent-avatar-sg-1258344699.cos.ap-singapore.myqcloud.com/toolbar_button_2.png","type":1,"content":"","isPreset":1,"presetId":"serviceRating","isEnabled":1},
{"title":"结束对话","icon":"https://tccc-im-agent-avatar-sg-1258344699.cos.ap-singapore.myqcloud.com/toolbar_button_3.png","type":1,"content":"","isPreset":1,"presetId":"endHumanService","isEnabled":1},
{"title":"智能客服","type":1,"content":"智能客服高","isPreset":0,"isEnabled":1}
];
wx.navigateTo({
url: `/ai-desk-customer-wechat/pages/index/index?SDKAppID=${SDKAppID}&userID=${userID}&userSig=${userSig}`
+ `&toolbarButtonList=${JSON.stringify(toolbarButtonList)}`
});
},
})
```
### 底部快捷订单
> **说明:**
>
> 请升级 [ai-desk-customer-wechat](https://www.npmjs.com/package/@tencentcloud/ai-desk-customer-wechat) 到 v1.5.2 或更高版本。
>
如果您想实现打开客服会话时在聊天区域底部展示快捷订单,可以配置 `bottomQuickOrder`,效果如下所示:
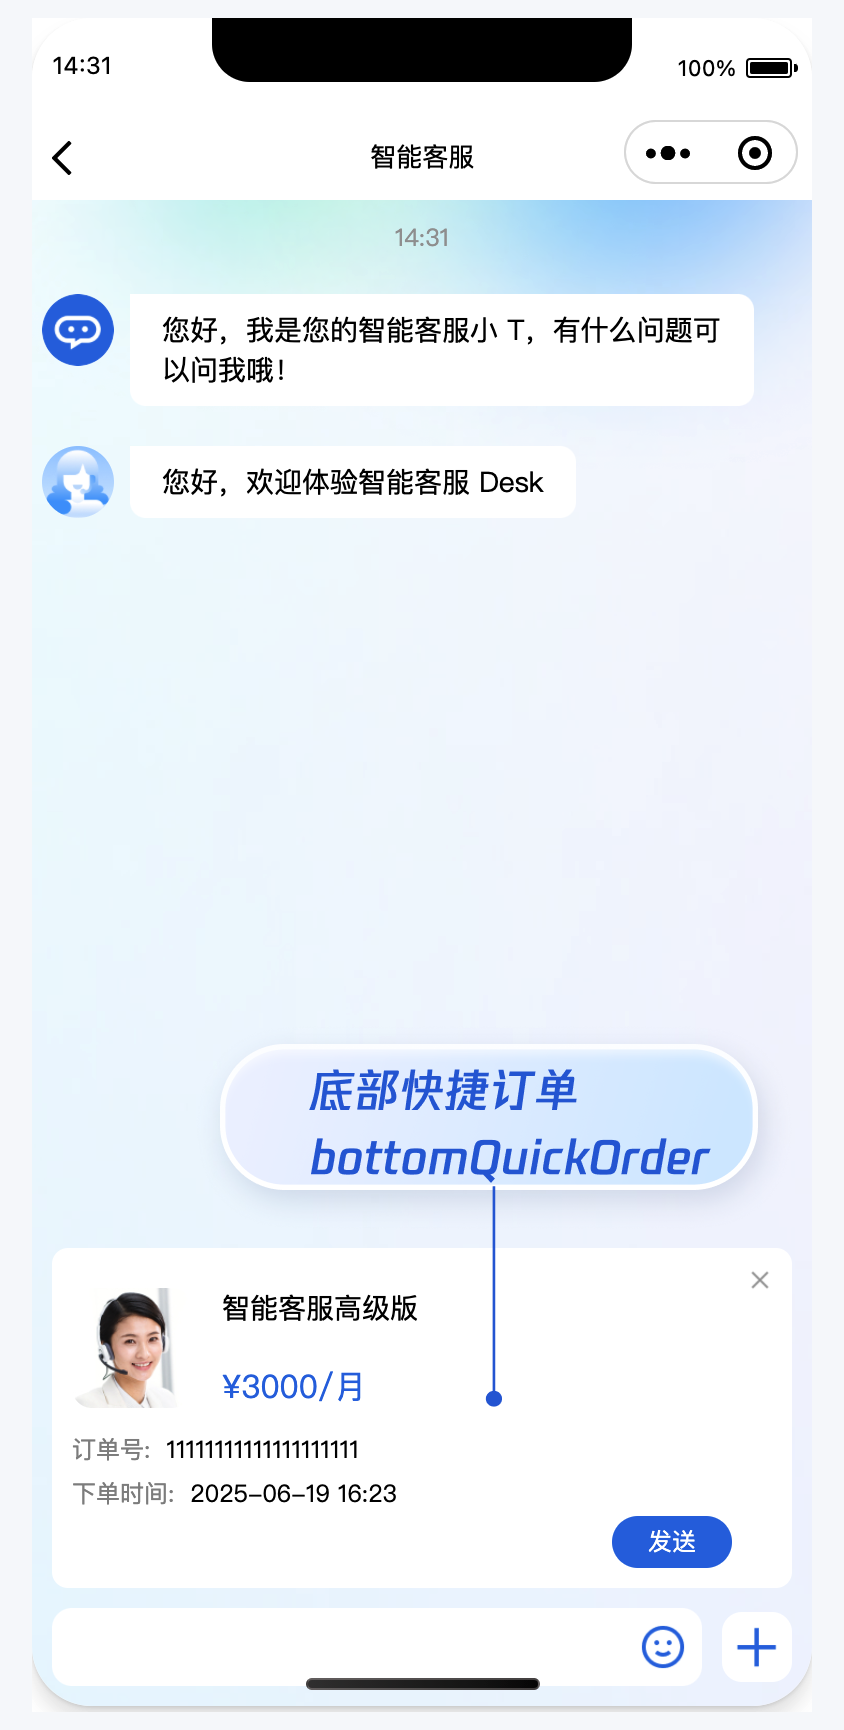
修改主包 `pages/index/index.js`,设置 `bottomQuickOrder` 并将其转成 json 字符串后传递给客服组件。
`bottomQuickOrder` 的参数描述如下:
<table>
<tr>
<td rowspan="1" colSpan="1" >参数</td>
<td rowspan="1" colSpan="1" >类型</td>
<td rowspan="1" colSpan="1" >是否必填</td>
<td rowspan="1" colSpan="1" >说明</td>
</tr>
<tr>
<td rowspan="1" colSpan="1" >header</td>
<td rowspan="1" colSpan="1" >String</td>
<td rowspan="1" colSpan="1" >Yes</td>
<td rowspan="1" colSpan="1" >订单标题,对应上图的“智能客服高级版”</td>
</tr>
<tr>
<td rowspan="1" colSpan="1" >desc</td>
<td rowspan="1" colSpan="1" >String</td>
<td rowspan="1" colSpan="1" >Yes</td>
<td rowspan="1" colSpan="1" >订单描述,对应上图的“3000/月”</td>
</tr>
<tr>
<td rowspan="1" colSpan="1" >pic</td>
<td rowspan="1" colSpan="1" >String</td>
<td rowspan="1" colSpan="1" >No</td>
<td rowspan="1" colSpan="1" >订单图片 url</td>
</tr>
<tr>
<td rowspan="1" colSpan="1" >url</td>
<td rowspan="1" colSpan="1" >String</td>
<td rowspan="1" colSpan="1" >Yes</td>
<td rowspan="1" colSpan="1" >当客服坐席收到订单消息时,点击可打开此 url 对应的页面</td>
</tr>
<tr>
<td rowspan="1" colSpan="1" >customField</td>
<td rowspan="1" colSpan="1" >Array</td>
<td rowspan="1" colSpan="1" >No</td>
<td rowspan="1" colSpan="1" >自定义配置,如“订单号”,“订单时间”等信息。</td>
</tr>
</table>
``` javascript
Page({
data: {
},
getSupport() {
// SDKAppID/userID/userSig 的获取请参考步骤4
const SDKAppID = 0;
const userID = '';
const userSig = '';
const toolbarButtonList = [
{"title":"人工服务","icon":"https://tccc-im-agent-avatar-1258344699.cos.ap-nanjing.myqcloud.com/toolbar_button_1.png","type":1,"content":"","isPreset":1,"presetId":"humanService","isEnabled":1},
{"title":"服务评价","icon":"https://tccc-im-agent-avatar-sg-1258344699.cos.ap-singapore.myqcloud.com/toolbar_button_2.png","type":1,"content":"","isPreset":1,"presetId":"serviceRating","isEnabled":1},
{"title":"结束对话","icon":"https://tccc-im-agent-avatar-sg-1258344699.cos.ap-singapore.myqcloud.com/toolbar_button_3.png","type":1,"content":"","isPreset":1,"presetId":"endHumanService","isEnabled":1},
{"type":1,"title":"智能客服高级版","content":"智能客服高级版","isPreset":0,"isEnabled":1}
];
const bottomQuickOrder = {
header: "智能客服高级版",
desc: "¥3000/月",
pic: "https://cloudcache.tencent-cloud.com/qcloud/portal/kit/images/presale.a4955999.jpeg",
url: 'https://cloud.tencent.com/document/product/269/97537',
customField: [
{
name: '订单号',
value: '11111111111111111111'
},
{
name: '下单时间',
value: '2025-07-02 16:23'
}
]
};
wx.navigateTo({
url: `/ai-desk-customer-wechat/pages/index/index?SDKAppID=${SDKAppID}&userID=${userID}&userSig=${userSig}`
+ `&toolbarButtonList=${JSON.stringify(toolbarButtonList)}`
+ `&bottomQuickOrder=${JSON.stringify(bottomQuickOrder)}`
});
},
})
```
### 多客服号
> **说明:**
>
> 请升级 [ai-desk-customer-wechat](https://www.npmjs.com/package/@tencentcloud/ai-desk-customer-wechat) 到 v1.5.3 或更高版本。
>
如果您的应用内需要多个客服号,为用户提供专属客服功能,以提高服务质量和响应速度,可用 UIKit 提供的多客服号功能实现。效果如下所示:
修改主包 `pages/index/index.js`,设置 `customerServiceIDList 和 customerServiceID` 并将其转成 json 字符串后传递给客服组件。
``` javascript
// 1. 初始化前将业务侧自定义的客服号 ID 传递给 UIKit
// 自定义客服号请使用 restapi - https://cloud.tencent.com/document/product/269/111798
const customerServiceIDList = ['customerServiceID_001', 'customerServiceID_002', 'customerServiceID_003'];
// 2. 初始化时,带上要发起会话的客服号 ID,比如 'customerServiceID_002'
// 如果不带上要发起会话的客服号 ID,则 UIKit 默认使用客服号 ID 列表的第 1 个元素
wx.navigateTo({
url: `/ai-desk-customer-wechat/pages/index/index?SDKAppID=${SDKAppID}&userID=${userID}&userSig=${userSig}`
+ `&customerServiceIDList=${JSON.stringify(customerServiceIDList)}`
+ `&customerServiceID=customerServiceID_002`
});
```
## 常见问题
### 什么是 UserSig?如何生成 UserSig?
UserSig 是用户登录即时通信 IM 的密码,其本质是对 UserID 等信息加密后得到的密文。
UserSig 签发方式是将 UserSig 的计算代码集成到您的服务端,并提供面向项目的接口,在需要 UserSig 时由您的项目向业务服务器发起请求获取动态 UserSig。更多详情请参见 [服务端生成 UserSig](https://cloud.tencent.com/document/product/269/32688#formal)。
### 小程序如果需要上线或者部署正式环境怎么办?
请在 [微信公众平台](https://mp.weixin.qq.com/) > **开发** > **开发管理** > **开发设**置 > **服务器域名**中进行域名配置。域名配置详细参见:[小程序合法域名](https://cloud.tencent.com/document/product/269/75285#56e2dceb-d703-43ea-bf8d-c772318b4eb2)。
## 交流与反馈
[点此进入 IM 社群](https://zhiliao.qq.com/s/c5GY7HIM62CK),享有专业工程师的支持,解决您的难题。