@preprio/prepr-nextjs
Version:
Next.js package for Prepr CMS preview functionality with advanced debugging and visual editing capabilities
867 lines (659 loc) • 23.3 kB
Markdown
# Prepr Next.js Package
A powerful TypeScript library that provides preview functionality, visual editing capabilities, and A/B testing for [Prepr CMS](https://prepr.io) integrated with Next.js applications.
## ⚡ Quick Start
```bash
# Install the package
npm install @preprio/prepr-nextjs
# or
pnpm add @preprio/prepr-nextjs
```
Add environment variables to your `.env`:
```bash
PREPR_GRAPHQL_URL=https://graphql.prepr.io/{YOUR_ACCESS_TOKEN}
PREPR_ENV=preview
```
Set up middleware in `middleware.ts`:
```typescript
import type { NextRequest } from 'next/server'
import createPreprMiddleware from '@preprio/prepr-nextjs/middleware'
export function middleware(request: NextRequest) {
return createPreprMiddleware(request, { preview: true })
}
```
Add toolbar and tracking to your layout:
```typescript
import { getToolbarProps, extractAccessToken } from '@preprio/prepr-nextjs/server'
import { PreprToolbar, PreprToolbarProvider, PreprTrackingPixel } from '@preprio/prepr-nextjs/react'
import '@preprio/prepr-nextjs/index.css'
export default async function RootLayout({ children }: { children: React.ReactNode }) {
const toolbarProps = await getToolbarProps(process.env.PREPR_GRAPHQL_URL!)
const accessToken = extractAccessToken(process.env.PREPR_GRAPHQL_URL!)
return (
<html>
<head>
{accessToken && <PreprTrackingPixel accessToken={accessToken!} />}
</head>
<body>
<PreprToolbarProvider props={toolbarProps}>
<PreprToolbar />
{children}
</PreprToolbarProvider>
</body>
</html>
)
}
```
## 📋 Prerequisites
Before installing, ensure you have:
- **Next.js 13.0.0 or later** (supports App Router)
- **React 17.0.0 or later** (React 18+ recommended)
- **Node.js 16.0.0 or later**
- **A Prepr account**
- **Prepr GraphQL URL** (found in Settings → Access tokens)
### Prepr Account Setup
1. **Create a Prepr account** at [prepr.io](https://prepr.io)
2. **Get your GraphQL URL**:
- Go to Settings → Access tokens
- Find your GraphQL Preview access token
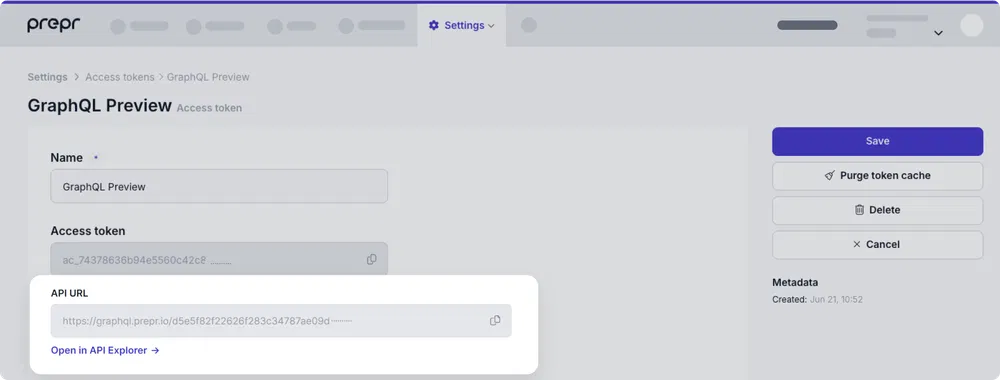
- Copy the full GraphQL URL (e.g., `https://graphql.prepr.io/e6f7a0521f11e5149ce65b0e9f372ced2dfc923490890e7f225da1db84cxxxxx`)
- The URL format is always `https://graphql.prepr.io/{YOUR_ACCESS_TOKEN}`
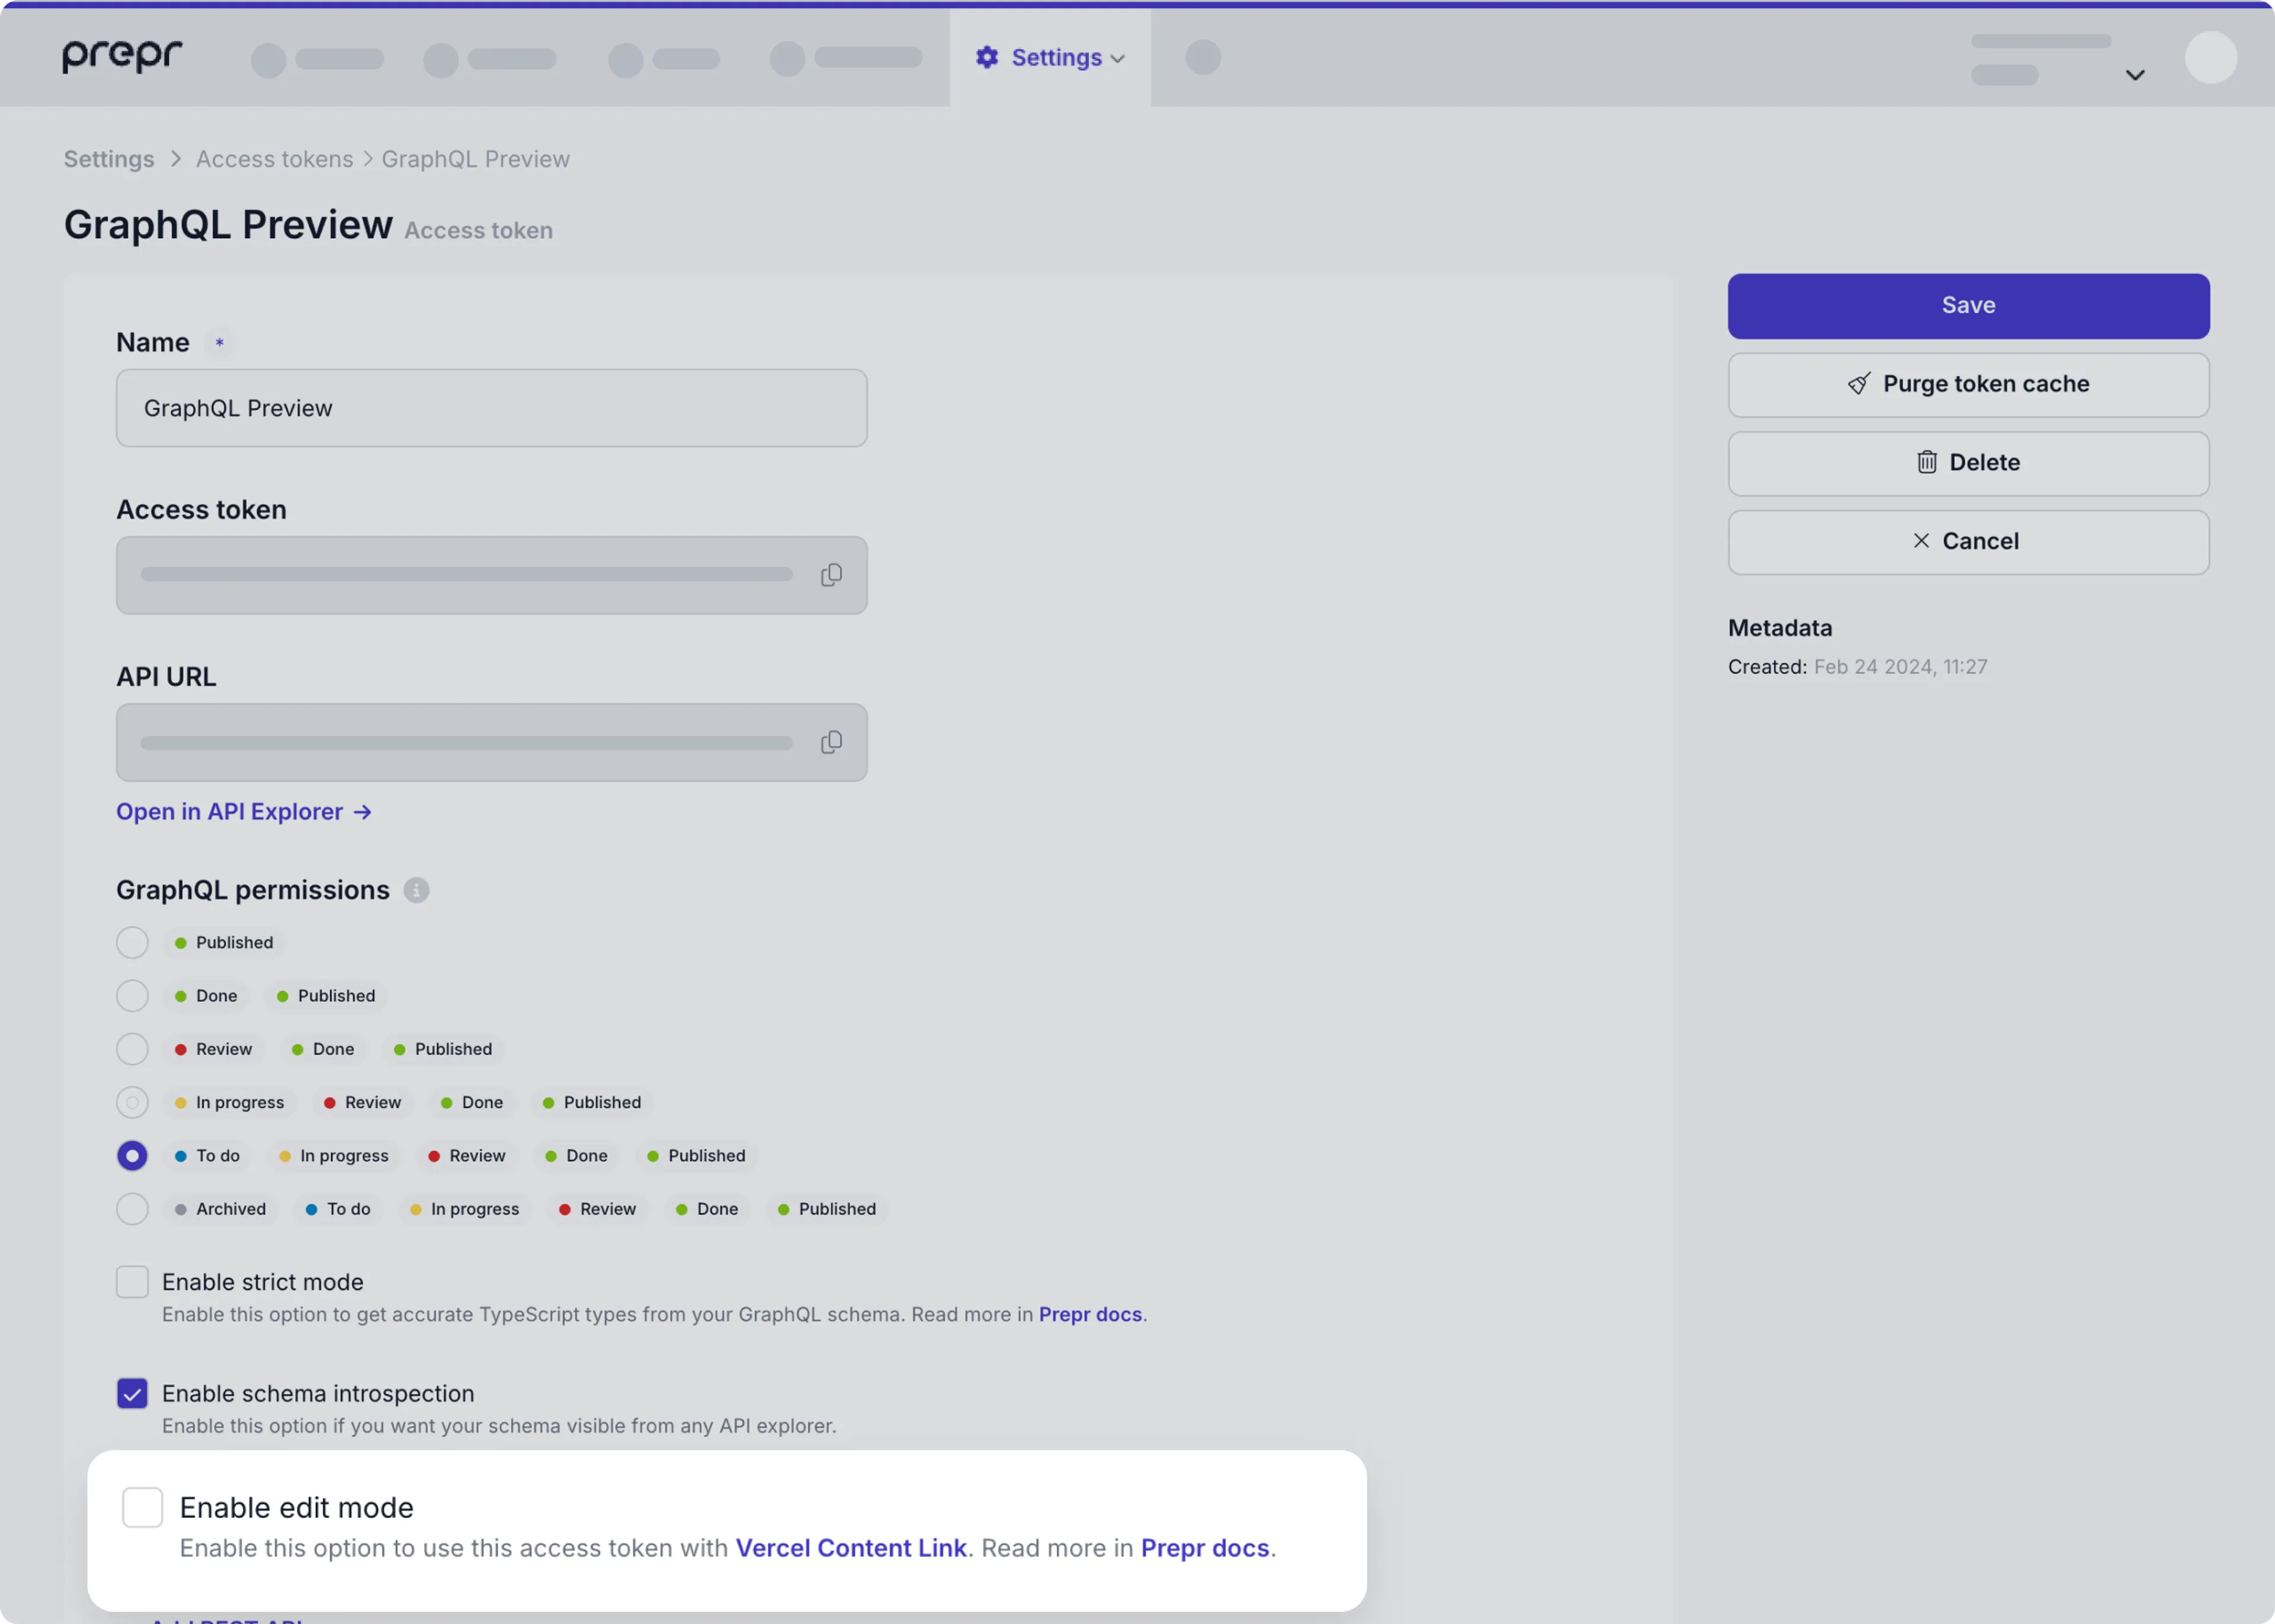
3. **Enable edit mode** (for toolbar):
- Open your GraphQL Preview access token
- Check "Enable edit mode"
- Save the token
## 🔧 Installation & Setup
### 1. Install the Package
```bash
npm install @preprio/prepr-nextjs
# or
pnpm add @preprio/prepr-nextjs
# or
yarn add @preprio/prepr-nextjs
```
### 2. Environment Configuration
Create or update your `.env` file:
```bash
# Required: Your Prepr GraphQL endpoint
PREPR_GRAPHQL_URL=https://graphql.prepr.io/{YOUR_ACCESS_TOKEN}
# Required: Environment mode
PREPR_ENV=preview # Use 'preview' for staging/development
# PREPR_ENV=production # Use 'production' for live sites
# Optional: Enable debug logging (development only)
# PREPR_DEBUG=true
```
> **Important**: Replace `{YOUR_ACCESS_TOKEN}` with your actual Prepr access token from Settings → Access tokens.
### 3. Middleware Setup
The middleware handles personalization headers, customer ID tracking, and preview mode functionality.
#### TypeScript Setup
Create or update `middleware.ts` in your project root:
```typescript
import type { NextRequest } from 'next/server'
import createPreprMiddleware from '@preprio/prepr-nextjs/middleware'
export function middleware(request: NextRequest) {
return createPreprMiddleware(request, {
preview: process.env.PREPR_ENV === 'preview'
})
}
export const config = {
matcher: [
/*
* Match all request paths except for the ones starting with:
* - api (API routes)
* - _next/static (static files)
* - _next/image (image optimization files)
* - favicon.ico (favicon file)
*/
'/((?!api|_next/static|_next/image|favicon.ico).*)',
],
}
```
#### JavaScript Setup
Create or update `middleware.js` in your project root:
```javascript
import createPreprMiddleware from '@preprio/prepr-nextjs/middleware'
export async function middleware(request) {
return createPreprMiddleware(request, {
preview: process.env.PREPR_ENV === 'preview'
})
}
export const config = {
matcher: [
'/((?!api|_next/static|_next/image|favicon.ico).*)',
],
}
```
#### Chaining with Existing Middleware
##### Basic Chaining Pattern
```typescript
import type { NextRequest, NextResponse } from 'next/server'
import createPreprMiddleware from '@preprio/prepr-nextjs/middleware'
export function middleware(request: NextRequest) {
// Start with your existing middleware
let response = NextResponse.next()
// Add your custom logic
if (request.nextUrl.pathname.startsWith('/admin')) {
response.headers.set('x-admin-route', 'true')
}
// Chain with Prepr middleware
return createPreprMiddleware(request, response, {
preview: process.env.PREPR_ENV === 'preview'
})
}
```
##### With next-intl Integration
```typescript
import type { NextRequest } from 'next/server'
import createIntlMiddleware from 'next-intl/middleware'
import createPreprMiddleware from '@preprio/prepr-nextjs/middleware'
const intlMiddleware = createIntlMiddleware({
locales: ['en', 'de', 'fr'],
defaultLocale: 'en'
})
export function middleware(request: NextRequest) {
// First run internationalization middleware
const intlResponse = intlMiddleware(request)
// If next-intl returns a redirect, return it immediately
if (intlResponse.status >= 300 && intlResponse.status < 400) {
return intlResponse
}
// Otherwise, chain with Prepr middleware
return createPreprMiddleware(request, intlResponse, {
preview: process.env.PREPR_ENV === 'preview'
})
}
export const config = {
matcher: [
'/((?!api|_next/static|_next/image|favicon.ico).*)',
],
}
```
##### Advanced Chaining with Multiple Middlewares
```typescript
import type { NextRequest, NextResponse } from 'next/server'
import createPreprMiddleware from '@preprio/prepr-nextjs/middleware'
import { authMiddleware } from '@/lib/auth'
import { rateLimitMiddleware } from '@/lib/rate-limit'
export function middleware(request: NextRequest) {
let response = NextResponse.next()
// 1. Rate limiting
response = rateLimitMiddleware(request, response)
// 2. Authentication (if needed)
if (request.nextUrl.pathname.startsWith('/dashboard')) {
response = authMiddleware(request, response)
}
// 3. Custom headers
response.headers.set('x-custom-header', 'my-value')
// 4. Finally, Prepr middleware
return createPreprMiddleware(request, response, {
preview: process.env.PREPR_ENV === 'preview'
})
}
```
##### Conditional Chaining
```typescript
import type { NextRequest, NextResponse } from 'next/server'
import createPreprMiddleware from '@preprio/prepr-nextjs/middleware'
export function middleware(request: NextRequest) {
const { pathname } = request.nextUrl
// Skip Prepr middleware for API routes
if (pathname.startsWith('/api/')) {
return NextResponse.next()
}
// Apply different logic based on route
let response = NextResponse.next()
if (pathname.startsWith('/blog')) {
response.headers.set('x-content-type', 'blog')
} else if (pathname.startsWith('/product')) {
response.headers.set('x-content-type', 'product')
}
// Always apply Prepr middleware for content routes
return createPreprMiddleware(request, response, {
preview: process.env.PREPR_ENV === 'preview'
})
}
```
### 4. Layout Integration
#### App Router (Next.js 13+)
The toolbar should only be rendered in preview environments to avoid showing development tools in production. Here are several approaches for conditional rendering:
##### Basic Conditional Rendering
Update your `app/layout.tsx`:
```typescript
import { getToolbarProps } from '@preprio/prepr-nextjs/server'
import {
PreprToolbar,
PreprToolbarProvider
} from '@preprio/prepr-nextjs/react'
import '@preprio/prepr-nextjs/index.css'
export default async function RootLayout({
children,
}: {
children: React.ReactNode
}) {
const isPreview = process.env.PREPR_ENV === 'preview'
const toolbarProps = isPreview ? await getToolbarProps(process.env.PREPR_GRAPHQL_URL!) : null
return (
<html lang="en">
<body>
{isPreview && toolbarProps ? (
<PreprToolbarProvider props={toolbarProps}>
<PreprToolbar />
{children}
</PreprToolbarProvider>
) : (
children
)}
</body>
</html>
)
}
```
##### Advanced Conditional Rendering with Error Handling
For production applications, you may want more robust error handling:
```typescript
import { getToolbarProps } from '@preprio/prepr-nextjs/server'
import {
PreprToolbar,
PreprToolbarProvider
} from '@preprio/prepr-nextjs/react'
import '@preprio/prepr-nextjs/index.css'
export default async function RootLayout({
children,
}: {
children: React.ReactNode
}) {
const isPreview = process.env.PREPR_ENV === 'preview'
const graphqlUrl = process.env.PREPR_GRAPHQL_URL
// Only fetch toolbar props in preview mode with valid URL
let toolbarProps = null
if (isPreview && graphqlUrl) {
try {
toolbarProps = await getToolbarProps(graphqlUrl)
} catch (error) {
console.error('Failed to load toolbar:', error)
// Continue without toolbar instead of breaking the app
}
}
return (
<html lang="en">
<body>
{isPreview && toolbarProps ? (
<PreprToolbarProvider props={toolbarProps}>
<PreprToolbar />
{children}
</PreprToolbarProvider>
) : (
children
)}
</body>
</html>
)
}
```
##### Component-Level Conditional Rendering
For better separation of concerns, create a dedicated component:
```typescript
// components/PreviewWrapper.tsx
import { getToolbarProps } from '@preprio/prepr-nextjs/server'
import {
PreprToolbar,
PreprToolbarProvider
} from '@preprio/prepr-nextjs/react'
interface PreviewWrapperProps {
children: React.ReactNode
}
export default async function PreviewWrapper({ children }: PreviewWrapperProps) {
const isPreview = process.env.PREPR_ENV === 'preview'
if (!isPreview) {
return <>{children}</>
}
const toolbarProps = await getToolbarProps(process.env.PREPR_GRAPHQL_URL!)
return (
<PreprToolbarProvider props={toolbarProps}>
<PreprToolbar />
{children}
</PreprToolbarProvider>
)
}
// app/layout.tsx
import PreviewWrapper from '@/components/PreviewWrapper'
import '@preprio/prepr-nextjs/index.css'
export default function RootLayout({
children,
}: {
children: React.ReactNode
}) {
return (
<html lang="en">
<body>
<PreviewWrapper>
{children}
</PreviewWrapper>
</body>
</html>
)
}
```
#### Why Conditional Rendering Matters
1. **Performance**: Prevents unnecessary API calls in production
2. **Security**: Avoids exposing preview functionality to end users
3. **Bundle Size**: Excludes toolbar code from production builds
4. **User Experience**: Ensures clean production UI without development tools
#### Best Practices for Conditional Rendering
- **Environment Variables**: Always use environment variables to control preview mode
- **Error Boundaries**: Wrap preview components in error boundaries to prevent crashes
- **Fallback UI**: Always provide a fallback when toolbar fails to load
- **TypeScript Safety**: Use proper type guards when checking conditions
- **Bundle Optimization**: Consider dynamic imports for preview-only code
```typescript
// Dynamic import example for advanced optimization
const ToolbarDynamic = dynamic(
() => import('@preprio/prepr-nextjs/react').then(mod => mod.PreprToolbar),
{
ssr: false,
loading: () => <div>Loading preview tools...</div>
}
)
```
### 5. User Tracking Setup
The tracking pixel is essential for collecting user interaction data and enabling personalization features. It should be included in all environments (both preview and production).
#### Basic Setup
Add the tracking pixel to your layout's `<head>` section:
```typescript
import { extractAccessToken } from '@preprio/prepr-nextjs/server'
import { PreprTrackingPixel } from '@preprio/prepr-nextjs/react'
export default function RootLayout({ children }: { children: React.ReactNode }) {
const accessToken = extractAccessToken(process.env.PREPR_GRAPHQL_URL!)
return (
<html>
<head>
{accessToken && <PreprTrackingPixel accessToken={accessToken!} />}
</head>
<body>{children}</body>
</html>
)
}
```
#### Alternative: Body Placement
You can also place the tracking pixel in the body if needed:
```typescript
export default function RootLayout({ children }: { children: React.ReactNode }) {
const accessToken = extractAccessToken(process.env.PREPR_GRAPHQL_URL!)
return (
<html>
<body>
{accessToken && <PreprTrackingPixel accessToken={accessToken!} />}
{children}
</body>
</html>
)
}
```
### 6. API Integration
Use the `getPreprHeaders()` helper function in your data fetching to enable personalization and A/B testing:
#### With Apollo Client
```typescript
import { getClient } from '@/lib/client'
import { GetPageBySlugDocument } from '@/gql/graphql'
import { getPreprHeaders } from '@preprio/prepr-nextjs/server'
const getData = async (slug: string) => {
const { data } = await getClient().query({
query: GetPageBySlugDocument,
variables: { slug },
context: {
headers: await getPreprHeaders(),
},
fetchPolicy: 'no-cache',
})
return data
}
```
#### With Fetch API
```typescript
import { getPreprHeaders } from '@preprio/prepr-nextjs/server'
const getData = async (slug: string) => {
const headers = await getPreprHeaders()
const response = await fetch(process.env.PREPR_GRAPHQL_URL!, {
method: 'POST',
headers: {
'Content-Type': 'application/json',
...headers,
},
body: JSON.stringify({
query: `
query GetPageBySlug($slug: String!) {
Page(slug: $slug) {
title
content
}
}
`,
variables: { slug },
}),
})
return response.json()
}
```
## 🎛️ API Reference
### Server Functions
#### `getPreprHeaders()`
Returns all Prepr headers for API requests.
```typescript
import { getPreprHeaders } from '@preprio/prepr-nextjs/server'
const headers = await getPreprHeaders()
// Returns: { 'prepr-customer-id': 'uuid', 'Prepr-Segments': 'segment-id', ... }
```
#### `getPreprUUID()`
Returns the current customer ID from headers.
```typescript
import { getPreprUUID } from '@preprio/prepr-nextjs/server'
const customerId = await getPreprUUID()
// Returns: 'uuid-string' or null
```
#### `getActiveSegment()`
Returns the currently active segment.
```typescript
import { getActiveSegment } from '@preprio/prepr-nextjs/server'
const segment = await getActiveSegment()
// Returns: 'segment-id' or null
```
#### `getActiveVariant()`
Returns the currently active A/B testing variant.
```typescript
import { getActiveVariant } from '@preprio/prepr-nextjs/server'
const variant = await getActiveVariant()
// Returns: 'A' | 'B' | null
```
#### `getToolbarProps()`
Fetches all necessary props for the toolbar component.
```typescript
import { getToolbarProps } from '@preprio/prepr-nextjs/server'
const props = await getToolbarProps(process.env.PREPR_GRAPHQL_URL!)
// Returns: { activeSegment, activeVariant, data }
```
#### `validatePreprToken()`
Validates a Prepr GraphQL URL format.
```typescript
import { validatePreprToken } from '@preprio/prepr-nextjs/server'
const result = validatePreprToken('https://graphql.prepr.io/YOUR_ACCESS_TOKEN')
// Returns: { valid: boolean, error?: string }
```
#### `isPreviewMode()`
Checks if the current environment is in preview mode.
```typescript
import { isPreviewMode } from '@preprio/prepr-nextjs/server'
const isPreview = isPreviewMode()
// Returns: boolean
```
#### `extractAccessToken()`
Extracts the access token from a Prepr GraphQL URL.
```typescript
import { extractAccessToken } from '@preprio/prepr-nextjs/server'
const token = extractAccessToken('https://graphql.prepr.io/abc123')
// Returns: 'abc123' or null
```
### React Components
#### `PreprToolbarProvider`
Context provider that wraps your app with toolbar functionality.
```typescript
import { PreprToolbarProvider } from '@preprio/prepr-nextjs/react'
<PreprToolbarProvider props={toolbarProps}>
{children}
</PreprToolbarProvider>
```
#### `PreprToolbar`
The main toolbar component.
```typescript
import { PreprToolbar } from '@preprio/prepr-nextjs/react'
<PreprToolbar />
```
#### `PreprTrackingPixel`
User tracking component that loads the Prepr tracking script.
```typescript
import { PreprTrackingPixel } from '@preprio/prepr-nextjs/react'
<PreprTrackingPixel accessToken="your-access-token" />
```
## 🔧 Configuration Options
### Environment Variables
| Variable | Required | Default | Description |
|----------|----------|---------|-------------|
| `PREPR_GRAPHQL_URL` | Yes | - | Your Prepr GraphQL endpoint URL |
| `PREPR_ENV` | Yes | - | Environment mode (`preview` or `production`) |
### Middleware Options
```typescript
// Simple usage (creates new NextResponse)
createPreprMiddleware(request, {
preview: boolean // Enable preview mode functionality
})
// Chaining usage (uses existing NextResponse)
createPreprMiddleware(request, response, {
preview: boolean // Enable preview mode functionality
})
```
### Toolbar Options
```typescript
<PreprToolbarProvider
props={toolbarProps}
options={{
debug: true, // Enable debug logging
locale: 'en', // Set UI locale (e.g., 'en', 'nl')
}}
>
```
### Internationalization (i18n)
This package includes simple, built-in i18n support with JSON dictionaries. You can:
- Pass a `locale` through `PreprToolbarProvider` options
- Read the current locale from the store
- Translate UI strings via a `useTranslations` hook
- Omit `locale` to auto-detect from the browser (supports `en` and `nl`, defaults to `en`)
Usage:
```tsx
import { PreprToolbarProvider, PreprToolbar, useTranslations } from '@preprio/prepr-nextjs/react'
export default function Layout({ children }: { children: React.ReactNode }) {
const toolbarProps = /* ... */
return (
<PreprToolbarProvider props={toolbarProps} options={{ locale: 'nl' }}>
<PreprToolbar />
<ExampleComponent />
{children}
</PreprToolbarProvider>
)
}
function ExampleComponent() {
const { t, locale } = useTranslations()
return (
<div>
<p>{t('common.viewingAs')}</p>
<small>Locale: {locale}</small>
</div>
)
}
```
To add or customize translations, edit the JSON files under `src/i18n/locales/` (e.g., `en.json`, `nl.json`).
## 🚨 Troubleshooting
### Common Issues
#### Toolbar Not Showing
- **Check environment**: Ensure `PREPR_ENV=preview` is set
- **Verify GraphQL URL**: Make sure `PREPR_GRAPHQL_URL` is correct and follows the format `https://graphql.prepr.io/YOUR_ACCESS_TOKEN`
- **Check token permissions**: Ensure "Enable edit mode" is checked in Prepr
#### Headers Not Working
- **Middleware setup**: Verify middleware is properly configured
- **API calls**: Ensure you're using `getPreprHeaders()` in your API calls
- **Environment**: Check that environment variables are loaded
#### TypeScript Errors
- **Version compatibility**: Ensure you're using compatible versions of Next.js and React
- **Type imports**: Import types from `@preprio/prepr-nextjs/types`
#### Build Issues
- **CSS imports**: Make sure to import the CSS file in your layout
- **Server components**: Ensure server functions are only called in server components
### Error Handling
The package includes comprehensive error handling:
```typescript
import { PreprError } from '@preprio/prepr-nextjs/server'
try {
const segments = await getPreprEnvironmentSegments(process.env.PREPR_GRAPHQL_URL!)
} catch (error) {
if (error instanceof PreprError) {
console.log('Error code:', error.code)
console.log('Context:', error.context)
}
}
```
### Debug Mode
Enable debug logging in development:
```typescript
<PreprToolbarProvider
props={toolbarProps}
options={{ debug: true }}
>
```
## 📊 How It Works
### Middleware Functionality
The middleware automatically:
1. **Generates customer IDs**: Creates unique visitor identifiers
2. **Tracks UTM parameters**: Captures marketing campaign data
3. **Manages segments**: Handles audience segmentation
4. **Processes A/B tests**: Manages variant assignments
5. **Sets headers**: Adds necessary headers for API calls
### Toolbar Features
The toolbar provides:
- **Segment selection**: Switch between different audience segments
- **A/B testing**: Toggle between variants A and B
- **Edit mode**: Visual content editing capabilities
- **Reset functionality**: Clear personalization settings
### Visual Editing
When edit mode is enabled, the package:
1. **Scans content**: Identifies editable content using Stega encoding
2. **Highlights elements**: Shows proximity-based highlighting
3. **Provides overlays**: Click-to-edit functionality
4. **Syncs with Prepr**: Direct integration with Prepr's editing interface
#### Fixing Styling Issues with Editable Fields
If the styling of editable fields is incorrect (e.g., text breaking out of its container), you can use the `data-prepr-edit-target` attribute to hide the encoded data in a hidden span. This is particularly useful when elements have `letter-spacing` set in CSS or are inside a `<ReactWrapBalancer>`.
**Install the required package** (if not already installed):
```bash
npm install @vercel/stega
```
**Example usage:**
```typescript
import { vercelStegaSplit } from '@vercel/stega';
function MyComponent({ text }) {
const { cleaned, encoded } = vercelStegaSplit(text);
return (
<h1 data-prepr-edit-target>
{cleaned}
<span style={{ display: 'none' }}>{encoded}</span>
</h1>
);
}
```
The stega scan will automatically detect elements with `data-prepr-edit-target` and look for encoded data in hidden spans within them. The element itself (not the hidden span) will be marked as editable and highlighted correctly.
**Note:** The hidden span should have `display: none` or `visibility: hidden` set via inline styles or CSS. The scan will detect these hidden spans and extract the encoded data to mark the parent element correctly.
## 🔄 Upgrading from v1 to v2
If you're upgrading from v1, please follow the [Upgrade Guide](./UPGRADE_GUIDE.md) for detailed migration instructions.
## 📜 License
MIT License - see the [LICENSE](./LICENSE) file for details.
## 🆘 Support
- **Documentation**: [Prepr Documentation](https://docs.prepr.io)
- **Issues**: [GitHub Issues](https://github.com/preprio/prepr-nextjs/issues)
- **Support**: [Prepr Support](https://prepr.io/support)