@mj-studio/react-native-naver-map
Version:
Naver Map Component for React Native
668 lines (530 loc) • 25.1 kB
Markdown
<p align="center">
<a href="https://mym0404.github.io/react-native-naver-map/">
<img width="160px" src="https://raw.githubusercontent.com/mym0404/image-archive/master/202404241422605.webp"><br/>
</a>
<h1 align="center">React Native Naver Map</h1>
<p align="center">
<a href="https://www.npmjs.com/package/@mj-studio/react-native-naver-map"><img src="https://img.shields.io/npm/dm/@mj-studio/react-native-naver-map.svg?style=flat-square" alt="NPM downloads"></a>
<a href="https://www.npmjs.com/package/@mj-studio/react-native-naver-map"><img src="https://img.shields.io/npm/v/@mj-studio/react-native-naver-map.svg?style=flat-square" alt="NPM version"></a>
<img src="https://img.shields.io/badge/Android_SDK-3.21.0-2ea44f?style=flat-square" alt="Android SDK version">
<img src="https://img.shields.io/badge/iOS_SDK-3.21.0-3522ff?style=flat-square" alt="iOS SDK version">
<a href="/LICENSE"><img src="https://img.shields.io/npm/l/@mj-studio/react-native-naver-map.svg?style=flat-square" alt="License"></a>
<h3 align="center">Bring Naver Map to Your React Fingertips</h3>
</p>
</p>
- [README English](/README-en.md)
- [Documentation](https://mym0404.github.io/react-native-naver-map/interfaces/NaverMapViewProps.html)
- [Tutorial 1 - 설치, 키 발급](https://medium.com/mj-studio/%EB%A6%AC%EC%95%A1%ED%8A%B8-%EB%84%A4%EC%9D%B4%ED%8A%B8%EB%B8%8C%EB%A1%9C-%EB%84%A4%EC%9D%B4%EB%B2%84-%EC%A7%80%EB%8F%84-%EA%B5%AC%ED%98%84%ED%95%98%EA%B8%B0-1-%EC%84%A4%EC%B9%98%EC%99%80-%ED%82%A4-%EB%B0%9C%EA%B8%89-%EB%B0%9B%EA%B8%B0-f826d8c0644d)
- [Tutorial 2 - 카메라, 위치 이동](https://medium.com/mj-studio/%EB%A6%AC%EC%95%A1%ED%8A%B8-%EB%84%A4%EC%9D%B4%ED%8A%B8%EB%B8%8C%EB%A1%9C-%EB%84%A4%EC%9D%B4%EB%B2%84-%EC%A7%80%EB%8F%84-%EA%B5%AC%ED%98%84%ED%95%98%EA%B8%B0-2-%EC%B9%B4%EB%A9%94%EB%9D%BC-%EC%9C%84%EC%B9%98-%EC%9D%B4%EB%8F%99%ED%95%98%EA%B8%B0-ea39843b31d2)
<img src="https://raw.githubusercontent.com/mym0404/image-archive/master/202404240329848.gif" width="400" alt="preview">
> ![IMPORTANT]
> `2.4.x` 버전부터 [AI NAVER API에서 제공되던 지도 API가 아닌 새롭게 출시된 Maps 단독 상품](https://www.ncloud.com/support/notice/all/1930?searchKeyword=map&page=1)이 지원됩니다.
## Highlights
### 1. New Architecture Fabric
Support Table
| React Native Naver Map | React Native | Note |
|------------------------|-------------------------------------|-------------------------------------------------------------------------------------------------------------------------------------------------------------------------------|
| ≥`2.1.0` | ≥ `0.74` | Drop Bridge Support & `0.74` required |
| ≥`2.x` | New Architecture Only | Drop Old Architecture Support, [**You should turn off bridgeless if want to render http web image marker**](https://github.com/mym0404/react-native-naver-map/discussions/72) |
| <`2.x` | Old Architecture + New Architecture | |
> [!IMPORTANT]
> `2.x`버전부턴 New Architecture에서만 동작합니다. Fabric을 활성화하지 않은 프로젝트에서는 `1.x` 버전을 사용하시면 됩니다. 자잘한 기능 말고 차이나는 부분은 없고 `1.x`버전에서도 충분히 필요한 기능들로 지도앱을 구축할 수 있습니다.
### 2. Detailed API Documentation
거의 모든 타입이 설명되어 있는 [API Docs](https://mym0404.github.io/react-native-naver-map/interfaces/NaverMapViewProps.html)를 구성했습니다.
최대한 가독성을 살렸으며 `component` 쪽에서 원하는 컴포넌트의 타입과 `Prop`및 `Ref`로 사용법을 확인 가능합니다.
### 3. Expo Support
[expo config plugin](https://docs.expo.dev/modules/config-plugin-and-native-module-tutorial/)을 사용해
Expo환경에서도 손쉽게 아키텍쳐에 상관없이 빌드할 수 있습니다.
Expo Go, Snack에선 사용하지
못하지만 [development build](https://docs.expo.dev/develop/development-builds/introduction/), production
환경에서 손쉽게 사용할 수 있습니다.
### 4. Marker Performance + Variants
> [!IMPORTANT]
> `[iOS, Android] x [new arch, old arch] x [debug, release]`
> **총 8가지 조건에서 모두 정상적으로 렌더링 되는 것을 테스트했습니다.**
- 네이버 맵 제공 기본 심볼 (`symbol`)
- React Native프로젝트의 로컬 이미지 리소스
- 성능 최적화를 위한 네이티브 프로젝트의 로컬 이미지 리소스 - Android(Drawable), iOS(Bundle Asset)
- HTTP 네트워크 웹이미지
- `children`으로 전달하는 React Native Custom View
### 5. Seamless API porting from Native Naver Map SDK
최신 버전의 SDK를 지원하며 Props와 Command들로 Naver Map의 최신 기능을 조작할 수 있습니다.
## Install
```shell
# npm
npm install --save @mj-studio/react-native-naver-map
# yarn
yarn add @mj-studio/react-native-naver-map
# expo
npx expo install @mj-studio/react-native-naver-map
```
For ios, you should install pods
### Android
더 자세한 설정은 [공식 문서](https://navermaps.github.io/android-map-sdk/guide-ko/1.html)를 참고해주세요.
#### 1. Maven repository import
Import Naver SDK Maven Repository to `android/build.gradle`.
```groovy
allprojects {
repositories {
maven {
url "https://repository.map.naver.com/archive/maven"
}
}
}
```
#### 2. Add Naver SDK key to `AndroidManifest.xml`
```xml
<manifest>
<application>
<meta-data
android:name="com.naver.maps.map.NCP_KEY_ID"
android:value="YOUR_CLIENT_ID_HERE" />
<!-- (legacy) 4월 17일 이전에 AI NAVER API를 사용하던 지도 API 고객 전용 -->
<!-- https://www.ncloud.com/support/notice/all/1930?searchKeyword=map&page=1 -->
<meta-data
android:name="com.naver.maps.map.CLIENT_ID"
android:value="YOUR_CLIENT_ID_HERE" />
</application>
</manifest>
```
#### 3. (Optional) Request location permission to `AndroidManifest.xml`
Currently, this package will request location permission for showing user's current location.
```xml
<manifest>
<uses-permission android:name="android.permission.ACCESS_FINE_LOCATION" />
<uses-permission android:name="android.permission.ACCESS_COARSE_LOCATION" />
# optional for background location
<uses-permission android:name="android.permission.ACCESS_BACKGROUND_LOCATION" />
</manifest>
```
자세한 권한에 관련된 내용은 [아래](#permission)에 기재되어있습니다.
### iOS
더 자세한 설정은 [공식 문서](https://navermaps.github.io/ios-map-sdk/guide-ko/1.html)를 참고해주세요.
#### 1. Set Naver SDK key to `info.plist`
```xml
<?xml version="1.0" encoding="UTF-8"?>
<!DOCTYPE plist PUBLIC "-//Apple//DTD PLIST 1.0//EN" "http://www.apple.com/DTDs/PropertyList-1.0.dtd">
<plist version="1.0">
<dict>
<key>NMFNcpKeyId</key>
<string>YOUR_CLIENT_ID_HERE</string>
<!-- (legacy) 2025.04.17 이전에 AI NAVER API를 사용하던 지도 API 고객 전용 -->
<!-- https://www.ncloud.com/support/notice/all/1930?searchKeyword=map&page=1 -->
<key>NMFClientId</key>
<string>YOUR_CLIENT_ID_HERE</string>
<dict>
<plist>
```
#### 2. (Optional) Set location permission usage description to `info.plist`
Currently, this package will request location permission for showing user's current location.
```xml
<plist version="1.0">
<dict>
<key>NSLocationAlwaysAndWhenInUseUsageDescription</key>
<string>{{usage description}}</string>
<key>NSLocationTemporaryUsageDescriptionDictionary</key>
<dict>
<key>{{your purpose key}}</key>
<string>{{usage description}}</string>
</dict>
<key>NSLocationWhenInUseUsageDescription</key>
<string>{{usage description}}</string>
</dict>
</plist>
```
자세한 권한에 관련된 내용은 [아래](#permission)에 기재되어있습니다.
### Expo
#### 1. Add `expo-build-properties` package
This is for inject naver maven repository.
```shell
npx expo install expo-build-properties
```
#### 2. Add Config Plugin into `app.json`
```json
{
...
"plugins": [
[
"@mj-studio/react-native-naver-map",
{
"client_id": "{{Naver Map Client Key}}",
// (optional, you can set with expo-location instead of this package)
"android": {
"ACCESS_FINE_LOCATION": true,
"ACCESS_COARSE_LOCATION": true,
"ACCESS_BACKGROUND_LOCATION": true
},
// (optional, you can set with expo-location instead of this package)
"ios": {
"NSLocationAlwaysAndWhenInUseUsageDescription": "{{ your location usage description }}",
"NSLocationWhenInUseUsageDescription": "{{ your location usage description }}",
"NSLocationTemporaryUsageDescriptionDictionary": {
"purposeKey": "{{ your purpose key }}",
"usageDescription": "{{ your location usage description }}"
}
}
}
],
[
"expo-build-properties",
{
"android": {
"extraMavenRepos": ["https://repository.map.naver.com/archive/maven"]
}
}
],
...
]
}
```
Expo는 위에서 설명된 Android, iOS의 설정법이 필요하지 않습니다.
자세한 권한에 관련된 내용은 [아래](#permission)에 기재되어있습니다.
## Example
```tsx
const jejuRegion: Region = {
latitude: 33.20530773,
longitude: 126.14656715029,
latitudeDelta: 0.38,
longitudeDelta: 0.8,
};
...
<NaverMapView
ref={ref}
style={{ flex: 1 }}
mapType={mapType}
layerGroups={{
BUILDING: true,
BICYCLE: false,
CADASTRAL: false,
MOUNTAIN: false,
TRAFFIC: false,
TRANSIT: false,
}}
initialRegion={jejuRegion}
isIndoorEnabled={indoor}
symbolScale={symbolScale}
lightness={lightness}
isNightModeEnabled={nightMode}
isShowCompass={compass}
isShowIndoorLevelPicker={indoorLevelPicker}
isShowScaleBar={scaleBar}
isShowZoomControls={zoomControls}
isShowLocationButton={myLocation}
isExtentBoundedInKorea
logoAlign={'TopRight'}
locale={'ja'}
onInitialized={() => console.log('initialized!')}
onOptionChanged={() => console.log('Option Changed!')}
onCameraChanged={(args) => console.log(`Camera Changed: ${formatJson(args)}`)}
onTapMap={(args) => console.log(`Map Tapped: ${formatJson(args)}`)}
>
<NaverMapMarkerOverlay
latitude={33.3565607356}
longitude={126.48599018}
onTap={() => console.log(1)}
anchor={{ x: 0.5, y: 1 }}
caption={{
key: '1',
text: 'hello',
}}
subCaption={{
key: '1234',
text: '123',
}}
width={100}
height={100}
/>
{/* Not Working in iOS Old Architecture Yet */}
<NaverMapMarkerOverlay*
latitude={33.4165607356}
longitude={126.48599018}
onTap={() => console.log(1)}
anchor={{ x: 0.5, y: 1 }}
caption={{
key: '1',
text: 'hello',
}}
subCaption={{
key: '1234',
text: '123',
}}
width={100}
height={100}
>
<View style={{ width: 100, height: 100, backgroundColor: 'red' }} />
</NaverMapMarkerOverlay>
<NaverMapMarkerOverlay
latitude={33.2565607356}
longitude={127.8599018}
onTap={() => console.log(1)}
anchor={{ x: 0.5, y: 1 }}
caption={{
key: '1',
text: 'hello',
}}
subCaption={{
key: '1234',
text: '123',
}}
width={100}
height={100}
image={{ uri: 'https://picsum.photos/100/100' }}
/>
<NaverMapCircleOverlay
latitude={33.17827398}
longitude={126.349895729}
radius={50000}
color={'#f2f1'}
outlineColor={'#aaa'}
outlineWidth={2}
onTap={() => console.log('hi')}
/>
<NaverMapPolygonOverlay
outlineWidth={5}
outlineColor={'#f2f2'}
color={'#0068'}
coords={[
{ latitude: 33.2249594, longitude: 126.54180047 },
{ latitude: 33.25683311547, longitude: 126.18193 },
{ latitude: 33.3332807, longitude: 126.838389399 },
]}
/>
<NaverMapPathOverlay
coords={[
{ latitude: 33.5249594, longitude: 126.24180047 },
{ latitude: 33.25683311547, longitude: 126.18193 },
{ latitude: 33.3332807, longitude: 126.838389399 },
]}
width={8}
color={'red'}
progress={-0.6}
passedColor={'green'}
/>
</NaverMapView>
```
## Usage
### API Documentation
[Documentation](https://mym0404.github.io/react-native-naver-map/interfaces/NaverMapViewProps.html)
모든 코드엔 JSDoc으로 주석이 삽입되어있으므로 Documentation없이도 개발을 시작할 수 있습니다.
하지만 정확히 어떤 타입들이 있고 어떤 속성을 의미하는지 웹사이트에서 확인하시려면 [Documentation](https://mym0404.github.io/react-native-naver-map/interfaces/NaverMapViewProps.html)를 참고해주세요.
### Permission
기본적으로 앱에서 권한은 직접 관리가 되어야 합니다.
이를 관리하기 위해 [react-native-permissions](https://github.com/zoontek/react-native-permissions)라이브러리를 사용하는 예시를 알아보겠습니다.
>[!TIP]
>Expo 사용자라면 [expo-location](https://docs.expo.dev/versions/latest/sdk/location/)를 참고해서 권한을 사용할 예정이다 라고 명시할 수 있습니다.
>따라서 아래 내용들 중 대부분은 필요하지 않고, 필요한 권한이 무엇인지, 어떻게 명시해야 하는지를 살펴보신 다음 [expo-location](https://docs.expo.dev/versions/latest/sdk/location/)에서의 사용법을 따르셔야 합니다.
우선 패키지를 설치하고 설정합니다.
```shell
yarn add react-native-permissions
```
`react-native-permission`의 각 플랫폼별 설정 방법은 [사용법](https://github.com/zoontek/react-native-permissions#setup)을 직접 참고해
`Podfile(iOS)`, `AndroidManifest.xml(Android)` 를 적절히 변경해주시길 바랍니다.
#### iOS
iOS는 다음과 같은 세 가지의 권한이 연관되어있습니다.
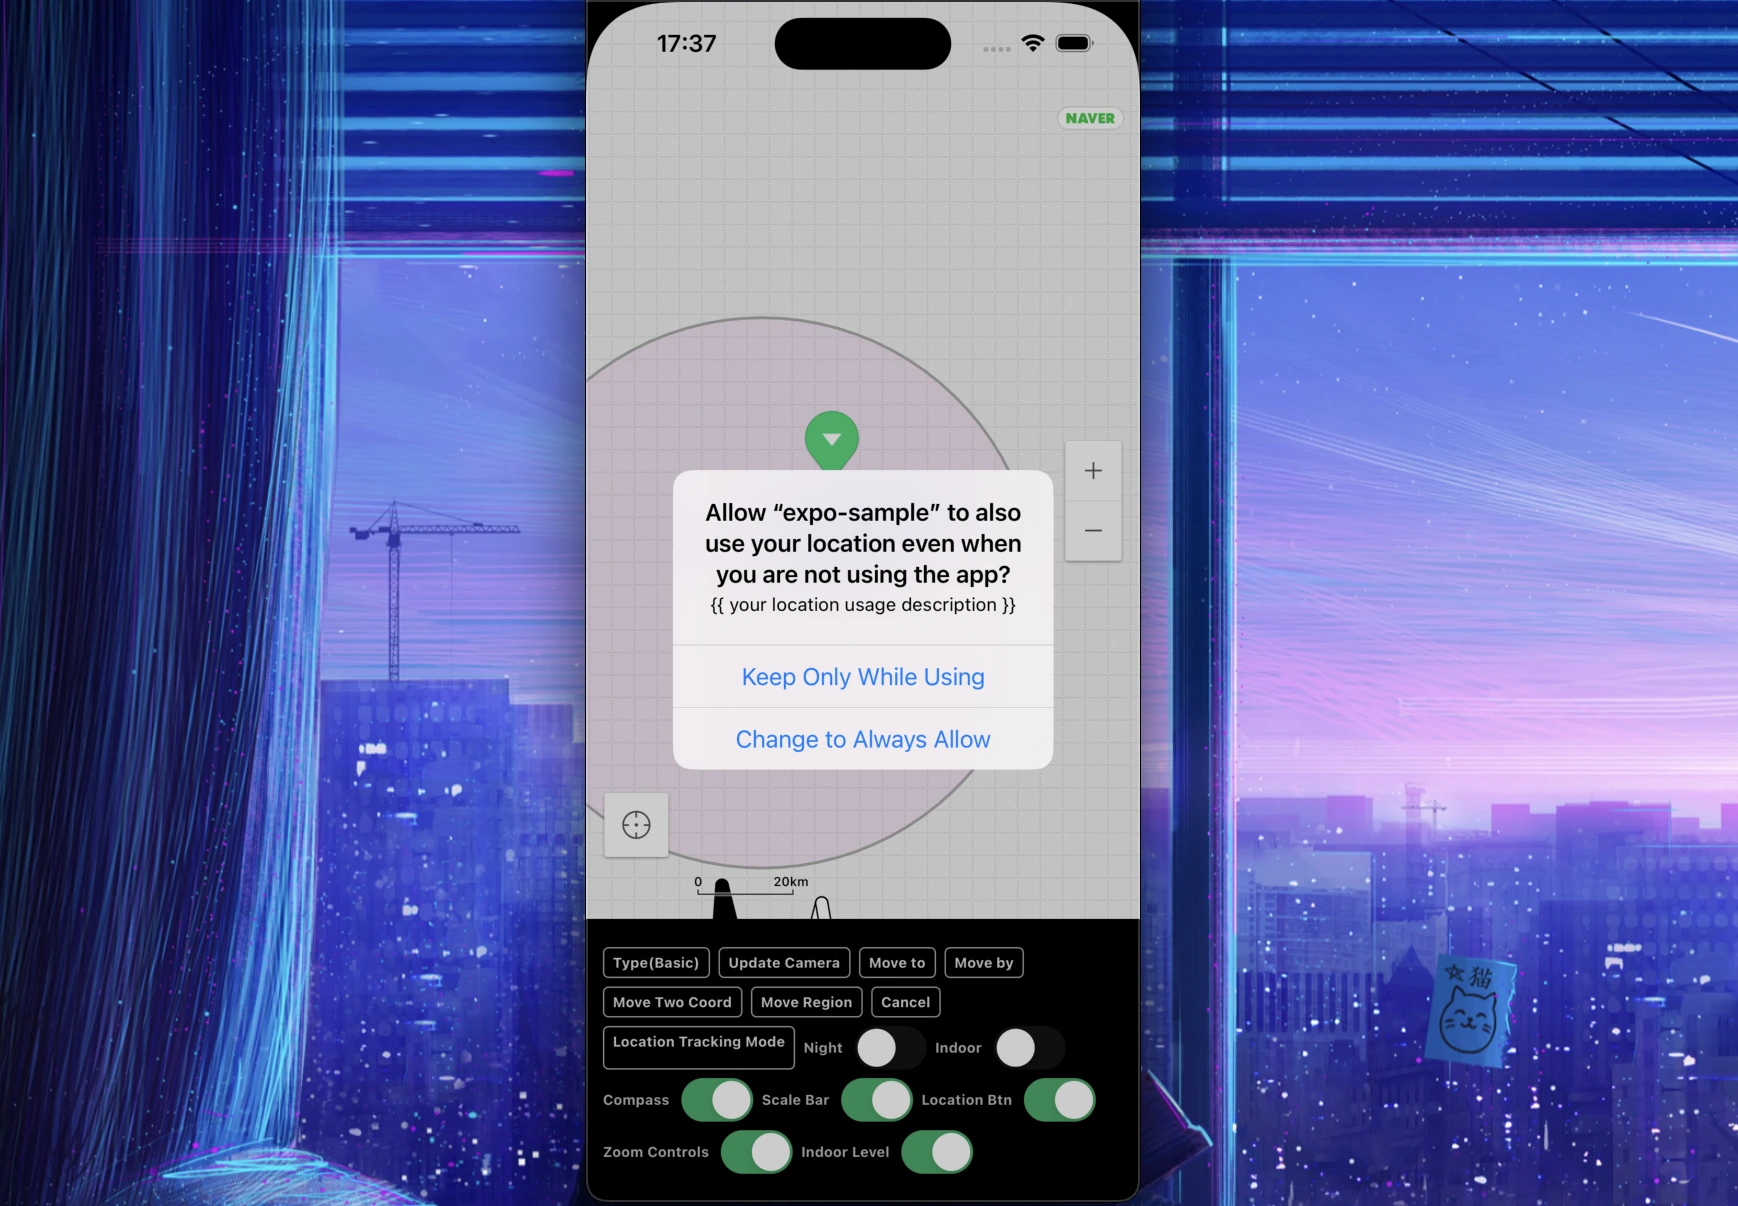
- `NSLocationAlwaysAndWhenInUseUsageDescription(>= iOS 11)`
- 앱이 foreground와 background 모두에서 위치 정보에 액세스하는 것을 허용합니다.
- iOS 11 이상에서는 NSLocationAlwaysUsageDescription 대신 이 키를 사용해야 합니다.
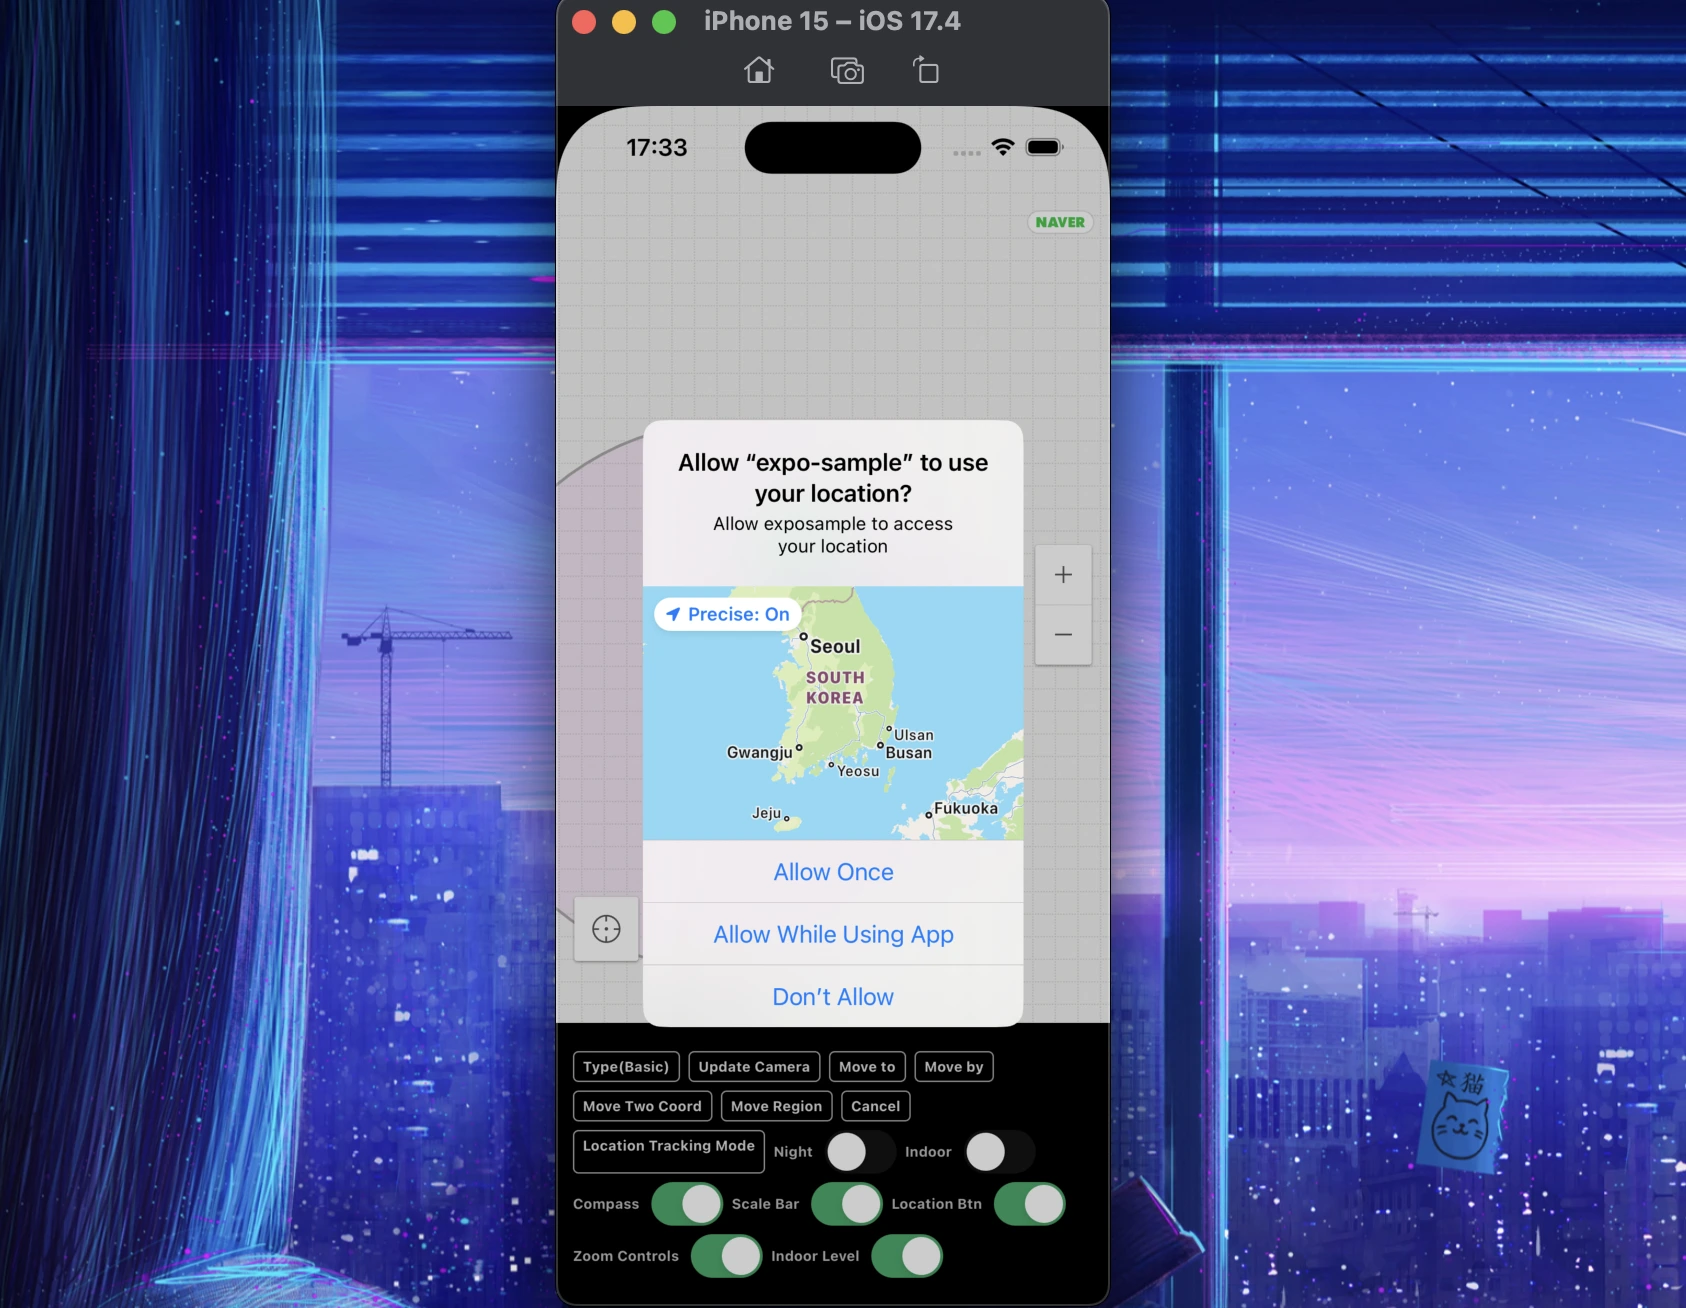
- `NSLocationWhenInUseUsageDescription`
- 앱이 foreground에 있을 때 (즉, 사용자가 actively하게 앱을 사용 중일 때) 위치 정보에 액세스하는 것을 허용합니다.
- `NSLocationTemporaryUsageDescriptionDictionary(>= iOS 14)`
- 앱이 임시로 정확한 위치 정보에 액세스할 수 있도록 허용합니다. 이는 앱이 특정 작업을 수행하는 동안에만 정확한 위치가 필요한 경우 사용됩니다.
>[!TIP]
>앱이 iOS 11미만의 기기를 지원하고 있지 않다면 `NSLocationAlwaysUsageDescription`을 기재하지 않아도 됩니다.
>만약 지원한다면 같이 설정해주셔야 합니다.
그럼 `Podfile`에서 다음과 같은 세 가지의 권한을 허용해줍니다.
```ruby
setup_permissions([
'LocationAccuracy',
'LocationAlways',
'LocationWhenInUse',
...
])
```
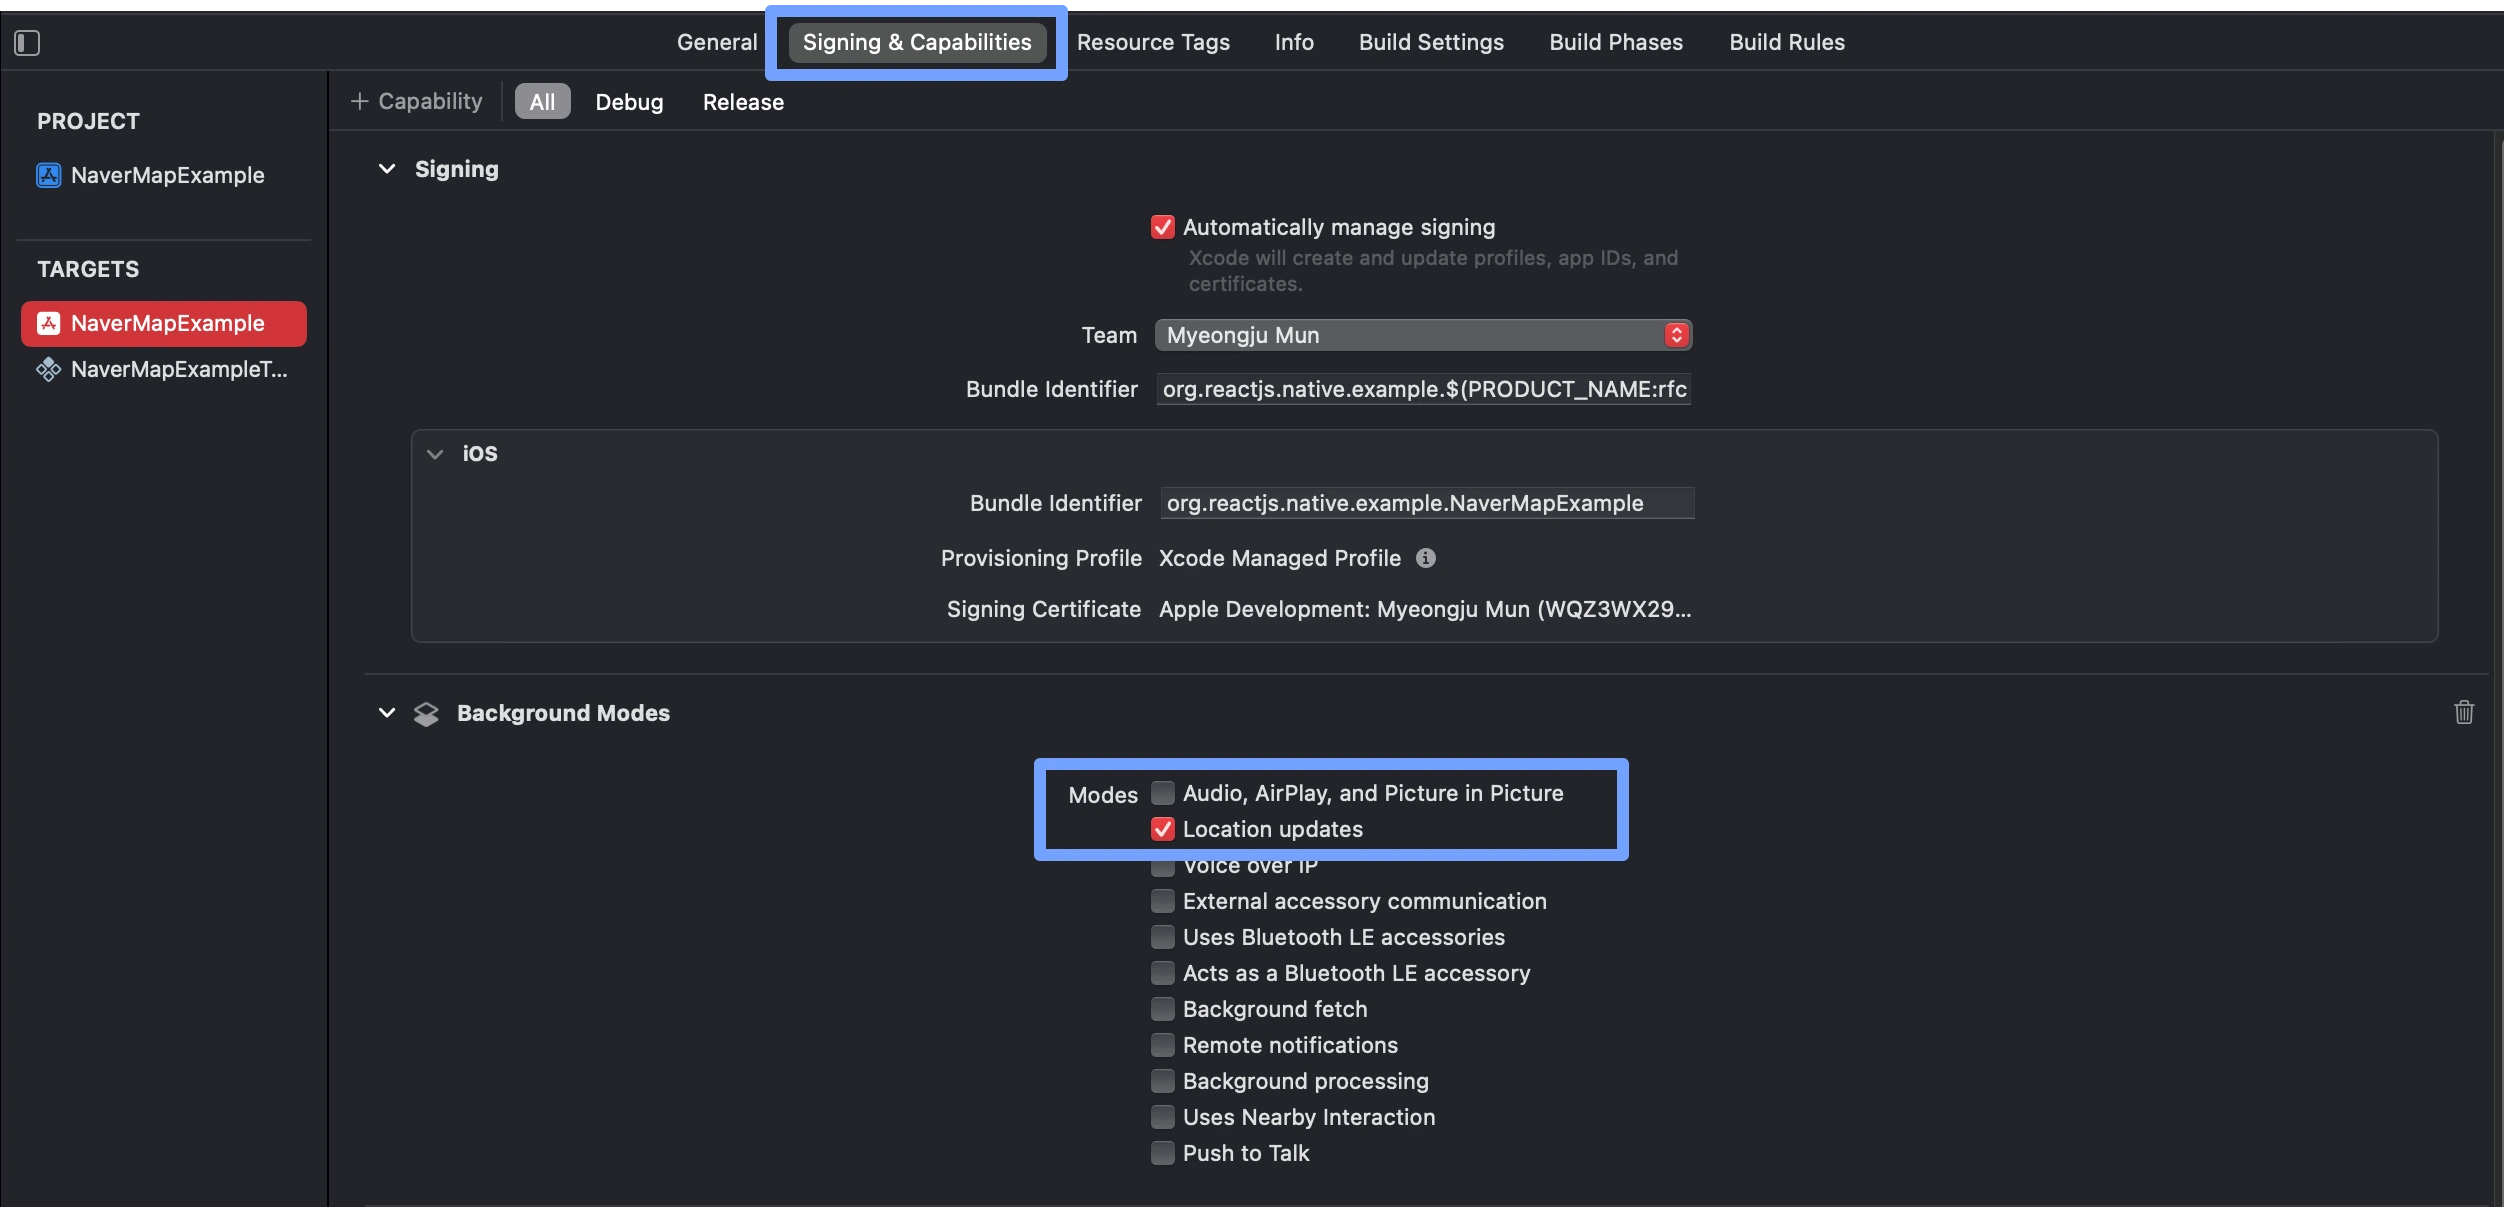
Xcode에서 앱 타겟의 `Signing & Capabilities` 탭에서 `Background Modes`를 활성화하고 `Location updates`옵션을 선택합니다.
이는 백그라운드에서 위치를 받아오기 위해 필요하므로 필요없다면 설정하지 않아도 됩니다.
#### Android
Naver Map SDK에서 내부적으로 이용하는 `FusedLocationSource`는 사용자가 [isShowLocationButton prop](https://mym0404.github.io/react-native-naver-map/interfaces/NaverMapViewProps.html#isShowLocationButton)을
`true`로 설정하는 순간 자동으로 권한 요청을 시행합니다.
Android는 비교적 간단하게 권한을 구현할 수 있습니다.
아래 권한들만 `AndroidManifest.xml`에 사용한다고 명시하면 됩니다.
- `android.permission.ACCESS_FINE_LOCATION`
- 정확한 위치 정보 권한
- `android.permission.ACCESS_COARSE_LOCATION`
- 대략적인 위치 정보 권한
- `android.permission.ACCESS_BACKGROUND_LOCATION`
- 백그라운드 상태에서 위치 정보 권한
#### 코드에서의 권한 요청
여기까지의 설정이 끝났다면 지도가 필요한 화면에서 다음과 같이 코드로 권한을 요청할 수 있습니다.
For Bare RN Project or ejected Expo (`react-native-permissions`)
```tsx
// useEffect는 단순히 컴포넌트가 mount될 때 호출해주기 위해서 사용되었습니다.
useEffect(() => {
if (Platform.OS === 'ios') {
request(PERMISSIONS.IOS.LOCATION_ALWAYS).then((status) => {
console.log(`Location request status: ${status}`);
if (status === 'granted') {
requestLocationAccuracy({
purposeKey: 'common-purpose', // replace your purposeKey of Info.plist
})
.then((accuracy) => {
console.log(`Location accuracy is: ${accuracy}`);
})
.catch((e) => {
console.error(`Location accuracy request has been failed: ${e}`);
});
}
});
}
if (Platform.OS === 'android') {
requestMultiple([
PERMISSIONS.ANDROID.ACCESS_FINE_LOCATION,
PERMISSIONS.ANDROID.ACCESS_BACKGROUND_LOCATION,
])
.then((status) => {
console.log(`Location request status: ${status}`);
})
.catch((e) => {
console.error(`Location request has been failed: ${e}`);
});
}
}, []);
```
For Expo (`expo-location`)
```tsx
import * as Location from 'expo-location'
...
useEffect(() => {
(async () => {
try {
const {granted} = await Location.requestForegroundPermissionsAsync();
/**
* Note: Foreground permissions should be granted before asking for the background permissions
* (your app can't obtain background permission without foreground permission).
*/
if(granted) {
await Location.requestBackgroundPermissionsAsync();
}
} catch(e) {
console.error(`Location request has been failed: ${e}`);
}
})();
}, []);
```
## Components
> [!NOTE]
> 대부분의 Type들과 Prop들의 설명은 코드의 주석에도 적혀있고 이 프로젝트는 TypeScript를 지원하니 코드에서만 확인해도 사용에 무리가 없을 것입니다.
- ✅ Fully Supported
- ⚠️ Developing, lack of features yet
- 📦 Planned
| Component | iOS | Android | Description |
|-----------------------------------------------------------------------------------------------|-----|---------|---------------|
| [NaverMapView](https://navermaps.github.io/android-map-sdk/guide-ko/2-3.html) | ✅ | ✅ | 지도 |
| [NaverMapMarkerOverlay](https://navermaps.github.io/android-map-sdk/guide-ko/5-2.html) | ✅ | ✅ | 마커 오버레이 |
| [Info Window](https://navermaps.github.io/android-map-sdk/guide-ko/5-3.html) | 📦 | 📦 | 오버레이의 콜오버, 툴팁 |
| [NaverMapCircleOverlay](https://navermaps.github.io/android-map-sdk/guide-ko/5-4.html) | ✅ | ✅ | 원 오버레이 |
| [NaverMapPolylineOverlay](https://navermaps.github.io/android-map-sdk/guide-ko/5-4.html) | ✅ | ✅ | 폴리라인 오버레이 |
| [NaverMapPolygonOverlay](https://navermaps.github.io/android-map-sdk/guide-ko/5-4.html) | ✅ | ✅ | 폴리곤 |
| [NaverMapGroundOverlay](https://navermaps.github.io/android-map-sdk/guide-ko/5-6.html) | ✅ | ✅ | 지상 오버레이 |
| [NaverMapPathOverlay](https://navermaps.github.io/android-map-sdk/guide-ko/5-7.html) | ✅ | ✅ | 경로 오버레이 |
| [NaverMapMultipartPathOverlay](https://navermaps.github.io/android-map-sdk/guide-ko/5-7.html) | 📦 | 📦 | 여러개의 경로 오버레이 |
| [NaverMapArrowPathOverlay](https://navermaps.github.io/android-map-sdk/guide-ko/5-7.html) | ✅ | ✅ | 화살표 경로 오버레이 |
## 마커 이미지의 종류와 성능
마커의 종류는 총 5가지입니다.
> [!IMPORTANT]
> `[iOS, Android] x [new arch, old arch] x [debug, release]`
> **총 8가지 조건에서 모두 정상적으로 렌더링 되는 것을 테스트했습니다.**
> [!TIP]
> `reuseIdentifier`는 전달하지 않아도 모두 자동으로 캐싱이 됩니다.
>
> 되도록이면 마커는 모두 `width`, `height` prop을 사용해야합니다. 2번 타입의 경우 현재 debug/release 빌드의 크기가 `width`, `height`없이 다르게 나오는 현상이 있습니다.
> release에서는 제대로 나옵니다.
1. Naver Map Basic Symbol (green, red, gray, ...) (caching ✅)
```js
image={{symbol: 'green'}}
```
2. Local Resource (`require` react native image file) (caching ✅)
```js
image={require('./marker.png')}
```
3. Local Native Resource
```js
image={{assetName: 'asset_image'}}
```
- iOS: main bundle의 image asset 이름
- Android: resources의 drawable 이름
4. Network Image (caching ✅)
```js
image={{httpUri: 'https://example.com/image.png'}}
```
> [!WARNING]
> 현재 header같은 속성은 지원되지 않습니다.
5. Custom React View (caching ❌)
iOS(new arch)에선 현재 View들에 `collapsable=false`를 설정해야 동작합니다.
> [!TIP]
> 마커의 생김새를 바꿔야 한다면 그것에 대한 의존성들을 제일 상위 자식의 `key`로 전달해야합니다.
```tsx
<NaverMapMarkerOverlay width={width} height={height} ...>
<View key={`${text}/${width}/${height}`} collapsable={false} style={{width, height}}>
<Text>{text}</Text>
</View>
</NaverMapMarkerOverlay>
```
> [!IMPORTANT]
> 이 타입은 많이 생성될 시 성능에 굉장히 영향을 미칠 수 있습니다.
> 아직은 단순하게만 사용하시거나 되도록이면 이미지를 사용하는 것을 추천드립니다.
현재 이 타입은 Android에선 `react-native-map`의 구현체를 비슷하게 가져와 React Native의 Shadow Node를 조금 커스텀해서 자식의 위치를
추적한다음 실제 Android의 `View`를 삽입해줍니다.
iOS에선 단순히 `UIView`를 `UIImage`로 캔버스에 그려 표시해줍니다.
두 방법 모두가 이미지 캐싱이 아직 지원되지 않고(추후에 `reuseableIdentifier`같은 속성으로 지원이 가능할 것으로 보입니다), 마커 하나당 많은 리소스를 차지하게 됩니다.
## TODO - Props & Commands
- ✅ Done
- 📦 Planned
- ❓ Maybe Planned
- ❌ Not Planned
### `NaverMapView`
#### Props
| Prop | iOS | Android |
|--------------------------|-----|---------|
| isLogoInteractionEnabled | ❌ | ❌ |
| gestureFrictions | 📦 | 📦 |
#### Events
| Event | iOS | Android |
|------------------|-----|---------|
| onTapSymbol | 📦 | 📦 |
| onAuthFailed | ❌ | ❌ |
| onLocationChange | 📦 | 📦 |
### Marker Common
#### Events
| | iOS | Android |
|-----------|-----|---------|
| onLongTap | ❌ | 📦 |
### `NaverMapMarkerOverlay`
#### Props
| Prop | iOS | Android |
|---------------------------|----------------------------------------------------|---------|
| caption-fontFamily | ❓ | ❓ |
| subcaption-fontFamily | ❓ | ❓ |
## Milestone
- [x] Project Started (23.04.01)
- [x] Project Setup & Component Structure (23.04.03)
- [x] General Props & Commands (23.04.05)
- [x] Camera, Region, Commands, Events (23.04.07)
- [x] Implement Basic Overlays (23.04.10)
- [x] Location Service (23.04.10)
- [x] Support Paper(Old Arch) (23.04.11)
- [x] Release (23.04.11)
- [x] Support Expo with config plugin (23.04.12)
- [x] Docs
- [x] Implement Clustering (23.04.24)
- [x] Implement ArrowheadPath Overlay (23.05.01)
- [x] Implement Ground Overlay (23.05.01)
- [ ] Implement Location Overlay Commands <- 🔥
- [ ] Implement MutlPath Overlay <- 🔥
## Contributing
See the [contributing guide](CONTRIBUTING.md) to learn how to contribute to the repository and the
development workflow.
## License
MIT