@matsukky/node_characterai
Version:
Unofficial Character AI wrapper for node.
181 lines (127 loc) • 10.4 kB
Markdown
# Character AI Unofficial Node API
> Node.js client for the unofficial [Character AI API](https://character.ai/), an awesome website which brings characters to life with AI!
## Intro
This repository is a fork of the [Coloride's characterai repo](https://github.com/realcoloride/node_characterai), itself inspired by [RichardDorian's unofficial node API](https://github.com/RichardDorian/node-character.ai/). I pretty maniac of depedencies errors and doesn't need image scrapping for my projects.
**This project is not affiliated with Character AI in any way! It is a community project.**
The purpose of this project is to bring and build projects powered by Character AI.
If you like this project, please check their [website](https://character.ai/).
## Features
* 👍 Fully written in Javascript and CommonJS (for max compatibility and ease of use)
* ⌚ Asynchronous requests
* 🗣️ Use conversations or use the API to fetch information
* 🧸 Easy to use
* 🔁 Active development
* 👤 Guest & token login support
## Installation
```bash
npm install @matsukky/node_characterai
```
## Usage
Basic guest authentication and message:
```javascript
const CharacterAI = require("@matsukky/node_characterai");
const characterAI = new CharacterAI();
(async () => {
// Authenticating as a guest (use `.authenticateWithToken()` to use an account)
await characterAI.authenticateAsGuest();
// Place your character's id here
const characterId = "8_1NyR8w1dOXmI1uWaieQcd147hecbdIK7CeEAIrdJw";
// Create a chat object to interact with the conversation
const chat = await characterAI.createOrContinueChat(characterId);
// Send a message
const response = await chat.sendAndAwaitResponse("Hello discord mod!", true);
console.log(response);
// Use `response.text` to use it as a string
})();
```
## Using an Access Token
Some parts of the API (like managing a conversation) require you to be logged in using a `sessionToken`.
To get it, you can open your browser, go to the [Character.AI website](https://character.ai) in `localStorage`.
---
### ⚠️ WARNING: DO NOT share your session token to anyone you do not trust or if you do not know what you're doing.
#### _Anyone with your session token could have access to your account without your consent. Do this at your own risk._
---
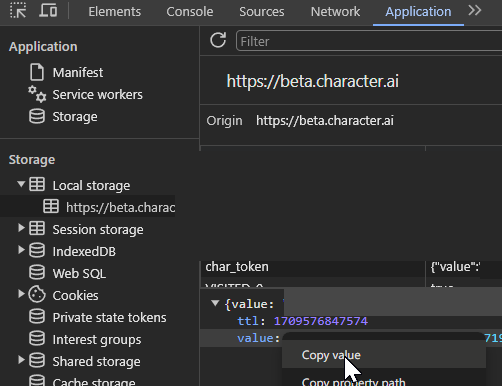
### On PC:
1. Open the Character.AI website in your browser (https://beta.character.ai)
2. Open the developer tools (<kbd>F12</kbd>, <kbd>Ctrl+Shift+I</kbd>, or <kbd>Cmd+J</kbd>)
3. Go to the `Application` tab
4. Go to the `Storage` section and click on `Local Storage`
5. Look for the `char_token` key
6. Open the object, right click on value and copy your session token.
### On Mobile (and PC in the devtools):
1. Open the Character.AI website in your browser on the OLD interface (https://old.character.ai/)
2. Open the URL bar, write `javascript:` (case sensitive) and paste the following:
```javascript
(function(){let e=window.localStorage["char_token"];if(!e){alert("You need to log in first!");return;}let t=JSON.parse(e).value;document.documentElement.innerHTML=`<div><i><p>provided by node_characterai - <a href="https://github.com/realcoloride/node_characterai?tab=readme-ov-file#using-an-access-token">click here for more information</a></p></i><p>Here is your session token:</p><input value="${t}" readonly><p><strong>Do not share this with anyone unless you know what you are doing! This is your personal session token. If stolen or requested by someone you don't trust, they could access your account without your consent; if so, please close the page immediately.</strong></p><button id="copy" onclick="navigator.clipboard.writeText('${t}'); alert('Copied to clipboard!')">Copy session token to clipboard</button><button onclick="window.location.reload();">Refresh the page</button></div>`;localStorageKey=null;storageInformation=null;t=null;})();
```
3. The following page should appear:

4. Click the respective buttons to copy your access token or id token to your clipboard.
---
When using the package, you can:
* Login as guest using `authenticateAsGuest()` - *for mass usage or testing purposes*
* Login with your account or a token using `authenticateWithToken()` - *for full features and unlimited messaging*
## Finding your character's ID
You can find your character ID in the URL of a Character's chat page.
For example, if you go to the chat page of the character `Discord Moderator` you will see the URL `https://beta.character.ai/chat?char=8_1NyR8w1dOXmI1uWaieQcd147hecbdIK7CeEAIrdJw`.
The last part of the URL is the character ID:

## Troubleshooting
|**Problem**|Answer|
|-------|------|
|❌ **Token was invalid**|Make sure your token is actually valid and you copied your entire token (its pretty long) or, you have not updated the package.|
|⚠️ **The specified Chromium path for puppeteer could not be located**|On most systems, puppeteer will automatically locate Chromium. But on certain distributions, the path has to be specified manually. This warning occurs if `node_characterai` could not locate Chromium on linux (*/usr/bin/chromium-browser*), and will error if puppeteer cannot locate it automatically. See [this](#specifying-chromiums-path) for a fix.|
|😮 **Why are chromium processes opening?**|This is because as of currently, the simple fetching is broken and I use puppeteer (a chromium browser control library) to go around cloudflare's restrictions.|
|👥 **`authenticateAsGuest()` doesn't work**|See issue [#14](https://github.com/realcoloride/node_characterai/issues/14).|
|🦒 **Hit the max amount of messages?**|Sadly, guest accounts only have a limited amount of messages before they get limited and forced to login. See below for more info 👇|
|🪐 **How to use an account to mass use the library?**|You can use **conversations**, a feature introduced in `1.0.0`, to assign to users and channels. **To reproduce a conversation, use OOC (out of character) to make the AI think you're with multiple people.** __See an example here:__  (Disclaimer: on some characters, their personality will make them ignore any OOC request). |
|🏃 **How do I avoid concurrency and crashes when using more than one request at a time?**|Check the solution found by @SeoulSKY [here](https://github.com/realcoloride/node_characterai/issues/157#issuecomment-2005709711) using `async-mutex`.|
|📣 **Is this official?**|No, this project is made by a fan of the website and is unofficial. *To support the developers, please check out [their website](https://beta.character.ai)*.|
|😲 **Did something awesome with `node_characterai`?**|Please let me know!|
|☕ **Want to support the orginal creator?**|You can send me a coffee on ko.fi: https://ko-fi.com/coloride.|
|💡 **Have an idea or find a issue?**|This is a little fork for remove image generation and not working h24 on it... I recomand you to open an issue in the [**Issues** of the orginial repo](https://github.com/realcoloride/node_characterai/issues) tab|
## In-depth troubleshooting
#### **🤚 Before you scroll, please know that:**
* In the `Client` class, you can access the `Requester` class and define puppeteer or other variables related to how CharacterAI will work using `characterAI.requester.(property)`. *Also, anything here is subject to change, so make sure to update the package frequently.*
### 💳 About CharacterAI+
#### **"I am a member of cai+, how do I use it?"**
Change the property `.usePlus` from the requester and if needed, change `.forceWaitingRoom`.
For example:
```javascript
// Default is `false`
characterAI.requester.usePlus = true;
```
### 🧭 About Puppeteer
Around a few months ago, the package only required the `node-fetch` module to run. The package was made using simple API requests.
*However, over time, Cloudflare started fighting against scraping and bots, which also made it almost impossible for anyone to use this package.*
**This is where in versions 1.1 and higher, puppeteer is used (which uses a chromium browser) to make requests with the API.**
### ⚙️ How to change Puppeteer settings
**👉 IMPORTANT: do the changes *before* you initialize your client!**
In the CharacterAI class, you can access the requester and define the `.puppeteerPath` variable or other arguments, and the properties include *(and are subject to change in future versions)*:
```javascript
// Chromium executable path (in some linux distributions, /usr/bin/chromium-browser)
puppeteerPath;
// Default arguments for when the browser launches
puppeteerLaunchArgs;
// Boolean representing the default timeout (default is 30000ms)
puppeteerNoDefaultTimeout;
// Number representing the default protocol timeout
puppeteerProtocolTimeout;
```
##### Specifying Chromium's path
🐧 For linux users, if your puppeteer doesn't automatically detect the path to Chromium, you will need to specify it manually.
To do this, you just need to set `puppeteerPath` to your Chromium path:
```javascript
characterAI.puppeteerPath = "/path/to/chromium-browser";
```
On Linux, you can use the `which` command to find where Chromium is installed:
```bash
$ which chromium-browser # or whatever command you use to launch chrome
```
💡 I recommend that you __frequently__ update this package for bug fixes and new additions.
## Disclaimer
##### ❤️ This project is updated frequently, **always check for the latest version for new features or bug fixes**.
🚀 If you have an issue or idea, let me know in the [**Issues**](https://github.com/realcoloride/node_characterai/issues) section.
📜 If you use this API, you also bound to the terms of usage of their website.
2023-2024, Licensed MIT.*