@loopback/docs
Version:
Documentation files rendered at [https://loopback.io](https://loopback.io)
407 lines (322 loc) • 13.3 kB
Markdown
# /authentication-jwt
This module is created as a prototype
[JWT(JSON web token)](https://github.com/auth0/node-jsonwebtoken#readme)
authentication system for users to quickly get started with LoopBack 4
authentication.
It exports the JWT authentication strategy and its corresponding token and user
service as a component. You can mount the component to get a prototype token
based authentication system in your LoopBack 4 application.
Please note this package has the user service is a reference implementation, not
recommended for production. You can follow the guide in section
[Customizing User](#customizing-user) to replace it.
To learn how you can apply it in your application, check the example
[todo-jwt](https://github.com/strongloop/loopback-next/tree/master/examples/todo-jwt)
and its tutorial
[Apply JWT Authentication in Todo Example](https://loopback.io/doc/en/lb4/Authentication-tutorial.html)
## Stability: ⚠️Experimental⚠️
> Experimental packages provide early access to advanced or experimental
> functionality to get community feedback. Such modules are published to npm
> using `0.x.y` versions. Their APIs and functionality may be subject to
> breaking changes in future releases.
## Architecture Overview
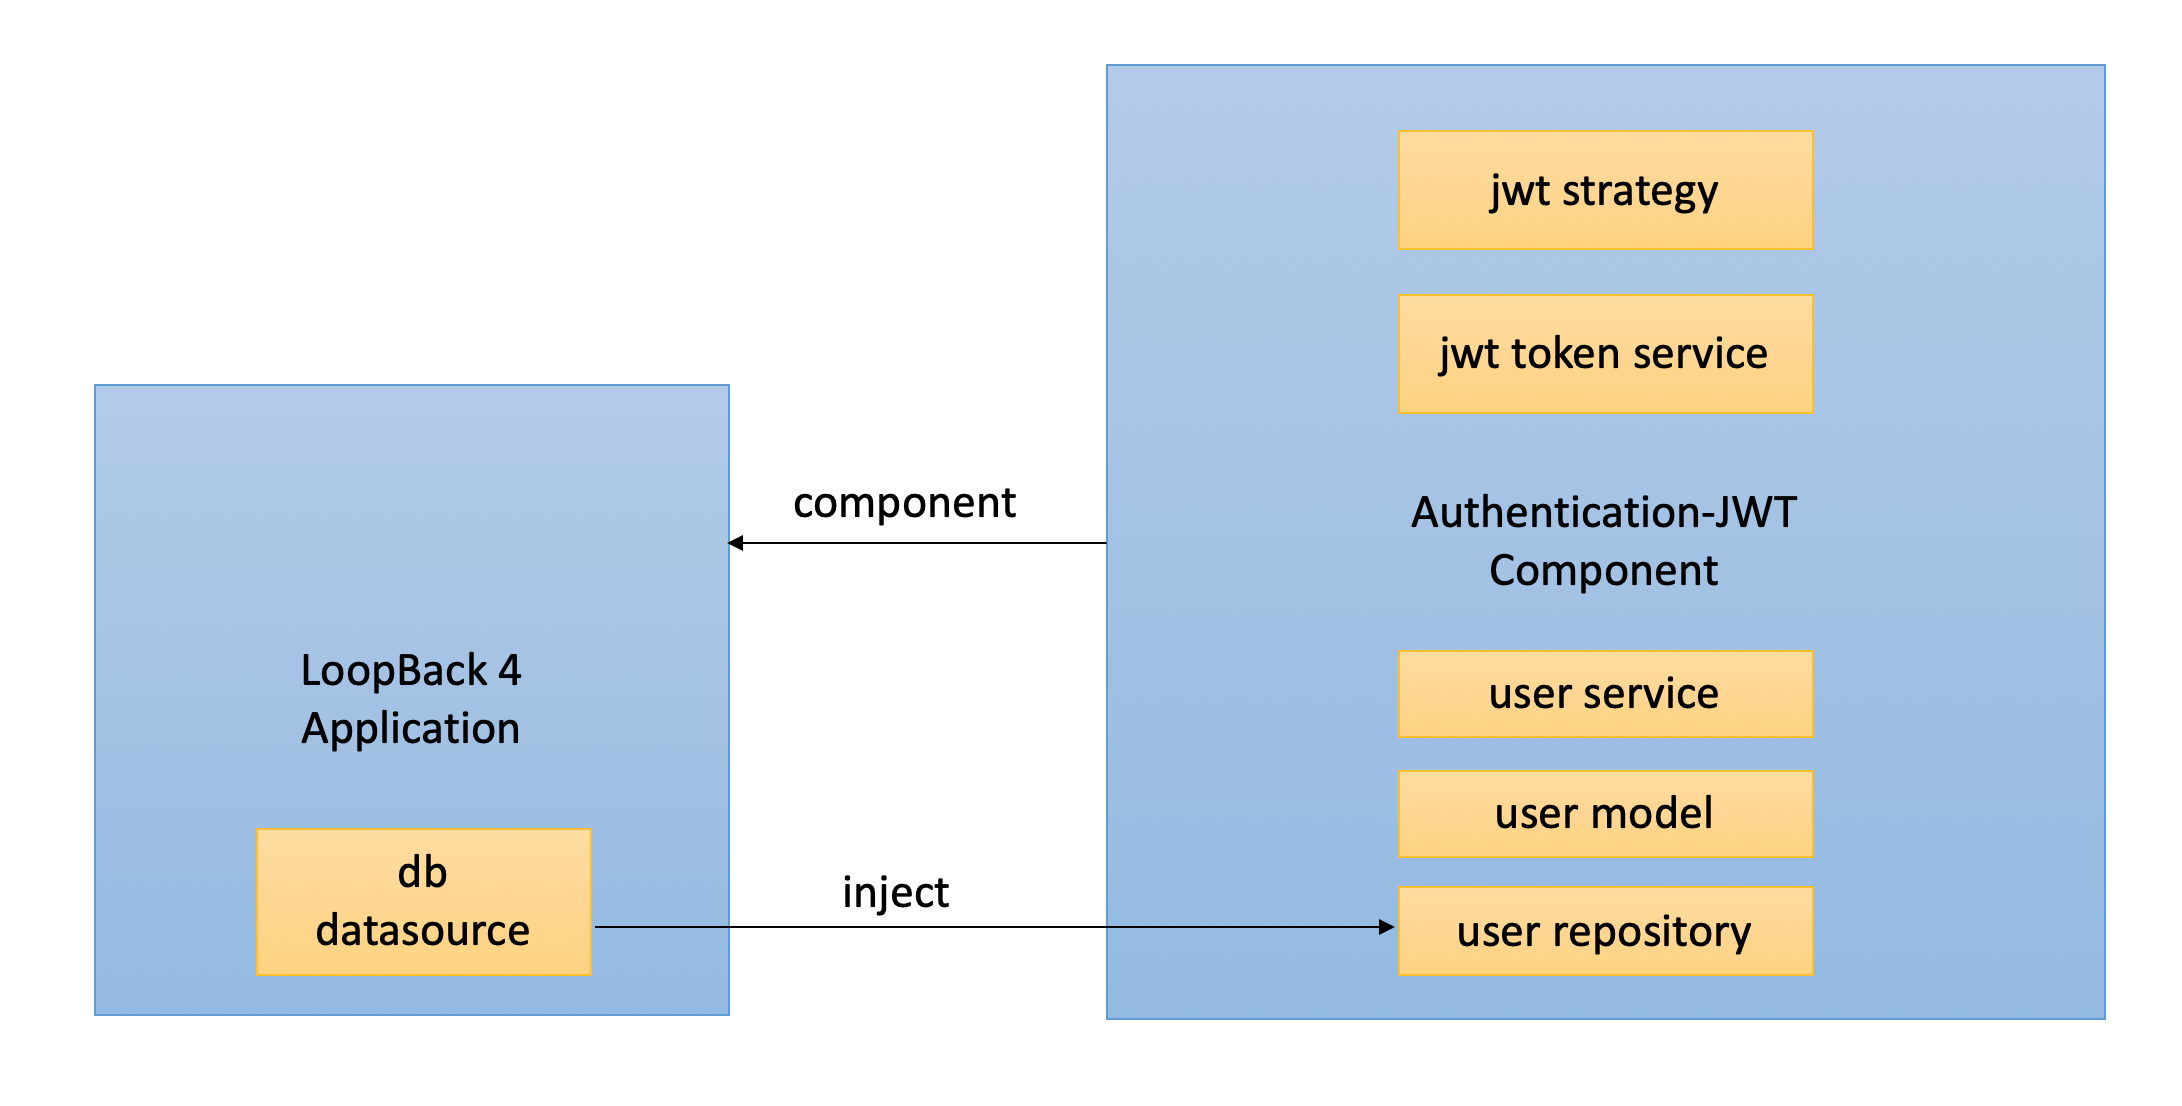
## Usage
To use this component, you need to have an existing LoopBack 4 application and a
datasource in it for persistency.
- create app: run `lb4 app`
- create datasource: run `lb4 datasource`
Next enable the jwt authentication system in your application:
- add authenticate action
<details>
<summary markdown="span"><strong>Check The Code</strong></summary>
{% include note.html content="
Skip this step when using a
[middleware-based sequence](https://loopback.io/doc/en/lb4/REST-middleware-sequence.html), which is used by
default on newly-generated LoopBack 4 applications.
" %}
```ts
import {
AuthenticateFn,
AuthenticationBindings,
AUTHENTICATION_STRATEGY_NOT_FOUND,
USER_PROFILE_NOT_FOUND,
} from '/authentication';
export class MySequence implements SequenceHandler {
constructor(
// - enable jwt auth -
// inject the auth action
(AuthenticationBindings.AUTH_ACTION)
protected authenticateRequest: AuthenticateFn,
) {}
async handle(context: RequestContext) {
try {
const {request, response} = context;
const route = this.findRoute(request);
// - enable jwt auth -
// call authentication action
await this.authenticateRequest(request);
const args = await this.parseParams(request, route);
const result = await this.invoke(route, args);
this.send(response, result);
} catch (error) {
// - enable jwt auth -
// improve the error check
if (
error.code === AUTHENTICATION_STRATEGY_NOT_FOUND ||
error.code === USER_PROFILE_NOT_FOUND
) {
Object.assign(error, {statusCode: 401 /* Unauthorized */});
}
this.reject(context, error);
}
}
}
```
</details>
- mount jwt component in application
- bind datasource to user service and refresh token
<details>
<summary markdown="span"><strong>Check The Code</strong></summary>
```ts
import {AuthenticationComponent} from '/authentication';
import {
JWTAuthenticationComponent,
SECURITY_SCHEME_SPEC,
} from '/authentication-jwt';
export class TestApplication extends BootMixin(
ServiceMixin(RepositoryMixin(RestApplication)),
) {
constructor(options: ApplicationConfig = {}) {
super(options);
// Set up the custom sequence
this.sequence(MySequence);
// Set up default home page
this.static('/', path.join(__dirname, '../public'));
// - enable jwt auth -
// Mount authentication system
this.component(AuthenticationComponent);
// Mount jwt component
this.component(JWTAuthenticationComponent);
// Bind datasource for user
this.dataSource(DbDataSource, UserServiceBindings.DATASOURCE_NAME);
// Bind datasource for refresh token
this.dataSource(DbDataSource, RefreshTokenServiceBindings.DATASOURCE_NAME);
this.component(RestExplorerComponent);
this.projectRoot = __dirname;
// Customize @loopback/boot Booter Conventions here
this.bootOptions = {};
}
}
```
</details>
_All the jwt authentication related code are marked with comment "- enable jwt
auth -", you can search for it to find all the related code you need to enable
the entire jwt authentication in a LoopBack 4 application._
## Adding Endpoint in Controller
After mounting the component, you can call token and user services to perform
login, then decorate endpoints with `('jwt')` to inject the
logged in user's profile.
This module contains an example application in the `fixtures` folder. It has a
controller with endpoints `/login`, `/refreshlogin`, `/refresh` and `/whoAmI`.
Before using the below snippet do not forget to inject below repositories and
bindings in your controller's constructor
```ts
(TokenServiceBindings.TOKEN_SERVICE)
public jwtService: TokenService,
(UserServiceBindings.USER_SERVICE)
public userService: UserService<User, Credentials>,
(SecurityBindings.USER, {optional: true})
private user: UserProfile,
(UserServiceBindings.USER_REPOSITORY)
public userRepository: UserRepository,
(RefreshTokenServiceBindings.REFRESH_TOKEN_SERVICE)
public refreshService: RefreshTokenService,
```
The code snippet for login function:
```ts
async login(
(CredentialsRequestBody) credentials: Credentials,
): Promise<{token: string}> {
// ensure the user exists, and the password is correct
const user = await this.userService.verifyCredentials(credentials);
// convert a User object into a UserProfile object (reduced set of properties)
const userProfile = this.userService.convertToUserProfile(user);
// create a JSON Web Token based on the user profile
const token = await this.jwtService.generateToken(userProfile);
return {token};
}
```
The code snippet for whoAmI function:
```ts
('jwt')
async whoAmI(): Promise<string> {
return this.user[securityId];
}
```
### Endpoints with refresh token
To add refresh token mechanism in your app, you can follow below example code at
the endpoint.
1. `To generate refresh token` : to generate the refresh token and access token
when user logins to your app with provided credentials.
```ts
async refreshLogin(
(CredentialsRequestBody) credentials: Credentials,
): Promise<TokenObject> {
// ensure the user exists, and the password is correct
const user = await this.userService.verifyCredentials(credentials);
// convert a User object into a UserProfile object (reduced set of properties)
const userProfile: UserProfile = this.userService.convertToUserProfile(
user,
);
const accessToken = await this.jwtService.generateToken(userProfile);
const tokens = await this.refreshService.generateToken(
userProfile,
accessToken,
);
return tokens;
}
```
2. `To refresh the token`: to generate the access token by the refresh token
obtained from the the last login endpoint.
```ts
async refresh(
(RefreshGrantRequestBody) refreshGrant: RefreshGrant,
): Promise<TokenObject> {
return this.refreshService.refreshToken(refreshGrant.refreshToken);
}
```
The complete file is in
[user.controller.ts](https://github.com/strongloop/loopback-next/tree/master/extensions/authentication-jwt/src/__tests__/fixtures/controllers/user.controller.ts)
## Customization
As a prototype implementation this module provides basic functionalities in each
service. You can customize and re-bind any element provided in the
[component](https://github.com/strongloop/loopback-next/tree/master/extensions/authentication-jwt/src/jwt-authentication-component.ts)
with your own one.
Replacing the `User` model is a bit more complicated because it's not injected
but imported directly in related files. The sub-section covers the steps to
provide your own `User` model and repository.
### Customizing User
1. Create your own user model and repository by running the `lb4 model` and
`lb4 repository` commands.
2. The user service requires the user model and repository, to provide your own
ones, you can create a custom `UserService` and bind it to
`UserServiceBindings.USER_SERVICE`. Take a look at
[the default user service](https://github.com/strongloop/loopback-next/blob/master/extensions/authentication-jwt/src/services/user.service.ts)
for an example of `UserService` implementation.
For convenience, here is the code in `user.service.ts`. You can replace the
`User` and `UserRepository` with `MyUser`, `MyUserRepository`:
<details>
<summary markdown="span"><strong>Check The Code</strong></summary>
```ts
import {UserService} from '/authentication';
import {repository} from '/repository';
import {HttpErrors} from '/rest';
import {securityId, UserProfile} from '/security';
import {compare} from 'bcryptjs';
// User --> MyUser
import {MyUser} from '../models';
// UserRepository --> MyUserRepository
import {MyUserRepository} from '../repositories';
export type Credentials = {
email: string;
password: string;
};
// User --> MyUser
export class CustomUserService implements UserService<MyUser, Credentials> {
constructor(
// UserRepository --> MyUserRepository
(MyUserRepository) public userRepository: MyUserRepository,
) {}
// User --> MyUser
async verifyCredentials(credentials: Credentials): Promise<MyUser> {
const invalidCredentialsError = 'Invalid email or password.';
const foundUser = await this.userRepository.findOne({
where: {email: credentials.email},
});
if (!foundUser) {
throw new HttpErrors.Unauthorized(invalidCredentialsError);
}
const credentialsFound = await this.userRepository.findCredentials(
foundUser.id,
);
if (!credentialsFound) {
throw new HttpErrors.Unauthorized(invalidCredentialsError);
}
const passwordMatched = await compare(
credentials.password,
credentialsFound.password,
);
if (!passwordMatched) {
throw new HttpErrors.Unauthorized(invalidCredentialsError);
}
return foundUser;
}
// User --> MyUser
convertToUserProfile(user: MyUser): UserProfile {
return {
[securityId]: user.id.toString(),
name: user.username,
id: user.id,
email: user.email,
};
}
}
```
</details>
3. Bind `MyUserRepository` (and `MyUserCredentialsRepository` if you create your
own as well) to the corresponding key in your `application.ts`:
```ts
import {CustomUserService} from './services/custom-user-service';
import {MyUserRepository, MyUserCredentialsRepository} from './repositories';
import {UserServiceBindings} from '/authentication-jwt';
export class TestApplication extends BootMixin(
ServiceMixin(RepositoryMixin(RestApplication)),
) {
constructor(options: ApplicationConfig = {}) {
super(options);
// ...other setup
this.component(JWTAuthenticationComponent);
// Bind datasource
this.dataSource(DbDataSource, UserServiceBindings.DATASOURCE_NAME);
// Bind user service
this.bind(UserServiceBindings.USER_SERVICE).toClass(CustomUserService),
// Bind user and credentials repository
this.bind(UserServiceBindings.USER_REPOSITORY).toClass(
UserRepository,
),
this.bind(UserServiceBindings.USER_CREDENTIALS_REPOSITORY).toClass(
UserCredentialsRepository,
),
}
}
```
### Extra configurations
1. To change the token secret in your application.ts
```
// for jwt access token
this.bind(TokenServiceBindings.TOKEN_SECRET).to("<yourSecret>");
// for refresh token
this.bind(RefreshTokenServiceBindings.TOKEN_SECRET).to("<yourSecret>");
```
2. To change token expiration. to learn more about expiration time here at
[Ziet/ms](https://github.com/zeit/ms)
```
// for jwt access token expiration
this.bind(TokenServiceBindings.TOKEN_EXPIRES_IN).to("<Expiration Time in sec>");
// for refresh token expiration
this.bind(RefreshTokenServiceBindings.TOKEN_EXPIRES_IN).to("<Expiration Time in sec>");
```
## Future Work
The security specification is currently manually added in the application file.
The next step is to create an enhancer in the component to automatically bind
the spec when app starts.
## Contributions
- [Guidelines](https://github.com/strongloop/loopback-next/blob/master/docs/CONTRIBUTING.md)
- [Join the team](https://github.com/strongloop/loopback-next/issues/110)
## Tests
Run `npm test` from the root folder.
## Contributors
See
[all contributors](https://github.com/strongloop/loopback-next/graphs/contributors).
## License
MIT