@loopback/docs
Version:
Documentation files rendered at [https://loopback.io](https://loopback.io)
105 lines (67 loc) • 2.84 kB
Markdown
# @loopback/example-todo
This is the basic tutorial for getting started with Loopback 4!
## Overview
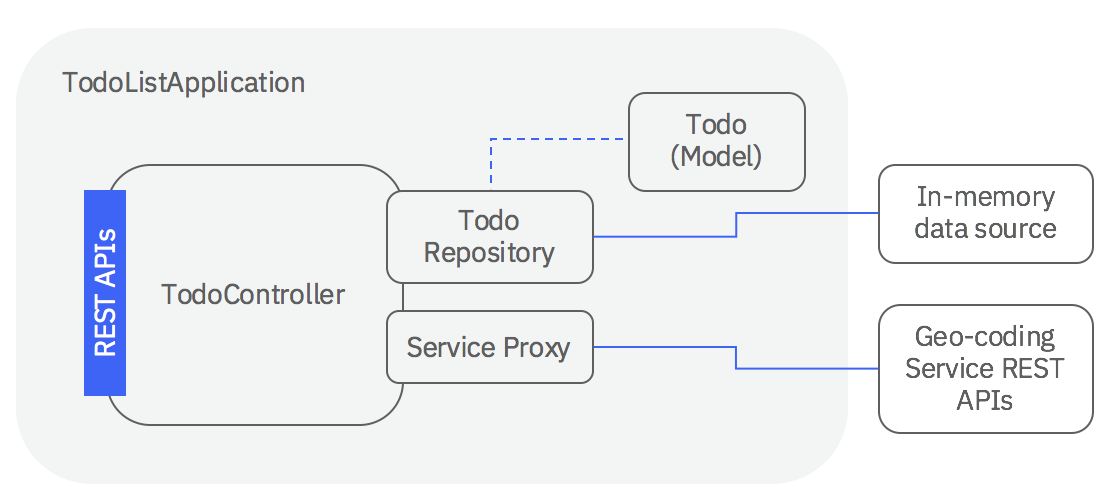
This tutorial demonstrates how to create a basic API for a todo list using
LoopBack 4. You will experience how you can create REST APIs with just
[5 steps](#steps).
## Setup
First, you'll need to install a supported version of Node:
- [Node.js](https://nodejs.org/en/) at v10 or greater
Additionally, this tutorial assumes that you are comfortable with certain
technologies, languages and concepts.
- JavaScript (ES6)
- [REST](http://www.restapitutorial.com/lessons/whatisrest.html)
Lastly, you'll need to install the LoopBack 4 CLI toolkit:
```sh
npm i -g @loopback/cli
```
## Tutorial
To follow this tutorial, begin with the
[Create your app scaffolding](http://loopback.io/doc/en/lb4/todo-tutorial-scaffolding.html)
section.
### Steps
1. [Create your app scaffolding](http://loopback.io/doc/en/lb4/todo-tutorial-scaffolding.html)
2. [Add your Todo model](http://loopback.io/doc/en/lb4/todo-tutorial-model.html)
3. [Add a datasource](http://loopback.io/doc/en/lb4/todo-tutorial-datasource.html)
4. [Add a repository](http://loopback.io/doc/en/lb4/todo-tutorial-repository.html)
5. [Add a controller](http://loopback.io/doc/en/lb4/todo-tutorial-controller.html)
6. [Putting it all together](http://loopback.io/doc/en/lb4/todo-tutorial-putting-it-together.html)
7. Bonus:
[Integrate with a geo-coding service](http://loopback.io/doc/en/lb4/todo-tutorial-geocoding-service.html)
## Try it out
If you'd like to see the final results of this tutorial as an example
application, follow these steps:
1. Run the `lb4 example` command to select and clone the todo repository:
```sh
lb4 example todo
```
2. Switch to the directory.
```sh
cd loopback4-example-todo
```
3. Finally, start the application!
```sh
$ npm start
Server is running at http://127.0.0.1:3000
```
Feel free to look around in the application's code to get a feel for how it
works. If you're interested in learning how to build it step-by-step, then
continue with this tutorial!
### Need help?
Check out our
[Slack](https://join.slack.com/t/loopbackio/shared_invite/zt-8lbow73r-SKAKz61Vdao~_rGf91pcsw)
and ask for help with this tutorial.
### Bugs/Feedback
Open an issue in [loopback-next](https://github.com/strongloop/loopback-next)
and we'll take a look.
## Contributions
- [Guidelines](https://github.com/strongloop/loopback-next/blob/master/docs/CONTRIBUTING.md)
- [Join the team](https://github.com/strongloop/loopback-next/issues/110)
## Tests
Run `npm test` from the root folder.
## Contributors
See
[all contributors](https://github.com/strongloop/loopback-next/graphs/contributors).
## License
MIT