@eeemarv/io-spi
Version:
Promise Based Native Node.js Addon for SPI devices on Linux
377 lines (251 loc) • 9.79 kB
Markdown
[](https://www.npmjs.com/package/@eeemarv/io-spi)

[](https://github.com/eeemarv/io-spi/blob/main/LICENSE)
[](https://www.npmjs.com/package/@eeemarv/io-spi)
[](https://www.npmjs.com/package/@eeemarv/io-spi)
[](https://en.wikipedia.org/wiki/Linux)
A high-performance Node.js native addon for SPI communication on Linux, leveraging direct `spidev.h` APIs.
Features
* Async/await friendly **Promise-based transfers** with configurable per-transfer settings.
* **Batched transfers**: Submit multiple SPI transactions in one call for maximum performance.
* **Zero abstraction**: Direct mapping to the Linux SPI interface (`spi_ioc_transfer`).
* Full support for Linux SPI parameters (e.g., delay_usecs, cs_change).
* Dynamic reconfiguration of mode, speed_hz, and bits_per_word.
* Getters for current device settings.
* Built-in TypeScript type declarations.
## Concurrency & Multiple Chip Select (CS)
### Non-Blocking API
All transfers are __asynchronous__ by design:
```js
import SPIDevice from '@eeemarv/io-spi';
spi = new SPIDevice('/dev/spidev0.0');
// Fire-and-forget transfer
spi.transfer([txBuffer])
.then([rxBuffer] => console.log('Done!'))
.catch(err => console.error('Error:', err));
```
* Transfers are queued at the OS level but don't block Node.js's event loop.
* Each transfer() call returns a native Promise (no manual threading required).
---
### Multiple Chip Select (CS) Pins
To control multiple SPI slaves, create separate instances per CS
```js
// Each CS line gets its own instance
// each instance contains its own configuration:
// mode, max_speed_hz and bits_per_word
const spiCS0 = new SPIDevice('/dev/spidev0.0'); // Uses CS0
const spiCS1 = new SPIDevice('/dev/spidev0.1',{
max_speed_hz: 500_000
}); // Uses CS1
const txBufferForDevice0 = Buffer.from([0x55, 0xAA]);
const txBufferForDevice1 = Buffer.from([0x66, 0xBB]);
// Concurrent operations
Promise.all([
spiCS0.transfer([txBufferForDevice0]),
spiCS1.transfer([txBufferForDevice1])
]).then(([[rxBufferfromDevice0], [rxBufferFromDevice1]]) => {
console.log(rxBufferfromDevice0);
console.log(rxBufferfromDevice1);
}).catch((error) => {
console.error(error);
});
```
* Ensure each slave has a dedicated CS line (e.g., CS0, CS1).
* Kernel must expose multiple /dev/spidevX.Y devices (check `ls /dev/spidev* -l`).
__Example Wiring (Raspberry Pi):__
Pi (Master) | Peripheral 0 | Peripheral 1
---|---|---
MOSI (GPIO10) | MOSI | MOSI
MISO (GPIO9) | MISO | MISO
SCLK (GPIO11) | SCLK | SCLK
CE0 (GPIO8) | CS | -
CE1 (GPIO7) | - | CS
## Installation
```bash
npm install @eeemarv/io-spi
# OR
yarn add @eeemarv/io-spi
```
## Prerequisites
* Linux (e.g., Raspberry Pi, Orange Pi) with SPI kernel support.
* Node.js v20+
* Build tools:
```bash
sudo apt-get install build-essential python3
```
## Usage
### Import
```js
const SPIDevice = require('@eeemarv/io-spi');
// OR
import SPIDevice from '@eeemarv/io-spi';
```
```js
const spi = new SPIDevice('/dev/spidev0.0', {
mode: 3, // SPI mode (default 0)
max_speed_hz: 500_000, // Clock speed (default 1_000_000 or 1MHz)
bits_per_word: 16 // Bits per word (default 8)
});
```
Or configure dynamically:
```js
spi.setMode(2); // Switch to mode 2
spi.setMaxSpeedHz(250_000); // Reduce speed to 250kHz
spi.setBitsPerWord(8);
console.log(spi.getMode()); // e.g., 2
```
```javascript
spi.transfer([
Buffer.from([0x01, 0x02])
]).then(([result]) => {
console.log(result); // Buffer with received data
}).catch((error) => {
console.log(error);
});
```
```javascript
spi.transfer([
Buffer.from([0x01, 0x02]), // Uses device defaults
{ // Overrides settings for this transfer
tx_buf: Buffer.from([0x03, 0x04]), // required
speed_hz: 500000, // Temporary speed change
delay_usecs: 100, // Delay after transfer (microseconds)
cs_change: 1 // Toggle CS after this transfer
},
Buffer.from([0x05, 0x06]) // Reverts to device defaults
]).then((results) => {
console.log(results); // `results` is an array of Buffers (one per transfer)
}).catch((error) => {
console.log(error);
});
```
* path (string): SPI device path (e.g., /dev/spidev0.0).
* options (object):
* mode: SPI mode 0-3 (CPOL/CPHA), more rare modes are also supported. Defaults to 0.
* max_speed_hz (number): Clock speed in Hz. Defaults to 1_000_000 (1Mhz)
* bits_per_word (number): Bits per word. Defaults to 8
### Methods
Method | Description
---|---
transfer(transfers) | Returns a Promise<Buffer[]> for all transfers. Each transfer can override settings (see below).
setMode(mode) | Sets SPI mode. Throws if invalid.
getMode() | Returns current mode.
setMaxSpeedHz(hz) | Sets maximum clock speed (Hz).
getMaxSpeedHz() | Returns current maximum speed.
setBitsPerWord(bits) | Sets bits per word (usually 8).
getBitsPerWord() | Returns current bits per word.
### Transfer Object Parameters
Each transfer can specify:
Parameter | Type | Description
---|---|---
`tx_buf` | Buffer | Data to send. Required.
`speed_hz` | number | Temporary clock speed (overrides max_speed_hz).
`delay_usecs` | number | Delay after transfer (microseconds).
`cs_change` | number (0,1) | Toggle chip select after this transfer. default is 0.
See [Linux spidev.h](https://github.com/torvalds/linux/blob/master/include/uapi/linux/spi/spidev.h) for full documentation of all parameters.
Parameters `tx_nbits`, `rx_nbits` and `word_delay_usecs` can also be used, but these are not widely implemented.
## TypeScript Support
This package includes built-in TypeScript type declarations via `index.d.ts`.
If you're using TypeScript, you'll get autocompletion and type checking automatically:
```ts
import SPIDevice from '@eeemarv/io-spi';
const spi = new SPIDevice('/dev/spidev0.0', {
max_speed_hz: 1_000_000,
mode: 0
});
```
Type definitions include
* Constructor options
* transfer() method with buffer/object overloads
* Getter/setter methods for mode, speed, and bits-per-word
No need to install @types/... — types are bundled with the package.
The loopback test is the only example included in the npm
package. More examples can be found in [a separate repository on Github](https://github.com/eeemarv/io-spi-examples#readme).
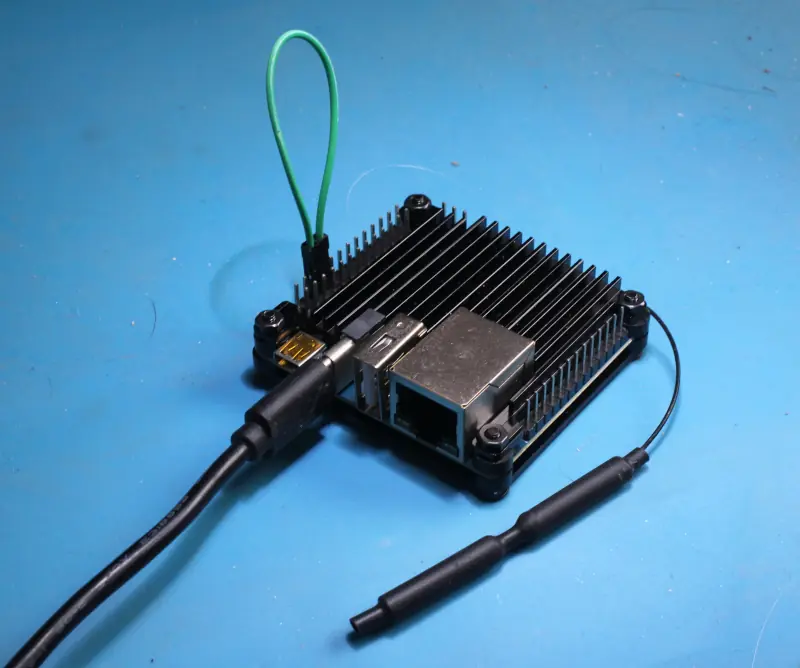
With this test you can see if the SPI device works without the involvement of a slave device. Connect the MOSI pin directly to the MISO pin, run the test and see if the data matches.
```bash
node loopback.js
```
The default device is `/dev/spidev0.0` but can be changed
with the `--device` flag.
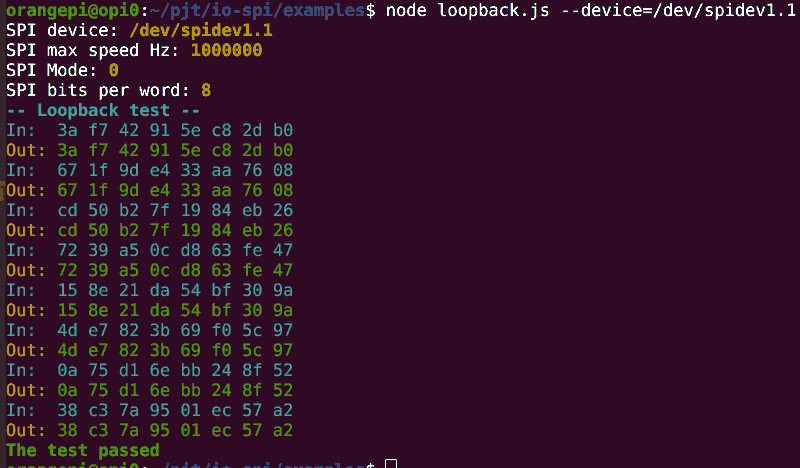
Check out if SPI is enabled. To list all available SPI devices:
```bash
ls -l /dev/spi*
```
Check out the manual of your SBC on how to enable the SPI devices.
If you have `raspi-config` (common on the Raspberry Pi), run
```bash
sudo raspi-config
```
Navigate to Interface options > Enable SPI.
On the Orange Pi, run `orangepi-config`
```bash
sudo orangepi-config
```
Navigate to System > Hardware > Toggle hardware configuration.
To allow non-root users to access the SPI device (e.g. `/dev/spidev0.0`, `/dev/spidev1.1`) without sudo, you need to modify the device permissions and group ownership permanently.
#### 1. Create a Dedicated Group for SPI Access
```bash
sudo groupadd spi
```
#### 2. Set a udev Rule to Change SPI Device Permissions
Ubuntu, Debian and Raspbian use udev to manage device permissions. Create a new rule:
```bash
sudo nano /etc/udev/rules.d/90-spi.rules
```
Add this line to grant read/write access to the `spi` group:
```bash
SUBSYSTEM=="spidev", GROUP="spi", MODE="0660"
```
```bash
sudo udevadm control --reload-rules
sudo udevadm trigger
```
Check the SPI device permissions:
```bash
ls -l /dev/spidev*
```
Expected output:
```bash
crw-rw---- 1 root spi 153, 0 Jun 17 10:14 /dev/spidev1.1
```
Now, users in the `spi` group can access it without sudo.
```bash
sudo usermod -aG spi $(whoami)
```
(Log out and back in for the group change to take effect.)
Verify parameters match spidev.h constraints (e.g., valid mode).
### Build Issues
Rebuild with `node-gyp rebuild --verbose`
### Hardware connection problems
For good connection, especially at speeds above 1Mhz,
be sure
* to keep wires or paths short
* to keep wires or paths bundled together
* to take ground (and power) from pins the closed
to the MISO, MOSI, CS and CLCK pins in order to provide
a ground return path
* to thoroughly clean up flux after soldering
* that you are invoking the right spi device. E.g. on the Orange Pi Zero 3 only /dev/spidev1.1 is available on the pinout.
## License
MIT