@dynatrace/react-native-plugin
Version:
This plugin gives you the ability to use the Dynatrace Mobile agent in your react native application.
1,087 lines (807 loc) • 101 kB
Markdown
[](https://dynatrace.com)
# Dynatrace React Native Plugin
The Dynatrace React Native plugin helps auto-instrument your React Native app with Dynatrace OneAgent for Android and iOS and also provides an API to add manual instrumentation.
If you want to start using this plugin and are not a Dynatrace customer yet, head to [dynatrace.com](https://dynatrace.com) and sign up for a free trial. For an intro you can also check out [our announcement blog post](https://www.dynatrace.com/news/blog/enhance-user-experience-with-full-insight-into-your-react-native-apps/).
## Supported features
* Auto-instrumentation using OneAgent for Android and iOS
* User actions for application start and native controls
* Web requests
* Crashes
* React-native Auto-instrumentation
* User actions for onPress and onLongPress (Touchables, Buttons, Pickers, RefreshControl, Pressable)
* User actions for class and functional components (lifecycle events such as render(), didMount() and didUpdate())
* Reporting React Native errors
* Manual instrumentation
* Typescript bindings to add manual instrumentation
* New React-Native architecture
## Requirements
* React v16.8 or newer
* React Native v0.60 or newer
* For Android users:
* SDK version 21+
* Gradle version 7.0+ ([How to update?](#updating-to-gradle-7))
* Android Gradle plugin version 7.0+
* Java 11
* Kotlin 2.0.21 - see [Kotlin Compatibility Note](#kotlin-compatibility-note)
* Jetpack Compose 1.4 - 1.9 - see [Compose Compatibility Note](#compose-compatibility-note)
* For iOS users: Minimum iOS 12
* NodeJS 16.0.0+ since our dependencies require NodeJS 16.0.0
## Agent Versions
This agent versions are configured in this plugin:
* Android Agent: 8.331.1.1004
* iOS Agent: 8.331.1.1008
## Quick Setup
1. [Install plugin](#1-install-the-plugin)
2. [Register Dynatrace transformer and reporter](#2-register-the-dynatrace-transformer-and-reporter)
3. [Setup configuration](#3-setup-dynatraceconfigjs)
4. [Update Babel Configuration](#4-update-babel-configuration)
5. [Build and run your app](#4-build-and-run-your-app)
## Advanced topics
* [Manual OneAgent Startup](#manual-oneagent-startup)
* [Manual instrumentation](#manual-instrumentation)
* [Plugin Startup](#plugin-startup)
* [Monitor a Component](#monitor-a-component)
* [Create Custom Action](#create-custom-actions)
* [Cancel Actions](#cancel-actions)
* [Manual Web Request Tagging](#manual-web-request-tagging)
* [Report Values](#report-values)
* [Report Stacktrace](#report-an-error-stacktrace)
* [Identify User](#identify-a-user)
* [End Session](#end-the-current-user-session)
* [Crash Reporting](#manually-report-a-crash)
* [User Privacy Options](#user-privacy-options)
* [Report GPS Position](#report-gps-location)
* [Business event capturing](#business-event-capturing)
* [Platform independent reporting](#platform-independent-reporting)
* [Set beacon headers](#setting-beacon-headers)
* [Exclude Individual JSX Elements](#exclude-individual-jsx-elements)
* [New RUM experience](#new-rum-experience)
* [Send Event](#send-event)
* [Send Session Property Event](#send-session-property-event)
* [Event Modifier](#event-modifier)
* [Send Exception Event](#send-exception-event)
* [Send HTTP Request Event](#send-http-request-event)
* [View Monitoring](#view-monitoring)
* [React Native Symbolication](#react-native-symbolication)
* [NPX Commands](#npx-commands)
* [npx instrumentDynatrace](#npx-instrumentdynatrace)
* [npx configDynatrace](#npx-configdynatrace)
* [npx lineOffsetDynatrace](#npx-lineoffsetdynatrace)
* [Customizing paths for configuration](#customizing-paths-for-configuration)
* [Manual adding iOS Agent to project](#manually-adding-ios-oneagent-to-a-project)
* [Setup for tvOS](#setup-for-tvos)
* [Configuration structure](#structure-of-the-dynatracejs-file)
* [Manual Startup Counterparts](#manual-startup-counterparts)
* [React block](#react-block)
* [Input](#input)
* [Lifecycle](#lifecycle)
* [Debug mode](#debug-mode)
* [Error Handler](#error-handler)
* [Autostart](#autostart)
* [Bundle Name and Version](#bundle-name-and-version)
* [Navigation](#navigation)
* [Source Map](#source-map)
* [Android block](#android-block)
* [iOS block](#ios-block)
* [Lifecycle modes](#lifecycle)
* [Define build stages](#define-build-stages-in-dynatraceconfigjs)
* [User Opt In Mode](#user-opt-in-mode)
* [Agent debug logs](#native-oneagent-debug-logs)
* [How does Dynatrace determine the user action name?](#how-does-dynatrace-determine-the-user-action-name)
* [Using dtActionName](#using-dtactionname-to-change-the-name-of-the-action)
* [How does Dynatrace automatically report crashes?](#how-does-dynatrace-automatically-report-crashes)
* [React Automatic Runtime](#react-automatic-runtime)
* [Using a second transformer besides the dynatrace transformer](#using-a-second-transformer-besides-the-dynatrace-transformer)
* [Upgrading project to Gradle 7](#updating-to-gradle-7)
* [Kotlin Compatibility Note](#kotlin-compatibility-note)
* [Compose Compatibility Note](#compose-compatibility-note)
* [Maven Central in top-level gradle file](#maven-central-in-top-level-gradle-file)
* [Configuration of standalone React Native project](#configuration-of-standalone-react-native-project)
* [Instrumentation Overhead](#instrumentation-overhead)
* [Typescript Setup for dtActionName and dtActionIgnore](#typescript-setup-for-dtactionignore-and-dtactionname)
## Troubleshooting
* [Documentation](#dynatrace-documentation)
* [Known issues](#troubleshooting-and-applicable-restrictions)
* [Supported and Unsupported libraries](#supported-and-unsupported-libraries)
* [Report bug / Get support](#report-a-bug-or-open-a-support-case)
* [Changelog](#changelog)
<br/><br/>
# Quick Setup
> **Note**: If you are upgrading to React Native v0.70 (or newer) or using the @react-native-community/cli 9.x+ version, be aware that our automated script running before every start/run-android/run-ios command is no longer working. When your *dynatrace.config.js* changed be sure to execute `npx instrumentDynatrace` beforehand.
## 1. Install the plugin
1. Install the plugin by calling:
- React Native v0.60 or newer : `npm install @dynatrace/react-native-plugin`
- React Native v0.59.x : `react-native install @dynatrace/react-native-plugin`.
2. **iOS only :** If you use pods, you need to go into your `ios` directory and execute `pod install` to install the new Dynatrace dependency to your xCode project.
### Troubleshooting
- Expo: Make sure you actually have platform folders like `android/` and/or `ios/` so the plugin can do the configuration correctly. Furthermore you need to trigger the configuration manually as the plugin is only automatically working with the React Native CLI. This means every time the configuration changes you need to call [`npx instrumentDynatrace`](#npx-instrumentdynatrace).
- Standalone Project: If you are using React Native standalone and embed it in your native project have a look [here](#configuration-of-standalone-react-native-project).
- If for some reason (e.g. seperate native projects) `react-native link` doesn't work as expected, [manually add the iOS agent to your project](#manually-adding-ios-oneagent-to-a-project).
## 2. Register the Dynatrace transformer and reporter
The transformer will add modifications to your code during build. The reporter will notify us if you clear the cache of the metro bundler.
Depending on your React Native version, you will need to use a different way to register the transformer. If you don't know the version, enter `react-native --version` in your terminal.
The following configuration must be added. If you already have a babel transformer (babelTransformerPath) in place, you need to [use the upstreamTransformer property in dynatrace.config.js](#using-a-second-transformer-besides-the-dynatrace-transformer) to use a transformer besides our dynatrace transformer.
In your project's root directory, create or extend `metro.config.js` so that it contains the following configuration properties `transformer.babelTransformerPath` and `reporter`:
#### For React Native v0.72.1 or newer
```js
const {getDefaultConfig, mergeConfig} = require('@react-native/metro-config');
const defaultConfig = getDefaultConfig(__dirname);
/**
* Metro configuration
* https://facebook.github.io/metro/docs/configuration
*
* @type {import('metro-config').MetroConfig}
*/
const config = {
transformer: {
babelTransformerPath: require.resolve(
'@dynatrace/react-native-plugin/lib/dynatrace-transformer',
),
},
reporter: require('@dynatrace/react-native-plugin/lib/dynatrace-reporter'),
};
module.exports = mergeConfig(defaultConfig, config);
```
#### For Expo
```js
const {getDefaultConfig} = require('expo/metro-config');
const config = getDefaultConfig(__dirname);
config.transformer.babelTransformerPath = require.resolve(
'@dynatrace/react-native-plugin/lib/dynatrace-transformer',
);
config.reporter = require('@dynatrace/react-native-plugin/lib/dynatrace-reporter');
module.exports = config;
```
#### For React Native v0.59 or newer
```js
module.exports = {
transformer: {
babelTransformerPath: require.resolve(
'@dynatrace/react-native-plugin/lib/dynatrace-transformer'
)
},
reporter: require('@dynatrace/react-native-plugin/lib/dynatrace-reporter'),
};
```
## 3. Setup dynatrace.config.js
> **Note**: If you are upgrading from a previous version of this plugin, you'll notice that the file format has changed. Your old configuration is still available in `dynatrace.config` and you have to copy your values to the new `dynatrace.config.js`.
Define a mobile app in Dynatrace and open the Mobile app instrumentation settings. In the settings you will see a `dynatrace.config.js` file which can be downloaded for React Native. Download and copy this file into the root folder of your application. If you are not sure you can always use `npx configDynatrace` to create a default configuration file.
> **Note**: Define the components that you want to see lifecycle instrumented ([example](#lifecycle)). This is important as you will only see Application startup and Touches out of the box.
For more details about the configuration, see [Advanced topics](#structure-of-the-dynatracejs-file).
## 4. Update Babel Configuration
Depending on your version of Metro or Expo (if used), your babel configuration `babel.config.js` will need to be updated.
The changes have to be done in the following cases:
- metro v0.72.0 or newer: https://github.com/facebook/metro/releases/tag/v0.72.0
- expo v44.0.0 or newer or babel-preset-expo v9.0.0 or newer: https://github.com/expo/expo/blob/main/packages/babel-preset-expo/CHANGELOG.md#900--2021-12-03
The required changes for the versions above can be found [here](#react-automatic-runtime).
## 5. Build and run your app
1. Only for Expo: If using expo make sure that your project is containing a "android" and/or "ios" folder. This can be done by using `npx expo prebuild`.
2. Execute [`npx instrumentDynatrace`](#npx-instrumentdynatrace) or `react-native instrument-dynatrace` in the root of your React Native project. This will configure both Android and iOS projects with the settings from `dynatrace.config.js`. You can use the same [custom arguments](#customizing-paths-for-configuration) as mentioned above. Be aware this configuration step will modify your application's *.plist and build.gradle file. This modification enables auto instrumentation on Android and is writing the configuration for both platforms needed for the OneAgent.
1. Use `react-native run-android` or `react-native run-ios` to rebuild and run your app. Specify custom paths via [custom arguments.](#customizing-paths-for-configuration).
4. **Attention:** Whenever you change your configuration in dynatrace.config.js please use `react-native start --reset-cache` option. Metro caches all files and a configuration change might lead to a different situation. Not resetting the cache might result in an mixture of old and new configuration.
# Advanced topics
### Manual OneAgent startup
If you can't do a automated startup through the `dynatrace.config.js`, you can always perform a manual startup and decide values such as `beaconUrl` and `applicationId` at runtime.
**Note**: An automated startup usually provides you with a lifecycle application start-up event. A manual startup on the other hand occurs later, thereby causing you to miss everything, including this application startup event, until the startup occurs.
A manual startup requires the following two steps:
1. Deactivate the automated startup in `dynatrace.config.js`:
```ts
module.exports = {
react: {
autoStart: false,
// ...
},
android: {
config: `
dynatrace {
configurations {
defaultConfig {
autoStart.enabled false
}
}
}
`
},
ios: {
config: `
<key>DTXAutoStart</key>
<false/>
`
},
};
```
2. Make the start-up call with at least `beaconUrl` and `applicationId`:
Example of a startup call:
```ts
import { Dynatrace, ConfigurationBuilder } from '@dynatrace/react-native-plugin';
await Dynatrace.start(new ConfigurationBuilder("beaconUrl", "applicationId").buildConfiguration());
```
For more details see the section about [startup API](#plugin-startup).
**Note**: If you don't deactivate the automated startup with the `dynatrace.config.js` file, the `beaconUrl` and `applicationId` values have no impact and are thrown away.
## Manual instrumentation
To use the API of the React Native plugin, import the API:
```ts
import { Dynatrace } from '@dynatrace/react-native-plugin';
```
### Plugin startup
The manual startup of the plugin is triggered via the `start(configuration: IConfiguration)` method. If you configured `dynatrace.config.js` for manual startup then the plugin doesn't send any data when not calling this function. Besides the application id and the beacon URL, there are several optional configuration parameters, which are shown in the table below.
```ts
import { Dynatrace, ConfigurationBuilder, LogLevel } from '@dynatrace/react-native-plugin';
const configurationBuilder = new ConfigurationBuilder("beaconUrl", "applicationId");
configurationBuilder.withCrashReporting(true)
.withErrorHandler(true)
.withReportFatalErrorAsCrash(true)
.withLogLevel(LogLevel.Info)
.withLifecycleUpdate(false)
.withUserOptIn(false)
.withActionNamePrivacy(false);
await Dynatrace.start(configurationBuilder.buildConfiguration());
```
**Info**: The value used in the function calls for the parameters is also their default value.
| Property name | Type | Default | Description |
|-------------------------|--------|-------------|---------------------------------------------------|
|beaconUrl |string |undefined |Identifies your environment within Dynatrace. This property is mandatory for [manual startup](#manual-oneagent-startup). OneAgent issues an error when the key isn't present.|
|applicationId |string |undefined |Identifies your mobile app. This property is mandatory for [manual startup](#manual-oneagent-startup). OneAgent issues an error when the key isn't present.|
|reportCrash |boolean |true |Reports crashes. |
|errorHandler |boolean |true |Enables the error/crash handler. |
|reportFatalErrorAsCrash |boolean |true |Reports an unhandled fatal error as a crash or an error. |
|logLevel |LogLevel|LogLevel.Info|Allows you to choose between `LogLevel.Info` and `LogLevel.Debug`. Debug returns more logs. This is especially important when something is not functioning correctly.|
|lifecycleUpdate |boolean |false |Decide if you want to see update cycles on lifecycle actions as well. This is per default false as it creates a lot more actions.|
|userOptIn |boolean |false |Activates the privacy mode when set to `true`. User consent must be queried and set. The privacy settings for [data collection](#user-privacy-options) and [crash reporting](#crash-reporting) can be changed via OneAgent SDK for Mobile as described under Data privacy. The default value is `false`.|
|actionNamePrivacy |boolean |false |Activates a privacy mode especially for Touchables and Buttons. Setting this option to true means that a name for the control will no longer be shown, e.g. "Touch on Button". When setting a dtActionName onto the component this setting will be ignored.
|bundleName |string |undefined |Should be used only if you have a multiple bundle setup where you load several .bundle files within your React Native application. Enter the name of your bundle. This should be unique in comparison to your other bundle names. This will ensure that actions coming from different bundles will not interfere with each other.
**Attention:**
* Keep in mind that configuration within the `dynatrace.config.js` file is the basis, even for manual startup. When we look at the lifecycleUpdate property: Per default if not used, it is false. If enabled (set to true) in `dynatrace.config.js` file, this will be also true if manual startup is used. You can still override this behavior by calling `ConfigurationBuilder.withLifecycleUpdate(false)`.
* Please use those parameters only when doing a manual startup. If you want to do an automated startup, please configure the properties via the [auto startup configuration](#manual-startup-counterparts). You will find a list which explains all the counterparts for the available options here.
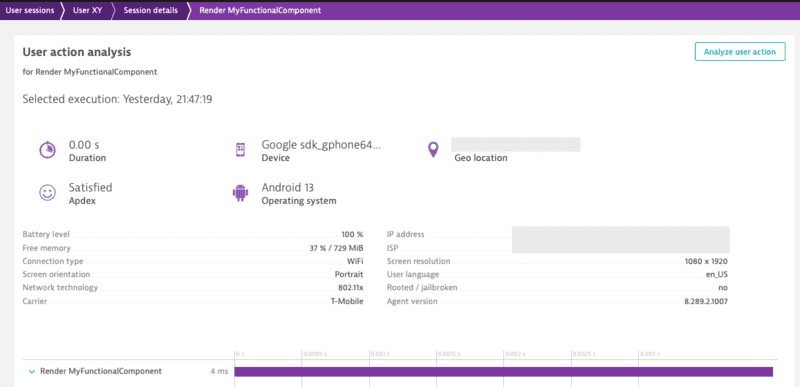
### Monitor a Component
A component can be either monitored automatically or manually. The auto instrumentation is handled via the dynatrace.config.js file. If you want to manually instrument a component you can use the API call `withMonitoring`.
* Example with Functional Component:
```ts
import { Dynatrace } from '@dynatrace/react-native-plugin';
import { FunctionComponent } from 'react';
export const MyFunctionalComponent: FunctionComponent<{}> = () => {
return null;
}
Dynatrace.withMonitoring(MyFunctionalComponent, "MyFunctionalComponent");
```
The String "MyFunctionalComponent" is optional as the name of the component can be retrieved through [different properties](#how-does-dynatrace-determine-the-user-action-name).
Combining manual and auto instrumentation should not be a problem. As they're running the same execution, the manual instrumentation will only override the content of auto instrumentation happening through the transformer.
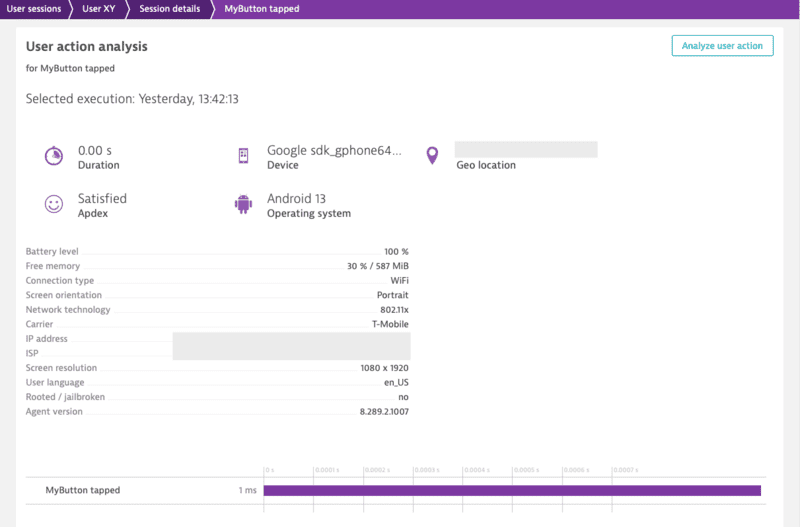
### Create custom actions
There are two options to create an action. Either using `enterAutoAction` (the previous `enterAction`) or `enterManualAction`:
**Important:** Action names are limited to 250 characters and will be truncated if they exceed this limit.
* `enterAutoAction` - Creates an Action which will be automatically handled by the plugin (This is the type of action which is internally used by the plugin when monitoring components and touchables). This means that the plugin decides about the hierarchy of this action. If there is no open action, the following action will be a root action. All other actions created by this method, while a root action is open, will be automatically inserted as a child action. Furthermore the plugin will automatically link webrequest (if they are not tagged manually) to the open root action. Be aware that the timeout/wait time for sub actions or web requests cannot be modified on the Android side for React Native Auto actions. The timeout is fixed to a 1000ms.
```ts
import { Dynatrace } from '@dynatrace/react-native-plugin';
const myAction = Dynatrace.enterAutoAction("MyButton tapped");
//Perform the action and whatever else is needed.
myAction.leaveAction();
```
* `enterManualAction` - Creates an Action which will NOT be handled by the plugin. This means that you have full control about the hierarchy of your actions. This function will create a root action for you, which has the ability to create child actions via `enterAction`. Be aware, because of the full manual approach the plugin will not link webrequest automatically. Webrequest have to be manually tagged by using the tag provided by the action via `getRequestTag`.
```ts
import { Dynatrace } from '@dynatrace/react-native-plugin';
const myAction = Dynatrace.enterManualAction("MyButton tapped");
//Perform the action and whatever else is needed.
myAction.leaveAction();
```
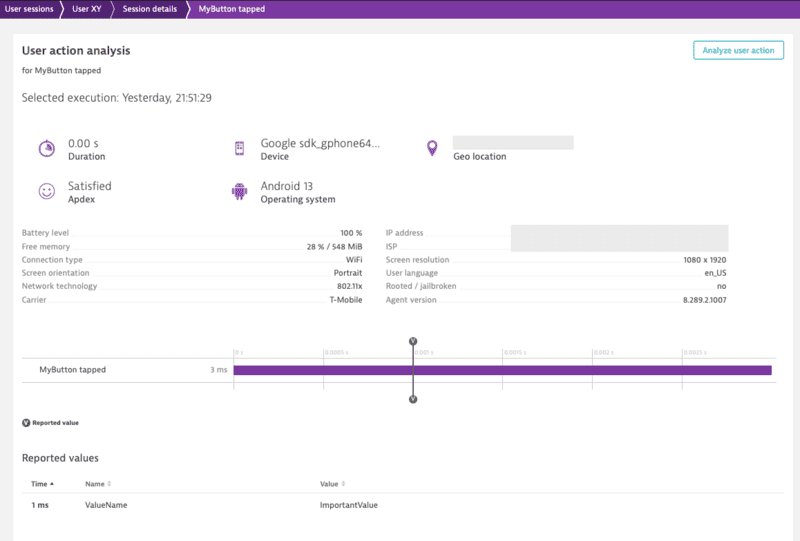
To create a custom action named `"MyButton tapped"`, use the following code. The *leaveAction* closes the action again. To report values for this action before closing, see [Report Values](#report-values).
```ts
import { Dynatrace } from '@dynatrace/react-native-plugin';
const myAction = Dynatrace.enterAutoAction("MyButton tapped");
//Perform the action and whatever else is needed.
myAction.leaveAction();
```
### Create custom sub actions
You can create a single custom action as well as sub actions. The `MyButton Sub Action` is automatically put under the `MyButton tapped`. As long as `MyButton tapped` is open, it gathers all the web requests.
**Important:** Action names are limited to 250 characters and will be truncated if they exceed this limit.
```ts
import { Dynatrace } from '@dynatrace/react-native-plugin';
const myAction = Dynatrace.enterManualAction("MyButton tapped");
const mySubAction = myAction.enterAction("MyButton Sub Action");
//Perform the action and whatever else is needed.
mySubAction.leaveAction();
myAction.leaveAction();
```

### Cancel actions
Actions can be canceled. That means they will not be sent and discarded fully. This also means that any values and sub actions attached to the action will be removed.
```ts
import { Dynatrace } from '@dynatrace/react-native-plugin';
const myAction = Dynatrace.enterAutoAction("MyButton tapped");
// Action will be canceled
myAction.cancel();
// Has no impact as the action is already canceled
myAction.leaveAction();
```
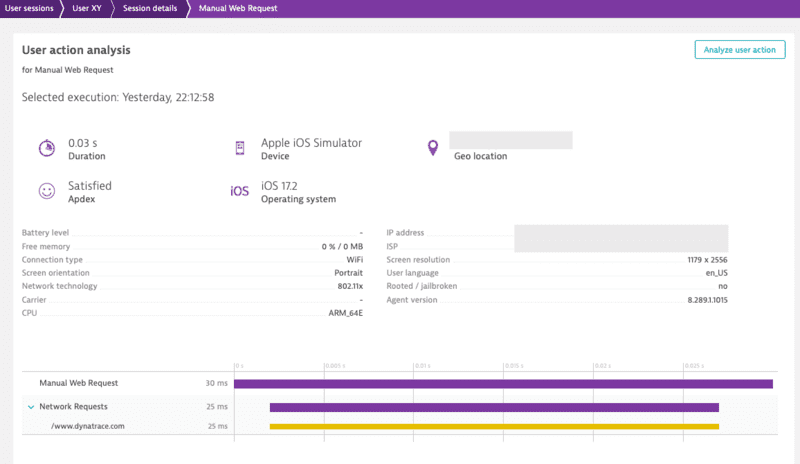
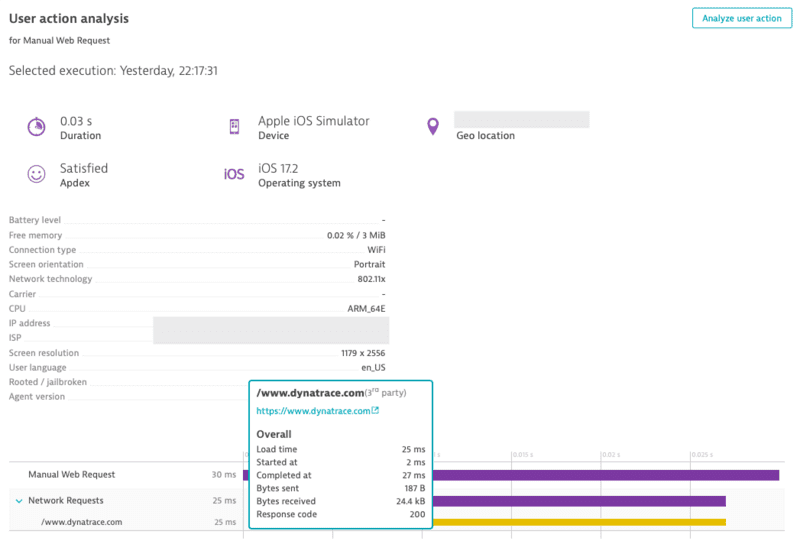
### Manual Web Request Tagging
You can manually tag and time your web requests. With the API shown below, you are able to manually capture the web requests of an http framework/library.
**Note:**
Using this API will force the request to be added to the action that is manually created.
```ts
import { Dynatrace, DynatraceWebRequestTiming } from '@dynatrace/react-native-plugin';
const action = Dynatrace.enterManualAction('API Data Fetch');
const url = 'https://api.example.com/data';
const tag = await action.getRequestTag(url);
const timing = new DynatraceWebRequestTiming(url, tag);
try {
timing.startWebRequestTiming();
const response = await fetch(url, {
headers: {
[timing.getRequestTagHeader()]: tag
}
});
timing.stopWebRequestTiming(response.status, response.statusText);
} catch (error) {
if (error instanceof Error) {
timing.stopWebRequestTiming(-1, error.message);
} else {
timing.stopWebRequestTiming(-1, (error as any).toString());
}
} finally {
action.leaveAction();
}
```
There is also the option to report values for request and response size:
```ts
import { Dynatrace, DynatraceWebRequestTiming } from '@dynatrace/react-native-plugin';
const action = Dynatrace.enterManualAction('API Data Upload');
const url = 'https://api.example.com/upload';
const tag = await action.getRequestTag(url);
const timing = new DynatraceWebRequestTiming(url, tag);
const requestData = JSON.stringify({ key: 'value' });
try {
timing.startWebRequestTiming();
const response = await fetch(url, {
method: 'POST',
headers: {
[timing.getRequestTagHeader()]: tag,
'Content-Type': 'application/json'
},
body: requestData
});
const responseData = await response.text();
timing.stopWebRequestTimingWithSize(
response.status,
response.statusText,
requestData.length,
responseData.length
);
} catch (error) {
if (error instanceof Error) {
timing.stopWebRequestTiming(-1, error.message);
} else {
timing.stopWebRequestTiming(-1, (error as any).toString());
}
} finally {
action.leaveAction();
}
```
### Report values
For any open action you can report certain values. The following API is available for action:
```ts
import { Platform } from '@dynatrace/react-native-plugin';
interface IDynatraceAction {
reportDoubleValue(valueName: string, value: number, platform?: Platform): void;
reportError(errorName: string, errorCode: number, platform?: Platform): void;
reportEvent(eventName: string, platform?: Platform): void;
reportIntValue(valueName: string, value: number, platform?: Platform): void;
reportStringValue(valueName: string, value: string, platform?: Platform): void;
}
```
**Important:** All string parameters (errorName, eventName, valueName, value) are limited to 250 characters and will be truncated if they exceed this limit.
To report a string value, use the following:
```ts
import { Dynatrace } from '@dynatrace/react-native-plugin';
const myAction = Dynatrace.enterAutoAction("MyButton tapped");
myAction.reportStringValue("ValueName", "ImportantValue");
myAction.leaveAction();
```
If you look at the API calls, you will see the optional parameter `platform?: Platform`. This parameter offers the possibility to report values only for a specific platform. to know more, see [Platform independent reporting](#platform-independent-reporting).
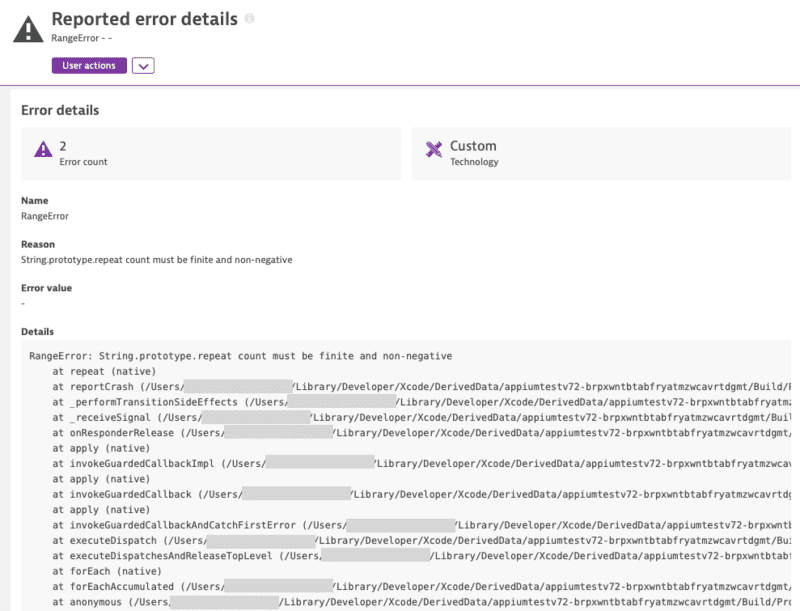
### Report an error stacktrace
To manually report an error stacktrace, use the following API call:
```ts
import { Dynatrace } from '@dynatrace/react-native-plugin';
try {
throw new Error('Database connection failed');
} catch (error) {
if (error instanceof Error) {
Dynatrace.reportErrorStacktrace(
'DatabaseError',
error.message,
'Failed to connect to remote database',
error.stack || 'No stack trace available'
);
}
}
```
**Note:**
The previous API without *errorValue* is deprecated and will be removed in the future. Please use the new API with errorValue if possible.
### Identify a user
You can identify a user and tag the current session with a name by making the following call:
**Important:** The user identifier is limited to 250 characters and will be truncated if it exceeds this limit.
```ts
import { Dynatrace } from '@dynatrace/react-native-plugin';
Dynatrace.identifyUser("User XY");
```

### End the current user session
To end the current user session, use the following API call:
```ts
import { Dynatrace } from '@dynatrace/react-native-plugin';
Dynatrace.endSession();
```
**Note:** The user tagging will not carry over to the new user session that is started after using this API. If user tagging is desired in the new user session, please ensure that you call the [user tagging](#identify-a-user) API.
### Manually report a crash
You can manually report a crash via the following API calls:
```ts
import { Dynatrace } from '@dynatrace/react-native-plugin';
try {
throw new Error('Fatal memory allocation failure');
} catch (error) {
if (error instanceof Error) {
Dynatrace.reportCrash(
'MemoryError',
error.message,
error.stack || 'No stack trace available'
);
// or directly via the full error
Dynatrace.reportCrashWithException('MemoryError', error);
}
}
```
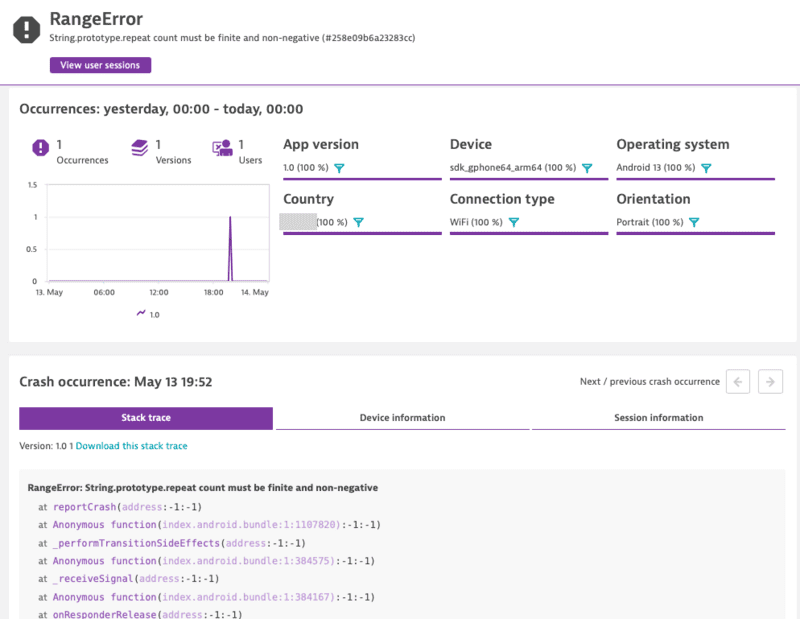
> **Note**: If you use this API call to report a crash manually, it will force the session to be completed. Any new actions that are captured afterwards will be added into a new session.
*reportCrashWithException* will use the crashName as name for the crash. It will only report the crash if there is also a stacktrace available.
### User Privacy Options
The privacy API methods allow you to dynamically change the data-collection level based on the individual preferences of your end users. Each end user can select from three data-privacy levels:
```ts
export enum DataCollectionLevel {
Off, Performance, UserBehavior
}
```
1. Off: Native Agent doesn't capture any monitoring data.
2. Performance: Native Agent captures only anonymous performance data. Monitoring data that can be used to identify individual users, such as user tags and custom values, aren't captured.
3. UserBehavior: Native Agent captures both performance and user data. In this mode, Native Agent recognizes and reports users who re-visit in future sessions.
Crash reporting is enabled by default. The Mobile agent captures all unhandled exceptions/errors and immediately sends the crash report to the server. With this API you can activate or deactivate crash reporting. To change this behaviour via the API, enable/activate [`userOptIn`](#user-opt-in-mode) and set the User Privacy Options.
The API to get and set the current privacy level looks like this:
```ts
import { Platform, UserPrivacyOptions } from '@dynatrace/react-native-plugin';
interface IDynatrace {
getUserPrivacyOptions(platform?: Platform): Promise<UserPrivacyOptions>;
applyUserPrivacyOptions(userPrivacyOptions: UserPrivacyOptions, platform?: Platform): void;
}
```
To check the current privacy options that are set:
```ts
import { Dynatrace } from '@dynatrace/react-native-plugin';
const privacyOptions = await Dynatrace.getUserPrivacyOptions();
```
If you want to create a new `UserPrivacyOptions` object and pass it to Dynatrace:
```ts
import { Dynatrace, DataCollectionLevel, UserPrivacyOptions } from '@dynatrace/react-native-plugin';
const privacyConfig = new UserPrivacyOptions(DataCollectionLevel.UserBehavior, true);
// Getter and setter available for UserPrivacyOptions
privacyConfig.crashReportingOptedIn = false;
privacyConfig.dataCollectionLevel = DataCollectionLevel.Performance;
const level = privacyConfig.dataCollectionLevel;
const crashReporting = privacyConfig.crashReportingOptedIn;
Dynatrace.applyUserPrivacyOptions(privacyConfig);
```
### Report GPS Location
You can report latitude and longitude and specify an optional platform.
```ts
import { Dynatrace } from '@dynatrace/react-native-plugin';
Dynatrace.setGPSLocation(48.31518732698596, 14.305245274594471);
```
### Platform independent reporting
You probably noticed that each method has an additional *optional* parameter named `platform` of type `Platform`. You can use this to only trigger manual instrumentation for a specific OS. The available values are: `Platform.Ios` and `Platform.Android`. Default is that it will work on any platform. Otherwise it is passed *only* to the relevant OS. For example:
* Passing to **iOS** only:
```ts
import { Dynatrace, Platform } from '@dynatrace/react-native-plugin';
const myAction = Dynatrace.enterAutoAction("MyButton tapped", Platform.Ios);
//Perform the action and whatever else is needed.
myAction.leaveAction(Platform.Ios);
```
* Passing to **Android** only:
```ts
import { Dynatrace, Platform } from '@dynatrace/react-native-plugin';
const myAction = Dynatrace.enterAutoAction("MyButton tapped", Platform.Android);
//Perform the action and whatever else is needed.
myAction.leaveAction(Platform.Android);
```
* Passing to **both**:
```ts
import { Dynatrace } from '@dynatrace/react-native-plugin';
const myAction = Dynatrace.enterAutoAction("MyButton tapped");
//Perform the action and whatever else is needed.
myAction.leaveAction();
```
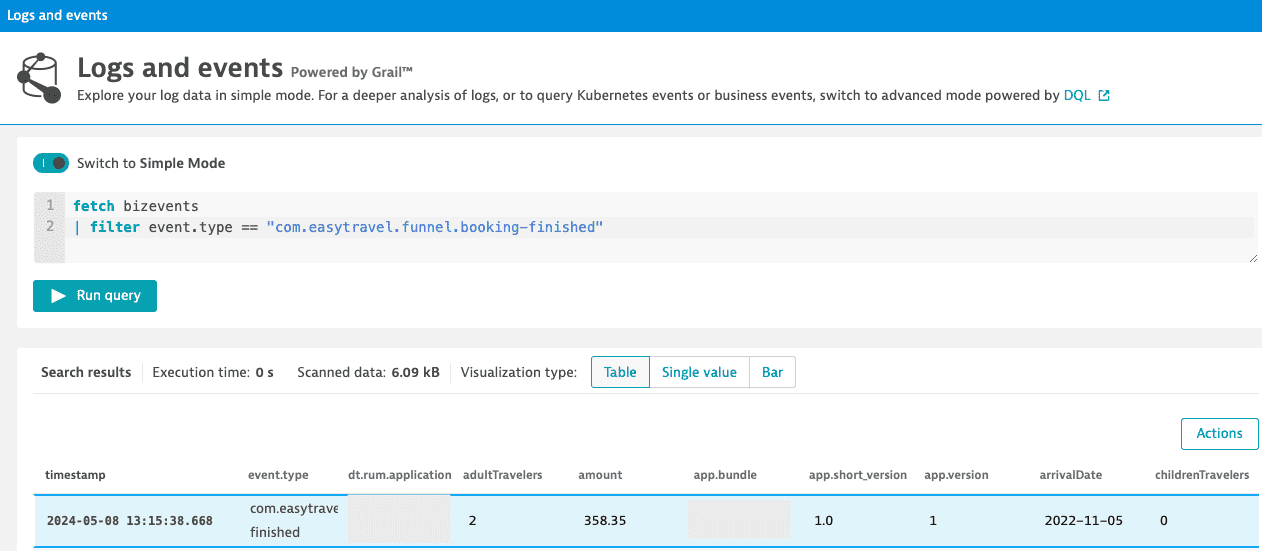
### Business event capturing
With `sendBizEvent`, you can report business events. These events are standalone events, as OneAgent sends them detached from user actions or user sessions.
For more information on business events, see [dynatrace documentation](https://www.dynatrace.com/support/help/how-to-use-dynatrace/business-analytics/ba-events-capturing#expand--example-configuration-files-for-rum--2).
```ts
import { Dynatrace } from '@dynatrace/react-native-plugin';
Dynatrace.sendBizEvent("com.easytravel.funnel.booking-finished", {
"event.name" : "Confirmed Booking",
"screen": "booking-confirmation",
"product": "Danube Anna Hotel",
"amount": 358.35,
"currency": "USD",
"reviewScore": 4.8,
"arrivalDate": "2022-11-05",
"departureDate": "2022-11-15",
"journeyDuration": 10,
"adultTravelers": 2,
"childrenTravelers": 0
});
```
### Setting beacon headers
This allows you to put a set of http headers on every agent http request (i.e. Authorization header etc.). It will also triggers the agent to reconnect to the beacon endpoint with the new headers.
**Note:** To clear the previously set headers, call the method without the headers parameter or with a null value for the headers parameter.
```ts
import { Dynatrace } from '@dynatrace/react-native-plugin';
const beaconHeaders = new Map<string, string>();
beaconHeaders.set('headerName', 'headerValue');
Dynatrace.setBeaconHeaders(beaconHeaders);
```
### Exclude Individual JSX Elements
If you want to instrument a functional component or class component but want to exclude a certain button or element, you can do this via the `dtActionIgnore` property. Example:
```tsx
import React from 'react';
import { TouchableHighlight, Text, View } from 'react-native';
const TouchableHighlightScreen = () => {
return (
<View>
<TouchableHighlight onPress={onPress}>
<Text>TouchableHighlight that will be monitored</Text>
</TouchableHighlight>
<TouchableHighlight onPress={onPress} dtActionIgnore="true">
<Text>TouchableHighlight that will be ignored</Text>
</TouchableHighlight>
</View>
);
};
const onPress = () => {
console.log("TouchableHighlight Pressed!");
};
export default TouchableHighlightScreen;
```
This example shows two *TouchableHighlight*, which will fire the *onPress()* function when pressed. The property `dtActionIgnore="true"` will prevent the monitoring of one of them. This means that the onPress will still be executed but we will no longer create a user action which is wrapping the button click.
>*Attention:* If you are using Typescript and want to set this property with type-safety, look [here](#typescript-setup-for-dtactionignore-and-dtactionname).
## New RUM experience
The New RUM Experience introduces a set of advanced APIs that allow you to send custom events, modify event data, track exceptions, monitor HTTP requests, and manage view contexts in your React Native application. These APIs provide more granular control over the data captured by Dynatrace and are designed for the next generation RUM capabilities.
For more detailed information about the New RUM Experience, see the [official Dynatrace documentation](https://docs.dynatrace.com/docs/shortlink/react-native-main).
### Send Event
The `sendEvent()` method allows you to send custom events with arbitrary properties using the EventData class. This is useful for tracking specific user interactions or application state changes.
```ts
import { Dynatrace, EventData } from '@dynatrace/react-native-plugin';
// Send a custom event with properties
Dynatrace.sendEvent(new EventData()
.addEventProperty("event_properties.button_clicked", "login_button")
.addEventProperty("event_properties.user_type", "premium")
.addEventProperty("event_properties.attempt_count", 3)
.withDuration(250)
);
```
**Property Requirements:**
* Only properties prefixed with `event_properties.*` are allowed
* Additionally, the `duration` property is allowed
* Maximum of 50 custom properties per event
* If the limit is exceeded, properties are sorted alphabetically by key and excess properties are dropped deterministically
* String properties are limited to 5000 characters (exceeding characters are truncated)
* Field names must contain only alphabetic characters, numbers, underscores, and dots
* Each dot must be followed by an alphabetic character
* Each underscore must be followed by an alphabetic character or number
* Values must be primitive types (string, number, boolean)
* Cannot contain functions, undefined, Infinity, or NaN as values (they will be replaced with null)
### Send Session Property Event
Session properties apply to all events within the current session. Use `sendSessionPropertyEvent()` to set properties that should be available across the entire user session.
```ts
import { Dynatrace, SessionPropertyEventData } from '@dynatrace/react-native-plugin';
// Set session-wide properties
Dynatrace.sendSessionPropertyEvent(new SessionPropertyEventData()
.addSessionProperty("session_properties.user_tier", "premium")
.addSessionProperty("session_properties.app_version", "2.1.0")
.addSessionProperty("session_properties.feature_flag_enabled", true)
);
```
**Important Notes:**
* Session properties persist throughout the entire session
* If you send the same property multiple times, only one value will be kept (first or last)
* Use session properties for data that applies to the entire user session
* Field naming follows the same rules as events, but with `session_properties.` prefix
* Additionally, the `duration` property is allowed
* Maximum of 50 custom properties per event
* If the limit is exceeded, properties are sorted alphabetically by key and excess properties are dropped deterministically
### Event Modifier
Event modifiers allow you to intercept and modify events before they are sent to Dynatrace. This is useful for adding common properties, filtering sensitive data, or enriching events with additional context. Event modifiers apply to all event types, including custom events, session properties, exceptions, and HTTP events.
If multiple event modifiers are added, they are executed in the order they were added.
Most fields and namespaces can't be modified in any way (added, removed or overridden), while others are open for modification.
**Open for modification and can be added:**
- `event_properties.*`
- `session_properties.*`
`session_properties.*` are only allowed to be on a session property event.
**Open for modification only:**
- `url.full`
- `exception.stack_trace`
#### Example
```ts
import { Dynatrace, IEventModifier } from '@dynatrace/react-native-plugin';
// Create an event modifier
const myModifier: IEventModifier = {
modifyEvent(event) {
// Add common properties to all events
event["event_properties.app_build"] = "1.2.3";
event["event_properties.environment"] = "production";
// Return null to discard the event entirely
if (event["event_properties.ignore"] === true) {
return null;
}
return event;
}
};
// Add the modifier
Dynatrace.addEventModifier(myModifier);
// Remove the modifier when no longer needed
Dynatrace.removeEventModifier(myModifier);
```
#### Important Considerations
- **Execution order**: If multiple event modifiers are added, they are executed in the order they were added
- **Returning null**: Returning `null` discards the event and prevents future modifier functions from being executed
- **Performance**: Event modifiers should be efficient as they are called for every event
- **Field naming**: Custom properties must follow the `event_properties.*` or `session_properties.*` prefix naming convention
- **Reserved fields**: Certain reserved fields and namespaces cannot be modified. Attempts to modify them will be ignored
- **Error handling**: If a modifier throws an exception, it will be logged but won't prevent other modifiers from executing
- **Primitive values**: Event fields can only contain primitive values (String, int, double, bool)
- **Invalid argument**: In case you pass an invalid argument to `addEventModifier`, we return a no-op placeholder modifier.
### Send Exception Event
The `sendExceptionEvent()` method provides a structured way to report exceptions with additional context and custom properties using the ExceptionEventData class.
```ts
import { Dynatrace, ExceptionEventData } from '@dynatrace/react-native-plugin';
try {
// Code that may throw an error
throw new Error('Something went wrong');
} catch (error) {
if (error instanceof Error) {
Dynatrace.sendExceptionEvent(new ExceptionEventData(error)
.addEventProperty('event_properties.custom_key', 'custom_value')
.addEventProperty('event_properties.error_context', 'user_action')
);
}
}
```
**Parameters:**
* `error`: The Error object containing exception information (required)
### Send HTTP Request Event
The `sendHttpRequestEvent()` method allows you to manually report HTTP request events with detailed information about the request and response.
```ts
import { Dynatrace, HttpRequestEventData } from '@dynatrace/react-native-plugin';
// Basic HTTP request event
const requestEventData = new HttpRequestEventData('https://api.example.com/users', 'GET');
Dynatrace.sendHttpRequestEvent(requestEventData);
// HTTP request with additional details
const detailedRequestEventData = new HttpRequestEventData('https://api.example.com/data', 'POST')
.withStatusCode(200)
.addEventProperty('event_properties.headers.content_type', 'application/json');
Dynatrace.sendHttpRequestEvent(detailedRequestEventData);
```
**Parameters:**
* `url`: The URL of the HTTP request (required)
* `method`: The HTTP method (e.g., 'GET', 'POST', 'PUT', 'DELETE') (required)
### View Monitoring
The view monitoring APIs allow you to track different screens or views in your application, providing context for all events happening within those views.
There are two ways to monitor views:
1. **Automatic view monitoring** - Enable navigation tracking in your configuration to automatically capture view changes through supported navigation libraries (enabled by default)
2. **Manual view monitoring** - Use the `startView()` API to manually control when view contexts are created and updated
> **Important:** These approaches should not be mixed, as the outcome is unpredictable. Choose either automatic or manual view monitoring for your application.
#### Automatic Navigation tracking
> **Note:** This feature only works with `@react-navigation` versions 5.x through 7.x.
The following is an example of how this feature can be configured in your `dynatrace.config.js` file. Note that this feature is enabled by default.
```js
react: {
navigation: {
enabled: true
}
}
```
When this feature is enabled, the view context will represent the current state of the `@react-navigation` `NavigationContainer`. The state gets represented as a URL-style route. All subsequent events get associated with the view context and thus with the current route.
For instance, assume the following setup:
```js
const Drawer = createDrawerNavigator();
function App() {
return (
<NavigationContainer>
<Drawer.Navigator initialRouteName="Home">
<Drawer.Screen name="Home" component={HomeScreen} />
<Drawer.Screen name="Feature" component={FeatureScreen}/>
</Drawer.Navigator>
</NavigationContainer>
);
}
const Stack = createStackNavigator();
function FeatureScreen() {
return (
<Stack.Navigator initialRouteName="ScreenOne">
<Stack.Screen name="ScreenOne" component={NestedScreenOne} />
<Stack.Screen name="ScreenTwo" component={NestedScreenTwo} />
</Stack.Navigator>
);
}
```
When navigating to `Home`, the view context will be set to `/Home`. When navigating to `Feature` and being redirected to the nested `ScreenOne`, the view context will be set to `/Home/ScreenOne`. When navigating to `ScreenTwo` within `Feature`, the view context will be set to `/Feature/ScreenTwo`.
#### Start View
Use `startView()` to begin monitoring a specific view or screen. When a view is started, all subsequent events will be associated with that view context.
```ts
import { Dynatrace } from '@dynatrace/react-native-plugin';
// Start monitoring a view
Dynatrace.startView("HomeScreen");
```
**Important Considerations:**
* Only one view can be active at a time
* Starting a new view will automatically stop the previous one
* View names should be meaningful and consistent across your application
* All events captured after starting a view will include the view context
**Complete Example:**
```ts
import { Dynatrace, EventData } from '@dynatrace/react-native-plugin';
// User navigates to profile screen
Dynatrace.startView("UserProfile");
// Send custom event within the view
Dynatrace.sendEvent(new EventData()
.addEventProperty("event_properties.profile_action", "edit_profile")
.addEventProperty("event_properties.changes_made", true)
);
// User navigates away
Dynatrace.startView("UserProfileDetailed");
```
### React Native Symbolication
Dynatrace can automatically symbolicate JavaScript stack traces captured by the plugin using sourcemaps. This allows you to view human-readable file names, line numbers, and column information in your crash reports.
#### Generating Sourcemaps
Sourcemaps are generated during release builds and map bytecode offsets (Hermes) and locations in the minified JavaScript bundle (JavaScriptCore) back to your original source code. We support sourcemaps for both Hermes and JavaScriptCore. For detailed instructions on generating sourcemaps, see the [React Native debugging release builds guide](https://reactnative.dev/docs/debugging-release-builds).
To generate a sourcemap:
**Android:**
* Run `npx react-native run-android --mode release` in your project root, or
* Run `gradlew assembleRelease` in the `/android` directory
**iOS:**
* First, enable sourcemaps according to the [React Native debugging release builds guide](https://reactnative.dev/docs/debugging-release-builds)
* Then run `npx react-native run-ios --mode Release`, or
* Build for release in Xcode
#### Accounting for Auto-Instrumentation
Since the plugin auto-instruments your code, sourcemap line numbers may be slightly offset. To ensure accurate symbolication:
* **Android**: Automatic patching is **enabled by default** and patches sourcemaps automatically at the end of every release build (see [Source Map](#source-map) configuration)
* **iOS**: There is currently **no automation** available. You **must** execute [`npx lineOffsetDynatrace`](#npx-lineoffsetdynatrace) to patch your sourcemap files before uploading them to Dynatrace. Without this step, line numbers will be slightly off depending on instrumentation in iOS
#### Uploading Sourcemaps
Once generated and patched, upload your sourcemaps to Dynatrace. For detailed instructions, see the [symbol file management documentation](https://docs.dynatrace.com/docs/observe/digital-experience/mobile-applications/analyze-and-use/upload-and-manage-symbol-files).
## NPX Commands
The following npx commands are available for the plugin:
* npx instrumentDynatrace - Is triggering the configuration process and will insert the configuration into the Android and iOS application. This is mandatory and should usually happen automatically when doing `react-native run-android` or `react-native run-ios` command.
* npx configDynatrace - Is checking the current configuration and is creating a default configuration if there is none.
* npx lineOffsetDynatrace - ...
### npx instrumentDynatrace
```
npx instrumentDynatrace [optional: config=... gradle=... plist=...]
```
* `gradle=C:\MyReactAndroidProject\build.gradle`: The location of the root build.gradle file. We will assume that the other gradle file resides in `/app/build.gradle`. This will add the whole agent dependencies automatically for you and will update the configuration.
* `plist=C:\MyReactIOSProject\projectName\info.plist`: Tell the script where your info.plist file is. The plist file is used for updating the configuration for the agent.
* `config=C:\SpecialFolderForDynatrace\dynatrace.config.js`: If you have not got your config file in the root folder of the React Native project but somewhere else.
### npx configDynatrace
```
npx configDynatrace [optional: config=...]
```
* `config=C:\SpecialFolderForDynatrace\dynatrace.config.js`: If you have not got your config file in the root folder of the React Native project but somewhere else.
## npx lineOffsetDynatrace
Our auto-instrumentation modifies your source code during the build process, which causes line numbers in your sourcemaps to become slightly offset from the original source. This can result in incorrect line numbers when viewing crash reports or stack traces in Dynatrace.
The `npx lineOffsetDynatrace` command patches your sourcemap file with offset information, allowing Dynatrace to accurately map instrumented line numbers back to the original source code. The patching process adds Dynatrace-specific metadata alongside the original sourcemap content without modifying any existing fields, ensuring your sourcemap continues to work as expected with all standard tooling.
**Usage:**
```
npx lineOffsetDynatrace sourcemapPath=/path/to/your/sourcemap.map
```
* `sourcemapPath=/path/to/your/sourcemap.map`: **(Required)** The path to the sourcemap file that should be patched.
## Customizing paths for configuration
> **Note:** This feature works directly on run-android, run-ios or start command only for React Native v0.60.1 or newer until v0.